m (Reverting to an earlier, more informative, version.) |
m (cleanup) |
||
| (107 intermediate revisions by 68 users not shown) | |||
| Line 1: | Line 1: | ||
| + | {{External|os|rsc}} |
||
| ⚫ | |||
| − | {{ |
+ | {{Otheruses|the quest|its music track|Waterfall (music track)}} |
{{Has quick guide}} |
{{Has quick guide}} |
||
{{Infobox Quest |
{{Infobox Quest |
||
|name = Waterfall Quest |
|name = Waterfall Quest |
||
| − | |image = [[File:Waterfall Quest.png| |
+ | |image = [[File:Waterfall Quest.png|200px]] |
|release = [[24 September]] [[2002]] |
|release = [[24 September]] [[2002]] |
||
|update = Tutorial island |
|update = Tutorial island |
||
|members = Yes |
|members = Yes |
||
|voice = No |
|voice = No |
||
| − | |series = [[Elf quest series|Elf]] |
+ | |series = [[Elf quest series|Elf]]<br />[[Gnome quest series|Gnome]] |
|difficulty = Intermediate |
|difficulty = Intermediate |
||
|length = Medium |
|length = Medium |
||
| Line 15: | Line 15: | ||
|developer = Tom W |
|developer = Tom W |
||
}} |
}} |
||
| − | '''Waterfall Quest''' is an intermediate quest about the legendary treasure hidden |
+ | '''Waterfall Quest''' is an intermediate quest about the legendary treasure hidden somewhere in the [[Baxtorian Falls]], but soon comes to focus on the history of [[King Baxtorian]] himself. |
==Official description== |
==Official description== |
||
| − | {{ |
+ | {{Quote|Investigate the death of elven leaders of old. Search for the elf King Baxtorian's tomb and discover the mysterious hidden treasure of the waterfall.}} |
{{clear}} |
{{clear}} |
||
| − | == |
+ | ==Walkthrough== |
{{Quest details |
{{Quest details |
||
|start = Speak to [[Almera]] in her house north-east of the Baxtorian Falls |
|start = Speak to [[Almera]] in her house north-east of the Baxtorian Falls |
||
| Line 27: | Line 27: | ||
|length = Medium |
|length = Medium |
||
|members = Yes |
|members = Yes |
||
| − | |requirements = |
+ | |requirements = |
| + | * None |
||
| ⚫ | |||
| + | |items = |
||
| ⚫ | |||
| − | *6 [[ |
+ | * 6 [[air runes]] |
| ⚫ | |||
| ⚫ | |||
| ⚫ | |||
| − | '''Recommended:''' |
||
| ⚫ | |||
| ⚫ | |||
| + | |recommended = |
||
| ⚫ | |||
| ⚫ | |||
| − | *Completion of [[File:Quest map icon.png]] [[Tree Gnome Village (Quest)|Tree Gnome Village]] to gain access to the [[Spirit Tree]]. |
||
| − | * |
+ | * Completion of [[File:Quest map icon.png]] [[Plague City]], for teleport access to Ardougne. |
| ⚫ | |||
| ⚫ | |||
| + | * [[Ardougne teleport]] runes, an [[Ardougne tablet]], an [[Ardougne cloak]] or access to the [[Ardougne lodestone]] for convenience. |
||
| ⚫ | |||
| + | * None, but you must be able to survive some attacks from various aggressive mobs, including [[Giant Spider]]s (lvl 44) and [[Skeleton]]s (lvl 58) |
||
| + | |icon = Quest icon 5th age.png |
||
}} |
}} |
||
| − | ===His |
+ | ===His precious=== |
[[File:Almera chathead.png|left|Almera]] |
[[File:Almera chathead.png|left|Almera]] |
||
[[File:Crashed raft.png|thumb|250px|Hudon, Almera's son, by the river.]] |
[[File:Crashed raft.png|thumb|250px|Hudon, Almera's son, by the river.]] |
||
| − | Start out by speaking to [[Almera]] in her house, upstream to the [[Baxtorian Falls]] and south of the [[Barbarian Outpost]]. Distressed, she tells you about her son [[Hudon]], who is looking for a hidden treasure in the river. |
+ | Start out by speaking to [[Almera]] in her house, upstream to the [[Baxtorian Falls]] and south of the [[Barbarian Outpost]]. You may use a games necklace for a quick way to get there. Distressed, she tells you about her son [[Hudon]], who is looking for a hidden treasure in the river. |
| − | She requests |
+ | She requests that you check on him by using the raft just outside the house. You can also fix the ruined [[rope rack]] near the shore for later use. |
| − | ===Baxtorian |
+ | ===Baxtorian and Glarial=== |
| − | Exit Almera's house through the west door and board the raft. You'll crash into a small island, just across the shore where [[Hudon]] is standing. You instantly insist |
+ | Exit Almera's house through the west door and board the raft. You'll crash into a small island, just across the shore where [[Hudon]] is standing. You instantly insist that he should go back to his mother, but he refuses to leave until he finds the treasure. Ask if you can help and he'll reject your offer, getting paranoid of you stealing his treasure. |
| − | With no arguments left, go south and swim down the river. Head north of where you wash up, to a small building |
+ | With no arguments left, go south and swim down the river. Head north of where you wash up, to a small building — the [[Tourist Information Centre]]. Talk to the guide, [[Hadley]], to learn the detailed history of the [[Baxtorian Falls]]. Next, go upstairs and search the bookcases to find a [[Book on Baxtorian]]. |
| − | You must read the book before you can progress in the quest. You discover that the area was originally inhabited by elven colonies, led by King [[Baxtorian]] and his wife, [[Glarial]]. During his long reign, Baxtorian is said to have hid valuable treasures under the nearby falls, granting access only to himself and his wife. You also learn that [[Glarial's pebble]], the key to open Glarial's tomb, can be found under the [[Tree Gnome Village ( |
+ | You must read the book before you can progress in the quest. You discover that the area was originally inhabited by elven colonies, led by King [[Baxtorian]] and his wife, [[Glarial]]. During his long reign, Baxtorian is said to have hid valuable treasures under the nearby falls, granting access only to himself and his wife. You also learn that [[Glarial's pebble]], the key to open Glarial's tomb, can be found under the [[Tree Gnome Village (location)|Tree Gnome Village]]. |
===Keystone=== |
===Keystone=== |
||
| − | [[File: |
+ | [[File:Gnome Maze map.png|left|200px]] |
| + | [[File:Gnome Village Dungeon map.png||link=Map:Gnome Village Dungeon|right|300px]] |
||
| − | To reach the village |
+ | To reach the village either use [[spirit tree]]s or 'follow' [[Elkoy]], the gnome outside the maze. Walk east to the [[Gnome Village Dungeon]] ladder entrance (marked with the [[File:Dungeon entrance map icon.png]] icon on the map). If you have not started [[Tree Gnome Village]] then you will have to navigate through the maze; use the map as a guide. |
| + | Lower-levelled players should beware of the [[hobgoblin]]s while speaking to Golrie. In the east room, search the crate (near some [[zombie]]s and [[giant bat]]s) that is slightly darker than the rest to receive [[a key]]. |
||
| − | When you find the ladder in the maze, climb down and go west. |
||
| − | <imagemap>File:Gnome Village Dungeon map.png|center| |
||
| − | poly 24 3 42 3 48 12 54 12 56 14 57 21 48 31 15 31 6 22 8 15 11 12 18 12 21 7 23 4 23 3 30 15 [[Golrie]] |
||
| − | poly 11 47 52 46 61 54 61 66 56 72 48 70 39 82 38 87 41 90 47 90 50 87 61 87 69 97 69 113 75 119 85 119 89 116 89 111 93 108 105 107 103 125 71 124 60 115 60 102 55 97 38 98 33 93 31 94 26 89 26 81 14 69 6 70 3 66 3 55 8 50 [[Hobgoblin]] |
||
| − | rect 126 63 139 78 [[Giant bat]] |
||
| − | rect 138 69 155 91 [[Zombie]] |
||
| − | poly 143 98 151 98 150 111 136 125 131 119 135 115 133 111 143 103 143 98 [[Giant bat]] |
||
| − | desc none |
||
| − | </imagemap> |
||
| − | {{Col-begin}} |
||
| − | {{col-2}} |
||
| − | '''1''' - Ladder to the surface<br /> |
||
| − | '''2''' - Level 28 [[hobgoblins]]<br /> |
||
| − | '''3''' - Golrie<br /> |
||
| − | '''4''' - Level 44 [[giant bats]] |
||
| − | {{col-2}} |
||
| − | '''5''' - Level 12 & 29 zombies<br /> |
||
| − | '''6''' - Crate with key to Golrie's cell<br /> |
||
| − | '''7''' - Passage to Yewnock's cave in the dungeon<br /> |
||
| − | {{col-end}} |
||
| − | + | Head to the west part of the dungeon to find a gnome named [[Golrie]] locked in a room, protecting himself from the [[hobgoblin]]s. Unlock the door using the key and then speak to Golrie, who is willing to exchange his escape for [[Glarial's pebble]], which he refers to as just "some elven junk". |
|
| − | |||
| − | Using the key, head back and unlock the cell door. Speak to Golrie, who will thank you for saving him and allow you to look around; you can find [[Glarial's pebble]] on the floor, which Golrie calls just "some elven junk" and allow you to have it. |
||
===Gravedigging=== |
===Gravedigging=== |
||
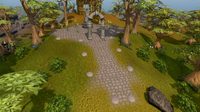
[[File:Glarial's tombstone.png|thumb|left|200px|The entrance to Glarial's resting place.]] |
[[File:Glarial's tombstone.png|thumb|left|200px|The entrance to Glarial's resting place.]] |
||
| − | You will not be able to enter Glarial's tomb with weapons, armour, or runes, as it is a sacred burial place which is not to be disturbed or tainted by combat equipment. |
+ | You will not be able to enter Glarial's tomb with weapons, armour, or runes, as it is a sacred burial place which is not to be disturbed or tainted by combat equipment. Go to a bank - the recommended option would be to use the bank chest at the Barbarian outpost - and deposit everything except Glarial's Pebble and some food as the [[moss giant]]s there can hit high and accurately. Summoning familiars and prayers also cannot be used inside the tomb. |
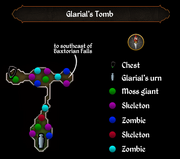
| + | [[File:Glarial's Tomb map.png|thumb|link=Map:Glarial's Tomb]] |
||
| − | {{Mapthumb |
||
| − | |image = Glarial's Tomb map.png |
||
| − | |link = Map:Glarial's Tomb |
||
| − | |caption = Click to view a larger version (opens on a new page). |
||
| − | |float = right |
||
| − | |width = 220px |
||
| ⚫ | |||
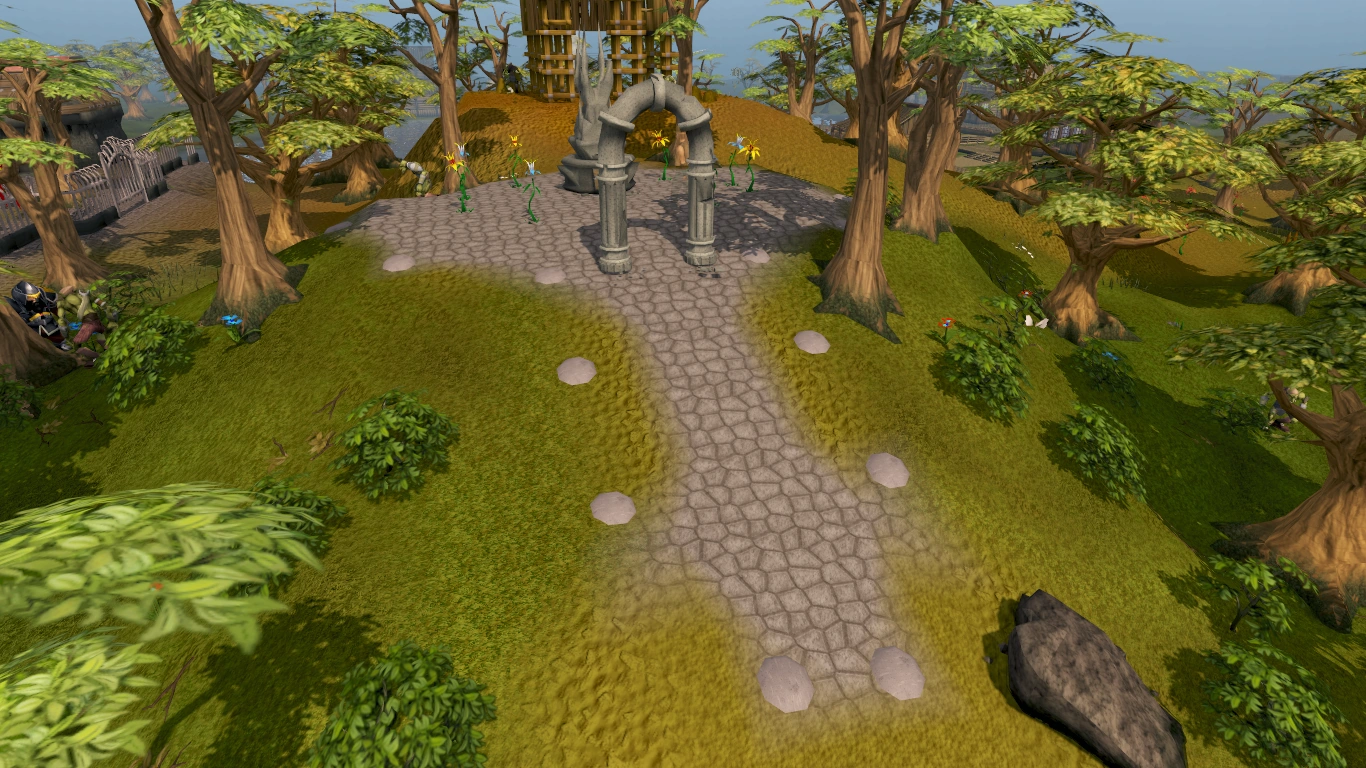
Go a bit south-east of Baxtorian Falls to find the entrance to Glarial's tombstone - inside a large greystone area. Use the [[Glarial's pebble]] on it to enter. |
Go a bit south-east of Baxtorian Falls to find the entrance to Glarial's tombstone - inside a large greystone area. Use the [[Glarial's pebble]] on it to enter. |
||
| − | Inside the tomb, are level 61 [[moss giant]]s and other low- |
+ | Inside the tomb, are level 61 [[moss giant]]s and other low-levelled monsters. First, go west and search the chest to receive [[Glarial's amulet]]. The amulet is required to enter the [[Waterfall Dungeon]], but it will be used up later in the quest, so you may use the [[drop trick]] to obtain another and be able to enter the dungeon after the quest is completed. |
After searching the chest, search Glarial's coffin in the southern room to receive [[Glarial's urn]]. Make sure you have the amulet and urn, and either teleport out or head back up the ladder to exit. |
After searching the chest, search Glarial's coffin in the southern room to receive [[Glarial's urn]]. Make sure you have the amulet and urn, and either teleport out or head back up the ladder to exit. |
||
| − | ===Behind the |
+ | ===Behind the waterfall=== |
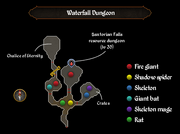
| + | [[File:Waterfall Dungeon map.png|link=Map:Waterfall Dungeon|thumb]] |
||
| − | + | {{Needed|6 [[air rune]]s, 6 [[water rune]]s, 6 [[earth rune]]s, a [[rope]], [[Glarial's urn]], and [[Glarial's amulet]]; [[combination rune]]s ([[dust rune]]s, [[lava rune]]s, etc.) will not work|recommended=Armour and food is recommended for lower levelled players}} |
|
| ⚫ | |||
| ⚫ | |||
| − | {{Mapthumb |
||
| − | |image = Waterfall dungeon map.png |
||
| − | |link = Map:Waterfall Dungeon |
||
| − | |caption = Click to view a larger version (opens on a new page). |
||
| − | |float = right |
||
| − | |width = 250px |
||
| − | }} |
||
| ⚫ | |||
| ⚫ | |||
| ⚫ | |||
| ⚫ | |||
| − | |||
| ⚫ | |||
| − | |||
| ⚫ | |||
[[File:Waterfall Quest Final Chamber.png|thumb|left|250px|The Chalice of Eternity.]] |
[[File:Waterfall Quest Final Chamber.png|thumb|left|250px|The Chalice of Eternity.]] |
||
| − | Past the doors is Baxtorian's tomb, where you'll find six pillars, two statues, and the [[Chalice of Eternity]] floating in the air. Use |
+ | Past the doors is Baxtorian's tomb, where you'll find six pillars, two statues, and the [[Chalice of Eternity]] floating in the air. Use an air rune, a water rune, and an earth rune on each of the six pillars, noted by a burst of smoke for each rune and a message in the chatbox. Finally, use [[Glarial's amulet]] on the statue of Glarial and the ground will suddenly rise behind you. |
[[File:Runes on pillars.png|thumb|200px|Placing a rune on a pillar.]] |
[[File:Runes on pillars.png|thumb|200px|Placing a rune on a pillar.]] |
||
| − | Now walk up the raised platform and use [[Glarial's urn]] on the chalice. |
+ | Now walk up the raised platform and use [[Glarial's urn]] on the chalice. If you try to take the chalice before you use the urn on it, you will be flooded out. In order to enter the tomb again, you'll need to get another [[Glarial's amulet]] and re-use the urn on the chalice. |
You will automatically take the reward from the chalice and finish. However, if your inventory is full, you will need to clear out 5 inventory spaces and use the urn on the chalice again. |
You will automatically take the reward from the chalice and finish. However, if your inventory is full, you will need to clear out 5 inventory spaces and use the urn on the chalice again. |
||
| + | |||
| + | Congratulations, quest complete! |
||
| + | |||
{{clear}} |
{{clear}} |
||
==Rewards== |
==Rewards== |
||
| + | {{Quest rewards |
||
| − | [[File:Waterfall Quest reward.png|center]] |
||
| ⚫ | |||
| − | *1 [[Quest point]] |
||
| + | |qp = 1 |
||
| − | *13,750 {{Skill clickpic|Attack}} Experience |
||
| + | |rewards = |
||
| − | *13,750 {{Skill clickpic|Strength}} Experience |
||
| + | * {{Sxp|Attack|13750}} |
||
| ⚫ | |||
| + | * {{Sxp|Strength|13750}} |
||
| ⚫ | |||
| ⚫ | |||
| ⚫ | |||
| ⚫ | |||
| ⚫ | *Access to the [[Waterfall dungeon]] for combat training. You must have [[Glarial's amulet]] in your inventory to re-enter the dungeon - attempting to enter without the amulet will result in the tunnel flooding with water, you getting washed into the river, ending up on the bank and taking some damage. |
||
| ⚫ | |||
| − | *{{Universal quest reward}} |
||
| ⚫ | * Access to the [[Waterfall dungeon]] for combat training. You must have [[Glarial's amulet]] in your inventory to re-enter the dungeon - attempting to enter without the amulet will result in the tunnel flooding with water, you getting washed into the river, ending up on the bank and taking some damage. |
||
| + | |music = |
||
| ⚫ | |||
| ⚫ | |||
==Required for completing== |
==Required for completing== |
||
Completion of Waterfall Quest is required for the following: |
Completion of Waterfall Quest is required for the following: |
||
| − | *[[Desert Treasure]] |
+ | * [[Desert Treasure]] |
| − | *[[Legends' Quest]] |
+ | * [[Legends' Quest]] |
| − | *[[The Path of Glouphrie]] |
+ | * [[The Path of Glouphrie]] |
| − | *[[Roving Elves]] |
+ | * [[Roving Elves]] |
| + | * [[Daemonheim Tasks]]: (for [[Ironman Mode]] players) |
||
| + | ** '''[[Daemonheim Tasks#Medium Tasks|Medium]]:''' "Totem Pole Position" |
||
==Transcript== |
==Transcript== |
||
{{hasdialogue|quest}} |
{{hasdialogue|quest}} |
||
| − | |||
| − | ==Music unlocked== |
||
| ⚫ | |||
==Cultural references== |
==Cultural references== |
||
| Line 160: | Line 136: | ||
[[nl:Waterfall Quest]] |
[[nl:Waterfall Quest]] |
||
[[fi:Waterfall Quest]] |
[[fi:Waterfall Quest]] |
||
| + | [[de:Das Wasserfall-Abenteuer]] |
||
| − | [[Category:Wikia Game Guides quests]] |
||
Latest revision as of 12:25, 8 June 2019
| |||||||||||||||||||||||||
| Release date | 24 September 2002 (Update) | ||||||||||||||||||||||||
|---|---|---|---|---|---|---|---|---|---|---|---|---|---|---|---|---|---|---|---|---|---|---|---|---|---|
| Members | Yes | ||||||||||||||||||||||||
| Voice Over | No | ||||||||||||||||||||||||
| Official difficulty | Intermediate | ||||||||||||||||||||||||
| Quest series | Elf Gnome | ||||||||||||||||||||||||
| Age | Fifth Age | ||||||||||||||||||||||||
| |||||||||||||||||||||||||
Waterfall Quest is an intermediate quest about the legendary treasure hidden somewhere in the Baxtorian Falls, but soon comes to focus on the history of King Baxtorian himself.
Official description
Investigate the death of elven leaders of old. Search for the elf King Baxtorian's tomb and discover the mysterious hidden treasure of the waterfall.
Walkthrough
| Start point | |
|---|---|
| Member requirement | |
| Official difficulty | |
| Official length | Medium |
| Requirements | Skill requirements are not boostable unless marked with a [B] for boostable.
|
| Items required | Items from the tool belt are not listed unless they do not work or are not automatically added.
|
| Recommended |
|
| Enemies to defeat |
|
His precious


Hudon, Almera's son, by the river.
Start out by speaking to Almera in her house, upstream to the Baxtorian Falls and south of the Barbarian Outpost. You may use a games necklace for a quick way to get there. Distressed, she tells you about her son Hudon, who is looking for a hidden treasure in the river.
She requests that you check on him by using the raft just outside the house. You can also fix the ruined rope rack near the shore for later use.
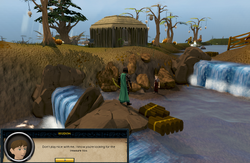
Baxtorian and Glarial
Exit Almera's house through the west door and board the raft. You'll crash into a small island, just across the shore where Hudon is standing. You instantly insist that he should go back to his mother, but he refuses to leave until he finds the treasure. Ask if you can help and he'll reject your offer, getting paranoid of you stealing his treasure.
With no arguments left, go south and swim down the river. Head north of where you wash up, to a small building — the Tourist Information Centre. Talk to the guide, Hadley, to learn the detailed history of the Baxtorian Falls. Next, go upstairs and search the bookcases to find a Book on Baxtorian.
You must read the book before you can progress in the quest. You discover that the area was originally inhabited by elven colonies, led by King Baxtorian and his wife, Glarial. During his long reign, Baxtorian is said to have hid valuable treasures under the nearby falls, granting access only to himself and his wife. You also learn that Glarial's pebble, the key to open Glarial's tomb, can be found under the Tree Gnome Village.
Keystone
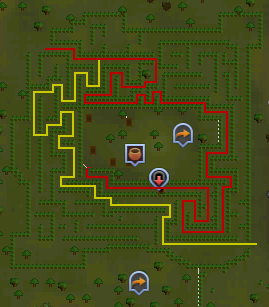
To reach the village either use spirit trees or 'follow' Elkoy, the gnome outside the maze. Walk east to the Gnome Village Dungeon ladder entrance (marked with the ![]() icon on the map). If you have not started Tree Gnome Village then you will have to navigate through the maze; use the map as a guide.
icon on the map). If you have not started Tree Gnome Village then you will have to navigate through the maze; use the map as a guide.
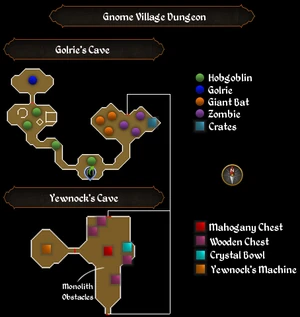
Lower-levelled players should beware of the hobgoblins while speaking to Golrie. In the east room, search the crate (near some zombies and giant bats) that is slightly darker than the rest to receive a key.
Head to the west part of the dungeon to find a gnome named Golrie locked in a room, protecting himself from the hobgoblins. Unlock the door using the key and then speak to Golrie, who is willing to exchange his escape for Glarial's pebble, which he refers to as just "some elven junk".
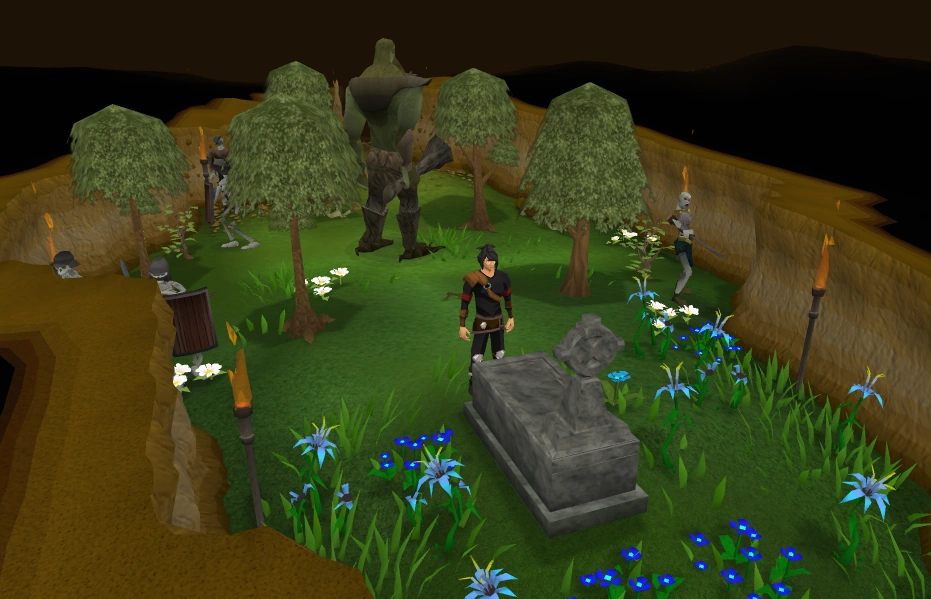
Gravedigging
The entrance to Glarial's resting place.
You will not be able to enter Glarial's tomb with weapons, armour, or runes, as it is a sacred burial place which is not to be disturbed or tainted by combat equipment. Go to a bank - the recommended option would be to use the bank chest at the Barbarian outpost - and deposit everything except Glarial's Pebble and some food as the moss giants there can hit high and accurately. Summoning familiars and prayers also cannot be used inside the tomb.
Go a bit south-east of Baxtorian Falls to find the entrance to Glarial's tombstone - inside a large greystone area. Use the Glarial's pebble on it to enter.
Inside the tomb, are level 61 moss giants and other low-levelled monsters. First, go west and search the chest to receive Glarial's amulet. The amulet is required to enter the Waterfall Dungeon, but it will be used up later in the quest, so you may use the drop trick to obtain another and be able to enter the dungeon after the quest is completed.
After searching the chest, search Glarial's coffin in the southern room to receive Glarial's urn. Make sure you have the amulet and urn, and either teleport out or head back up the ladder to exit.
Behind the waterfall
Items recommended: Armour and food is recommended for lower levelled players
Go back to Almera's house and board the raft. You will crash, yet again; walk south to the edge of the island and use your rope on the rock on the small island, past the rockslides, as the current is too strong to swim across. Next, use the rope on the dead tree closest to you.
Do not climb the dead tree or use the barrel as you'll end up in the river. When you reach the doors at the waterfall ledge, make sure that you have Glarial's amulet either in your inventory or equipped, and enter through the door.
Take the eastern passage and go search the crates for a key. Next, head into the western passage and past the fire giants, and use the key on the couple of doors that follow.
Lost treasures

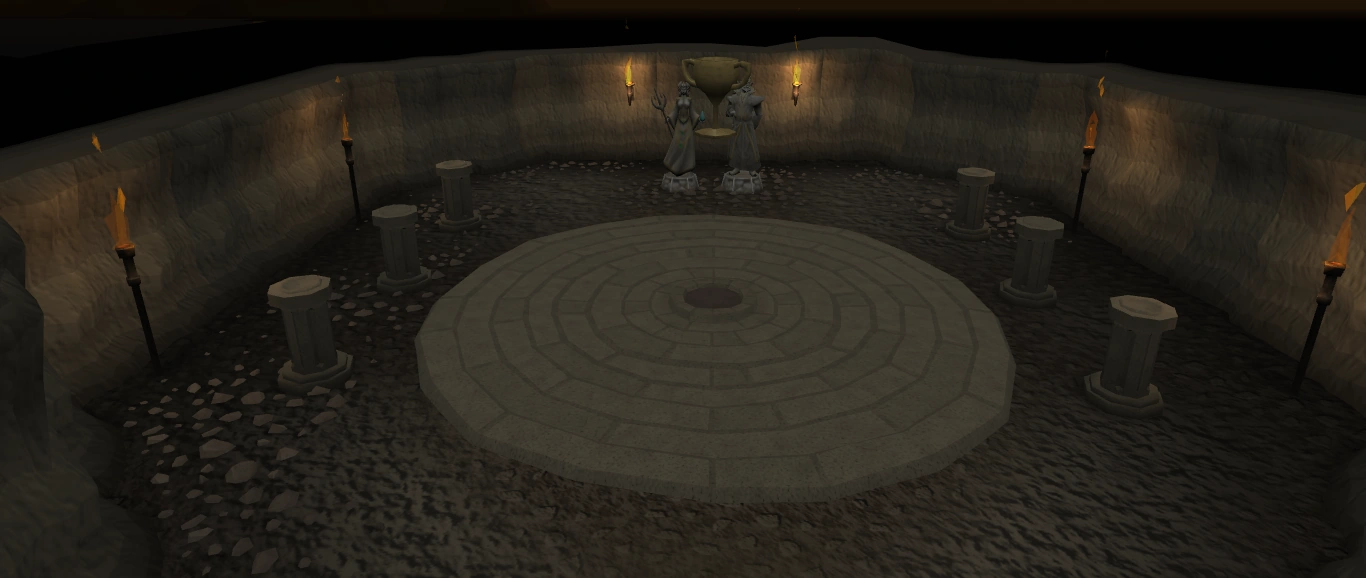
The Chalice of Eternity.
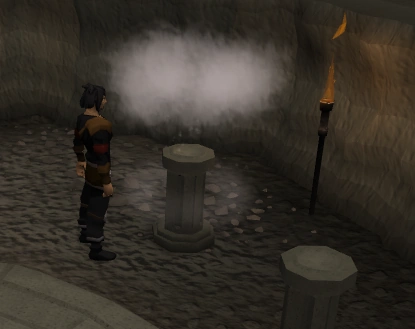
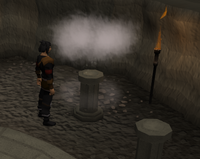
Past the doors is Baxtorian's tomb, where you'll find six pillars, two statues, and the Chalice of Eternity floating in the air. Use an air rune, a water rune, and an earth rune on each of the six pillars, noted by a burst of smoke for each rune and a message in the chatbox. Finally, use Glarial's amulet on the statue of Glarial and the ground will suddenly rise behind you.
Placing a rune on a pillar.
Now walk up the raised platform and use Glarial's urn on the chalice. If you try to take the chalice before you use the urn on it, you will be flooded out. In order to enter the tomb again, you'll need to get another Glarial's amulet and re-use the urn on the chalice.
You will automatically take the reward from the chalice and finish. However, if your inventory is full, you will need to clear out 5 inventory spaces and use the urn on the chalice again.
Congratulations, quest complete!
Rewards
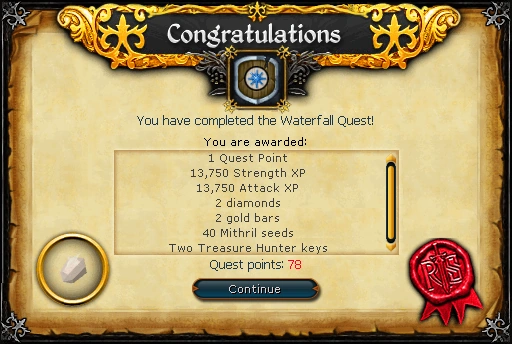
- 1 quest point
- 13,750
 experience
 - 13,750 experience
- 2 gold bars
- 2 diamonds
- 40 Mithril seeds which can be used to grow flowers
- Access to the Waterfall dungeon for combat training. You must have Glarial's amulet in your inventory to re-enter the dungeon - attempting to enter without the amulet will result in the tunnel flooding with water, you getting washed into the river, ending up on the bank and taking some damage.
- 2 Treasure Hunter keys and 2 Hearts of Ice
- Music unlocked
Required for completing
Completion of Waterfall Quest is required for the following:
- Desert Treasure
- Legends' Quest
- The Path of Glouphrie
- Roving Elves
- Daemonheim Tasks: (for Ironman Mode players)
- Medium: "Totem Pole Position"
Transcript
Cultural references
- The act of using the ashes as a counterweight to take the treasure is possibly a reference to the movie Raiders of the Lost Ark, where Indiana Jones uses a bag of sand to the same effect.
Waterfall Quest | |||||||
|---|---|---|---|---|---|---|---|
| Related to the Elf quest series | |||||||
| NPCs | |||||||
| Items |
| ||||||
| Locations |
| ||||||
| Music |
| ||||||
| Miscellaneous |
| ||||||
| Main series | |
| Related quests |
|
| Quest recollector |
|
| Main series | |
| Related |
|