No edit summary |
(Reverted vandalism) Tag: Visual edit |
||
| (907 intermediate revisions by more than 100 users not shown) | |||
| Line 1: | Line 1: | ||
| + | <noinclude>{{ToC}}</noinclude> |
||
| + | ==Scans== |
||
[[File:Scan detail.png|thumb|right|An example of a scan clue when the "Read" option has been selected.]] |
[[File:Scan detail.png|thumb|right|An example of a scan clue when the "Read" option has been selected.]] |
||
[[File:Clue scroll (elite).png|left]] |
[[File:Clue scroll (elite).png|left]] |
||
| − | '''Scans''' are a type of [[Treasure Trail]] clue that only occur during [[clue scroll (elite)|elite clue scrolls]]. |
+ | '''Scans''' are a type of [[Treasure Trail]] clue that can only occur during [[clue scroll (elite)|elite]] and [[clue scroll (master)|master clue scrolls]]. The first batch of scans came to the game as part of the [[Update:Elite Treasure Trails and New Rewards|Treasure Trail update]] on [[4 August]] [[2010]], while the second batch came to the game as part of the [[Update:Clue Scroll Overhaul - Lightning Weapons|clue scroll overhaul]] on [[26 February]] [[2018]]. They can be distinguished from other types of clues by the orb attached to the clue scroll. Scan clues require going to a particular region and scanning in order to find the next clue (or the casket). |
| + | Some scans may be found in multiple levels; so far to date, only [[Dorgesh-Kaan]] and [[Brimhaven Dungeon]] have scans which can be found on multiple levels. If the message "Try scanning another level." appears, players must go to the other level(s) and scan from there. |
||
| − | To start the clue, players must first right-click the scroll and select the "Read" option to find out which region they must search in. They must then go to this region and use the scroll's "Scan" option to scan the region for the correct spot. Scanning has a limited range and the correct location may be anywhere within the stated region, so it is important to scan all parts of the region when searching. When the correct spot is within the orb's scan range, using the scan option will detect it. When this happens an arrow appears above the spot in-game and on the minimap. |
||
| + | To start the clue, players must first right-click the scroll and select the "Read" option to find out which region they must search in. They must then go to this region and open the scroll's "Scan" interface to automatically scan the region for the correct spot. Upon starting the scan, a blue pulse appear around the player and "ping". |
||
| − | When the player is standing on the exact spot indicated by the arrow they can use a [[spade]] to dig up the next clue or casket (a spade on a toolbelt cannot be used). Alternatively a [[Meerkat]] familiar's [[fetch casket]] [[special move]] can be used (this requires level 4 [[Summoning]] and [[fetch casket scroll]]s). Use of a meerkat's special move is recommended in order to avoid the possibility of having to kill a [[Guthix Wizard]]. When using a spade to dig up the clue there is a chance that a level 180 or 190 [[Guthix wizard]] (level 160 in the [[Wilderness]]) will appear and attack the player. This wizard must be killed before the player can dig up the next clue. |
||
| + | This blue pulse is extremely helpful for finding the scan's dig spot (it is not affected even if the scan is on another level) and has three stages: |
||
| − | Details of possible locations for each region can be found below. The symbols on the maps represent:<br /> |
||
| + | * Low ping (stage 1) - the pulse emits very slowly. Occurs when the player is very far from the scan spot (double + 1 pace away from the spot) |
||
| − | [[File:Scan clue location.png]] - An accurate location<br /> |
||
| + | * Medium ping (stage 2) - the pulse starts to emit faster (two pings). Occurs when the player is at least double the scan range from the spot. (e.g 28 paces away when the scan covers 14 paces) |
||
| − | [[File:Scan clue location (approximate).png]] - An approximate location |
||
| + | * High ping (stage 3) - the pulse emits very fast pings. Occurs when the player is within range of the scan range of the spot. |
||
| + | Using the meerkat familiar will increase the scan range of all scans by 5. |
||
| − | ==Ardougne== |
||
| − | ''Area Information: [[West Ardougne]]; [[East Ardougne]]''<br /> |
||
| + | When the player is standing on the exact spot indicated by the arrow they can use a [[spade]] to dig up the next clue or casket (a spade on the tool belt can be used by right-clicking Dig on the clue scroll). Alternatively a [[Meerkat]] familiar's [[fetch casket]] [[special move]] can be used (this requires level 4 [[Summoning]] and [[fetch casket scroll]]s). Use of a meerkat's special move is recommended in order to avoid the possibility of a wizard fight: |
||
| − | '''Orb scan range: 22 paces'''<br /> |
||
| + | |||
| + | * On elite clues, players may fight a level 109 or 119 [[guthix wizard]] (109 in the Wilderness, 119 elsewhere) |
||
| + | * On master clues, players may fight a level 105 [[Cabbagemancer]], a level 119 [[Bandosian wild mage]], or a level 119 [[Armadylean shaman (Treasure Trails)|Armadylean shaman]]. These monsters are capable of using abilities in combat. |
||
| + | |||
| + | On [[10 July]] [[2017]], the [[Chaos Tunnels]] were removed as a potential new scan location. However, any existing Chaos Tunnel scan clues remain until they are solved. |
||
| + | |||
| + | Details of possible locations for each region can be found below. The symbols on the maps represent: |
||
| + | |||
| + | [[File:Scan clue location.png]] - An accurate location |
||
| + | |||
| + | [[File:Scan clue location (approximate).png]] - An approximate location or location without an in-game image |
||
| + | |||
| + | ===Locations=== |
||
| + | ====Ardougne==== |
||
| + | ''Area Information: [[West Ardougne]]; [[East Ardougne]]'' |
||
| + | |||
| + | '''Scan range: 22 paces''' |
||
| − | ''Click [[Map:Ardougne scan|here]] for full size of the map.'' |
||
{{Map:Ardougne scan}} |
{{Map:Ardougne scan}} |
||
| − | {|class="wikitable" |
+ | {| class="wikitable" |
| − | !style="width: 300px;"|Possible locations |
+ | ! style="width: 300px;" |Possible locations |
!Image |
!Image |
||
| + | |- id="East Ardougne, west of Estate Agent" |
||
| + | |East Ardougne, just west of the [[Estate Agent]] and north-west of the southern bank. |
||
| + | |[[File:Scan clue East Ardougne west of Estate Agent.png|300px|center]] |
||
| + | |- id="East Ardougne, south of Handelmort Mansion" |
||
| + | |East Ardougne, just south of [[Handelmort Mansion]], and between [[Horacio]]'s patch and the [[Jade vine patch]]. |
||
| + | |[[File:Scan clue East Ardougne south of Handelmort Mansion.png|300px|center]] |
||
| + | |- id="East Ardougne, east of church" |
||
| + | |East Ardougne, between [[Handelmort Mansion]] and [[East Ardougne church]]. |
||
| + | |[[File:Scan clue East Ardougne east of church.png|300px|center]] |
||
|- id="East Ardougne, centre of market" |
|- id="East Ardougne, centre of market" |
||
|East Ardougne, centre of the market. |
|East Ardougne, centre of the market. |
||
|[[File:Scan clue East Ardougne centre of market.png|300px|center]] |
|[[File:Scan clue East Ardougne centre of market.png|300px|center]] |
||
|- id="East Ardougne, outside Servants' Guild" |
|- id="East Ardougne, outside Servants' Guild" |
||
| − | |East Ardougne, outside of the [[ |
+ | |East Ardougne, outside of the [[Servants' Guild]]. North of market. |
|[[File:Scan clue East Ardougne outside Servants' Guild.png|300px|center]] |
|[[File:Scan clue East Ardougne outside Servants' Guild.png|300px|center]] |
||
|- id="East Ardougne, south of Ardougne lodestone" |
|- id="East Ardougne, south of Ardougne lodestone" |
||
| Line 33: | Line 60: | ||
|[[File:Scan clue East Ardougne south of Ardougne lodestone.png|300px|center]] |
|[[File:Scan clue East Ardougne south of Ardougne lodestone.png|300px|center]] |
||
|- id="East Ardougne, outside northern bank" |
|- id="East Ardougne, outside northern bank" |
||
| − | |East Ardougne, outside of the northern bank. |
+ | |East Ardougne, outside of the northern bank. Two steps south of the pictured location. |
|[[File:Scan clue East Ardougne outside northern bank.png|300px|center]] |
|[[File:Scan clue East Ardougne outside northern bank.png|300px|center]] |
||
|- id="East Ardougne, north of house with pottery wheel" |
|- id="East Ardougne, north of house with pottery wheel" |
||
| − | |East Ardougne, north of house with [[pottery wheel]]. |
+ | |East Ardougne, north of house with [[pottery wheel]]. One step south of the location pictured. |
|[[File:Scan clue East Ardougne north of house with pottery wheel.png|300px|center]] |
|[[File:Scan clue East Ardougne north of house with pottery wheel.png|300px|center]] |
||
|- id="East Ardougne, south of house with pottery wheel" |
|- id="East Ardougne, south of house with pottery wheel" |
||
| − | |East Ardougne, south of house with [[pottery wheel]]. |
+ | |East Ardougne, south of house with [[pottery wheel]]. One pace south of the location pictured. |
|[[File:Scan clue East Ardougne south of house with pottery wheel.png|300px|center]] |
|[[File:Scan clue East Ardougne south of house with pottery wheel.png|300px|center]] |
||
|- id="East Ardougne, west of Flying Horse Inn" |
|- id="East Ardougne, west of Flying Horse Inn" |
||
| Line 48: | Line 75: | ||
|[[File:Scan clue East Ardougne north of Flying Horse Inn.png|300px|center]] |
|[[File:Scan clue East Ardougne north of Flying Horse Inn.png|300px|center]] |
||
|- id="East Ardougne, north of Ardougne Castle" |
|- id="East Ardougne, north of Ardougne Castle" |
||
| − | |East Ardougne, just north of [[Ardougne Castle]]. |
+ | |East Ardougne, just north of [[Ardougne Castle]]. One pace south of the location pictured. |
|[[File:Scan clue East Ardougne north of Ardougne Castle.png|300px|center]] |
|[[File:Scan clue East Ardougne north of Ardougne Castle.png|300px|center]] |
||
|- id="East Ardougne, east of Carnillean Mansion" |
|- id="East Ardougne, east of Carnillean Mansion" |
||
| Line 54: | Line 81: | ||
|[[File:Scan clue East Ardougne east of Carnillean Mansion.png|300px|center]] |
|[[File:Scan clue East Ardougne east of Carnillean Mansion.png|300px|center]] |
||
|- id="West Ardougne, outside mourner headquarters" |
|- id="West Ardougne, outside mourner headquarters" |
||
| − | |West Ardougne, outside the |
+ | |West Ardougne, outside the mourners' headquarters. |
|[[File:Scan clue West Ardougne outside mourner headquarters.png|300px|center]] |
|[[File:Scan clue West Ardougne outside mourner headquarters.png|300px|center]] |
||
|- id="West Ardougne, centre of town square" |
|- id="West Ardougne, centre of town square" |
||
| Line 71: | Line 98: | ||
|West Ardougne, inside graveyard. |
|West Ardougne, inside graveyard. |
||
|[[File:Scan clue West Ardougne inside graveyard.png|300px|center]] |
|[[File:Scan clue West Ardougne inside graveyard.png|300px|center]] |
||
| + | |- id="West Ardougne, southwest of graveyard" |
||
| + | |West Ardougne, southwest of the graveyard. |
||
| + | |[[File:Scan clue West Ardougne southwest of graveyard.png|300px|center]] |
||
|- id="West Ardougne, east of building with anvil" |
|- id="West Ardougne, east of building with anvil" |
||
|West Ardougne, just east of building with anvil. |
|West Ardougne, just east of building with anvil. |
||
| Line 77: | Line 107: | ||
|West Ardougne, inside northernmost house of housing area. |
|West Ardougne, inside northernmost house of housing area. |
||
|[[File:Scan clue West Ardougne inside house north of housing area.png|300px|center]] |
|[[File:Scan clue West Ardougne inside house north of housing area.png|300px|center]] |
||
| + | |- id="West Ardougne, west of north housing area" |
||
| + | |West Ardougne, just west of the northern housing area. |
||
| + | |[[File:Scan clue West Ardougne west of north housing area.png|300px|center]] |
||
| + | |- id="West Ardougne, south of northwestern housing area" |
||
| + | |South of northwestern housing area. |
||
| + | |[[File:Scan clue West Ardougne south of northwestern housing area.png|300px|center]] |
||
|- id="West Ardougne, outside general store" |
|- id="West Ardougne, outside general store" |
||
|West Ardougne, outside general store. |
|West Ardougne, outside general store. |
||
| Line 83: | Line 119: | ||
|West Ardougne, outside [[Underground Pass]] entrance. |
|West Ardougne, outside [[Underground Pass]] entrance. |
||
|[[File:Scan clue West Ardougne outside Underground Pass entrance.png|300px|center]] |
|[[File:Scan clue West Ardougne outside Underground Pass entrance.png|300px|center]] |
||
| − | |- id="West Ardougne |
+ | |- id="West Ardougne north-east of Underground Pass entrance" |
| − | | |
+ | |West Ardougne, north-east of the [[Underground Pass]] entrance. |
| − | |[[File:Scan clue West Ardougne east of |
+ | |[[File:Scan clue West Ardougne north-east of Underground Pass entrance.png|300px|center]] |
| − | |- id=" |
+ | |- id="North-west of Civic Office" |
| + | |West Ardougne, north-west of the Civic Office. |
||
| − | |colspan="2" | |
||
| + | |[[File:Scan clue West Ardougne north-west of civic office.png|300px|center]] |
||
| − | '''Other possible locations''' |
||
| − | |||
| − | East Ardougne |
||
| − | |||
| − | *At [[Handelmort Mansion]], in between [[Horacio]]'s patch and the [[Jade vine patch]]. |
||
| − | *North of [[Ardougne Zoo]]. |
||
|} |
|} |
||
| − | ==Brimhaven Dungeon== |
+ | ====Brimhaven Dungeon==== |
| − | ''Area Information: [[Brimhaven Dungeon]]'' |
+ | ''Area Information: [[Brimhaven Dungeon]]'' |
| − | To enter the dungeon players will need 875 [[coins]] unless they own [[Karamja gloves 3]] or [[Karamja gloves 4|4]] (to gain free access to the dungeon it is not necessary to have the gloves with you). A [[hatchet]] is also needed to cut through the obstructing vines within the dungeon (a hatchet on the [[toolbelt]] will work). Scans will either be on the upper or lower level of Brimhaven Dungeon, if the player is not on the right level for their scan they will be told "Try scanning another level". Players may also find [[:File:Brimhaven_dungeon_map.png|this map]], showing the dungeon's monsters, useful. |
||
| − | <br /> |
||
| + | To enter the dungeon players will need 875 [[coins]] unless they own [[Karamja gloves 3]] or [[Karamja gloves 4|4]] (to gain free access to the dungeon it is not necessary to have the gloves with you). A [[hatchet]] is also needed to cut through the obstructing vines within the dungeon (a hatchet on the [[tool belt]] will work). Scans will either be on the upper or lower level of Brimhaven Dungeon, if the player is not on the right level for their scan they will be told "Try scanning another level". Players may also find [[:Map:Brimhaven Dungeon]] showing the dungeon's monsters, useful. |
||
| − | '''Orb Scan range: 14 paces''' |
||
| + | |||
| + | '''Scan range: 14 paces''' |
||
| − | ''Click [[Map:Brimhaven Dungeon scan|here]] for full size of the map.'' |
||
{{Map:Brimhaven Dungeon scan}} |
{{Map:Brimhaven Dungeon scan}} |
||
| + | =====Lower level===== |
||
| − | {|class="wikitable" |
||
| + | {| class="wikitable" |
||
| − | !style="width: 300px;"|Possible locations |
||
| + | ! style="width: 300px;" |Possible locations |
||
!Image |
!Image |
||
|- id="Lower level, west of entrance" |
|- id="Lower level, west of entrance" |
||
|Lower level, just west of the dungeon's entrance. |
|Lower level, just west of the dungeon's entrance. |
||
|[[File:Scan clue Brimhaven Dungeon lower level west of entrance.png|300px|center]] |
|[[File:Scan clue Brimhaven Dungeon lower level west of entrance.png|300px|center]] |
||
| + | |- id="Lower level, East of vine near the dungeon entrance." |
||
| + | | Lower level, east of vine near the dungeon entrance. One pace south-east of the location pictured. |
||
| + | |[[File:Scan clue Brimhaven Dunegon lower level east of vines.png|300px|center]] |
||
|- id="Lower level, north-west of entrance" |
|- id="Lower level, north-west of entrance" |
||
|Lower level, north-west of the dungeon's entrance. In the passage leading north from the entrance. |
|Lower level, north-west of the dungeon's entrance. In the passage leading north from the entrance. |
||
|[[File:Scan clue Brimhaven Dungeon lower level north-west of entrance.png|300px|center]] |
|[[File:Scan clue Brimhaven Dungeon lower level north-west of entrance.png|300px|center]] |
||
| + | |- id="Lower level, in passage east of north-west chamber with central lava pool" |
||
| + | |Lower level, in the passage east of north-west chamber with a pool of lava containing a pillar statue in its centre. |
||
| + | |[[File:Scan clue Brimhaven Dungeon lower level in passage east of north-west chamber with central lava pool.png|300px|center]] |
||
|- id="Lower level, in north-west chamber with central lava pool" |
|- id="Lower level, in north-west chamber with central lava pool" |
||
|Lower level, in north-west chamber with a pool of lava containing a pillar statue in its centre. |
|Lower level, in north-west chamber with a pool of lava containing a pillar statue in its centre. |
||
|[[File:Scan clue Brimhaven Dungeon lower level in north-west chamber with central lava pool.png|300px|center]] |
|[[File:Scan clue Brimhaven Dungeon lower level in north-west chamber with central lava pool.png|300px|center]] |
||
| + | |- id="Lower level, south-east corner of small moss giant room" |
||
| + | |Lower level, south of the dungeon's entrance in the small moss giant room with the shortcut to red dragons. |
||
| + | |[[File:Scan clue Brimhaven Dungeon lower level south-east corner of small moss giant room.png|300px|center]] |
||
| + | |- id="Lower level, near the north of the moss giants chamber" |
||
| + | |Lower level, near the north of the moss giants chamber. |
||
| + | |[[File:Scan clue Brimhaven Dungeon lower level Moss Giants chamber.png|300px|center]] |
||
| + | |- id="Lower level, in the centre of the moss giants chamber" |
||
| + | |Lower level, at the centre of the moss giant room. |
||
| + | |[[File:Scan clue Brimhaven Dungeon lower level in the centre of the Moss Giants chamber.png|300px|center]] |
||
|- id="Lower level, in west chamber with staircase to upper level" |
|- id="Lower level, in west chamber with staircase to upper level" |
||
|Lower level, in west chamber containing [[moss giant]]s, [[wild dog]]s and a staircase to the upper level. |
|Lower level, in west chamber containing [[moss giant]]s, [[wild dog]]s and a staircase to the upper level. |
||
| Line 128: | Line 174: | ||
|[[File:Scan clue Brimhaven Dungeon lower level in passage south of west chamber with staircase to upper level.png|300px|center]] |
|[[File:Scan clue Brimhaven Dungeon lower level in passage south of west chamber with staircase to upper level.png|300px|center]] |
||
|- id="Lower level, north-west side of fire giant chamber" |
|- id="Lower level, north-west side of fire giant chamber" |
||
| − | |Lower level, on the north-west side of the chamber containing [[fire giant]]s. |
+ | |Lower level, on the north-west side of the chamber containing [[fire giant]]s. One step south of the location pictured. |
|[[File:Scan clue Brimhaven Dungeon lower level north-west side of fire giant chamber.png|300px|center]] |
|[[File:Scan clue Brimhaven Dungeon lower level north-west side of fire giant chamber.png|300px|center]] |
||
| − | |- id="Lower level, west side of |
+ | |- id="Lower level, west side of fire giant chamber" |
| − | |Lower level, on the west side of the chamber |
+ | |Lower level, on the west side of the [[fire giant]] chamber, between the [[fire giant]]s and [[moss giant]]s. |
| − | |[[File:Scan clue Brimhaven Dungeon lower level west side of |
+ | |[[File:Scan clue Brimhaven Dungeon lower level west side of fire giant chamber.png|300px|center]] |
| + | |- id="Lower level, north-east side of fire giant chamber" |
||
| + | |Lower level, on the north-east side of the chamber containing [[fire giant]]s. |
||
| + | |[[File:Scan clue Brimhaven Dungeon lower level north-east side of fire giant chamber.png|300px|center]] |
||
| + | |- id="Lower level, north side of red dragon chamber" |
||
| + | |Lower level, on the north side of the chamber containing [[red dragon]]s and [[baby red dragon]]s. |
||
| + | |[[File:Scan clue Brimhaven Dungeon lower level north side of red dragon chamber.png|300px|center]] |
||
| + | |- id="Lower level, in eastern part of red dragon chamber" |
||
| + | |Lower level, near the eastern wall of the chamber containing [[red dragon]]s and [[baby red dragon]]s. |
||
| + | |[[File:Scan clue Brimhaven Dungeon lower level in eastern part of red dragon chamber.png|center|300px]] |
||
| + | |- id="Lower level, in southern part of red dragon chamber" |
||
| + | |Lower level, in southern part of the chamber containing [[red dragon]]s and [[baby red dragon]]s. |
||
| + | |[[File:Scan clue Brimhaven Dungeon lower level in southern part of red dragon chamber.png|300px|center]] |
||
| + | |- id="Lower level, room between fire giants and black demons" |
||
| + | |Lower level, stair room between fire giants and black demons. |
||
| + | |[[File:Scan_clue_Brimhaven_Dungeon_lower_level_stair_room_between_fire_giants_and_black_demons.png|300px|center]] |
||
| + | |- id="Lower level, between the vines and Summoning obelisk" |
||
| + | |Lower level, between the vines and Summoning obelisk. |
||
| + | |[[File:Scan clue Brimhaven Dungeon lower level between the vines and Summoning obelisk.png|300px|center]] |
||
|- id="Lower level, north of Summoning obelisk" |
|- id="Lower level, north of Summoning obelisk" |
||
|Lower level, north of the [[Summoning obelisk]] in the chamber containing [[black demon]]s and [[wild dog]]s. North of the chamber containing [[Iron Dragon|iron]] and [[steel dragon]]s. |
|Lower level, north of the [[Summoning obelisk]] in the chamber containing [[black demon]]s and [[wild dog]]s. North of the chamber containing [[Iron Dragon|iron]] and [[steel dragon]]s. |
||
|[[File:Scan clue Brimhaven Dungeon lower level north of Summoning obelisk.png|300px|center]] |
|[[File:Scan clue Brimhaven Dungeon lower level north of Summoning obelisk.png|300px|center]] |
||
| − | |- id="Lower level, |
+ | |- id="Lower level, south-east corner of bronze dragon chamber" |
| − | |Lower level, |
+ | |Lower level, On the east side of the chamber containing [[bronze dragon]]s. North of the chamber containing [[iron dragon|iron]] and [[steel dragon]]s. |
| − | |[[File:Scan clue Brimhaven Dungeon lower level |
+ | |[[File:Scan clue Brimhaven Dungeon lower level south-east corner of bronze dragon chamber.png|300px|center]] |
| − | |- id="Lower level, |
+ | |- id="Lower level, iron and steel dragon chamber, north of the Brimhaven resource dungeon" |
| − | |Lower level, |
+ | |Lower level, north of entrance to [[Brimhaven Dungeon resource dungeon|Brimhaven resource dungeon]]. |
| − | |[[File:Scan clue Brimhaven Dungeon lower level |
+ | |[[File:Scan clue Brimhaven Dungeon lower level north of entrance to Brimhaven resource dungeon.png|300px|center]] |
| + | |- id="Lower level, west side of iron and steel dragon chamber" |
||
| + | |Lower level, west side of iron and steel dragon chamber. Just south-east of the [[Brimhaven Dungeon resource dungeon]] entrance. |
||
| + | |[[File:Scan clue Brimhaven Dungeon lower level west side of iron and steel dragon chamber.png|300px|center]] |
||
| + | |- id="Lower level, in centre of iron and steel dragon chamber" |
||
| + | |Lower level, at the centre of the iron and steel dragon chamber. |
||
| + | |[[File:Scan clue Brimhaven Dungeon lower level center of iron and steel dragon chamber.png|300px|center]] |
||
| + | |- id="Lower level, in iron and steel dragon chamber, south of south-eastern lava pool" |
||
| + | |Lower level, south-east corner of iron and steel dragon chamber. Just south of the south-eastern pool of lava. |
||
| + | |[[File:Scan clue Brimhaven Dungeon lower level in iron and steel dragon chamber south of south-eastern lava pool.png|300px|center]] |
||
| + | |- id="Lower level, in iron and steel dragon chamber, east of south-eastern lava pool" |
||
| + | |Lower level, south-east corner of iron and steel dragon chamber. Just east of the south-eastern pool of lava. |
||
| + | |[[File:Scan clue Brimhaven Dungeon lower level in iron and steel dragon chamber east of south-eastern lava pool.png|300px|center]] |
||
| + | |- id="Lower level, iron and steel dragon chamber, north-east corner" |
||
| + | |Lower level, north-east corner of the chamber containing [[iron dragon|iron]] and [[steel dragon]]s. Three steps south of the torch at the north-eastern pillar. |
||
| + | |[[File:Scan clue Brimhaven Dungeon lower level north-east corner of the chamber containing iron and steel dragons.png|300px|center]] |
||
| + | |- id="Other possible locations (Brimhaven Dungeon, lower level)" |
||
| + | | colspan="2" | |
||
| + | '''Other possible locations''' |
||
| + | * In south-west corner of small chamber containing [[moss giant]]s. |
||
| + | * North-east of the stepping stones shortcut near to moss giants. Three paces south of the torch on the northern wall of the passage. |
||
| + | * A few steps into the central chamber of [[wild dog]]s. |
||
| + | * West of the broken bridge leading to the [[red dragon]] chamber. |
||
| + | * In the central area of the red dragon chamber, 7 tiles south and 3 tiles west of the southwestern corner of the northeastern pillar. |
||
| + | * In small, south-east chamber of [[wild dog]]s. |
||
| + | |} |
||
| + | |||
| + | =====Upper level===== |
||
| + | {| class="wikitable" |
||
| + | ! style="width: 300px;" |Possible locations |
||
| + | !Image |
||
|- id="Upper level, west of north staircase" |
|- id="Upper level, west of north staircase" |
||
|Upper level, west of the northern staircase to the level. North-east of the area containing [[fire giant]]s and [[wild dog]]s. |
|Upper level, west of the northern staircase to the level. North-east of the area containing [[fire giant]]s and [[wild dog]]s. |
||
| Line 157: | Line 251: | ||
|Upper level, south of the southern staircase to the level. North of the area containing [[greater demon]]s and [[wild dog]]s. |
|Upper level, south of the southern staircase to the level. North of the area containing [[greater demon]]s and [[wild dog]]s. |
||
|[[File:Scan clue Brimhaven Dungeon upper level south of south staircase.png|300px|center]] |
|[[File:Scan clue Brimhaven Dungeon upper level south of south staircase.png|300px|center]] |
||
| + | |- id="Upper level, west of south staircase" |
||
| + | |Upper level, west of the southern staircase to the level. North of the area containing [[greater demon]]s and [[wild dog]]s. |
||
| + | |[[File:Scan clue Brimhaven Dungeon upper level west of south staircase.png|300px|center]] |
||
|- id="Upper level, south-east of greater demon area" |
|- id="Upper level, south-east of greater demon area" |
||
|Upper level, south-east corner of the level. South-east of the area containing [[greater demon]]s and [[wild dog]]s. |
|Upper level, south-east corner of the level. South-east of the area containing [[greater demon]]s and [[wild dog]]s. |
||
|[[File:Scan clue Brimhaven Dungeon upper level south-east of greater demon area.png|300px|center]] |
|[[File:Scan clue Brimhaven Dungeon upper level south-east of greater demon area.png|300px|center]] |
||
| + | |- id="Upper level, west side of greater demon area" |
||
| − | |- id="Other possible locations (Brimhaven Dungeon)" |
||
| + | |Upper level, west side of the greater demon area. |
||
| − | |colspan="2" | |
||
| + | |[[File:Scan clue Brimhaven Dungeon upper level west side of greater demon area.png|300px|center]] |
||
| + | |- id="Other possible locations (Brimhaven Dungeon, upper level)" |
||
| + | | colspan="2" | |
||
'''Other possible locations''' |
'''Other possible locations''' |
||
| + | *South-west of the northern staircase. |
||
| + | |} |
||
| + | ====Darkmeyer==== |
||
| − | Lower level |
||
| + | ''Area Information: [[Darkmeyer]]'' |
||
| + | To access Darkmeyer the player must have partially completed [[The Branches of Darkmeyer]]. |
||
| − | *On the east side of the chamber containing [[bronze dragon]]s. North of the chamber containing [[Iron Dragon|iron]] and [[steel dragon]]s. |
||
| − | *In the north-east corner of the chamber containing [[Iron Dragon|iron]] and [[steel dragon]]s. |
||
| − | |} |
||
| + | Fastest way to get here: use [[Drakan's medallion]]. To prevent the [[vyres]] from getting aggressive, wear the [[Darkmeyer disguise]] or the [[House Drakan outfit]] (obtained during ''[[The Lord of Vampyrium]]''). |
||
| − | ==Chaos Tunnels== |
||
| − | ''Area Information: [[Chaos Tunnels]]''<br /> |
||
| − | Players may also find [[:File:Chaos tunnels map.png|this map]], showing the monsters of and routes through the Chaos Tunnels, useful when navigating this area.<br /> |
||
| − | ''' |
+ | '''Scan range: 16 paces''' |
| + | {{Map:Darkmeyer scan}} |
||
| − | ''Click [[Map:Chaos Tunnels scan|here]] for full size of the map.'' |
||
| − | {{Map:Chaos Tunnels scan}} |
||
| − | {|class="wikitable" |
+ | {| class="wikitable" |
| − | !style="width: 300px;"|Possible locations |
+ | ! style="width: 300px;" |Possible locations |
!Image |
!Image |
||
| − | |- id=" |
+ | |- id="East of bloodwood tree" |
| − | | |
+ | |Just west of the [[bloodwood tree]], outside the [[Arboretum (location)|Arboretum]]. |
| − | |[[File:Scan clue |
+ | |[[File:Scan clue Darkmeyer east of bloodwood tree.png|300px|center]] |
| − | |- id=" |
+ | |- id="House south of Castle Drakan entrance" |
| + | | Outside house south of Castle Drakan entrance in the south-west corner of Darkmeyer. |
||
| − | |In the south-west part of the Chaos Tunnels, on the east side of the chamber of [[ice troll female]]s and [[ice troll male]]s. |
||
| − | |[[File:Scan clue |
+ | |[[File:Scan clue Darkmeyer house south of Castle Drakan entrance.png|300px|centre]] |
| − | |- id=" |
+ | |- id="North of prison" |
| − | | |
+ | |Just north of the prison in the south west corner of Darkmeyer. |
| − | |[[File:Scan clue |
+ | |[[File:Scan clue Darkmeyer north of prison.png|300px|center]] |
| + | |- id="Inside house with 3 coffins south of Castle Drakan entrance" |
||
| − | |- id="West dust devil chamber" |
||
| − | |In the |
+ | |In the building with three coffins, south of the entrance to Castle Drakan and opposite Vanstrom Klause's house, against the west wall level with the south coffin. |
| − | |[[File:Scan clue |
+ | |[[File:Scan clue Darkmeyer inside house with 3 coffins south of Castle Drakan entrance.png|300px|center]] |
| + | |- id="Just outside the building with a Prayer altar" |
||
| − | |- id="North-west earth warrior chamber" |
||
| − | | |
+ | | Just outside the building with a [[Prayer]] altar, in the north-west of the city. |
| − | |[[File:Scan clue |
+ | |[[File:Scan clue Darkmeyer just outside building with Prayer altar.png|300px|center]] |
| − | |- id=" |
+ | |- id="Next to Boris Barrington" |
| + | |Next to [[Boris Barrington]], the [[musician]]. |
||
| − | |In the north-west part of the Chaos Tunnels, on the west side of the chamber containing [[waterfiend]]s. |
||
| − | |[[File:Scan clue |
+ | |[[File:Scan clue Darkmeyer next to Boris Barrington.png|300px|center]] |
| + | |- id="In the north of the city, south-west of Port Phasmatys Hunter area" |
||
| − | |- id="North giant rock crab chamber" |
||
| − | |In the north |
+ | |In the north of the city, south-west of the [[Port Phasmatys Hunter area]]. |
| − | |[[File:Scan clue |
+ | |[[File:Scan clue Darkmeyer in the north of the city, south-west of Port Phasmatys Hunter area.png|300px|center]] |
| − | |- id=" |
+ | |- id="In north-east corner, next to the furnace" |
| + | |In the north-east corner of Darkmeyer, next to the furnace. |
||
| − | |In the north part of the Chaos Tunnels, on the east side of the large chamber of aggressive [[Zamorak mage]]s, [[Zamorak ranger|rangers]] and [[Zamorak Warrior|warriors]]. |
||
| − | |[[File:Scan clue |
+ | |[[File:Scan clue Darkmeyer in north-east corner next to furnace.png|300px|center]] |
| − | |- id=" |
+ | |- id="South-west of building with a range" |
| − | | |
+ | |South-west of the building with a [[range]], next to the north-east stairs. |
| − | |[[File:Scan clue |
+ | |[[File:Scan clue Darkmeyer south-west of building with range.png|300px|center]] |
| − | |- id=" |
+ | |- id="South-east of building with a range" |
| − | | |
+ | |South-east of the building with a [[range]], next to the north-east stairs. |
| − | |[[File:Scan clue |
+ | |[[File:Scan clue Darkmeyer south-east of building with range.png|300px|center]] |
| − | |- id=" |
+ | |- id="Inside building south-east of north-east stairs" |
| − | | |
+ | |Inside building with 4 coffins in it, south-east of the north-east stairs. |
| − | |[[File:Scan clue |
+ | |[[File:Scan clue Darkmeyer inside building south-east of north-east stairs.png|300px|center]] |
| − | |- id=" |
+ | |- id="South-east of Arboretum" |
| + | | Just south-east of the [[Arboretum (location)|Arboretum]], beyond the fence. |
||
| − | |In the north-east part of the Chaos Tunnels, on the north side of chamber containing [[Big Wolf|big wolves]] and [[shadow hound]]s. |
||
| − | |[[File:Scan clue |
+ | |[[File:Scan clue Darkmeyer south-east of arboretum.png|300px|center]] |
| + | |- id="South-east corner of Darkmeyer" |
||
| − | |- id="East big wolf and shadow hound chamber" |
||
| + | | In the south-east corner of Darkmeyer. |
||
| − | |In the east part of the Chaos Tunnels, on the west side of the chamber containing [[Big Wolf|big wolves]] and [[shadow hound]]s. |
||
| − | |[[File:Scan clue |
+ | |[[File:Scan clue Darkmeyer south-east corner of Darkmeyer.png|300px|center]] |
| + | |- id="North of entrance" |
||
| − | |- id="North-east green dragon, baby black dragon and animated spade chamber" |
||
| + | |North of the entrance from [[Meiyerditch]], between buildings in group of 3 buildings. |
||
| − | |In the north-east part of the Chaos Tunnels, on the north side of the chamber of [[green dragon]]s, aggressive [[baby black dragon]]s aggressive and [[animated spade]]s. |
||
| − | |[[File:Scan clue |
+ | |[[File:Scan clue Darkmeyer north of entrance.png|300px|center]] |
| − | |- id=" |
+ | |- id="Other possible locations (Darkmeyer)" |
| + | | colspan="2" | |
||
| − | |In the east part of the Chaos Tunnels, north side of the chamber containing aggressive [[giant crypt rat]]s. |
||
| − | |[[File:Scan clue Chaos Tunnels east giant crypt rat chamber.png|300px|center]] |
||
| − | |- id="Large south-east giant ant worker and soldier chamber" |
||
| − | |In the south-east part of the Chaos Tunnels, in the centre of the largest chamber of [[giant ant workers]] and aggressive [[giant ant soldiers]]. |
||
| − | |[[File:Scan clue Chaos Tunnels large south-east giant ant worker and soldier chamber.png|300px|center]] |
||
| − | |- id="South-east poison and shadow spider chamber" |
||
| − | |In the south-east part of the Chaos Tunnels, north-east side of the chamber of aggressive [[Poison Spider|poison]] and [[shadow spider]]s. |
||
| − | |[[File:Scan clue Chaos Tunnels south-east poison and shadow spider chamber.png|300px|center]] |
||
| − | |- id="South-east leech and bloodworm chamber" |
||
| − | |In the south-east part of the Chaos Tunnels, centre of the chamber of aggressive [[leech]]es and [[bloodworm]]s. |
||
| − | |[[File:Scan clue Chaos Tunnels south-east leech and bloodworm chamber.png|300px|center]] |
||
| − | |- id="South giant rock crab chamber" |
||
| − | |In the south part of the Chaos Tunnels, in the large chamber of aggressive [[giant rock crab]]s. |
||
| − | |[[File:Scan clue Chaos Tunnels south giant rock crab chamber.png|300px|center]] |
||
| − | |- id="Small central Zamorak warrior chamber" |
||
| − | |In the central part of the Chaos Tunnels, in the centre of the small chamber of aggressive [[Zamorak warrior]]s. |
||
| − | |[[File:Scan clue Chaos Tunnels small central Zamorak warrior chamber.png|300px|center]] |
||
| − | |- id="Central moss giant chamber" |
||
| − | |In the central part of the Chaos Tunnels, in the centre of the chamber containing [[moss giant]]s. |
||
| − | |[[File:Scan clue Chaos Tunnels central moss giant chamber.png|300px|center]] |
||
| − | |- id="South infernal mage chamber" |
||
| − | |In the southern part of the Chaos Tunnels, in the chamber of [[infernal mage]]s. |
||
| − | |[[File:Scan clue Chaos Tunnels south infernal mage chamber.png|300px|center]] |
||
| − | |- id="Other possible locations (Chaos Tunnels)" |
||
| − | |colspan="2" | |
||
'''Other possible locations''' |
'''Other possible locations''' |
||
| + | * In the northern part of the city, one pace south of the south-western corner of the building with the [[Pottery oven|Pottery Ovens]]. |
||
| − | |||
| − | *In the north-west part of the Chaos Tunnels. In the chamber of aggressive [[Dagannoth (Chaos Tunnels)|dagannoth]], near the portal leading to [[Bork]]. |
||
| − | *In the north-west part of the Chaos Tunnels, in the chamber of [[nechryael]]. |
||
| − | *In the north-west part of the Chaos Tunnels, in the chamber containing [[bronze dragon]]s and [[fire elemental]]s. |
||
| − | *In the north part of the Chaos Tunnels, in the small chamber of [[deadly red spider]]s. |
||
| − | *In the south-east part of the Chaos Tunnels, in the small chamber of [[giant ant workers]] and aggressive [[giant ant soldiers]]. |
||
| − | *In the south-east part of the Chaos Tunnels, in the chamber of [[Jelly|jellies]] and aggressive [[poison spider]]s. |
||
| − | *In the south part of the Chaos Tunnels, in the chamber containing aggressive [[ice giant]]s and [[ice warrior]]s. |
||
|} |
|} |
||
| − | ==Dorgesh-Kaan== |
+ | ====Dorgesh-Kaan==== |
| + | "This scroll will work in the cave goblin city of Dorgesh-Kaan." |
||
| − | ''Area Information: [[Dorgesh-Kaan]]''<br /> |
||
| − | Scans will either be on the upper or lower level of Dorgesh-Kaan, if the player is not on the right level for their scan they will be told "Try scanning another level".<br /> |
||
| + | ''Area Information: [[Dorgesh-Kaan]]'' |
||
| − | '''Orb scan range: 16 paces''' |
||
| + | |||
| + | Scans will either be on the upper or lower level of Dorgesh-Kaan, if the player is not on the right level for their scan they will be told "Try scanning another level". |
||
| + | |||
| + | '''Scan range: 16 paces''' |
||
| − | ''Click [[Map:Dorgeshkaan_scan|here]] for full size of the map.'' |
||
{{Map:Dorgeshkaan_scan}} |
{{Map:Dorgeshkaan_scan}} |
||
| + | =====Lower level===== |
||
| − | {|class="wikitable" |
||
| + | {| class="wikitable" |
||
| − | !style="width: 300px;"|Possible locations |
||
| + | ! style="width: 300px;" |Possible locations |
||
!Image |
!Image |
||
|- id="Lower level, inside the bank" |
|- id="Lower level, inside the bank" |
||
| Line 277: | Line 347: | ||
|[[File:Scan clue Dorgesh-Kaan lower level inside bank.png|300px|center]] |
|[[File:Scan clue Dorgesh-Kaan lower level inside bank.png|300px|center]] |
||
|- id="Lower level, south-east of group of fountains" |
|- id="Lower level, south-east of group of fountains" |
||
| − | |Lower level, south-east of the group of |
+ | |Lower level, south-east of the group of four fountains. Just east of [[Ur-Vass]]. |
|[[File:Scan clue Dorgesh-Kaan lower level south-east of group of fountains.png|300px|center]] |
|[[File:Scan clue Dorgesh-Kaan lower level south-east of group of fountains.png|300px|center]] |
||
|- id="Lower level, centre of marketplace" |
|- id="Lower level, centre of marketplace" |
||
| − | |Lower level, centre of marketplace. Close to [[Lurgon]] and [[Reldak]] who run [[Dorgesh-Kaan General Supplies]] and [[Reldak's Leather |
+ | |Lower level, centre of marketplace. Close to [[Lurgon]] and [[Reldak]] who run [[Dorgesh-Kaan General Supplies]] and [[Reldak's Leather Armour]]. |
|[[File:Scan clue Dorgesh-Kaan lower level centre of marketplace.png|300px|center]] |
|[[File:Scan clue Dorgesh-Kaan lower level centre of marketplace.png|300px|center]] |
||
|- id="Lower level, south-east of marketplace" |
|- id="Lower level, south-east of marketplace" |
||
| Line 301: | Line 371: | ||
|[[File:Scan clue Dorgesh-Kaan lower level inside isolated room south of marketplace.png|300px|center]] |
|[[File:Scan clue Dorgesh-Kaan lower level inside isolated room south of marketplace.png|300px|center]] |
||
|- id="Lower level, east of sandpit" |
|- id="Lower level, east of sandpit" |
||
| − | |Lower level, east of sandpit and south of building with range and sink and the [[ |
+ | |Lower level, east of sandpit and south of building with range and sink and the [[spit goblin]]. |
|[[File:Scan clue Dorgesh-Kaan lower level east of sandpit.png|300px|center]] |
|[[File:Scan clue Dorgesh-Kaan lower level east of sandpit.png|300px|center]] |
||
| + | |- id="Lower level, east of building with range and sink" |
||
| + | |Lower level, in the southern part of the level, east of building with range and sink, by the staircase. |
||
| + | |[[File:Scan clue Dorgesh-Kaan lower level east of building with range and sink.png|300px|center]] |
||
|- id="Lower level, inside southeastern room" |
|- id="Lower level, inside southeastern room" |
||
| − | |Lower level, inside southeastern room containing [[Ur-Pel]] and [[Ur-Lun]]. |
+ | |Lower level, inside southeastern room containing [[Ur-Pel]] and [[Ur-Lun]]. |
|[[File:Scan clue Dorgesh-Kaan lower level southeastern room.png|300px|center]] |
|[[File:Scan clue Dorgesh-Kaan lower level southeastern room.png|300px|center]] |
||
| + | |} |
||
| + | |||
| + | =====Upper level===== |
||
| + | {| class="wikitable" |
||
| + | ! style="width: 300px;" |Possible locations |
||
| + | !Image |
||
|- id="Upper level, south-east corner" |
|- id="Upper level, south-east corner" |
||
|Upper level, south-east corner of the level. |
|Upper level, south-east corner of the level. |
||
| Line 322: | Line 401: | ||
|[[File:Scan clue Dorgesh-Kaan upper level west of Council chamber.png|300px|center]] |
|[[File:Scan clue Dorgesh-Kaan upper level west of Council chamber.png|300px|center]] |
||
|- id="Upper level, outside house in north-west corner" |
|- id="Upper level, outside house in north-west corner" |
||
| − | |Upper level, outside house in north-west corner of level. |
+ | |Upper level, outside of a house in north-west corner of level. |
|[[File:Scan clue Dorgesh-Kaan upper level outside house in north-west corner.png|300px|center]] |
|[[File:Scan clue Dorgesh-Kaan upper level outside house in north-west corner.png|300px|center]] |
||
|- id="Upper level, inside western house" |
|- id="Upper level, inside western house" |
||
| − | |Upper level, inside house on western side of the level. |
+ | |Upper level, inside a house on western side of the level. |
|[[File:Scan clue Dorgesh-Kaan upper level inside western house.png|300px|center]] |
|[[File:Scan clue Dorgesh-Kaan upper level inside western house.png|300px|center]] |
||
|- id="Upper level, near train station" |
|- id="Upper level, near train station" |
||
|Upper level, near station for the [[Dorgesh-Kaan - Keldagrim Train System]]. |
|Upper level, near station for the [[Dorgesh-Kaan - Keldagrim Train System]]. |
||
|[[File:Scan clue Dorgesh-Kaan upper level near train station.png|300px|center]] |
|[[File:Scan clue Dorgesh-Kaan upper level near train station.png|300px|center]] |
||
| − | |- id="Other possible locations (Dorgesh-Kaan)" |
||
| − | |colspan="2" | |
||
| − | '''Other possible locations''' |
||
| − | |||
| − | Lower level |
||
| − | |||
| − | *In the southern part of the level, east of building with range and sink, by the staircase. |
||
|} |
|} |
||
| − | ==Falador== |
+ | ====Falador==== |
| − | ''Area Information: [[Falador]]'' |
+ | ''Area Information: [[Falador]]'' |
'''Scan range: 22 paces''' |
'''Scan range: 22 paces''' |
||
| − | ''Click [[Map:Falador scan|here]] for full size of the map.'' |
||
{{Map:Falador_scan}} |
{{Map:Falador_scan}} |
||
| − | {|class="wikitable" |
+ | {| class="wikitable" |
| − | !style="width: 300px;"|Possible locations |
+ | ! style="width: 300px;" |Possible locations |
!Image |
!Image |
||
| − | |- id="South of general store" |
+ | |- id="South of general store (Falador)" |
|South of the [[Falador General Store]] and north-east of Falador's west bank. |
|South of the [[Falador General Store]] and north-east of Falador's west bank. |
||
|[[File:Scan clue Falador south of general store.png|300px|center]] |
|[[File:Scan clue Falador south of general store.png|300px|center]] |
||
|- id="Centre of White Knights' Castle courtyard" |
|- id="Centre of White Knights' Castle courtyard" |
||
|In the centre of the courtyard of the [[White Knights' Castle]]. |
|In the centre of the courtyard of the [[White Knights' Castle]]. |
||
| − | |[[File:Scan clue Falador centre of White Knights' Castle courtyard. |
+ | |[[File:Scan clue Falador centre of White Knights' Castle courtyard.png|300px|center]] |
|- id="North-west of hairdresser" |
|- id="North-west of hairdresser" |
||
|Just north-west of the [[Hairdresser]] and north of Falador's west bank. |
|Just north-west of the [[Hairdresser]] and north of Falador's west bank. |
||
|[[File:Scan clue Falador north-west of hairdresser.png|300px|center]] |
|[[File:Scan clue Falador north-west of hairdresser.png|300px|center]] |
||
| + | |- id="Northwest of Flynn's Mace Market" |
||
| + | |Northwest of [[Flynn's Mace Market]], in the middle of the corner. |
||
| + | |[[File:Scan_clue_Falador_northwest_flynns_mace_shop.png|300px|center]] |
||
|- id="South-west of west bank (Falador)" |
|- id="South-west of west bank (Falador)" |
||
|South-west of Falador's west bank. Just east of the crumbling wall [[Agility]] [[shortcut]] between Falador and southern [[Taverley]] which requires level 5 Agility to use. |
|South-west of Falador's west bank. Just east of the crumbling wall [[Agility]] [[shortcut]] between Falador and southern [[Taverley]] which requires level 5 Agility to use. |
||
| Line 366: | Line 440: | ||
|[[File:Scan clue Falador north of gem shop.png|300px|center]] |
|[[File:Scan clue Falador north of gem shop.png|300px|center]] |
||
|- id="South-west of gem shop" |
|- id="South-west of gem shop" |
||
| − | |Inside the city walls, south-west of [[White Knights' Castle]] and east of the [[ |
+ | |Inside the city walls, south-west of [[White Knights' Castle]] and east of the [[Makeover Mage]] and [[Photo Booth]]. |
|[[File:Scan clue Falador south-west of gem shop.png|300px|center]] |
|[[File:Scan clue Falador south-west of gem shop.png|300px|center]] |
||
|- id="South of gem shop" |
|- id="South of gem shop" |
||
| − | |South of [[Herquin's Gems]] (the gem shop). Just north of the underwall tunnel [[Agility]] [[shortcut]] between Falador and the [[Clan Camp]] that requires level 26 Agility to use. |
+ | |South of [[Herquin's Gems]] (the gem shop). Just north of the underwall tunnel [[Agility]] [[shortcut]] between Falador and the [[Clan Camp]] that requires level 26 Agility to use. One pace west of the location pictured. |
|[[File:Scan clue Falador south of gem shop.png|300px|center]] |
|[[File:Scan clue Falador south of gem shop.png|300px|center]] |
||
|- id="North-east of chainmail shop" |
|- id="North-east of chainmail shop" |
||
| Line 386: | Line 460: | ||
|North of [[Artisan's Workshop]] in the south-east corner of the city. |
|North of [[Artisan's Workshop]] in the south-east corner of the city. |
||
|[[File:Scan clue Falador north of Artisan's Workshop.png|300px|center]] |
|[[File:Scan clue Falador north of Artisan's Workshop.png|300px|center]] |
||
| + | |- id="North-east of Party Room" |
||
| + | |In the north-east corner of Falador. Just north-east of the [[Party Room]]. |
||
| + | |[[File:Scan clue Falador north-east of Party Room.png|300px|center]] |
||
|- id="East of Wyson the gardener's house" |
|- id="East of Wyson the gardener's house" |
||
| − | |Just east of the house outside the eastern side of [[Falador Park]]. This house belongs to [[Wyson the |
+ | |Just east of the house outside the eastern side of [[Falador Park]]. This house belongs to [[Wyson the gardener]] who can sell the player [[woad leaves]] and trade the [[Mole skin|skin]] and [[Mole claw|claws]] of the [[Giant Mole]] for [[bird's nest]]s. |
|[[File:Scan clue Falador east of Wyson the gardener's house.png|300px|center]] |
|[[File:Scan clue Falador east of Wyson the gardener's house.png|300px|center]] |
||
|- id="South of Wyson the gardener's house" |
|- id="South of Wyson the gardener's house" |
||
| − | |South of the house outside the eastern side of [[Falador Park]]. This house belongs to [[Wyson the |
+ | |South of the house outside the eastern side of [[Falador Park]]. This house belongs to [[Wyson the gardener]] who can sell the player [[woad leaves]] and trade the [[Mole skin|skin]] and [[Mole claw|claws]] of the [[Giant Mole]] for [[bird's nest]]s. |
|[[File:Scan clue Falador south of Wyson the gardener's house.png|300px|center]] |
|[[File:Scan clue Falador south of Wyson the gardener's house.png|300px|center]] |
||
|- id="Centre of Falador Park" |
|- id="Centre of Falador Park" |
||
| Line 396: | Line 473: | ||
|[[File:Scan clue Falador centre of Falador Park.png|300px|center]] |
|[[File:Scan clue Falador centre of Falador Park.png|300px|center]] |
||
|- id="East side of Falador Park" |
|- id="East side of Falador Park" |
||
| − | |On the eastern side of [[Falador Park]], within the park's fence. West of the house outside the eastern side of [[Falador Park]]. This house belongs to [[Wyson the |
+ | |On the eastern side of [[Falador Park]], within the park's fence. West of the house outside the eastern side of [[Falador Park]]. This house belongs to [[Wyson the gardener]] who can sell the player [[woad leaves]] and trade the [[Mole skin|skin]] and [[Mole claw|claws]] of the [[Giant Mole]] for [[bird's nest]]s. |
|[[File:Scan clue Falador east side of Falador Park.png|300px|center]] |
|[[File:Scan clue Falador east side of Falador Park.png|300px|center]] |
||
| − | |- id="Other possible locations (Falador)" |
||
| − | |colspan="2" | |
||
| − | '''Other possible locations''' |
||
| − | |||
| − | *In the north-east corner of the city, north-east of the [[Party Room]]. |
||
|} |
|} |
||
| − | ==Fremennik Isles (Neitiznot and Jatizso)== |
+ | ====Fremennik Isles (Neitiznot and Jatizso)==== |
| − | ''Area Information: [[Neitiznot]]; [[Jatizso]]'' |
+ | ''Area Information: [[Neitiznot]]; [[Jatizso]]'' |
| − | ''' |
+ | '''Scan range: 16 paces''' |
| − | ''Click [[Map:Fremennik Isles scan|here]] for full size of the map.'' |
||
{{Map:Fremennik Isles scan}} |
{{Map:Fremennik Isles scan}} |
||
| − | {|class="wikitable" |
+ | {| class="wikitable" |
| − | !style="width: 300px;"|Possible locations |
+ | ! style="width: 300px;" |Possible locations |
!Image |
!Image |
||
|- id="Neitiznot, inside yak pen" |
|- id="Neitiznot, inside yak pen" |
||
|Neitiznot, inside the [[yak]] pen. |
|Neitiznot, inside the [[yak]] pen. |
||
|[[File:Scan clue Fremennik Isles Neitiznot inside yak pen.png|300px|center]] |
|[[File:Scan clue Fremennik Isles Neitiznot inside yak pen.png|300px|center]] |
||
| + | |- id="Neitiznot, south-west of summoning obelisk" |
||
| + | |Neitiznot, south-west of the [[Summoning obelisk]]. |
||
| + | |[[File:Scan clue Fremennik Isles Neitiznot south-west of summoning obelisk.png|300px|center]] |
||
|- id="Neitiznot, between town gates and Summoning obelisk" |
|- id="Neitiznot, between town gates and Summoning obelisk" |
||
| − | |Neitiznot, inside broken building between the town gates and a [[Summoning |
+ | |Neitiznot, inside broken building between the town gates and a [[Summoning obelisk]]. |
|[[File:Scan clue Fremennik Isles Neitiznot between town gates and Summoning obelisk.png|300px|center]] |
|[[File:Scan clue Fremennik Isles Neitiznot between town gates and Summoning obelisk.png|300px|center]] |
||
|- id="Neitiznot, outside room with spinning wheel" |
|- id="Neitiznot, outside room with spinning wheel" |
||
| − | |Neitiznot, just south of a building with a [[ |
+ | |Neitiznot, just south of a building with a [[spinning wheel]] in the south-eastern part of the town. |
| − | |[[File:Scan clue |
+ | |[[File:Scan clue Fremennik Isles Neitiznot outside room with spinning wheel.png|300px|center]] |
|- id="Western tip of grassy island" |
|- id="Western tip of grassy island" |
||
| − | |On western tip of the grassy island north of Neitiznot. North of the west bridge between the grassy island and Neitiznot. |
+ | |On western tip of the grassy island north of Neitiznot. North of the west bridge between the grassy island and Neitiznot. Two steps west of the location pictured. |
|[[File:Scan clue Fremennik Isles western tip of grassy island.png|300px|center]] |
|[[File:Scan clue Fremennik Isles western tip of grassy island.png|300px|center]] |
||
|- id="Inside ring of arctic pines on grassy island" |
|- id="Inside ring of arctic pines on grassy island" |
||
| − | |In the centre of a ring of five [[Arctic |
+ | |In the centre of a ring of five [[Arctic Pine]] trees on the grassy island north of Neitiznot. |
|[[File:Scan clue Fremennik Isles inside ring of arctic pines on grassy island.png|300px|center]] |
|[[File:Scan clue Fremennik Isles inside ring of arctic pines on grassy island.png|300px|center]] |
||
| + | |- id="Eastern tip of grassy island" |
||
| + | |On eastern tip of the grassy island north of Neitiznot. South of the central island. |
||
| + | |[[File:Scan clue Fremennik Isles eastern tip of grassy island.png|300px|center]] |
||
|- id="On smallest central island" |
|- id="On smallest central island" |
||
| − | |On the smallest island with in the centre of the other Fremennik isles with 7 [[coal rocks]] and 1 [[Runite rock]] (the [[Central Fremennik Isles mining site]]). |
+ | |On the smallest island with in the centre of the other Fremennik isles with 7 [[coal rocks]] and 1 [[Runite rock]] (the [[Central Fremennik Isles mining site]]). One pace south of the location pictured. |
|[[File:Scan clue Fremennik Isles on smallest central island.png|300px|center]] |
|[[File:Scan clue Fremennik Isles on smallest central island.png|300px|center]] |
||
|- id="By eastern woodcutting stump on south-west snowy island" |
|- id="By eastern woodcutting stump on south-west snowy island" |
||
|On south-west snowy island, by the eastern [[Woodcutting stump]]. |
|On south-west snowy island, by the eastern [[Woodcutting stump]]. |
||
|[[File:Scan clue Fremennik Isles by eastern woodcutting stump on south-west snowy island.png|300px|center]] |
|[[File:Scan clue Fremennik Isles by eastern woodcutting stump on south-west snowy island.png|300px|center]] |
||
| + | |- id="East tip of southwestern snowy island" |
||
| + | |On south-west snowy island, west of the bridge connecting Neitiznot with Jatizso. |
||
| + | |[[File:Scan_clue_Fremennik_Isles_west_of_the_bridge_to_Jatizso.png|300px|center]] |
||
|- id="West tip of south-west snowy island" |
|- id="West tip of south-west snowy island" |
||
| − | |On south-west snowy island, on the west tip of the island. By [[ |
+ | |On south-west snowy island, on the west tip of the island. By [[copper rock]]s and west [[Woodcutting stump]]. One pace east of the location pictured. |
|[[File:Scan clue Fremennik Isles west tip of south-west snowy island.png|300px|center]] |
|[[File:Scan clue Fremennik Isles west tip of south-west snowy island.png|300px|center]] |
||
| + | |- id="East of bridge to south-west snowy island" |
||
| + | |East of bridge to south-west snowy island. |
||
| + | |[[File:Scan clue Fremennik Isles east of bridge to south-west snowy island.png|300px|center]] |
||
|- id="North of land bridge connecting two snowy islands" |
|- id="North of land bridge connecting two snowy islands" |
||
|Just north of land bridge connecting north snowy island and south-west snowy island. |
|Just north of land bridge connecting north snowy island and south-west snowy island. |
||
|[[File:Scan clue Fremennik Isles north of land bridge connecting two snowy islands.png|300px|center]] |
|[[File:Scan clue Fremennik Isles north of land bridge connecting two snowy islands.png|300px|center]] |
||
| + | |- id="Land bridge connecting two snowy islands" |
||
| + | |On the land bridge connecting the north snowy island and south-west snowy island. |
||
| + | |[[File:Scan clue Fremennik Isles land bridge connecting two snowy islands.png|300px|center]] |
||
|- id="West tip of north snowy island" |
|- id="West tip of north snowy island" |
||
|On north snowy island, west tip. By west cave entrance. |
|On north snowy island, west tip. By west cave entrance. |
||
| Line 452: | Line 538: | ||
|On north snowy island, just outside east cave entrance. |
|On north snowy island, just outside east cave entrance. |
||
|[[File:Scan clue Fremennik Isles outside eastern cave on northern snowy island.png|300px|center]] |
|[[File:Scan clue Fremennik Isles outside eastern cave on northern snowy island.png|300px|center]] |
||
| + | |- id="East tip of north snowy island" |
||
| + | |On north snowy island, east tip. |
||
| + | |[[File:Scan clue Fremennik Isles east tip of north snowy island.png|300px|center]] |
||
|- id="West of mining site on southeastern snowy island" |
|- id="West of mining site on southeastern snowy island" |
||
|On south-east snowy island, by [[coal rocks]] just west of [[Mining site]] icon. |
|On south-east snowy island, by [[coal rocks]] just west of [[Mining site]] icon. |
||
| Line 470: | Line 559: | ||
|Jatizso, south of town wall and north-west of [[fishing spots]]. |
|Jatizso, south of town wall and north-west of [[fishing spots]]. |
||
|[[File:Scan clue Fremennik Isles south of town wall.png|300px|center]] |
|[[File:Scan clue Fremennik Isles south of town wall.png|300px|center]] |
||
| + | |- id="South-east of guard tower" |
||
| + | |Just south-east of the guard tower on Jatizso. |
||
| + | |[[File:Scan clue Fremennik Isles south east of guard tower.png|300px|center]] |
||
| + | |- id="Just east of the guard tower on the western tip of Jatizso" |
||
| + | |Just east of the guard tower on the western tip of Jatizso |
||
| + | |[[File:Scan clue Fremennik Isles east of Jatizo guard tower.png|300px|center]] |
||
| + | |- id="West of Neitiznot guard tower" |
||
| + | |Immediately west of the guard tower in Neitiznot. |
||
| + | |[[File:Scan clue Fremennik Isles west of Neitiznot guard tower.png|300px|center]] |
||
| + | |- id="West of the Jatizso mine entrance" |
||
| + | |A couple steps west of the mine entrance in Jatizso. |
||
| + | |[[File:Scan clue Fremennik Isles west of the Jatizso mine entrance.png|300px|center]] |
||
| + | |- id="Jatizso, south-east of the southern town entrance" |
||
| + | |Jatizso, south-east of the southern town entrance. |
||
| + | |[[File:Scan clue Fremennik Isles Jatizso, south-east of the southern town entrance.png|300px|center]] |
||
| + | |- id="North between 2 Arctic Pines on south-west snowy island" |
||
| + | |North between 2 [[Arctic Pine]]s on south-west snowy island |
||
| + | |[[File:Scan clue Fremennik Isles north between 2 Arctic Pines on south-west snowy island.png|300px|center]] |
||
| + | |- id="In the centre of Neitiznot, just south of the oven" |
||
| + | |In the centre of Neitiznot, just south of the oven. |
||
| + | |[[File:Scan clue Fremennik Isles in the centre of Neitiznot, just south of the oven.png|300px|center]] |
||
| + | |- id="In the centre of Neitiznot, just east of the fountain" |
||
| + | |In the centre of Neitiznot, just east of the fountain. |
||
| + | |[[File:Scan clue Fremennik Isles in the centre of Neitiznot, just east of the fountain.png|300px|center]] |
||
|- id="Other possible locations (Fremennik Isles)" |
|- id="Other possible locations (Fremennik Isles)" |
||
| − | |colspan="2"| |
+ | | colspan="2" | |
'''Other possible locations''' |
'''Other possible locations''' |
||
| + | *On the eastern tip of southwestern snowy island. Two paces east of the south-eastern corner of the [[Arctic Pine]]. |
||
| − | |||
| − | * |
+ | *Two paces west of the south-western corner of the Jatizso mine entrance. |
| − | *2 paces east of the Guard Tower on the western tip of Jatizso. |
||
|} |
|} |
||
| − | ==Fremennik Slayer |
+ | ====Fremennik Slayer Dungeons==== |
| − | ''Area Information: [[Fremennik Slayer Dungeon]]'' |
+ | ''Area Information: [[Fremennik Slayer Dungeon]]'' |
| + | |||
| − | Players may find [[:File:Fremennik Slayer Dungeon map.png|this map]], showing the locations of the dungeon's monsters, useful when navigating the area.<br /> |
||
| + | Players may find [[:File:Fremennik Slayer Dungeon map.png|this map]], showing the locations of the dungeon's monsters, useful when navigating the area. |
||
'''Scan range: 16 paces''' |
'''Scan range: 16 paces''' |
||
| − | ''Click [[Map:Fremennik Slayer Dungeon scan|here]] for full size of the map.'' |
||
{{Map:Fremennik Slayer Dungeon scan}} |
{{Map:Fremennik Slayer Dungeon scan}} |
||
| − | {|class="wikitable" |
+ | {| class="wikitable" |
| − | !style="width: 300px;"|Possible locations |
+ | ! style="width: 300px;" |Possible locations |
!Image |
!Image |
||
|- id="Near entrance" |
|- id="Near entrance" |
||
|Near the dungeon entrance, in the [[cave crawler]] chamber. |
|Near the dungeon entrance, in the [[cave crawler]] chamber. |
||
|[[File:Scan clue Fremennik Slayer Dungeon near entrance.png|300px|center]] |
|[[File:Scan clue Fremennik Slayer Dungeon near entrance.png|300px|center]] |
||
| + | |- id="East side of rock slug chamber" |
||
| + | |East side of [[rock slug]] chamber. |
||
| + | |[[File:Scan clue Fremennik Slayer Dungeon east side of rockslug chamber.png|300px|center]] |
||
|- id="North side of cockatrice chamber" |
|- id="North side of cockatrice chamber" |
||
|On the northern side of the [[cockatrice]] chamber. |
|On the northern side of the [[cockatrice]] chamber. |
||
| Line 514: | Line 629: | ||
|In the passage between the [[basilisk]] and [[jelly]] chambers. |
|In the passage between the [[basilisk]] and [[jelly]] chambers. |
||
|[[File:Scan clue Fremennik Slayer Dungeon in passage between basilisk and jelly chambers.png|300px|center]] |
|[[File:Scan clue Fremennik Slayer Dungeon in passage between basilisk and jelly chambers.png|300px|center]] |
||
| + | |- id="In the centre of the jelly chamber" |
||
| + | |In the centre of the [[jelly]] chamber. |
||
| + | |[[File:Scan clue Fremennik Slayer Dungeon centre of jelly chamber.png|300px|center]] |
||
| + | |- id="West side of the turoth chamber" |
||
| + | |On west side of the [[turoth]] chamber. |
||
| + | |[[File:Scan clue Fremennik Slayer Dungeon west side of turoth chamber.png|center|300px]] |
||
|- id="South-east side of turoth chamber" |
|- id="South-east side of turoth chamber" |
||
|On south-east side of [[turoth]] chamber. |
|On south-east side of [[turoth]] chamber. |
||
| Line 526: | Line 647: | ||
|In the centre of the [[aquanite]] chamber. |
|In the centre of the [[aquanite]] chamber. |
||
|[[File:Scan clue Fremennik Slayer Dungeon centre of aquanite chamber.png|300px|center]] |
|[[File:Scan clue Fremennik Slayer Dungeon centre of aquanite chamber.png|300px|center]] |
||
| + | |- id="North of the centre of the Aquanite chamber" |
||
| + | |Slightly north east of the centre of the [[aquanite]] chamber. |
||
| + | |[[File:Scan clue Fremennik Slayer Dungeon north of centre of aquanite chamber.png|300px|center]] |
||
|- id="East side of aquanite chamber" |
|- id="East side of aquanite chamber" |
||
| − | | |
+ | |East tip of the [[aquanite]] chamber. |
|[[File:Scan clue Fremennik Slayer Dungeon east side of aquanite chamber.png|300px|center]] |
|[[File:Scan clue Fremennik Slayer Dungeon east side of aquanite chamber.png|300px|center]] |
||
| + | |- id="Southeast side of aquanite chamber" |
||
| − | |- id="Other possible locations (Fremennik Slayer Dungeon)" |
||
| + | |Southeast side of aquanite chamber. |
||
| − | |colspan="2" | |
||
| + | |[[File:Scan clue Fremennik Slayer Dungeon southeast side of aquanite chamber.png|300px|center]] |
||
| − | '''Other possible locations''' |
||
| + | |- id="North of basilisk chamber" |
||
| − | |||
| − | + | |Just north of the [[basilisk]] chamber. |
|
| − | + | |[[File:Scan clue Fremennik Slayer Dungeon north of basilisk chamber.png|300px|center]] |
|
| − | *In the centre of the [[jelly]] chamber. |
||
| − | *West side of the [[turoth]] chamber. |
||
|} |
|} |
||
| − | ==Haunted Woods== |
+ | ====Haunted Woods==== |
| − | ''Area Information: [[Haunted Woods]]'' |
+ | ''Area Information: [[Haunted Woods]]'' |
| − | This area contains aggressive [[leech]]es and [[Vampyre (monster)|vampyres]].<br /> |
||
| + | This area contains aggressive [[leech]]es and [[Vampyre (monster)|vampyres]]. |
||
| − | '''Orb scan range: 11 paces''' |
||
| + | |||
| + | '''Scan range: 11 paces''' |
||
| − | ''Click [[Map:Haunted Woods scan|here]] for full size of the map.'' |
||
{{Map:Haunted Woods scan}} |
{{Map:Haunted Woods scan}} |
||
| − | {|class="wikitable" |
+ | {| class="wikitable" |
| − | !style="width: 300px;"|Possible locations |
+ | ! style="width: 300px;" |Possible locations |
!Image |
!Image |
||
| + | |- id="South-west of Alice's Farming Shop" |
||
| + | |South-west of [[Alice's Farming Shop]] and the pen where [[Alice's husband]] keeps [[undead chicken]]s and [[undead cow]]s. |
||
| + | |[[File:Scan clue Haunted Woods south-west of Alice's Farming Shop.png|300px|center]] |
||
|- id="South of Alice's Farming Shop" |
|- id="South of Alice's Farming Shop" |
||
|South of [[Alice's Farming Shop]] and the pen where [[Alice's husband]] keeps [[undead chicken]]s and [[undead cow]]s. |
|South of [[Alice's Farming Shop]] and the pen where [[Alice's husband]] keeps [[undead chicken]]s and [[undead cow]]s. |
||
| Line 569: | Line 694: | ||
|Just north-west of [[fairy ring]] (code {{fairycode|ALQ}}). |
|Just north-west of [[fairy ring]] (code {{fairycode|ALQ}}). |
||
|[[File:Scan clue Haunted Woods north-west of fairy ring.png|300px|center]] |
|[[File:Scan clue Haunted Woods north-west of fairy ring.png|300px|center]] |
||
| + | |- id="East of fairy ring" |
||
| + | |Just east of the [[fairy ring]] (code {{fairycode|ALQ}}). |
||
| + | |[[File:Scan clue Haunted Woods east of fairy ring.png|300px|center]] |
||
|- id="South-west of musician" |
|- id="South-west of musician" |
||
| − | |South-west of [[musician]] |
+ | |South-west of [[musician]]. |
|[[File:Scan clue Haunted Woods south-west of musician.png|300px|center]] |
|[[File:Scan clue Haunted Woods south-west of musician.png|300px|center]] |
||
| + | |- id="South-east of lake containing island" |
||
| + | |Just south-east of the lake containing an island that cannot be reached. |
||
| + | |[[File:Scan clue Haunted Woods south-east of lake containing island.png|300px|center]] |
||
|- id="South-west of fairy ring" |
|- id="South-west of fairy ring" |
||
|South-west of [[fairy ring]] (code {{fairycode|ALQ}}). |
|South-west of [[fairy ring]] (code {{fairycode|ALQ}}). |
||
|[[File:Scan clue Haunted Woods south-west of fairy ring.png|300px|center]] |
|[[File:Scan clue Haunted Woods south-west of fairy ring.png|300px|center]] |
||
| − | |- id="South of |
+ | |- id="South of fairy ring" |
| − | |South of |
+ | |South of [[fairy ring]] (code {{fairycode|ALQ}}). |
| − | |[[File: |
+ | |[[File:Scan_clue_Haunted_Woods_south_of_fairy_ring.png|300px|center]] |
|- id="South-west of woods" |
|- id="South-west of woods" |
||
|In south-western part of the Haunted Woods. Far south-west of the [[fairy ring]] (code {{fairycode|ALQ}}) and south-east of the lake containing an island. |
|In south-western part of the Haunted Woods. Far south-west of the [[fairy ring]] (code {{fairycode|ALQ}}) and south-east of the lake containing an island. |
||
|[[File:Scan clue Haunted Woods south-west of woods.png|300px|center]] |
|[[File:Scan clue Haunted Woods south-west of woods.png|300px|center]] |
||
| + | |- id="South of lake containing island" |
||
| + | |South of the lake containing an island that cannot be reached. |
||
| + | |[[File:Scan clue Haunted Woods south of lake containing island.png|300px|center]] |
||
|- id="South-west of lake containing island" |
|- id="South-west of lake containing island" |
||
|South-west of the lake containing an island that cannot be reached. |
|South-west of the lake containing an island that cannot be reached. |
||
| Line 591: | Line 725: | ||
|[[File:Scan clue Haunted Woods south-east of Canifis bank.png|300px|center]] |
|[[File:Scan clue Haunted Woods south-east of Canifis bank.png|300px|center]] |
||
|- id="South-east of Canifis lodestone" |
|- id="South-east of Canifis lodestone" |
||
| − | |South-east of [[Canifis]] [[lodestone]], [[ |
+ | |South-east of [[Canifis]] [[lodestone]], [[Mazchna]] the [[Slayer Master]] and the Canifis site for the [[God Statues]] Distraction and Diversion. |
|[[File:Scan clue Haunted Woods south-east of Canafis lodestone.png|300px|center]] |
|[[File:Scan clue Haunted Woods south-east of Canafis lodestone.png|300px|center]] |
||
|- id="South of Fenkenstrain's Castle" |
|- id="South of Fenkenstrain's Castle" |
||
| − | |South of [[ |
+ | |South of [[Fenkenstrain's Castle]]. |
|[[File:Scan clue Haunted Woods south of Fenkenstrain's Castle.png|300px|center]] |
|[[File:Scan clue Haunted Woods south of Fenkenstrain's Castle.png|300px|center]] |
||
| + | |- id="South-east of Fenkenstrain's Castle" |
||
| − | |- id="Other possible locations (Haunted Woods)" |
||
| + | |South-east of [[Fenkenstrain's Castle]] and south-west of the [[musician]]. |
||
| − | |colspan="2" | |
||
| + | |[[File:Scan clue Haunted Woods south-east of Fenkenstrain's Castle.png|300px|center]] |
||
| + | |- id="North of the Werewolf Agility Course" |
||
| + | |Just north of the agility training icon indicating the entrance to the [[Werewolf Agility Course]]. |
||
| + | |[[File:Scan clue Haunted Woods north of Werewolf Agility Course.png|300px|center]] |
||
| + | |} |
||
| + | |||
| + | ====The Heart of Gielinor==== |
||
| + | ''Area Information: [[Heart of Gielinor]]'' |
||
| + | |||
| + | '''Scan range: 49 paces''' |
||
| + | |||
| + | {{Map:Heart of Gielinor scan}} |
||
| + | |||
| + | {| class="wikitable" |
||
| + | ! style="width: 300px;" |Possible locations |
||
| + | !Image |
||
| + | |- id="North of The Heart (left side)" |
||
| + | | North-west of The Heart on the left side, between Zamorak's rampart and Sliske's necropolis. Just south-west of a node. |
||
| + | |[[File:Scan clue Heart of Gielinor north of The Heart (left side).png|300px|centre]] |
||
| + | |- id="North of The Heart (right side)" |
||
| + | | North-west of The Heart on the right side, between Zamorak's rampart and Sliske's necropolis. Just south-west of a node. |
||
| + | |[[File:Scan clue Heart of Gielinor north of The Heart (right side).png|300px|center]] |
||
| + | |- id="South-west of slope to Gregorovic area" |
||
| + | | In Sliske's Necropolis, just south-west of the slope to [[Gregorovic]]'s area. Seven paces north and four east of the location pictured. |
||
| + | |[[File:Scan clue Heart of Gielinor south-west of slope to Gregorovic's area.png|300px|center]] |
||
| + | |- id="West of first threshold to Gregorovic" |
||
| + | | In Sliske's necropolis, just west of the 40 [[killcount]] threshold to Gregorovic's area. |
||
| + | |[[File:Scan clue Heart of Gielinor west of first threshold to Gregorovic.png|300px|center]] |
||
| + | |- id="North-east of The Heart, north of node" |
||
| + | | North of The Heart, south-west of Sliske's Necropolis. North of a node. One pace north of the location pictured. |
||
| + | |[[File:Scan clue Heart of Gielinor north-east of The Heart, north of node.png|300px|center]] |
||
| + | |- id="Directly east of Telos entrance" |
||
| + | | Directly east of [[Telos]] entrance, just south-east of a node. |
||
| + | |[[File:Scan clue Heart of Gielinor directly east of Telos entrance.png|300px|center]] |
||
| + | |- id="West of slope to Helwyr area" |
||
| + | | In Seren's encampment, just west of the slope leading to [[Helwyr]]'s area, near a rock shaped like a mushroom. |
||
| + | |[[File:Scan clue Heart of Gielinor west of slope to Helwyr area.png|300px|center]] |
||
| + | |- id="East of slope to Helwyr area" |
||
| + | | In Seren's encampment, just east of the slope leading to [[Helwyr]]'s area. |
||
| + | |[[File:Scan clue Heart of Gielinor east of slope to Helwyr area.png|300px|center]] |
||
| + | |- id="Next to Helwyr banner" |
||
| + | | In Seren's encampment, south of the slope leading to Helwyr's area. Next to the banner of Helwyr. |
||
| + | |[[File:Scan clue Heart of Gielinor next to Helwyr banner in Seren Encampment.png|300px|center]] |
||
| + | |- id="South-east of slope to Vindicta" |
||
| + | | In Zaros's bastion, south-east of the slope leading of [[Vindicta]]'s area. |
||
| + | |[[File:Scan clue Heart of Gielinor south-east of slope to Vindicta.png|300px|center]] |
||
| + | |- id="South-west of the entrance platform" |
||
| + | | In Zaros's bastion, south-west of the entrance platform. |
||
| + | |[[File:Scan clue Heart of Gielinor south-west of entrance platform.png|300px|center]] |
||
| + | |- id="Between two platforms north-east of Zaros' Bastion" |
||
| + | |Between two platforms north-east of Zaros' Bastion |
||
| + | |[[File:Scan clue Heart of Gielinor between two platforms north-east of Zaros' Bastion.png|300px|center]] |
||
| + | |- id="South of slope to Vindicta" |
||
| + | | In Zaros's bastion, south of the slope leading of [[Vindicta]]'s area. |
||
| + | |[[File:Scan clue Heart of Gielinor south of slope to Vindicta.png|300px|center]] |
||
| + | |- id="North-east of first threshold to Vindicta" |
||
| + | | In Zaros's bastion, just north-east of the 40 [[killcount]] threshold to [[Vindicta]]'s area. |
||
| + | |[[File:Scan clue Heart of Gielinor north-east of first threshold to Vindicta.png|300px|center]] |
||
| + | |- id="North-west of The Heart" |
||
| + | | North-west of The Heart. |
||
| + | |[[File:Scan clue Heart of Gielinor north-west of The Heart.png|300px|center]] |
||
| + | |- id="South-west of Zamorak's rampart, west of node" |
||
| + | | South-west of Zamorak's rampart, west of a node. |
||
| + | |[[File:Scan clue Heart of Gielinor south-west of Zamorak's rampart, west of node.png|300px|center]] |
||
| + | |- id="Near 3 tents, south-east of first threshold to Twin Furies" |
||
| + | | Near 3 tents, south-east of first threshold to [[Twin Furies]] area |
||
| + | |[[File:Scan clue Heart of Gielinor near 3 tents, south-east of first threshold to Twin Furies.png|300px|center]] |
||
| + | |- id="Other possible locations (Heart of Gielinor)" |
||
| + | | colspan="2" | |
||
'''Other possible locations''' |
'''Other possible locations''' |
||
| + | * South-west of The Heart, just east of the stairs leading to Zaros's Bastion. One pace north of the southern tent. |
||
| + | * In Zamorak's Rampart, six paces north of the portal's second tile from the west. |
||
| + | * In Zaros's Bastion, eight paces north and five west of the northern part of the portal. |
||
| + | |} |
||
| + | ====Isafdar and Lletya==== |
||
| − | *Two paces north of the agility training icon indicating the entrance to the [[Werewolf Agility Course]]. |
||
| + | ''Area Information: [[Tirannwn]], [[Lletya]]'' |
||
| + | |||
| + | Players may also find it helpful to use [[:File:Isafdar map.png|this map]], showing the routes through and obstacles of Tirannwn, when navigating the area. |
||
| + | |||
| + | '''Scan range: 22 paces''' |
||
| + | |||
| + | {{Map:Tirannwn scan}} |
||
| + | |||
| + | {| class="wikitable" |
||
| + | ! style="width: 300px;" |Possible locations |
||
| + | !Image |
||
| + | |- id="East of charter ship in Port Tyras" |
||
| + | |East of the [[Charter Ship|charter ship]], in [[Port Tyras]]. South-west of [[Tyras Camp]]. |
||
| + | |[[File:Scan clue Tirannwn east of charter ship in Port Tyras.png|300px|center]] |
||
| + | |- id="Centre of Tyras Camp" |
||
| + | |Centre of [[Tyras Camp]]. |
||
| + | |[[File:Scan clue Tirannwn centre of Tyras Camp.png|300px|center]] |
||
| + | |- id="North of Tyras Camp" |
||
| + | |North of [[Tyras Camp]], through the [[dense forest]] obstacle. Just north-west of the catapult used in the [[Catapult Construction]] quest. |
||
| + | |[[File:Scan clue Tirannwn north of Tyras Camp.png|300px|center]] |
||
| + | |- id="Southwest of Pawya hunter clearing pond" |
||
| + | |Southwest of a pond in the [[Pawya]] hunter clearing, across the river from the [[Elf Camp]]. Accessed by stepping over a [[Stick trap]]. |
||
| + | |[[File:Scan clue Tirannwn southwest of pond in pawya clearing.png|300px|center]] |
||
| + | |- id="Just north of the two tripwires east of Tyras Camp" |
||
| + | |East of [[Tyras Camp]], just north of two adjacent [[trip wire]] obstacles. Accessed by leaving the camp through the [[dense forest]] obstacle and going south through a second patch of dense forest to the east of the camp. |
||
| + | |[[File:Scan clue Tirannwn just north of the two tripwires east of Tyras Camp.png|300px|center]] |
||
| + | |- id="In small clearing north of Hunter training icon east of Tyras Camp" |
||
| + | |In small clearing north of the Hunter training icon, east of [[Tyras Camp]]. The clearing can be entered at its south, south of the two adjacent [[trip wire]] obstacles. |
||
| + | |[[File:Scan clue Tirannwn in small clearing north of Hunter training icon east of Tyras Camp.png|300px|center]] |
||
| + | |- id="North of the mushroom patch" |
||
| + | |North of the mushroom patch |
||
| + | |[[File:Scan clue Tirannwn north of mushroom patch.png|300px|center]] |
||
| + | |- id="South-west of Hunter training icon east of Tyras Camp" |
||
| + | |In the centre of a ring of mushrooms south-west of the Hunter training icon, east of [[Tyras Camp]]. South of a group of [[yew tree]]s indicated by a rare trees icon. |
||
| + | |[[File:Scan clue Tirannwn south-west of Hunter training icon east of Tyras Camp.png|300px|center]] |
||
| + | |- id="South-west of Tirannwn lodestone" |
||
| + | |South-west of Tirannwn [[lodestone]] and the [[Elf Tracker]]. |
||
| + | |[[File:Scan clue Tirannwn south-west of Tirannwn lodestone.png|300px|center]] |
||
| + | |- id="North of Poison Waste" |
||
| + | |North of [[Poison Waste]] and south of Tirannwn [[lodestone]]. |
||
| + | |[[File:Scan clue Tirannwn north of Poison Waste.png|300px|center]] |
||
| + | |- id="North-east of Tirannwn lodestone" |
||
| + | |North-east of Tirannwn [[lodestone]] and just north-west of the [[Lletya mining site]] which contains 7 [[Adamantite ore rock|adamantite ore rocks]]. |
||
| + | |[[File:Scan clue Tirannwn north-east of Tirannwn lodestone.png|300px|center]] |
||
| + | |- id="Clearing south of Elf Camp" |
||
| + | |In the middle of [[grenwall]]s, [[grizzly bear cub]]s and [[rabbit]]s south of the [[Elf Camp]]. |
||
| + | |[[File:Scan clue Tirannwn clearing south of elf camp.png|300px|center]] |
||
| + | |- id="South-east of Hunter training icon south of Elf Camp" |
||
| + | |South-east of the Hunter training icon, which indicates the presence of [[grenwalls]] and [[pawya]], south of Elf Camp. This clearing can be accessed just south of a patch of [[dense forest]]; it is not necessary to travel through the dense forest to get to the clearing. |
||
| + | |[[File:Scan clue Tirannwn south-east of Hunter training icon south of Elf Camp.png|300px|center]] |
||
| + | |- id="South of Elf Camp fishing spot" |
||
| + | |South of Elf Camp fishing spot. |
||
| + | |[[File:Scan clue Tirannwn south of Elf Camp fishing spot.png|300px|center]] |
||
| + | |- id="South of Elf Camp" |
||
| + | |On the southern tip of the [[Elf Camp]]. Just west of the log balance crossing to the camp. |
||
| + | |[[File:Scan clue Tirannwn south of Elf Camp.png|300px|center]] |
||
| + | |- id="Centre of Elf Camp" |
||
| + | |In the centre of the [[Elf Camp]], between the two tents. |
||
| + | |[[File:Scan clue Tirannwn centre of Elf Camp.png|300px|center]] |
||
| + | |- id="South of Prifddinas main entrance" |
||
| + | |Just south of the main entrance to [[Prifddinas]] (the elf city that cannot be accessed by players). |
||
| + | |[[File:Scan clue Tirannwn south of Prifddinas main entrance.png|300px|center]] |
||
| + | |- id="West of the Arandar mountain pass's southern end" |
||
| + | |West of the [[Arandar]] mountain pass's southern end and east of the central bridge. East of the [[leaf trap]]. Three tiles north and one tile east of the location pictured. |
||
| + | |[[File:Scan clue Tirannwn West of the Arandar mountain pass's southern end.png|300px|center]] |
||
| + | |- id="North-west of central bridge" |
||
| + | |North-west of the area's central bridge, south of the main entrance to [[Prifddinas]] (the elf city that cannot be accessed by players). This location can be accessed by travelling through a [[dense forest]] obstacle. |
||
| + | |[[File:Scan clue Tirannwn north-west of central bridge.png|300px|center]] |
||
| + | |- id="South-east of central bridge" |
||
| + | |In a clearing south-east of the area's central bridge and south-west of one the quest start points for the [[Roving Elves]] and [[Mourning's Ends Part 1]] quests. This clearing can be entered at its south, just west of a [[leaf trap]] obstacle. |
||
| + | |[[File:Scan clue Tirannwn south-east of central bridge.png|300px|center]] |
||
| + | |- id="South of eastern bridge" |
||
| + | |In a clearing south of the most eastern bridge in the area. This clearing cannot be entered by travelling south from the bridge; it can be accessed at its south-west near a [[dense forest]] obstacle (it is not necessary to travel through the dense forest to get to the clearing). |
||
| + | |[[File:Scan clue Tirannwn south of eastern bridge.png|300px|center]] |
||
| + | |- id="South-east of eastern bridge" |
||
| + | |In a clearing south-east of the most eastern bridge in the area. This clearing cannot be entered by travelling south from the bridge; it can be accessed at its south-west near a [[dense forest]] obstacle (it is not necessary to travel through the dense forest to get to the clearing). |
||
| + | |[[File:Scan clue Tirannwn south-east of eastern bridge.png|300px|center]] |
||
| + | |- id="Between magic trees west of Lletya" |
||
| + | |In a group of 3 [[magic tree]]s west of [[Lletya]]. Exit Lletya through the village's gates and travel south to find the magic trees. |
||
| + | |[[File:Scan clue Tirannwn between magic trees west of Lletya.png|300px|center]] |
||
| + | |- id="South of Lletya General Store" |
||
| + | |Inside [[Lletya]]. On the west side of the village, south of [[Lletya General Store]], south-east of [[Lletya Seamstress]] and north-east of [[Lletya Archery Shop]]. |
||
| + | |[[File:Scan clue Tirannwn south of Lletya General Store.png|300px|center]] |
||
| + | |- id="North-east corner of Lletya" |
||
| + | |Inside [[Lletya]]. In the north-east corner of the village, east of [[Lletya General Store]]. |
||
| + | |[[File:Scan clue Tirannwn north-east corner of Lletya.png|300px|center]] |
||
| + | |- id="Southeast of tree gate" |
||
| + | |Right outside [[Lletya]] just south east of the gate made of trees. |
||
| + | |[[File:Scan clue Tirannwn southeast of tree gate.png|300px|center]] |
||
| + | |- id="Other possible locations (Tirannwn)" |
||
| + | | colspan="2" | |
||
| + | '''Other possible locations''' |
||
| + | * South of pond east of [[Tyras Camp]]. Three paces north of the base of the southernmost of the trees encircling the opening. |
||
| + | * South-west of the central bridge. One step north of the north-eastern portion of the second evergreen tree from the west. |
||
| + | * Inside [[Lletya]]. In the north-west corner of the village, inside the sheep pen, three paces south and one pace east of the trapdoor. |
||
|} |
|} |
||
| + | ====The Islands That Once Were Turtles==== |
||
| − | ==Keldagrim== |
||
| − | Area Information: [[ |
+ | ''Area Information: [[The Islands That Once Were Turtles]]'' |
| + | To access The Islands That Once Were Turtles the player must have completed [[Impressing the Locals]]. 90 Divination may also be needed to harvest ancestral energy for access to the Second and Third Island. Ancestral energy can be harvested at 95 Divination, or positive/negative energy can be channeled if the other energy is present in the inventory. 50 ancestral energies are needed to charge a portal. |
||
| − | '''Orb scan range: 11 paces''' |
||
| + | |||
| + | '''Scan range: 27 paces''' |
||
| + | |||
| + | {{Map:The Islands That Once Were Turtles scan}} |
||
| + | |||
| + | {| class="wikitable" |
||
| + | ! style="width: 300px;" |Possible locations |
||
| + | !Image |
||
| + | |- id="First island, south of tortle portal, right by the docks" |
||
| + | | First island, south of the [[tortle portal]], right by the docks. |
||
| + | |[[File:Scan clue Turtles first island south of tortle portal by the docks.png|center|300px]] |
||
| + | |- id="First island, inside the encampment in the south" |
||
| + | | First island, inside the encampment, one pace north and four west of the entrance to the damaged tent. |
||
| + | | |
||
| + | |- id="First island, inside the encampment in the middle" |
||
| + | | First island, inside the encampment, two paces south of the barrel. |
||
| + | | |
||
| + | |- id="First island, in the middle of west coast of the island" |
||
| + | | First island, in the middle of west coast of the island. North-east of the southern Farming patch. |
||
| + | |[[File:Scan clue Turtles first island middle of western coast.png|300px|center]] |
||
| + | |- id="First island, north coast, south of mushroom cluster" |
||
| + | |First island, northernmost coast, south of mushroom cluster. |
||
| + | |[[File:Scan clue Turtles first island north coast south of mushroom cluster.png|center|300px]] |
||
| + | |- id="First island, middle of east coast, north-east of watchtower" |
||
| + | |First island, in the middle of the east coast and north-east of the watchtower. |
||
| + | |[[File:Scan clue Turtles first island middle of east coast.png|300px|center]] |
||
| + | |- id="First island, middle of east coast, south-east of watchtower" |
||
| + | |First island, in the middle of the east coast and south-east of the watchtower. One pace west of the southern set of starfish. |
||
| + | | |
||
| + | |- id="First island, outside the lighthouse" |
||
| + | | First island, just outside the broken lighthouse |
||
| + | |[[File:Scan clue Turtles first island outside the lighthouse.png|300px|center]] |
||
| + | |- id="Second island, on east coast of island" |
||
| + | | Second island, on east coast of island, north-east of the [[tortle portal]] from the first island. |
||
| + | |[[File:Scan clue Turtles second island on east coast of island.png|300px|center]] |
||
| + | |- id="Second island, south-east of Halia" |
||
| + | | South-east of [[Halia (divine merchant)]] |
||
| + | |[[File:Scan clue Turtles second island south-east of Halia.png|300px|center]] |
||
| + | |- id="Second island, south-east of volcano" |
||
| + | | Second island, south-east of the volcano near the teleport to the third island |
||
| + | |[[File:Scan clue Turtles second island south-east of volcano.png|300px|center]] |
||
| + | |- id="Third island, between the portals" |
||
| + | | Third island, between the portals. |
||
| + | |[[File:Scan clue Turtles third island between the portals.png|300px|center]] |
||
| + | |- id="Third island, south-west of the eastern tortle portal" |
||
| + | |Third island, south-west of the eastern [[tortle portal]]. Five paces west and four south of the portal. |
||
| + | |- id="Third island, north-west of mushroom cluster" |
||
| + | |Third island, north-west of mushroom cluster. |
||
| + | |[[File:Scan clue Turtles third island north-west of mushroom cluster.png|center|300px]] |
||
| + | |- id="Third island, south of mushroom cluster" |
||
| + | |Third island, three paces south of the southern edge of the mushroom cluster. |
||
| + | | |
||
| + | |} |
||
| + | |||
| + | ====Keldagrim==== |
||
| + | Area Information: [[Keldagrim]] |
||
| + | |||
| + | '''Scan range: 11 paces''' |
||
| − | ''Click [[Map:Keldagrim scan|here]] for full size of the map.'' |
||
{{Map:Keldagrim scan}} |
{{Map:Keldagrim scan}} |
||
{| class="wikitable" |
{| class="wikitable" |
||
| − | !style="width: 300px;"|Possible locations |
+ | ! style="width: 300px;" |Possible locations |
!Image |
!Image |
||
|- id="South-west of mine cart tracks" |
|- id="South-west of mine cart tracks" |
||
| Line 624: | Line 983: | ||
|[[File:Scan clue Keldagrim south-east of mine cart tracks.png|300px|center]] |
|[[File:Scan clue Keldagrim south-east of mine cart tracks.png|300px|center]] |
||
|- id="Inside long building north of mine cart tracks" |
|- id="Inside long building north of mine cart tracks" |
||
| − | |East Keldagrim, inside long thin building just north of the [[mine cart]] tracks hub. |
+ | |East Keldagrim, inside long thin building just north of the [[mine cart]] tracks hub. One pace south of the location pictured. |
|[[File:Scan clue Keldagrim inside long building north of mine cart tracks.png|300px|center]] |
|[[File:Scan clue Keldagrim inside long building north of mine cart tracks.png|300px|center]] |
||
|- id="South-east of Blast Furnace" |
|- id="South-east of Blast Furnace" |
||
| Line 637: | Line 996: | ||
|- id="East of Laughing Miner pub" |
|- id="East of Laughing Miner pub" |
||
|East Keldagrim, east of the [[Laughing Miner Pub]] and west of the [[Blast Furnace]] entrance. |
|East Keldagrim, east of the [[Laughing Miner Pub]] and west of the [[Blast Furnace]] entrance. |
||
| − | |[[File: |
+ | |[[File:Scan clue Keldagrim east of Laughing Miner Pub.png|300px|center]] |
|- id="East of Blast Furnace" |
|- id="East of Blast Furnace" |
||
|East Keldagrim, just east of the [[Blast Furnace]] entrance. |
|East Keldagrim, just east of the [[Blast Furnace]] entrance. |
||
| Line 650: | Line 1,009: | ||
|West Keldagrim, just outside the north-west corner of west marketplace. |
|West Keldagrim, just outside the north-west corner of west marketplace. |
||
|[[File:Scan clue Keldagrim north-west outside west marketplace.png|300px|center]] |
|[[File:Scan clue Keldagrim north-west outside west marketplace.png|300px|center]] |
||
| + | |- id="Inside the bank" |
||
| + | | Inside the bank. |
||
| + | |[[File:Scan clue Keldagrim inside the bank.png|300px|center]] |
||
|- id="South-west of the Quality Armour Store" |
|- id="South-west of the Quality Armour Store" |
||
| − | |West Keldagrim, south-west of the [[Quality |
+ | |West Keldagrim, south-west of the [[Quality Armour Shop]] and the bank. |
|[[File:Scan clue Keldagrim south-west of the Quality Armour Store.png|300px|center]] |
|[[File:Scan clue Keldagrim south-west of the Quality Armour Store.png|300px|center]] |
||
|- id="South of King's Axe Inn" |
|- id="South of King's Axe Inn" |
||
| Line 660: | Line 1,022: | ||
|[[File:Scan clue Keldagrim south of hops patch.png|300px|center]] |
|[[File:Scan clue Keldagrim south of hops patch.png|300px|center]] |
||
|- id="North of general store" |
|- id="North of general store" |
||
| − | |West Keldagrim, inside west marketplace. North of [[Gunslik's Assorted Items]] (general store) and south of the room with an [[anvil]] |
+ | |West Keldagrim, inside west marketplace. North of [[Gunslik's Assorted Items]] (general store) and south of the room with an [[anvil]]. |
|[[File:Scan clue Keldagrim north of general store.png|300px|center]] |
|[[File:Scan clue Keldagrim north of general store.png|300px|center]] |
||
| − | |- id="South of general store" |
+ | |- id="South of general store (Keldagrim)" |
|West Keldagrim, south of [[Gunslik's Assorted Items]] (general store) outside west marketplace and north of [[Keldagrim Watchtower]]. |
|West Keldagrim, south of [[Gunslik's Assorted Items]] (general store) outside west marketplace and north of [[Keldagrim Watchtower]]. |
||
|[[File:Scan clue Keldagrim south of general store.png|300px|center]] |
|[[File:Scan clue Keldagrim south of general store.png|300px|center]] |
||
| − | |- id="Other possible locations (Keldagrim)" |
||
| − | |colspan="2" | |
||
| − | '''Other possible locations''' |
||
| − | |||
| − | West Keldagrim |
||
| − | |||
| − | *North of the bank. |
||
| − | *Inside the bank. |
||
|} |
|} |
||
| − | ==Kharazi Jungle== |
+ | ====Kharazi Jungle==== |
| − | ''Area Information: [[Kharazi Jungle]]'' |
+ | ''Area Information: [[Kharazi Jungle]]'' |
| − | To enter the Kharazi Jungle the player must have started [[Legends Quest]] and have a [[hatchet]] and [[machete]] (ones on a [[toolbelt]] will work) to cut through the dense jungle blocking its entrances. The jungle contains aggressive [[wolf|wolves]].<br /> |
||
| + | To enter the Kharazi Jungle the player must have started [[Legends' Quest]] and have a [[hatchet]] and [[machete]] (ones on the [[tool belt]] will work) to cut through the dense jungle blocking its entrances. The jungle contains aggressive [[wolf|wolves]]. |
||
| − | '''Orb scan range: 27 paces''' |
||
| + | |||
| + | '''Scan range: 14 paces''' |
||
| − | ''Click [[Map:Kharazi Jungle scan|here]] for full size of the map.'' |
||
{{Map:Kharazi Jungle scan}} |
{{Map:Kharazi Jungle scan}} |
||
| − | {|class="wikitable" |
+ | {| class="wikitable" |
| − | !style="width: 300px;"|Possible locations |
+ | ! style="width: 300px;" |Possible locations |
!Image |
!Image |
||
| − | |- id=" |
+ | |- id="On ridge south-east of Shilo Village" |
| + | |On the top of ridge in the jungle south-east of [[Shilo Village]]. |
||
| − | |East side of the south camp of [[Herblore Habitat]]. The south camp contains a [[Bank Deposit Box|bank deposit box]] and a tunnel entrance to the [[Jadinko Lair]] (when this has been previously unlocked by the player); [[jadinkos]] can be hunted here. |
||
| − | |[[File:Scan clue Kharazi Jungle east |
+ | |[[File:Scan clue Kharazi Jungle on ridge south-east of Shilo Village.png|300px|center]] |
| − | |- id="North-west side of Herblore Habitat south camp" |
||
| − | |In the north-west area of the southern part of Herblore Habitat. |
||
| − | |[[File:Scan clue Kharazi Jungle north-west side of Herblore Habitat south camp.png|300px|center]] |
||
| − | |- id="North side of Herblore Habitat middle camp" |
||
| − | |In the central camp of [[Herblore Habitat]]. The central camp contains unique farming patches that are watched over by [[Astlayrix]] and the [[Zombie farmer]]. |
||
| − | |[[File:Scan clue Kharazi Jungle north side of Herblore Habitat middle camp.png|300px|center]] |
||
| − | |- id="West of Papa Mambo's Shop" |
||
| − | |In the north camp of [[Herblore Habitat]], just west of [[Papa Mambo's Shop]]. |
||
| − | |[[File:Scan clue Kharazi Jungle west of Papa Mambo's Shop.png|300px|center]] |
||
| − | |- id="North of Herblore Habitat" |
||
| − | |Just north of [[Herblore Habitat]] and [[Papa Mambo's Shop]]. |
||
| − | |[[File:Scan clue Kharazi Jungle north of Herblore Habitat.png|300px|center]] |
||
|- id="On ridge in north-east corner of jungle" |
|- id="On ridge in north-east corner of jungle" |
||
|On the top of ridge in the north-east corner of the jungle. |
|On the top of ridge in the north-east corner of the jungle. |
||
|[[File:Scan clue Kharazi Jungle on ridge north-east corner of jungle.png|300px|center]] |
|[[File:Scan clue Kharazi Jungle on ridge north-east corner of jungle.png|300px|center]] |
||
| + | |- id="North-east corner of jungle" |
||
| + | |In the north-east corner of the jungle, just south-west of [[Papa Mambo's Shop]]. |
||
| + | |[[File:Scan clue Kharazi Jungle north-east corner of jungle.png|300px|center]] |
||
|- id="Eastern side of the jungle" |
|- id="Eastern side of the jungle" |
||
|In the eastern edge of the jungle, west of [[Herblore Habitat]] (cannot be accessed by travelling through Herblore Habitat). |
|In the eastern edge of the jungle, west of [[Herblore Habitat]] (cannot be accessed by travelling through Herblore Habitat). |
||
|[[File:Scan clue Kharazi Jungle eastern edge of the jungle.png|300px|center]] |
|[[File:Scan clue Kharazi Jungle eastern edge of the jungle.png|300px|center]] |
||
| + | |- id="In south-east corner of jungle" |
||
| + | |In the south-east corner of the jungle, west of the [[Jadinko Lair]] entrance in Herblore Habitat south camp. |
||
| + | |[[File:Scan clue Kharazi Jungle in south-east corner of jungle.png|300px|centre]] |
||
|- id="On peninsula south of eastern edge of jungle" |
|- id="On peninsula south of eastern edge of jungle" |
||
|On peninsula south of the eastern edge of the jungle. |
|On peninsula south of the eastern edge of the jungle. |
||
| Line 714: | Line 1,062: | ||
|North-west of the eastern rare trees map icon that indicates the presence of the nearby [[teak trees]]. |
|North-west of the eastern rare trees map icon that indicates the presence of the nearby [[teak trees]]. |
||
|[[File:Scan clue Kharazi Jungle north-west of eastern rare trees map icon.png|300px|center]] |
|[[File:Scan clue Kharazi Jungle north-west of eastern rare trees map icon.png|300px|center]] |
||
| + | |- id="West of eastern rare trees map icon" |
||
| + | |West of the eastern rare trees map icon that indicates the presence of the nearby [[teak trees]], near a central peninsula. |
||
| + | |[[File:Scan clue Kharazi Jungle west of eastern rare trees map icon.png|300px|center]] |
||
|- id="South-east of water pool" |
|- id="South-east of water pool" |
||
| − | |South-east of the water pool which is used to obtain [[Holy water]] in [[ |
+ | |South-east of the water pool which is used to obtain [[Holy water]] in [[Legends' Quest]]. West of the western rare trees map icon that indicates the presence of the nearby [[teak trees]]. |
|[[File:Scan clue Kharazi Jungle south-east of water pool.png|300px|center]] |
|[[File:Scan clue Kharazi Jungle south-east of water pool.png|300px|center]] |
||
| + | |- id="Just east of water pool" |
||
| + | |Just east of the water pool which is used to obtain [[Holy water]] in [[Legends' Quest]]. West of the western rare trees map icon that indicates the presence of the nearby [[teak trees]]. |
||
| + | |[[File:Scan clue Kharazi Jungle just east of water pool.png|300px|center]] |
||
| + | |- id="In centre of the jungle, east of water pool and totem pole." |
||
| + | |In centre of the jungle, east of water pool and totem pole. |
||
| + | |[[File:Scan clue Kharazi Jungle centre of jungle east of totem pole.png|300px|center]] |
||
|- id="South-west of western rare trees map icon" |
|- id="South-west of western rare trees map icon" |
||
|On the southern coast of the jungle; south-west of the western rare trees map icon that indicates the presence of the nearby [[teak trees]]. |
|On the southern coast of the jungle; south-west of the western rare trees map icon that indicates the presence of the nearby [[teak trees]]. |
||
| − | |[[File:Scan clue Kharazi Jungle south-west of western rare trees map icon. |
+ | |[[File:Scan clue Kharazi Jungle south-west of western rare trees map icon.png|300px|center]] |
|- id="On ridge south of general store" |
|- id="On ridge south of general store" |
||
|On top of ridge inside the jungle, south of [[Obli's General Store]] (the general store in [[Shilo Village]]). |
|On top of ridge inside the jungle, south of [[Obli's General Store]] (the general store in [[Shilo Village]]). |
||
|[[File:Scan clue Kharazi Jungle on ridge south of general store.png|300px|center]] |
|[[File:Scan clue Kharazi Jungle on ridge south of general store.png|300px|center]] |
||
| − | |- id=" |
+ | |- id="On ridge south of the bank" |
| + | |On top of the ridge inside the jungle, south of the Bank in [[Shilo Village]]. |
||
| + | |[[File:Scan clue Kharazi Jungle on ridge south of the bank.png|300px|center]] |
||
| + | |- id="South-west of drummer" |
||
|Inside the jungle, south-west of the [[musician]] (drummer). |
|Inside the jungle, south-west of the [[musician]] (drummer). |
||
|[[File:Scan clue Kharazi Jungle south-west of musician.png|300px|center]] |
|[[File:Scan clue Kharazi Jungle south-west of musician.png|300px|center]] |
||
|- id="On ridge in north-west corner of jungle" |
|- id="On ridge in north-west corner of jungle" |
||
| − | |On top of ridge in north-west corner of the jungle. |
+ | |On top of ridge in north-west corner of the jungle. One pace south of the location pictured. |
|[[File:Scan clue Kharazi Jungle on ridge north-west corner of jungle.png|300px|center]] |
|[[File:Scan clue Kharazi Jungle on ridge north-west corner of jungle.png|300px|center]] |
||
| + | |- id="In north-west corner of jungle, near coastline" |
||
| + | |In north-west corner of jungle, near coastline. |
||
| + | |[[File:Scan_clue_Kharazi_Jungle_In_north-west_corner_of_jungle,_near_coastline.png|300px|center]] |
||
| + | |- id="5 steps from the western coastline" |
||
| + | |Five paces east from the western coastline. |
||
| + | |[[File:Scan clue Kharazi Jungle 5 steps from western coastline.png|300px|center]] |
||
|- id="South-west corner of jungle" |
|- id="South-west corner of jungle" |
||
| − | |In south- |
+ | |In the south-western corner of the jungle. |
|[[File:Scan clue Kharazi Jungle south-west corner of jungle.png|300px|center]] |
|[[File:Scan clue Kharazi Jungle south-west corner of jungle.png|300px|center]] |
||
|- id="On peninsula south of western edge of jungle" |
|- id="On peninsula south of western edge of jungle" |
||
|On peninsula south of western edge of the jungle. |
|On peninsula south of western edge of the jungle. |
||
| − | |[[File:Scan clue Kharazi Jungle on peninsula |
+ | |[[File:Scan clue Kharazi Jungle on peninsula southwestern edge of jungle.png|300px|center]] |
| + | |- id="On the peninsula south-east of the western rare tree map icon" |
||
| − | |- |
||
| + | |On the peninsula south-east of the western rare tree map icon. |
||
| − | |colspan="2" | |
||
| + | |[[File:Scan clue Kharazi Jungle on peninsula south-east of western rare tree map icon.png|300px|center]] |
||
| + | |- id="On ridge south-east of general store" |
||
| + | |On top of ridge inside the jungle, south-east of [[Obli's General Store]] (the general store in [[Shilo Village]]). 5 steps east of the [[Scans#On ridge south of general store|other location nearby]]. |
||
| + | |[[File:Scan clue Kharazi Jungle on ridge south-east of general store.png|300px|center]] |
||
| + | |- id="Other possible locations (Kharazi Jungle)" |
||
| + | | colspan="2" | |
||
'''Other possible locations''' |
'''Other possible locations''' |
||
| + | * West of [[Herblore Habitat]], ten paces west and four north of the north-western corner of the fruit tree patch. |
||
|} |
|} |
||
| − | ==Kharidian Desert, east== |
+ | ====Kharidian Desert, east==== |
| + | "This scroll will work in the desert, east of the Elid and north of Nardah." |
||
| − | ''Area Information: [[Kharidian Desert]]''<br /> |
||
| − | To avoid taking damage from the desert heat while in this area players will need [[waterskin]]s or an [[enchanted water tiara]].<br/ /> |
||
| + | ''Area Information: [[Kharidian Desert]]'' |
||
| − | '''Orb scan range: 27 paces''' |
||
| + | |||
| + | To avoid taking damage from the desert heat while in this area players will need [[waterskin]]s, an [[enchanted water tiara]], or a [[tome of frost]]. These are not necessary after the completion of [[Crocodile Tears]]. |
||
| + | |||
| + | '''Scan range: 27 paces''' |
||
| − | ''Click [[Map:Kharidian Desert East scan|here]] for full size of the map.'' |
||
{{Map:Kharidian Desert East scan}} |
{{Map:Kharidian Desert East scan}} |
||
| − | {|class="wikitable" |
+ | {| class="wikitable" |
| − | !style="width: 300px;"|Possible locations |
+ | ! style="width: 300px;" |Possible locations |
!Image |
!Image |
||
|- id="Just north of Nardah" |
|- id="Just north of Nardah" |
||
|Just north of [[Nardah]]. North of the part of the city containing the [[Elidinis Statuette]] and [[Ali the Wise]] (the quest start point for [[The Curse Of Arrav]] quest). |
|Just north of [[Nardah]]. North of the part of the city containing the [[Elidinis Statuette]] and [[Ali the Wise]] (the quest start point for [[The Curse Of Arrav]] quest). |
||
|[[File:Scan clue Kharidian Desert just north of Nardah.png|300px|center]] |
|[[File:Scan clue Kharidian Desert just north of Nardah.png|300px|center]] |
||
| + | |- id="North of most northeastern building in Nardah" |
||
| + | |North-east of Nardah, north of most northeastern building. |
||
| + | |[[File:Scan clue Kharidian Desert north of most northeastern building in Nardah.png|300px|center]] |
||
| + | |- id="North-east of Nardah" |
||
| + | |Near a rock, north-east of Nardah. |
||
| + | |[[File:Scan clue Kharidian Desert north-east of Nardah.png|300px|center]] |
||
| + | |- id="North of Nardah, close to rocks" |
||
| + | |Just north of [[Nardah]], near to a group of rocks. |
||
| + | |[[File:Scan clue Kharidian Desert north of Nardah, close to rocks.png|300px|center]] |
||
| + | |- id="East of Pollnivneach mayor's house" |
||
| + | |On the shore east of [[Pollnivneach]], east of [[Ali the Mayor]]'s house. North-west of [[Nardah]]. |
||
| + | |[[File:Scan clue Kharidian Desert east of Pollniveach mayor's house.png|300px|center]] |
||
|- id="East of Pollnivneach" |
|- id="East of Pollnivneach" |
||
| − | |On the shore east of [[Pollnivneach]]. |
+ | |On the shore east of [[Pollnivneach]]. Five paces north and six paces west of the larger of the round cacti. |
|[[File:Scan clue Kharidian Desert east of Pollnivneach.png|300px|center]] |
|[[File:Scan clue Kharidian Desert east of Pollnivneach.png|300px|center]] |
||
|- id="North-east of Pollnivneach" |
|- id="North-east of Pollnivneach" |
||
| − | |On the shore north-east of [[Pollnivneach]] and south-west of the [[ |
+ | |On the shore north-east of [[Pollnivneach]] and south-west of the [[desert lizard]]s. |
|[[File:Scan clue Kharidian Desert north-east of Pollnivneach.png|300px|center]] |
|[[File:Scan clue Kharidian Desert north-east of Pollnivneach.png|300px|center]] |
||
|- id="West of desert lizards" |
|- id="West of desert lizards" |
||
| − | |On the shore west of the [[ |
+ | |On the shore west of the [[desert lizard]]s. One pace south of the location pictured. |
|[[File:Scan clue Kharidian Desert west of desert lizards.png|300px|center]] |
|[[File:Scan clue Kharidian Desert west of desert lizards.png|300px|center]] |
||
|- id="North of fairy ring (Kharidian Desert)" |
|- id="North of fairy ring (Kharidian Desert)" |
||
| − | |Just |
+ | |Just west of the [[fairy ring]] (code {{fairycode|DLQ}}). |
|[[File:Scan clue Kharidian Desert north of fairy ring.png|300px|center]] |
|[[File:Scan clue Kharidian Desert north of fairy ring.png|300px|center]] |
||
| + | |- id="South-west of desert lizards" |
||
| + | |South-west of the [[Desert Lizard]]s and south of the [[fairy ring]] (code {{fairycode|DLQ}}). |
||
| + | |[[File:Scan clue Kharidian Desert southwest of desert lizards.png|300px|center]] |
||
|- id="South-east of fairy ring" |
|- id="South-east of fairy ring" |
||
| − | |South-east of the [[fairy ring]] (code {{fairycode|DLQ}}). North-east of [[Nardah]] and south-west of the [[Uzer Mastaba]] (pyramid building south of the [[Ruins of Uzer]]). |
+ | |South-east of the [[fairy ring]] (code {{fairycode|DLQ}}). North-east of [[Nardah]] and south-west of the [[Uzer Mastaba]] (pyramid building south of the [[Ruins of Uzer]]). One pace south of the location pictured. |
|[[File:Scan clue Kharidian Desert south-east of fairy ring.png|300px|center]] |
|[[File:Scan clue Kharidian Desert south-east of fairy ring.png|300px|center]] |
||
| − | |- id=" |
+ | |- id="West of Uzer Mastaba" |
| − | | |
+ | |West of the [[Uzer Mastaba]] (pyramid building south of the [[Ruins of Uzer]]). |
| − | |[[File:Scan clue Kharidian Desert |
+ | |[[File:Scan clue Kharidian Desert west of Uzer Mastaba.png|300px|center]] |
|- id="North-west of Uzer Mastaba" |
|- id="North-west of Uzer Mastaba" |
||
| − | |North-west of the [[Uzer Mastaba]] (pyramid building south of the [[Ruins of Uzer]]) and south of the desert oasis. |
+ | |North-west of the [[Uzer Mastaba]] (pyramid building south of the [[Ruins of Uzer]]) and south of the desert oasis. One pace south of the location pictured. |
|[[File:Scan clue Kharidian Desert north-west of Uzer Mastaba.png|300px|center]] |
|[[File:Scan clue Kharidian Desert north-west of Uzer Mastaba.png|300px|center]] |
||
| + | |- id="South-west of oasis" |
||
| + | |South-west of the desert oasis. |
||
| + | |[[File:Scan clue Kharidian Desert south-west of oasis.png|300px|center]] |
||
|- id="North of oasis" |
|- id="North of oasis" |
||
|North of the desert oasis and south of the [[Ruins of Uzer]]. |
|North of the desert oasis and south of the [[Ruins of Uzer]]. |
||
|[[File:Scan clue Kharidian Desert north of oasis.png|300px|center]] |
|[[File:Scan clue Kharidian Desert north of oasis.png|300px|center]] |
||
| − | |- id="North |
+ | |- id="North of Uzer Mastaba" |
| − | |North |
+ | |North of the [[Uzer Mastaba]] (pyramid building south of the [[Ruins of Uzer]]). |
| − | |[[File:Scan clue Kharidian Desert north |
+ | |[[File:Scan clue Kharidian Desert north of Uzer Mastaba.png|300px|center]] |
| − | |- id="North- |
+ | |- id="North-east of Uzer Mastaba" |
| − | |North- |
+ | |North-east of the [[Uzer Mastaba]] (pyramid building south of the [[Ruins of Uzer]]). |
| − | |[[File:Scan clue Kharidian Desert north- |
+ | |[[File:Scan clue Kharidian Desert north-east of Uzer Mastaba.png|300px|center]] |
| − | |- id=" |
+ | |- id="Inside house in Uzer" |
| + | |Inside the southwestern house in the [[Ruins of Uzer]]. |
||
| − | |North-east of the [[Shanty Pass]]. On the ridge overlooking [[Dominion Tower]] and the area where the [[Desert Phoenix]] is located. |
||
| − | |[[File:Scan clue Kharidian Desert |
+ | |[[File:Scan clue Kharidian Desert inside house in Uzer.png|300px|center]] |
| − | |- id=" |
+ | |- id="East of Uzer" |
| + | |East of the [[Ruins of Uzer]]. |
||
| − | |South-west of [[Dominion Tower]]. North of the bridge connecting the eastern and western parts of the Kharidian Desert. |
||
| − | |[[File:Scan clue Kharidian Desert |
+ | |[[File:Scan clue Kharidian Desert east of Uzer.png|300px|center]] |
| + | |- id="North-east of Uzer" |
||
| + | |North-east of the [[Ruins of Uzer]]. Two steps north of the location pictured. |
||
| + | |[[File:Scan clue Kharidian Desert north-east of Uzer.png|300px|center]] |
||
| + | |- id="East of Uzer flying carpet" |
||
| + | |North-east of the [[Ruins of Uzer]], just east of the Uzer [[flying carpet]]. |
||
| + | |[[File:Scan_clue_Kharidian_Desert_east_of_Uzer_flying_carpet.png|300px|center]] |
||
| + | |- id="South-east of Citharede Abbey" |
||
| + | |By the [[Uzer mine]]. South-east of the cliff where the [[Abbey of St. Elspeth]] (used in the quest [[One Piercing Note]]) is located and north of the [[Ruins of Uzer]]. |
||
| + | |[[File:Scan clue Kharidian Desert south-east of Citharede Abbey.png|300px|center]] |
||
| + | |- id="South-west of north-western mine" |
||
| + | |South-west of north-western mine, near cacti. |
||
| + | |[[File:Scan clue Kharidian Desert south-west of north-western mine.png|300px|center]] |
||
| + | |- id="South of Citharede Abbey" |
||
| + | |In the desert, south of the cliff where the [[Abbey of St. Elspeth]] (used in the quest [[One Piercing Note]]) is located. |
||
| + | |[[File:Scan clue Kharidian Desert south of Citharede Abbey.png|300px|center]] |
||
| + | |- id="Next to entrance to eagle transport system" |
||
| + | |Southeast of the entrance to the [[Eagle transport]] system (unlocked during [[Eagles' Peak]] quest). |
||
| + | |[[File:Scan clue Kharidian Desert next to entrance to eagle transport system.png|300px|center]] |
||
| + | |- id="South-east of northern mine" |
||
| + | |South-east of the north-western mine. |
||
| + | |[[File:Scan clue Kharidian Desert south-east of north-western mine.png|300px|centre]] |
||
|- id="North of Dominion Tower" |
|- id="North of Dominion Tower" |
||
|North of [[Dominion Tower]] and south of the waterfall source of the [[River Elid]]. |
|North of [[Dominion Tower]] and south of the waterfall source of the [[River Elid]]. |
||
|[[File:Scan clue Kharidian Desert north of Dominion Tower.png|300px|center]] |
|[[File:Scan clue Kharidian Desert north of Dominion Tower.png|300px|center]] |
||
|- id="North-east of Dominion Tower" |
|- id="North-east of Dominion Tower" |
||
| − | |North-east of [[Dominion Tower]]. |
+ | |North-east of [[Dominion Tower]], two paces west of the shortbow spawn. |
|[[File:Scan clue Kharidian Desert north-east of Dominion Tower.png|300px|center]] |
|[[File:Scan clue Kharidian Desert north-east of Dominion Tower.png|300px|center]] |
||
|- id="North-east of Hunter training icon" |
|- id="North-east of Hunter training icon" |
||
|East of [[Dominion Tower]] and north-east of the Hunter training icon which indicates the [[Uzer Hunter Area]]. |
|East of [[Dominion Tower]] and north-east of the Hunter training icon which indicates the [[Uzer Hunter Area]]. |
||
|[[File:Scan clue Kharidian Desert north-east of Hunter training icon.png|300px|center]] |
|[[File:Scan clue Kharidian Desert north-east of Hunter training icon.png|300px|center]] |
||
| + | |- id="East of Dominion Tower" |
||
| + | |East of [[Dominion Tower]]. |
||
| + | |[[File:Scan_clue_Kharidian_Desert_east_of_Dominion_Tower.png|300px|center]] |
||
|- id="South of Hunter training icon" |
|- id="South of Hunter training icon" |
||
|East of [[Dominion Tower]] and south of the Hunter training icon which indicates the [[Uzer Hunter Area]]. |
|East of [[Dominion Tower]] and south of the Hunter training icon which indicates the [[Uzer Hunter Area]]. |
||
|[[File:Scan clue Kharidian Desert south of Hunter training icon.png|300px|center]] |
|[[File:Scan clue Kharidian Desert south of Hunter training icon.png|300px|center]] |
||
| − | |- id="South of |
+ | |- id="South of Dominion Tower" |
| + | |South of the [[Dominion Tower]]. |
||
| − | |South of the entrance to the [[Eagle transport]] system (unlocked during [[Eagle's Peak]] quest). |
||
| − | |[[File:Scan clue Kharidian Desert south of |
+ | |[[File:Scan clue Kharidian Desert south of Dominion Tower.png|300px|center]] |
| − | |- id="South of |
+ | |- id="South-west of Dominion Tower" |
| − | | |
+ | |South-west of [[Dominion Tower]]. North of the bridge connecting the eastern and western parts of the Kharidian Desert. One pace south of the location pictured. |
| − | |[[File:Scan clue Kharidian Desert south of |
+ | |[[File:Scan clue Kharidian Desert south-west of Dominion Tower.png|300px|center]] |
|- id="West of Uzer" |
|- id="West of Uzer" |
||
|West of the [[Ruins of Uzer]] and east of the [[Uzer Hunter Area]]. |
|West of the [[Ruins of Uzer]] and east of the [[Uzer Hunter Area]]. |
||
|[[File:Scan clue Kharidian Desert west of Uzer.png|300px|center]] |
|[[File:Scan clue Kharidian Desert west of Uzer.png|300px|center]] |
||
| − | |- id=" |
+ | |- id="North-west of desert lizards" |
| − | | |
+ | |North-west of the desert lizards and south of the Uzer Hunter Area. |
| − | |[[File:Scan clue Kharidian Desert |
+ | |[[File:Scan clue Kharidian Desert north-west of desert lizards.png|300px|center]] |
| − | |- id="North |
+ | |- id="North of desert lizards" |
| − | |North |
+ | |North of [[desert lizard]]s and south of the [[Uzer Hunter Area]], west of the desert oasis. |
| − | |[[File:Scan clue Kharidian Desert north |
+ | |[[File:Scan clue Kharidian Desert north of desert lizards.png|300px|center]] |
| − | |- id=" |
+ | |- id="North-west of oasis" |
| − | | |
+ | |North-west of the desert oasis and south-west of the [[Ruins of Uzer]]. |
| − | |[[File:Scan clue Kharidian Desert |
+ | |[[File:Scan clue Kharidian Desert north-west of oasis.png|300px|center]] |
| + | |- id="South of fairy ring (Kharidian Desert)" |
||
| − | |- id="Near desert goats" |
||
| + | |South of fairy ring. Seven steps south and one step east of the southernmost rock in the second group of rocks from [[River Elid]]. |
||
| − | |Near [[goats]]. |
||
| − | |[[File:Scan clue |
+ | |[[File:Scan clue Kharidian Desert south of fairy ring.png|300px|center]] |
| + | |- id="Midway between Dominion Tower and Ruins of Uzer" |
||
| + | | Midway between [[Dominion Tower]] and the ruins of [[Uzer]], ten paces south of the cuttable [[Kharidian cactus]]. |
||
| + | | [[File:Scan clue Desert midway between Dominion Tower and Ruins of Uzer.png|300px|center]] |
||
|- id="Other possible locations (Kharidian Desert)" |
|- id="Other possible locations (Kharidian Desert)" |
||
| − | |colspan="2" | |
+ | | colspan="2" | |
'''Other possible locations''' |
'''Other possible locations''' |
||
| + | *North of Nardah, south-west of rocks. |
||
| − | |||
| − | *North of |
+ | *North-east of Nardah, three paces east of the southern rock in a group of rocks. |
| + | *On southern tip of peninsula, north-east of Pollnivneach. |
||
| + | *South-west of the fairy ring, seven paces north and one pace west of the northern small rock in the rock formation to the south. |
||
| + | *West of the fairy ring. |
||
| + | *East of the fairy ring. Two paces north of the [[Kharidian cactus]]. |
||
| + | *South-west of the [[Uzer Mastaba]] (pyramid building south of the [[Ruins of Uzer]]). One step north and two steps west of the northern cactus in the group of cacti nearest to the pyramid in the south-west. |
||
| + | *By crates in [[Uzer]]. |
||
| + | *West of the ruins of [[Uzer]] and south-east of the [[Uzer Hunter area]], two paces north and one pace west of the north-western corner of the round cactus. |
||
| + | *East of northern mine. 5 steps west and 2 steps south of the Kharidian cactus. |
||
| + | *South-east of northern mine. |
||
| + | *South-west of the [[Abbey of St. Elspeth Citharede]]. Two steps north and one step east of the western young tree. |
||
| + | *West of the northern mine. Eight paces south and one west of the eastern of the two northern [[young tree]]s. |
||
| + | *North-west of the fairy ring. Nine paces east and seven north of the cuttable [[Kharidian cactus]] nearby. |
||
|} |
|} |
||
| − | ==Lumbridge Swamp |
+ | ====Lumbridge Swamp Caves==== |
| + | "This scroll will work in the dark and damp caves below Lumbridge Swamp." |
||
| − | ''Area Information: [[Lumbridge Swamp Caves]]''<br /> |
||
| − | While in the caves players must use a [[light source]] to avoid deadly, rapid attacks from insects that will otherwise attack them and a [[spiny helmet]] or [[slayer helmet]] if they wish to avoid taking damage from [[wall beasts]].<br /> |
||
| + | ''Area Information: [[Lumbridge Swamp Caves]]'' |
||
| − | '''Orb scan range: 11 paces''' |
||
| + | |||
| + | While in the caves players must use a [[light source]] to avoid deadly, rapid attacks from insects that will otherwise attack them and a [[spiny helmet]] or [[slayer helmet]] if they wish to avoid taking damage from [[wall beasts]]. |
||
| + | *The scan may not work if the quest [[The Mighty Fall]] has not been started, and you haven't spoken to the bosses in the main chamber. However, certain players have reported success without beginning the quest. |
||
| + | |||
| + | '''Scan range: 11 paces''' |
||
| − | ''Click [[Map:Lumbridge swamp caves scan|here]] for full size of the map.'' |
||
{{Map:Lumbridge swamp caves scan}} |
{{Map:Lumbridge swamp caves scan}} |
||
| − | {|class="wikitable" |
+ | {| class="wikitable" |
| − | !style="width: 300px;"|Possible locations |
+ | ! style="width: 300px;" |Possible locations |
!Image |
!Image |
||
|- id="By Lumbridge Swamp entrance" |
|- id="By Lumbridge Swamp entrance" |
||
| Line 847: | Line 1,282: | ||
|[[File:Scan clue Lumbridge Swamp Caves by Lumbridge Swamp entrance.png|300px|center]] |
|[[File:Scan clue Lumbridge Swamp Caves by Lumbridge Swamp entrance.png|300px|center]] |
||
|- id="South-west of Dorgesh-Kaan mine entrance" |
|- id="South-west of Dorgesh-Kaan mine entrance" |
||
| − | |In the north part of the Lumbridge Swamp Caves, south-west of the [[Dorgesh-Kaan mine]] entrance. |
+ | |In the north part of the Lumbridge Swamp Caves, south-west of the [[Dorgesh-Kaan mine]] entrance. One pace south-east of the location pictured. |
|[[File:Scan clue Lumbridge Swamp Caves south-west of Dorgesh-Kaan mine entrance.png|300px|center]] |
|[[File:Scan clue Lumbridge Swamp Caves south-west of Dorgesh-Kaan mine entrance.png|300px|center]] |
||
|- id="South of Dorgesh-Kaan mine entrance" |
|- id="South of Dorgesh-Kaan mine entrance" |
||
| Line 853: | Line 1,288: | ||
|[[File:Scan clue Lumbridge Swamp Caves south of Dorgesh-Kaan mine entrance.png|300px|center]] |
|[[File:Scan clue Lumbridge Swamp Caves south of Dorgesh-Kaan mine entrance.png|300px|center]] |
||
|- id="East of Lumbridge Swamp entrance" |
|- id="East of Lumbridge Swamp entrance" |
||
| − | |In the centre of the Lumbridge Swamp Caves. East of the [[Lumbridge Swamp]] rope entrance and south of the [[Dorgesh-Kaan mine]] entrance. North of the [[Tears of Guthix Cavern]] entrance and west of the eastern [[Fishing spot]]. |
+ | |In the centre of the Lumbridge Swamp Caves. East of the [[Lumbridge Swamp]] rope entrance and south of the [[Dorgesh-Kaan mine]] entrance. North of the [[Tears of Guthix Cavern]] entrance and west of the eastern [[Fishing spot]]. One step south of the location pictured. |
|[[File:Scan clue Lumbridge Swamp Caves east of Lumbridge Swamp entrance.png|300px|center]] |
|[[File:Scan clue Lumbridge Swamp Caves east of Lumbridge Swamp entrance.png|300px|center]] |
||
|- id="North-east of east Fishing spot" |
|- id="North-east of east Fishing spot" |
||
| Line 859: | Line 1,294: | ||
|[[File:Scan clue Lumbridge Swamp Caves north-east of east Fishing spot.png|300px|center]] |
|[[File:Scan clue Lumbridge Swamp Caves north-east of east Fishing spot.png|300px|center]] |
||
|- id="South of east Fishing spot" |
|- id="South of east Fishing spot" |
||
| − | |In the east part of the Lumbridge Swamp Caves, just south of the eastern [[Fishing spot]]. |
+ | |In the east part of the Lumbridge Swamp Caves, just south of the eastern [[Fishing spot]]. Three steps east of the pictured location. |
|[[File:Scan clue Lumbridge Swamp Caves south of east Fishing spot.png|300px|center]] |
|[[File:Scan clue Lumbridge Swamp Caves south of east Fishing spot.png|300px|center]] |
||
|- id="North-east of Tears of Guthix Cavern entrance" |
|- id="North-east of Tears of Guthix Cavern entrance" |
||
| − | |In the south-west part of the Lumbridge Swamp Caves. North-east of the [[Tears of Guthix Cavern]] entrance, in the area with [[big frog]]s and [[giant frog]]s. |
+ | |In the south-west part of the Lumbridge Swamp Caves. North-east of the [[Tears of Guthix Cavern]] entrance, in the area with [[big frog]]s and [[giant frog]]s. One step west of the location pictured. |
|[[File:Scan clue Lumbridge Swamp Caves north-east of Tears of Guthix Cavern entrance.png|300px|center]] |
|[[File:Scan clue Lumbridge Swamp Caves north-east of Tears of Guthix Cavern entrance.png|300px|center]] |
||
|- id="North-west of Tears of Guthix Cavern entrance" |
|- id="North-west of Tears of Guthix Cavern entrance" |
||
| − | |In the south part of the Lumbridge Swamp Caves, north-west of the [[Tears of Guthix Cavern]] entrance. |
+ | |In the south part of the Lumbridge Swamp Caves, north-west of the [[Tears of Guthix Cavern]] entrance. One pace south from the location pictured. |
|[[File:Scan clue Lumbridge Swamp Caves north-west of Tears of Guthix Cavern entrance.png|300px|center]] |
|[[File:Scan clue Lumbridge Swamp Caves north-west of Tears of Guthix Cavern entrance.png|300px|center]] |
||
| + | |- id="West of area with wall beasts" |
||
| + | |In the south part of the Lumbridge Swamp Caves, just west of the area with [[wall beasts]]. |
||
| + | |[[File:Scan clue Lumbridge Swamp Caves west of area with wall beasts.png|300px|center]] |
||
| + | |- id="South of Lumbridge Swamp entrance" |
||
| + | |In the south part of the Lumbridge Swamp Caves. South of the [[Lumbridge Swamp]] rope entrance and north-east of the western [[Fishing spot]]. |
||
| + | |[[File:Scan clue Lumbridge Swamp Caves south of Lumbridge Swamp entrance.png|300px|center]] |
||
|- id="South-east of Lumbridge Swamp entrance" |
|- id="South-east of Lumbridge Swamp entrance" |
||
|In the south part of the Lumbridge Swamp Caves. South-east of the [[Lumbridge Swamp]] rope entrance and north-east of the western [[Fishing spot]]. |
|In the south part of the Lumbridge Swamp Caves. South-east of the [[Lumbridge Swamp]] rope entrance and north-east of the western [[Fishing spot]]. |
||
| Line 873: | Line 1,314: | ||
|In the south-west part of the Lumbridge Swamp Caves, east of the western [[Fishing spot]]. |
|In the south-west part of the Lumbridge Swamp Caves, east of the western [[Fishing spot]]. |
||
|[[File:Scan clue Lumbridge Swamp Caves east of west Fishing spot.png|300px|center]] |
|[[File:Scan clue Lumbridge Swamp Caves east of west Fishing spot.png|300px|center]] |
||
| + | |} |
||
| + | |||
| + | ====Menaphos==== |
||
| + | ''Area Information: [[Menaphos]]'' |
||
| + | |||
| + | Players must have completed part of [[The Jack of Spades]] to access Menaphos. |
||
| + | |||
| + | '''Scan range: 30 paces''' |
||
| + | |||
| + | {{Map:Menaphos scan}} |
||
| + | |||
| + | {| class="wikitable" |
||
| + | ! style="width: 300px;" |Possible locations |
||
| + | !Image |
||
| + | |- id="Imperial district, just east of Shifting Tombs entrance" |
||
| + | | [[Imperial district]], just east of the entrance to [[Shifting Tombs]], west of the Menaphos [[lodestone]]. |
||
| + | | [[File:Scan clue Menaphos Imperial district just east of Shifting Tombs entrance.png|300px|center]] |
||
| + | |- id="Imperial district, south-east of deposit box" |
||
| + | |Imperial district, south-east of the deposit box outside the entrance to the [[Grand Library of Menaphos]]. |
||
| + | | [[File:Scan clue Menaphos Imperial district south-east of deposit box.png|300px|center]] |
||
| + | |- id="Imperial district, south-west of Grand Library" |
||
| + | | Imperial district, south-west of the [[Grand Library of Menaphos]]. |
||
| + | | [[File:Scan clue Menaphos Imperial district south-west of Grand Library.png|300px|center]] |
||
| + | |- id="Imperial district, east of musician" |
||
| + | | Imperial district, east of the [[Imperial district musician]] and south-west of the [[Grand Library of Menaphos]]. |
||
| + | | [[File:Scan clue Menaphos Imperial district east of musician.png|300px|center]] |
||
| + | |- id="Imperial district, north of soul altar entrance" |
||
| + | | Imperial district, north of the [[Soul Altar]] entrance. |
||
| + | | [[File:Scan clue Menaphos Imperial district north of soul altar entrance.png|300px|center]] |
||
| + | |- id="Imperial district, north-west of Grand Library" |
||
| + | | Imperial distict, north-west of [[Golden Palace]]. Three paces south of the second palm tree from the north. (The picture's location is incorrect.) |
||
| + | | [[File:Scan clue Menaphos Imperial district north-west of Grand Library pyramid.png|300px|center]] |
||
| + | |- id="Imperial district, north of Grand Library pyramid" |
||
| + | | Imperial district, north of [[Golden Palace]]. |
||
| + | | [[File:Scan clue Menaphos Imperial district north of Grand Library pyramid.png|300px|center]] |
||
| + | |- id="Imperial district, north-east of VIP skilling area" |
||
| + | | Imperial district, north-east of the [[VIP skilling area]]. |
||
| + | | [[File:Scan clue Menaphos Imperial district north-east of VIP skilling area.png|300px|center]] |
||
| + | |- id="Worker district, north-east of concentrated sandstone rocks" |
||
| + | | [[Worker district]], north-east of the [[concentrated sandstone rocks]]. |
||
| + | | [[File:Scan clue Menaphos Worker district north-east of the concentrated sandstone rocks.png|300px|center]] |
||
| + | |- id="Worker district, south-west of concentrated sandstone rocks" |
||
| + | | Worker district, south-west of the concentrated sandstone rocks and east of the [[furnace]]. |
||
| + | | [[File:Scan clue Menaphos Worker district south-west of the concentrated sandstone rocks.png|300px|center]] |
||
| + | |- id="Worker district, west of Kharl on the southern end of the beach" |
||
| + | | Worker district, just west of [[Kharl]] on the southern end of the beach. |
||
| + | | [[File:Scan clue Menaphos Worker district, west of Kharl on the southern end of the beach.png|300px|center]] |
||
| + | |- id="Worker district, middle of beach" |
||
| + | | Worker district, in the middle of the beach. |
||
| + | | [[File:Scan clue Menaphos Worker district middle of beach.png|300px|center]] |
||
| + | |- id="Merchant district, just south-west of the main gate" |
||
| + | | [[Merchant district]], just south-west of the main gate. |
||
| + | | [[File:Scan clue Menaphos Merchant district south-west of main gate.png|300px|center]] |
||
| + | |- id="Merchant district, just south-west of fish cart" |
||
| + | | Merchant district, just south-west of fish cart. One pace south of the location pictured. |
||
| + | | [[File:Scan clue Menaphos Merchant district south-west of fish cart.png|300px|center]] |
||
| + | |- id="Merchant district, just north-west of Grand Exchange" |
||
| + | | Merchant district, just north-west of [[Grand Exchange]]. |
||
| + | | [[File:Scan clue Menaphos Merchant district north-west of Grand Exchange.png|300px|center]] |
||
| + | |- id="Merchant district, just south-east of the general store" |
||
| + | | Merchant district, just south-east of the [[general store]]. One pace south of the location pictured. |
||
| + | | [[File:Scan clue Menaphos Merchant district just south-east of the general store.png|300px|center]] |
||
| + | |- id="Port district, next to Lookout Ekahi" |
||
| + | | [[Port district]], next to [[Lookout Ekahi]]. |
||
| + | | [[File:Scan clue Menaphos Port district next to Lookout Ekahi.png|300px|center]] |
||
| + | |- id="Port district, outside house with furnace" |
||
| + | | Port district, outside of [[Rhotep]]'s house (containing a [[furnace]] and [[anvil]]) and east of the crane. |
||
| + | |[[File:Scan clue Menaphos Port district outside house with furnace.png|300px|center]] |
||
| + | |- id="Port district, west of Shifting Tombs entrance" |
||
| + | | Port district, west of [[Shifting Tombs]] entrance and south-east of [[musician]]. |
||
| + | | [[File:Scan clue Menaphos Port district west of Shifting Tombs entrance.png|300px|center]] |
||
| + | |- id="Port district, south of charter ship" |
||
| + | | Port district, on the dock just south of the [[charter ship]]. |
||
| + | | [[File:Scan clue Menaphos Port district south of charter ship.png|300px|center]] |
||
| + | |- id="Port district, north-east of POH portal" |
||
| + | | Port district, on the platform just north-east of the [[POH portal]]. |
||
| + | | [[File:Scan clue Menaphos Port district north-east of POH portal.png|300px|center]] |
||
|- |
|- |
||
| + | |- id="Other possible locations (Menaphos)" |
||
| − | |colspan="2" | |
||
| + | | colspan="2" | |
||
'''Other possible locations''' |
'''Other possible locations''' |
||
| + | * South east of the entrance to the Soul Altar, on the small outcrop. |
||
|} |
|} |
||
| − | ==Mos Le'Harmless== |
+ | ====Mos Le'Harmless==== |
| − | ''Area Information: [[Mos Le'Harmless]]'' |
+ | ''Area Information: [[Mos Le'Harmless]]'' |
| − | Players must have completed the [[Cabin Fever]] quest to access Mos Le'Harmless. The area outside the base contains many aggressive [[cave horrors]] and poisonous [[Snake (poisonous)|snakes]].<br /> |
||
| + | Players must have completed the [[Cabin Fever]] quest to access Mos Le'Harmless. The area outside the base contains many aggressive [[jungle horror]]s and poisonous [[Snake (poisonous)|snakes]]. |
||
| − | '''Orb scan range: 27 paces''' |
||
| + | |||
| + | '''Scan range: 27 paces''' |
||
| − | ''Click [[Map:Mos Le'Harmless scan|here]] for full size of the map.'' |
||
{{Map:Mos_Le'Harmless_scan}} |
{{Map:Mos_Le'Harmless_scan}} |
||
| − | {|class="wikitable" |
+ | {| class="wikitable" |
| − | !style="width: 300px;"|Possible locations |
+ | ! style="width: 300px;" |Possible locations |
!Image |
!Image |
||
|- id="West of docks" |
|- id="West of docks" |
||
|Inside the base's walls, west of the docks. |
|Inside the base's walls, west of the docks. |
||
|[[File:Scan clue Mos Le'Harmless west of docks.png|300px|center]] |
|[[File:Scan clue Mos Le'Harmless west of docks.png|300px|center]] |
||
| + | |- id="West of Harpoon Joe's House of 'Rum'" |
||
| + | |Inside the base's walls, along the western coastline. West of [[Harpoon Joe's House of 'Rum']] and north-west of [[The Other Inn]]. |
||
| + | |[[File:Scan clue Mos Le'Harmless west of Harpoon Joe's House of 'Rum'.png|300px|center]] |
||
|- id="West of bank" |
|- id="West of bank" |
||
|Inside the base's walls, west of the bank. |
|Inside the base's walls, west of the bank. |
||
|[[File:Scan clue Mos Le'Harmless west of bank.png|300px|center]] |
|[[File:Scan clue Mos Le'Harmless west of bank.png|300px|center]] |
||
| − | |- id=" |
+ | |- id="Inside clothes shop" |
| + | |Inside the base's walls, inside [[Dodgy Mike's Second-hand Clothing]] (clothes shop). One step southwest of the location pictured. |
||
| + | |[[File:Scan clue Mos Le'Harmless inside the clothes shop.png|300px|center]] |
||
| + | |- id="East of clothes shop" |
||
|Inside the base's walls, east of [[Dodgy Mike's Second-hand Clothing]] (clothes shop). |
|Inside the base's walls, east of [[Dodgy Mike's Second-hand Clothing]] (clothes shop). |
||
|[[File:Scan clue Mos Le'Harmless east of clothes shop, inside base.png|300px|center]] |
|[[File:Scan clue Mos Le'Harmless east of clothes shop, inside base.png|300px|center]] |
||
| Line 902: | Line 1,428: | ||
|Inside the base's walls, north-east of the bank and [[Dodgy Mike's Second-hand Clothing]] (clothes shop). |
|Inside the base's walls, north-east of the bank and [[Dodgy Mike's Second-hand Clothing]] (clothes shop). |
||
|[[File:Scan clue Mos Le'Harmless north-east of bank.png|300px|center]] |
|[[File:Scan clue Mos Le'Harmless north-east of bank.png|300px|center]] |
||
| + | |- id="North of entrance (Mos Le'Harmless)" |
||
| + | |North of the city outside the wall. |
||
| + | |[[File:Scan clue Mos Le'Harmless north of entrance.png|300px|center]] |
||
|- id="East of wheat field" |
|- id="East of wheat field" |
||
|Just east of the patch of [[wheat]] which is north-east outside the base. |
|Just east of the patch of [[wheat]] which is north-east outside the base. |
||
|[[File:Scan clue Mos Le'Harmless east of wheat field.png|300px|center]] |
|[[File:Scan clue Mos Le'Harmless east of wheat field.png|300px|center]] |
||
| + | |- id="North-east of wheat field" |
||
| + | |North-east of the path of [[wheat]] which is north-east outside the base. |
||
| + | |[[File:Scan_clue_Mos_Le'Harmless_north-east_of_wheat_field.png|300px|center]] |
||
|- id="South-east of most northwestern lake" |
|- id="South-east of most northwestern lake" |
||
| − | |Just south-east of the most |
+ | |Just south-east of the most northwestern lake, north of the base. |
|[[File:Scan clue Mos Le'Harmless south-east of most northwestern lake.png|300px|center]] |
|[[File:Scan clue Mos Le'Harmless south-east of most northwestern lake.png|300px|center]] |
||
| + | |- id="East of most northwestern lake" |
||
| + | |North-east of the most northwestern lake, north of the base, two steps west of a tree stump. |
||
| + | |[[File:Scan clue Mos Le'Harmless east of most northwestern lake.png|300px|center]] |
||
|- id="North-east of most northwestern lake" |
|- id="North-east of most northwestern lake" |
||
|North-east of the most northwestern lake, north of the base. |
|North-east of the most northwestern lake, north of the base. |
||
|[[File:Scan clue Mos Le'Harmless north-east of most northwestern lake.png|300px|center]] |
|[[File:Scan clue Mos Le'Harmless north-east of most northwestern lake.png|300px|center]] |
||
| + | |- id="North-west of most northwestern lake" |
||
| + | |North-west of the most northwestern lake, north of the base, in between a tree and the lake. |
||
| + | |[[File:Scan clue Mos Le'Harmless north-west of most northwestern lake.png|300px|center]] |
||
|- id="North of group of lakes" |
|- id="North of group of lakes" |
||
|Just north of the group of lakes that are north-east of the base and north-west of [[Trouble Brewing]]. |
|Just north of the group of lakes that are north-east of the base and north-west of [[Trouble Brewing]]. |
||
|[[File:Scan clue Mos Le'Harmless north of group of lakes.png|300px|center]] |
|[[File:Scan clue Mos Le'Harmless north of group of lakes.png|300px|center]] |
||
| + | |- id="North-east of group of lakes" |
||
| + | |Just north-east of the group of lakes that are north-east of the base and north-west of [[Trouble Brewing]]. |
||
| + | |[[File:Scan clue Mos Le'Harmless north-east of group of lakes.png|300px|center]] |
||
|- id="Centre of group of lakes" |
|- id="Centre of group of lakes" |
||
|In the centre of the group of lakes that are north-east of the base and north-west of [[Trouble Brewing]]. |
|In the centre of the group of lakes that are north-east of the base and north-west of [[Trouble Brewing]]. |
||
| Line 939: | Line 1,480: | ||
|[[File:Scan clue Mos Le'Harmless south-west of Trouble Brewing.png|300px|center]] |
|[[File:Scan clue Mos Le'Harmless south-west of Trouble Brewing.png|300px|center]] |
||
|- id="North-west of Trouble Brewing" |
|- id="North-west of Trouble Brewing" |
||
| − | |North-west of [[Trouble Brewing]]; west of the minigame's red team base. |
+ | |North-west of [[Trouble Brewing]]; north-west of the minigame's red team base. |
|[[File:Scan clue Mos Le'Harmless north-west of Trouble Brewing.png|300px|center]] |
|[[File:Scan clue Mos Le'Harmless north-west of Trouble Brewing.png|300px|center]] |
||
| + | |- id="West of Trouble Brewing" |
||
| + | |North-west of [[Trouble Brewing]]; west of the minigame's red team base. |
||
| + | |[[File:Scan clue Mos Le'Harmless west of Trouble Brewing.png|300px|center]] |
||
|- id="East of group of lakes" |
|- id="East of group of lakes" |
||
|East of the group of lakes that are north-east of the base and north-west of [[Trouble Brewing]]. |
|East of the group of lakes that are north-east of the base and north-west of [[Trouble Brewing]]. |
||
|[[File:Scan clue Mos Le'Harmless east of group of lakes.png|300px|center]] |
|[[File:Scan clue Mos Le'Harmless east of group of lakes.png|300px|center]] |
||
|- id="North of Trouble Brewing" |
|- id="North of Trouble Brewing" |
||
| − | |North of [[Trouble Brewing]]; north of the minigame's red team waiting room. |
+ | |North of [[Trouble Brewing]]; north of the minigame's red team waiting room. One pace south of the location pictured. |
|[[File:Scan clue Mos Le'Harmless north of Trouble Brewing.png|300px|center]] |
|[[File:Scan clue Mos Le'Harmless north of Trouble Brewing.png|300px|center]] |
||
|- id="North-east of Trouble Brewing" |
|- id="North-east of Trouble Brewing" |
||
| − | |North-east of [[Trouble Brewing]] |
+ | |North-east of [[Trouble Brewing]], north-east of the minigame's blue team lobby. |
|[[File:Scan clue Mos Le'Harmless north-east of Trouble Brewing.png|300px|center]] |
|[[File:Scan clue Mos Le'Harmless north-east of Trouble Brewing.png|300px|center]] |
||
| + | |- id="North of Trouble Brewing blue team lobby" |
||
| + | |Just north of Trouble Brewing's blue team lobby. |
||
| + | |[[File:Scan clue Mos Le'Harmless north of Trouble Brewing blue team lobby.png|300px|center]] |
||
| + | |- id="North-west of Trouble Brewing red team lobby" |
||
| + | |Just north of Trouble Brewing's red team lobby. |
||
| + | |[[File:Scan clue Mos Le'Harmless northwest of Trouble Brewing red team lobby.png|300px|center]] |
||
|- id="East of Trouble Brewing" |
|- id="East of Trouble Brewing" |
||
|East of [[Trouble Brewing]]; east of the minigame's red team base. |
|East of [[Trouble Brewing]]; east of the minigame's red team base. |
||
|[[File:Scan clue Mos Le'Harmless east of Trouble Brewing.png|300px|center]] |
|[[File:Scan clue Mos Le'Harmless east of Trouble Brewing.png|300px|center]] |
||
| − | |- id=" |
+ | |- id="East of Trouble Brewing north wall" |
| + | |East of [[Trouble Brewing]] north wall, near coast. |
||
| − | |colspan="2" | |
||
| + | |[[File:Scan clue Mos Le' Harmless east of Trouble Brewing north wall.png|300px|center]] |
||
| − | '''Other possible locations''' |
||
| − | |||
| − | *West side of the base. |
||
|} |
|} |
||
| − | ==Piscatoris Hunter Area== |
+ | ====Piscatoris Hunter Area==== |
| − | ''Area Information: [[Piscatoris Hunter area]]'' |
+ | ''Area Information: [[Piscatoris Hunter area]]'' |
| − | ''' |
+ | '''Scan range: 14 paces''' |
| − | + | {{Map:Piscatoris Hunter Area scan}} |
|
| − | {{Map:Piscatoris_Hunter_Area_scan}} |
||
| − | {|class="wikitable" |
+ | {| class="wikitable" |
| − | !style="width: 300px;"|Possible locations |
+ | ! style="width: 300px;" |Possible locations |
!Image |
!Image |
||
|- id="North of fairy ring (Piscatoris Hunter Area)" |
|- id="North of fairy ring (Piscatoris Hunter Area)" |
||
|Just north of the [[fairy ring]] (code {{fairycode|AKQ}}). |
|Just north of the [[fairy ring]] (code {{fairycode|AKQ}}). |
||
|[[File:Scan clue Piscatoris Hunter area north of fairy ring.png|300px|center]] |
|[[File:Scan clue Piscatoris Hunter area north of fairy ring.png|300px|center]] |
||
| + | |- id="West of elder tree" |
||
| + | |West of the elder tree slightly below the fairy ring. |
||
| + | |[[File:Scan clue Piscatoris Hunter area west of elder tree.png|300px|center]] |
||
|- id="South of Piscatoris mining site" |
|- id="South of Piscatoris mining site" |
||
| − | |North-east of the [[fairy ring]] (code {{fairycode|AKQ}}). South of [[Piscatoris mining site]] and [[summoning obelisk]] cave entrance. |
+ | |North-east of the [[fairy ring]] (code {{fairycode|AKQ}}). South of [[Piscatoris mining site]] and [[summoning obelisk]] cave entrance. One pace north of the location pictured. |
|[[File:Scan clue Piscatoris Hunter area south of Piscatoris mining site.png|300px|center]] |
|[[File:Scan clue Piscatoris Hunter area south of Piscatoris mining site.png|300px|center]] |
||
|- id="South of tunnel entrance to Piscatoris Fishing Colony" |
|- id="South of tunnel entrance to Piscatoris Fishing Colony" |
||
|South of the tunnel entrance to [[Piscatoris Fishing Colony]]. East of [[Piscatoris mining site]] and [[summoning obelisk]] cave entrance. |
|South of the tunnel entrance to [[Piscatoris Fishing Colony]]. East of [[Piscatoris mining site]] and [[summoning obelisk]] cave entrance. |
||
|[[File:Scan clue Piscatoris Hunter area south of tunnel entrance to Piscatoris Fishing Colony.png|300px|center]] |
|[[File:Scan clue Piscatoris Hunter area south of tunnel entrance to Piscatoris Fishing Colony.png|300px|center]] |
||
| − | |- id="East of fairy ring" |
+ | |- id="East of Piscatoris fairy ring" |
| − | |East of the [[fairy ring]] (code {{fairycode|AKQ}}) and west of the [[ |
+ | |East of the [[fairy ring]] (code {{fairycode|AKQ}}) and west of the [[Piscatoris Hunter area (falconry)|falconry area]] (Hunter training area surrounded by fence). |
|[[File:Scan clue Piscatoris Hunter area east of fairy ring.png|300px|center]] |
|[[File:Scan clue Piscatoris Hunter area east of fairy ring.png|300px|center]] |
||
|- id="North-west of Falconer" |
|- id="North-west of Falconer" |
||
| − | |North-west of the |
+ | |North-west of the falconry area and east of the [[fairy ring]] (code {{fairycode|AKQ}}). |
|[[File:Scan clue Piscatoris Hunter area north-west of Falconer.png|300px|center]] |
|[[File:Scan clue Piscatoris Hunter area north-west of Falconer.png|300px|center]] |
||
|- id="North of Falconer" |
|- id="North of Falconer" |
||
| − | |North of the |
+ | |North of the falconry area. South-east of the transportation map icon which indicates the rowing boat network between [[Piscatoris Fishing Colony]] and the [[Tree Gnome Stronghold]], run by [[Kathy Corkat]] and [[David Mendleberg]]. |
|[[File:Scan clue Piscatoris Hunter area north of Falconer.png|300px|center]] |
|[[File:Scan clue Piscatoris Hunter area north of Falconer.png|300px|center]] |
||
| + | |- id="South of Falconer's hut" |
||
| + | |Inside the falconry area, south of the Falconer's hut. |
||
| + | |[[File:Scan clue Piscatoris Hunter area South of Falconers hut.png|300px|center]] |
||
|- id="East inside Falconer" |
|- id="East inside Falconer" |
||
| − | |Inside the |
+ | |Inside the falconry area, by the fence on the east side of the enclosure. |
|[[File:Scan clue Piscatoris Hunter area east inside Falconer.png|300px|center]] |
|[[File:Scan clue Piscatoris Hunter area east inside Falconer.png|300px|center]] |
||
|- id="South-east of Falconer" |
|- id="South-east of Falconer" |
||
| − | |South-east of the |
+ | |South-east of the falconry area. |
|[[File:Scan clue Piscatoris Hunter area south-east of Falconer.png|300px|center]] |
|[[File:Scan clue Piscatoris Hunter area south-east of Falconer.png|300px|center]] |
||
| + | |- id="South-east of Falconer by fence" |
||
| + | |South-east of the falconry area, just outside the fence. |
||
| + | |[[File:Scan clue Piscatoris Hunter area south of Falconer by fence.png|300px|center]] |
||
|- id="North-west of Tree Gnome Stronghold" |
|- id="North-west of Tree Gnome Stronghold" |
||
|South-east of the Piscatoris Hunter area. Near the coast north-west of the [[Tree Gnome Stronghold]]. |
|South-east of the Piscatoris Hunter area. Near the coast north-west of the [[Tree Gnome Stronghold]]. |
||
|[[File:Scan clue Piscatoris Hunter area north-west of Tree Gnome Stronghold.png|300px|center]]. |
|[[File:Scan clue Piscatoris Hunter area north-west of Tree Gnome Stronghold.png|300px|center]]. |
||
| + | |- id="North of Eagles' Peak" |
||
| + | |North of [[Eagles' Peak]] lodestone, south from a deadfall trap, and north-west of the southern fence. |
||
| + | |[[File:Scan clue Piscatoris north-west of southern fence.png|300px|center]] |
||
| + | |- id="East of central Hunter training icon" |
||
| + | |East of the central Hunter training icon which indicates the presence of kebbits, [[copper longtail]]s, [[ruby harvest]]s, [[ferret]]s, [[chinchompa]]s and [[white rabbit]]s. |
||
| + | |[[File:Scan clue Piscatoris Hunter area east of central Hunter training icon.png|300px|center]] |
||
|- id="South-west of Falconer" |
|- id="South-west of Falconer" |
||
| + | |South-west of the falconry area. South of the boulder next to the south-western corner of the falconry area. |
||
| − | |South-west of the [[Falconer]] (Hunter training area surrounded by fence). East of the central Hunter training icon which indicates the presence of kebbits, [[copper longtail]]s, [[ruby harvest]]s, [[ferret]]s, [[chinchompa]]s and [[white rabbit]]s. |
||
|[[File:Scan clue Piscatoris Hunter area south-west of Falconer.png|300px|center]] |
|[[File:Scan clue Piscatoris Hunter area south-west of Falconer.png|300px|center]] |
||
| + | |- id="Slightly north-east of the central Hunter training icon" |
||
| + | |Slightly north-east of the central Hunter training icon. |
||
| + | |[[File:Scan clue Piscatoris Hunter area slightly north-east of the central Hunter training icon.png|300px|center]] |
||
|- id="South-east of central Hunter training icon" |
|- id="South-east of central Hunter training icon" |
||
| − | |Just south-east of the central Hunter training icon which indicates the presence of kebbits, [[copper longtail]]s, [[ruby harvest]]s, [[ferret]]s, [[chinchompa]]s and [[white rabbit]]s. |
+ | |Just south-east of the central Hunter training icon which indicates the presence of kebbits, [[copper longtail]]s, [[ruby harvest]]s, [[ferret]]s, [[chinchompa]]s and [[white rabbit]]s. One step south of the location pictured. |
|[[File:Scan clue Piscatoris Hunter area south-east of central Hunter training icon.png|300px|center]] |
|[[File:Scan clue Piscatoris Hunter area south-east of central Hunter training icon.png|300px|center]] |
||
|- id="South of central Hunter training icon" |
|- id="South of central Hunter training icon" |
||
|South of the central Hunter training icon which indicates the presence of kebbits, [[copper longtail]]s, [[ruby harvest]]s, [[ferret]]s, [[chinchompa]]s and [[white rabbit]]s. |
|South of the central Hunter training icon which indicates the presence of kebbits, [[copper longtail]]s, [[ruby harvest]]s, [[ferret]]s, [[chinchompa]]s and [[white rabbit]]s. |
||
|[[File:Scan clue Piscatoris Hunter area south of central Hunter training icon.png|300px|center]] |
|[[File:Scan clue Piscatoris Hunter area south of central Hunter training icon.png|300px|center]] |
||
| − | |- id=" |
+ | |- id="West of central Hunter training icon, close to trees" |
| + | |West of the central Hunter training icon which indicates the presence of kebbits, [[copper longtail]]s, [[ruby harvest]]s, [[ferret]]s, [[chinchompa]]s and [[white rabbit]]s. East of the western coastline of the area, by trees. |
||
| − | |Centre of the Piscatoris Hunter area. |
||
| − | |[[File:Scan clue Piscatoris Hunter area |
+ | |[[File:Scan clue Piscatoris Hunter area west of central Hunter training icon, close to trees.png|300px|center]] |
|- id="West of central Hunter training icon" |
|- id="West of central Hunter training icon" |
||
| − | |West of the central Hunter training icon which indicates the presence of kebbits, [[copper longtail]]s, [[ruby harvest]]s, [[ferret]]s, [[chinchompa]]s and [[white rabbit]]s. East of the western coastline of the area. |
+ | |West of the central Hunter training icon which indicates the presence of kebbits, [[copper longtail]]s, [[ruby harvest]]s, [[ferret]]s, [[chinchompa]]s and [[white rabbit]]s. East of the western coastline of the area, by rocks. |
|[[File:Scan clue Piscatoris Hunter area west of central Hunter training icon.png|300px|center]] |
|[[File:Scan clue Piscatoris Hunter area west of central Hunter training icon.png|300px|center]] |
||
| + | |- id="On western coastline, west of deadfall trap" |
||
| + | |On western coastline, west of a [[deadfall]] trap. |
||
| + | |[[File:Scan clue Piscatoris Hunter area on western coastline, west of deadfall trap.png|300px|center]] |
||
|- id="South-west of central Hunter training icon" |
|- id="South-west of central Hunter training icon" |
||
| − | |South-west of the central Hunter training icon which indicates the presence of kebbits, [[copper longtail]]s, [[ruby harvest]]s, [[Ferret|ferrets]], [[chinchompa]]s and [[white rabbit]]s |
+ | |South-west of the central Hunter training icon which indicates the presence of kebbits, [[copper longtail]]s, [[ruby harvest]]s, [[Ferret|ferrets]], [[chinchompa]]s and [[white rabbit]]s. East of the western coastline of the area. |
|[[File:Scan clue Piscatoris Hunter area south-west of central Hunter training icon.png|300px|center]] |
|[[File:Scan clue Piscatoris Hunter area south-west of central Hunter training icon.png|300px|center]] |
||
| − | |- id="North-west of |
+ | |- id="North-west of Eagles' Peak" |
| − | |North-west of [[ |
+ | |North-west of [[Eagles' Peak (mountain)]], the mountain used in [[Eagles' Peak]] quest. |
| − | |[[File:Scan clue Piscatoris Hunter area north-west of |
+ | |[[File:Scan clue Piscatoris Hunter area north-west of Eagles' Peak.png|300px|center]] |
| − | |- id="North-east of |
+ | |- id="North-east of Eagles' Peak" |
| − | |North-east of [[ |
+ | |North-east of [[Eagles' Peak (mountain)]], the mountain used in [[Eagles' Peak]] quest. South of the fencing in the south-east of Piscatoris Hunter area. |
| − | |[[File:Scan clue Piscatoris Hunter area north-east of |
+ | |[[File:Scan clue Piscatoris Hunter area north-east of Eagles' Peak.png|300px|center]] |
| + | |- id="North-east of southeastern fencing" |
||
| + | |North-east of the fencing in the south-east of Piscatoris Hunter area. North-east of [[Eagles' Peak (mountain)]], the mountain used in [[Eagles' Peak]] quest. |
||
| + | |[[File:Scan clue Piscatoris Hunter area north-east of southeastern fencing.png|300px|center]] |
||
|- id="North of southeastern fencing" |
|- id="North of southeastern fencing" |
||
| − | |North of the fencing in the south-east of Piscatoris Hunter area. North-east of [[ |
+ | |North of the fencing in the south-east of Piscatoris Hunter area. North-east of [[Eagles' Peak (mountain)]], the mountain used in [[Eagles' Peak]] quest. |
|[[File:Scan clue Piscatoris Hunter area north of southeastern fencing.png|300px|center]] |
|[[File:Scan clue Piscatoris Hunter area north of southeastern fencing.png|300px|center]] |
||
| + | |} |
||
| − | |- id="Other possible locations (Piscatoris Hunter area)" |
||
| − | |colspan="2"| |
||
| − | '''Other possible locations''' |
||
| + | ====Prifddinas==== |
||
| − | *Slightly north-east of the central Hunter training icon. |
||
| + | ''Area Information: [[Prifddinas]]'' |
||
| + | |||
| + | To access Prifddinas the player must have completed [[Plague's End]]. |
||
| + | |||
| + | '''Scan range: 30 paces''' |
||
| + | |||
| + | {{Map:Prifddinas scan}} |
||
| + | |||
| + | {| class="wikitable" |
||
| + | ! style="width: 300px;" |Possible locations |
||
| + | !Image |
||
| + | |- id="Crwys, on outcrop south of Prifddinas Waterfall Fishing Shop" |
||
| + | | [[Crwys]], on the outcrop leading to the [[Prifddinas Waterfall]], just south of the [[Prifddinas Waterfall Fishing Shop]]. |
||
| + | |[[File:Scan clue Prifddinas Crwys on outcrop south of Prifddinas Waterfall Fishing Shop.png|300px|center]] |
||
| + | |- id="Crwys, south-east of elder tree patch" |
||
| + | | Crwys, south-east of [[elder tree patch]]. |
||
| + | |[[File:Scan clue Prifddinas Crwys south-east of elder tree patch.png|300px|centre]] |
||
| + | |- id="At eastern entrance" |
||
| + | | At the eastern entrance. |
||
| + | | [[File:Scan clue Prifddinas at eastern entrance.png|300px|center]] |
||
| + | |- id="Trahaearn, next to adamantite ore rocks" |
||
| + | | [[Trahaearn]], next to [[adamantite ore rocks]]. |
||
| + | |[[File:Scan clue Prifddinas Trahaearn next to adamantite ore rocks.png|300px|center]] |
||
| + | |- id="Trahaearn, south-east of seren stones" |
||
| + | | Trahaearn district, south-east of the Seren stones. |
||
| + | |[[File:Scan clue Prifddinas Trahaearn south-east of seren stones.png|300px|center]] |
||
| + | |- id="South-west of the entrance gate" |
||
| + | | South-west of the southern entrance gate. |
||
| + | |[[File:Scan clue Prifddinas south-west of entrance gate.png|300px|center]] |
||
| + | |- id="Just south of the entrance gate" |
||
| + | | Just south of the southern entrance gate. One pace south of the location pictured. |
||
| + | |[[File:Scan clue Prifddinas just south of entrance gate.png|300px|center]] |
||
| + | |- id="South-east of the entrance gate, south-west of monument" |
||
| + | | South-east of the entrance gate, just south-west of the Prifddinas monument. |
||
| + | |[[File:Scan clue Prifddinas south-east of entrance gate, south-west of monument.png|300px|center]] |
||
| + | |- id="South-east of the entrance gate, south-east of monument" |
||
| + | | South-east of the entrance gate, just south-east of the Prifddinas monument. |
||
| + | |[[File:Scan clue Prifddinas south-east of entrance gate, south-east of monument.png|300px|center]] |
||
| + | |- id="Iorwerth, west of manor" |
||
| + | | [[Iorwerth]], west of the manor containing the [[crystal chest]]. |
||
| + | |[[File:Scan clue Prifddinas Iorwerth west of manor.png|300px|center]] |
||
| + | |- id="Iorwerth, south of musician" |
||
| + | | Iorwerth, just south of the [[Iorwerth musician]], west of [[Morvran]]. One pace east of the location pictured. |
||
| + | |[[File:Scan clue Prifddinas Iorwerth south of musician.png|300px|center]] |
||
| + | |- id="Amlodd, south of Daffyd's house" |
||
| + | | [[Amlodd]], just south of [[Daffyd]]'s house. |
||
| + | |[[File:Scan clue Prifddinas Amlodd south of Daffyd's house.png|300px|center]] |
||
| + | |- id="Amlodd, on island east of Daffyd's house" |
||
| + | | [[Amlodd]], on island east of [[Daffyd]]'s house. |
||
| + | |[[File:Scan clue Prifddinas Amlodd on island east of Daffyd's house.png|300px|center]] |
||
| + | |- id="Ithell, next to crystal-flecked sandstone" |
||
| + | | [[Ithell]], next to the crystal-flecked sandstone. |
||
| + | |[[File:Scan clue Prifddinas Ithell next to crystal-flecked sandstone.png|300px|center]] |
||
| + | |- id="Hefin, near light creature" |
||
| + | | [[Hefin]], near light creature. |
||
| + | |[[File:Scan clue Prifddinas Hefin near light creature.png|300px|center]] |
||
| + | |- id="Hefin, south-east of cathedral" |
||
| + | | [[Hefin]], south-east of [[Hefin Cathedral]]. |
||
| + | |[[File:Scan clue Prifddinas Hefin south-east of cathedral.png|300px|center]] |
||
| + | |- id="Meilyr, south-east of fruit tree patch" |
||
| + | | Meilyr, south-east of the [[fruit tree patch]]. |
||
| + | |[[File:Scan clue Prifddinas Meilyr south-east of fruit tree patch.png|300px|center]] |
||
| + | |- id="Meilyr, west of Gorajo hoardstalker dungeon" |
||
| + | | [[Meilyr]], west of [[Gorajo hoardstalker dungeon]]. |
||
| + | |[[File:Scan clue Prifddinas Meilyr west of Gorajo hoardstalker dungeon.png|300px|center]] |
||
| + | |- id="Other possible locations (Prifddinas)" |
||
| + | | colspan="2" | |
||
| + | '''Other possible locations''' |
||
| + | * Next to bench in Hefin Clan district. |
||
| + | * Next to the crystal sandstone in the Ithell Clan district. |
||
| + | * Trahaearn east of rune rocks. |
||
| + | * Amlodd, near the [[light creature]]s. |
||
|} |
|} |
||
| − | ==Taverley Dungeon== |
+ | ====Taverley Dungeon==== |
| − | ''Area Information: [[Taverley Dungeon]]'' |
+ | ''Area Information: [[Taverley Dungeon]]'' |
| − | To access all areas of Taverley Dungeon the player will need either a [[Dusty Key|dusty key]] or level 70 [[Agility]]. Players may find [[:File:Taverley Dungeon map.png|this map]], showing the locations of the dungeon's monsters, useful when navigating the area.<br /> |
||
| + | To access all areas of Taverley Dungeon the player will need either a [[dusty key]] or level 70 [[Agility]]. Players may find [[:File:Taverley Dungeon map.png|this map]], showing the locations of the dungeon's monsters, useful when navigating the area. |
||
| − | '''Orb scan range: 22 paces''' |
||
| + | '''Scan range: 22 paces''' |
||
| − | ''Click [[Map:Taverley Dungeon scan|here]] for full size of the map.'' |
||
| − | {{Map:Taverley_Dungeon_scan}} |
||
| + | {{Map:Taverley Dungeon scan}} |
||
| − | {|class="wikitable" |
||
| + | |||
| − | !style="width: 300px;"|Possible locations |
||
| + | {| class="wikitable" |
||
| + | ! style="width: 300px;" |Possible locations |
||
!Image |
!Image |
||
|- id="Just north of entrance" |
|- id="Just north of entrance" |
||
| − | |Just north of the entrance to the dungeon, by the obstacle pipe [[Agility]] [[ |
+ | |Just north of the entrance to the dungeon, by the obstacle pipe [[Agility]] [[shortcut]] which requires level 70 Agility to use. |
|[[File:Scan clue Taverley Dungeon just north of entrance.png|300px|center]] |
|[[File:Scan clue Taverley Dungeon just north of entrance.png|300px|center]] |
||
| + | |- id="In passage north of entrance" |
||
| + | |In the passage north of the entrance. |
||
| + | |[[File:Scan clue Taverley Dungeon in passage north of entrance.png|300px|center]] |
||
|- id="In chamber with Cauldron of Thunder" |
|- id="In chamber with Cauldron of Thunder" |
||
|North-east of the dungeon's entrance, in the chamber with the [[Cauldron of Thunder]]. |
|North-east of the dungeon's entrance, in the chamber with the [[Cauldron of Thunder]]. |
||
|[[File:Scan clue Taverley Dungeon in chamber with Cauldron of Thunder.png|300px|center]] |
|[[File:Scan clue Taverley Dungeon in chamber with Cauldron of Thunder.png|300px|center]] |
||
| + | |- id="North east of chamber with Cauldron of Thunder" |
||
| + | |North-east of the chamber with the [[Cauldron of Thunder]]. |
||
| + | |[[File:Scan clue Taverley Dungeon north east of chamber with Cauldron of Thunder.png|300px|center]] |
||
|- id="In north-east chaos druid chamber" |
|- id="In north-east chaos druid chamber" |
||
| − | |In the north-east corner of the dungeon, in the chamber with [[ |
+ | |In the north-east corner of the dungeon, in the chamber with [[chaos druid]]s and their leader [[Ikadia the Exile]]. One step north-east of the location pictured. |
|[[File:Scan clue Taverley Dungeon in north-east chaos druid chamber.png|300px|center]] |
|[[File:Scan clue Taverley Dungeon in north-east chaos druid chamber.png|300px|center]] |
||
|- id="In passage north-west of magic axe chamber" |
|- id="In passage north-west of magic axe chamber" |
||
| − | |In the eastern part of the dungeon. In the passage containing [[ |
+ | |In the eastern part of the dungeon. In the passage containing [[black knight]]s north-west of the chamber of [[Magic Axe|magic axes]]. One pace south of the location pictured. |
|[[File:Scan clue Taverley Dungeon in passage north-west of magic axe chamber.png|300px|center]] |
|[[File:Scan clue Taverley Dungeon in passage north-west of magic axe chamber.png|300px|center]] |
||
|- id="North-west corner of magic axe chamber" |
|- id="North-west corner of magic axe chamber" |
||
| − | |In the eastern part of the dungeon. Just outside the north-west corner of the chamber containing [[ |
+ | |In the eastern part of the dungeon. Just outside the north-west corner of the chamber containing [[magic axe]]s. |
|[[File:Scan clue Taverley Dungeon north-west corner of magic axe chamber.png|300px|center]] |
|[[File:Scan clue Taverley Dungeon north-west corner of magic axe chamber.png|300px|center]] |
||
|- id="East side of magic axe chamber" |
|- id="East side of magic axe chamber" |
||
| − | |In the eastern part of the dungeon. On the east side of the chamber containing [[ |
+ | |In the eastern part of the dungeon. On the east side of the chamber containing [[magic axe]]s. |
|[[File:Scan clue Taverley Dungeon east side of magic axe chamber.png|300px|center]] |
|[[File:Scan clue Taverley Dungeon east side of magic axe chamber.png|300px|center]] |
||
| + | |- id="South-east of dusty key spawn" |
||
| + | |In the eastern part of the dungeon, south-east of the [[lava eel]] [[Fishing spot]] and the location where the [[dusty key]] spawns. West of [[chaos dwarves]]. |
||
| + | |[[File:Scan clue Taverley Dungeon south-east of dusty key spawn.png|300px|center]] |
||
| + | |- id="East of the chaos dwarves" |
||
| + | |In a small area along the narrow path towards the [[chaos dwarves]] and [[black knight]]s, which has some [[Poison Scorpion]]s lurking about. |
||
| + | |[[File:Scan clue Taverley Dungeon east of the chaos dwarves.png|300px|center]] |
||
|- id="Centre of hill giant chamber" |
|- id="Centre of hill giant chamber" |
||
| − | |In the southern part of the dungeon. In the centre of the chamber of [[ |
+ | |In the southern part of the dungeon. In the centre of the chamber of [[hill giant]]s. |
|[[File:Scan clue Taverley Dungeon centre of hill giant chamber.png|300px|center]] |
|[[File:Scan clue Taverley Dungeon centre of hill giant chamber.png|300px|center]] |
||
|- id="South of hill giant chamber" |
|- id="South of hill giant chamber" |
||
| − | |In the southern part of the dungeon. South of the chamber of [[ |
+ | |In the southern part of the dungeon. South of the chamber of [[hill giant]]s and north of the chamber of [[black knight]]s. |
|[[File:Scan clue Taverley Dungeon south of hill giant chamber.png|300px|center]] |
|[[File:Scan clue Taverley Dungeon south of hill giant chamber.png|300px|center]] |
||
|- id="North side of black knight chamber" |
|- id="North side of black knight chamber" |
||
| − | |In the southern part of the dungeon. On the north side of the chamber of [[ |
+ | |In the southern part of the dungeon. On the north side of the chamber of [[black knight]]s, south-west of the building containing a water source and [[Cooking]] [[range]]. |
|[[File:Scan clue Taverley Dungeon north side of black knight chamber.png|300px|center]] |
|[[File:Scan clue Taverley Dungeon north side of black knight chamber.png|300px|center]] |
||
|- id="East side of black knight chamber" |
|- id="East side of black knight chamber" |
||
| − | |In the southern part of the dungeon. On the east side of the chamber of [[ |
+ | |In the southern part of the dungeon. On the east side of the chamber of [[black knight]]s, by the [[Jailer]]. If a player does not have a [[dusty key]] then they can obtain one here by killing the Jailer to get a [[jail key]], using the jail key to free [[Velrak the Explorer]] from his prison cell and asking him if he knows any good places to explore. |
|[[File:Scan clue Taverley Dungeon east side of black knight chamber.png|300px|center]] |
|[[File:Scan clue Taverley Dungeon east side of black knight chamber.png|300px|center]] |
||
| + | |- id="North-west corner of blue dragon chamber" |
||
| + | |In the north-west corner of the chamber of [[blue dragon]]s. Near the entrance to the [[Taverley blue dragon resource dungeon|Taverley resource dungeon]]. |
||
| + | |[[File:Scan clue Taverley Dungeon north-west corner of blue dragon chamber.png|300px|center]] |
||
| + | |- id="In passage south-west of blue dragon chamber" |
||
| + | |In passage south-west of the chamber of [[blue dragon]]s, near to a [[small obelisk]]. |
||
| + | |[[File:Scan clue Taverley Dungeon passage south of blue dragons.png|300px|center]] |
||
|- id="North-east of Fishing spot" |
|- id="North-east of Fishing spot" |
||
| − | |In the centre of the dungeon, north-east of the [[Fishing spot]] for [[Raw lava eel|lava eels]] near the [[ |
+ | |In the centre of the dungeon, north-east of the [[Fishing spot]] for [[Raw lava eel|lava eels]] near the [[dusty key]] spawn point. The player must either use a dusty key on the locked door on the east side of the chamber of [[blue dragon]]s or use one of the [[Agility]] [[shortcuts]] near the dungeon entrance in order to travel to this location. One pace west of the location pictured. |
|[[File:Scan clue Taverley Dungeon north-east of Fishing spot.png|300px|center]] |
|[[File:Scan clue Taverley Dungeon north-east of Fishing spot.png|300px|center]] |
||
|- id="North side of black demon chamber" |
|- id="North side of black demon chamber" |
||
| − | |In the western part of the dungeon, on the north side of the chamber of [[ |
+ | |In the western part of the dungeon, on the north side of the chamber of [[black demon]]s. The player must either use a [[dusty key]] on the locked door on the east side of the chamber of [[blue dragon]]s or use one of the [[Agility]] [[shortcuts]] near the dungeon entrance in order to travel to this location. |
|[[File:Scan clue Taverley Dungeon north side of black demon chamber.png|300px|center]] |
|[[File:Scan clue Taverley Dungeon north side of black demon chamber.png|300px|center]] |
||
| + | |- id="Between black demons and spiders" |
||
| + | |On the path between black demons and poison spiders. |
||
| + | |[[File:Scan clue Taverley Dungeon path between black demons and poison spiders.png|300px|center]] |
||
|- id="North-west of entrance" |
|- id="North-west of entrance" |
||
| − | |In the centre of the dungeon, north-west of the entrance in the area with [[ |
+ | |In the centre of the dungeon, north-west of the entrance in the area with [[poison spider]]s. The player must either use a [[dusty key]] on the locked door on the east side of the chamber of [[blue dragon]]s or use one of the [[Agility]] [[shortcuts]] near the dungeon entrance in order to travel to this location. |
|[[File:Scan clue Taverley Dungeon north-west of entrance.png|300px|center]] |
|[[File:Scan clue Taverley Dungeon north-west of entrance.png|300px|center]] |
||
|- id="In monk of Zamorak chamber" |
|- id="In monk of Zamorak chamber" |
||
| − | |In the north-west part of the dungeon, in the chamber with [[Monk of Zamorak|monks of Zamorak]]. The player must either use a [[ |
+ | |In the north-west part of the dungeon, in the chamber with [[Monk of Zamorak|monks of Zamorak]]. The player must either use a [[dusty key]] on the locked door on the east side of the chamber of [[blue dragon]]s or use one of the [[Agility]] [[shortcuts]] near the dungeon entrance in order to travel to this location. |
|[[File:Scan clue Taverley Dungeon in monk of Zamorak chamber.png|300px|center]] |
|[[File:Scan clue Taverley Dungeon in monk of Zamorak chamber.png|300px|center]] |
||
|- id="South-east of the Obelisk of Fire" |
|- id="South-east of the Obelisk of Fire" |
||
| − | |In the north-west part of the dungeon, south-east of the [[Obelisk of Fire]]. The player must either use a [[ |
+ | |In the north-west part of the dungeon, south-east of the [[Obelisk of Fire]]. The player must either use a [[dusty key]] on the locked door on the east side of the chamber of [[blue dragon]]s or use one of the [[Agility]] [[shortcuts]] near the dungeon entrance in order to travel to this location. |
|[[File:Scan clue Taverley Dungeon south-east of the Obelisk of Fire.png|300px|center]] |
|[[File:Scan clue Taverley Dungeon south-east of the Obelisk of Fire.png|300px|center]] |
||
| + | |- id="South-west exit of magic axe area" |
||
| + | |South-west exit of magic axe area, four steps west of the southwestern pillar in the room. |
||
| + | |[[File:Scan clue Taverley Dungeon south-west exit of magic axe area.png|300px|center]] |
||
|- id="Other possible locations (Taverley Dungeon)" |
|- id="Other possible locations (Taverley Dungeon)" |
||
| − | |colspan="2" | |
+ | | colspan="2" | |
'''Other possible locations''' |
'''Other possible locations''' |
||
| + | *In the eastern part of the dungeon, on the west side of the chamber of [[magic axe]]s. Two steps south and one step west of the second pillar in the western column of pillars. |
||
| − | |||
| + | *In passage between chamber of black dragons and chamber of Zamorak monks. Three paces east and two paces north of the torch nearby. |
||
| − | *In the eastern part of the dungeon, on the west side of the chamber of [[Magic Axe|magic axes]]. |
||
| − | *In the north-west part of the dungeon, in the chamber of [[Black dragon|black dragons]]. North of the chamber of [[Monk of Zamorak|monks of Zamorak]] and east of the [[Obelisk of Fire]]. The player must either use a [[Dusty key|dusty key]] on the locked door on the east side of the chamber of [[Blue dragons|blue dragons]] or use one of the [[Agility]] [[Shortcut|shortcuts]] near the dungeon entrance in order to travel to this location. |
||
| − | |} |
||
| − | |||
| − | ==Tirannwn (Elven Lands)== |
||
| − | ''Area Information: [[Tirannwn]]''<br /> |
||
| − | Players may also find it helpful to use [[:File:Tirannwnmaplegend.png|this map]], showing the routes through and obstacles of Tirannwn, when navigating the area.<br /> |
||
| − | |||
| − | '''Orb scan range: 38 paces''' |
||
| − | |||
| − | ''Click [[Map:Tirannwn scan|here]] for full size of the map.'' |
||
| − | {{Map:Tirannwn scan}} |
||
| − | |||
| − | {|class="wikitable" |
||
| − | !style="width: 300px;"|Possible locations |
||
| − | !Image |
||
| − | |- id="East of charter ship in Port Tyras" |
||
| − | |East of the [[Charter Ship|charter ship]], in [[Port Tyras]]. South-west of [[Tyras Camp]]. |
||
| − | |[[File:Scan clue Tirannwn east of charter ship in Port Tyras.jpg|300px|center]] |
||
| − | |- id="Centre of Tyras Camp" |
||
| − | |Centre of [[Tyras Camp]]. |
||
| − | |[[File:Scan clue Tirannwn centre of Tyras Camp.png|300px|center]] |
||
| − | |- id="North of Tyras Camp" |
||
| − | |North of [[Tyras Camp]], through the [[dense forest]] obstacle. Just north-west of the catapult used in the [[Catapult Construction]] quest. |
||
| − | |[[File:Scan clue Tirannwn north of Tyras Camp.png|300px|center]] |
||
| − | |- id="Just north of the two tripwires east of Tyras Camp" |
||
| − | |East of [[Tyras Camp]], just north of two adjacent [[trip wire]] obstacles. Accessed by leaving the camp through the [[dense forest]] obstacle and going south through a second patch of dense forest to the east of the camp. |
||
| − | |[[File:Scan clue Tirannwn just north of the two tripwires east of Tyras Camp.png|300px|center]] |
||
| − | |- id="In small clearing north of Hunter training icon east of Tyras Camp" |
||
| − | |In small clearing north of the Hunter training icon, east of [[Tyras Camp]]. The clearing can be entered at its south, south of the two adjacent [[trip wire]] obstacles. |
||
| − | |[[File:Scan clue Tirannwn in small clearing north of Hunter training icon east of Tyras Camp.png|300px|center]] |
||
| − | |- id="South-west of Hunter training icon east of Tyras Camp" |
||
| − | |In the centre of a ring of mushrooms south-west of the Hunter training icon, east of [[Tyras Camp]]. South of a group of [[yew tree]]s indicated by a rare trees icon. |
||
| − | |[[File:Scan clue Tirannwn south-west of Hunter training icon east of Tyras Camp.png|300px|center]] |
||
| − | |- id="South-west of Tirannwn lodestone" |
||
| − | |South-west of Tirannwn [[lodestone]] and the [[Elf Tracker]]. |
||
| − | |[[File:Scan clue Tirannwn south-west of Tirannwn lodestone.png|300px|center]] |
||
| − | |- id="North of Poison Waste" |
||
| − | |North of [[Poison Waste]] and south of Tirannwn [[lodestone]]. |
||
| − | |[[File:Scan clue Tirannwn north of Poison Waste.png|300px|center]] |
||
| − | |- id="North-east of Tirannwn lodestone" |
||
| − | |North-east of Tirannwn [[lodestone]] and just north-west of the [[Lletya mining site]] which contains 7 [[Adamantite ore rock|adamantite ore rocks]]. |
||
| − | |[[File:Scan clue Tirannwn north-east of Tirannwn lodestone.png|300px|center]] |
||
| − | |- id="South-east of Hunter training icon south of Elf Camp" |
||
| − | |South-east of Hunter training icon indicating the presence of [[grenwalls]] and [[pawya]], south of the [[Elf Camp]]. This clearing can be accessed just south of a patch of [[dense forest]]; it is not necessary to travel through the dense forest to get to the clearing. |
||
| − | |[[File:Scan clue Tirannwn south-east of Hunter training icon south of Elf Camp.png|300px|center]] |
||
| − | |- id="South of Elf Camp" |
||
| − | |On the southern tip of the [[Elf Camp]]. Just west of the log balance crossing to the camp. |
||
| − | |[[File:Scan clue Tirannwn south of Elf Camp.png|300px|center]] |
||
| − | |- id="North-west of Elf Camp" |
||
| − | |North-west of the [[Elf Camp]]. On the western coastline, north of a fishing spot. |
||
| − | |[[File:Scan clue Tirannwn north-west of Elf Camp.png|300px|center]] |
||
| − | |- id="South of Prifddinas main entrance" |
||
| − | |Just south of the main entrance to [[Prifddinas]] (the elf city that cannot be accessed by players). |
||
| − | |[[File:Scan clue Tirannwn south of Prifddinas main entrance.png|300px|center]] |
||
| − | |- id="North-west of central bridge" |
||
| − | |North-west of the area's central bridge, south of the main entrance to [[Prifddinas]] (the elf city that cannot be accessed by players). This location can be accessed by travelling through a [[dense forest]] obstacle. |
||
| − | |[[File:Scan clue Tirannwn north-west of central bridge.png|300px|center]] |
||
| − | |- id="South-east of central bridge" |
||
| − | |In a clearing south-east of the area's central bridge and south-west of one the quest start points for the [[Roving Elves]] and [[Mourning's Ends Part 1]] quests. This clearing can be entered at its south, just west of a [[leaf trap]] obstacle. |
||
| − | |[[File:Scan clue Tirannwn south-east of central bridge.png|300px|center]] |
||
| − | |- id="South of eastern bridge" |
||
| − | |In a clearing south of the most eastern bridge in the area. This clearing cannot be entered by travelling south from the bridge; it can be accessed at its south-west near a [[dense forest]] obstacle (it is not necessary to travel through the dense forest to get to the clearing). |
||
| − | |[[File:Scan clue Tirannwn south of eastern bridge.png|300px|center]] |
||
| − | |- id="Between magic trees west of Lletya" |
||
| − | |In a group of 3 [[magic tree]]s west of [[Lletya]]. Exit Lletya through the village's gates and travel south to find the magic trees. |
||
| − | |[[File:Scan clue Tirannwn between magic trees west of Lletya.png|300px|center]] |
||
| − | |- id="South of Lletya General Store" |
||
| − | |Inside [[Lletya]]. On the west side of the village, south of [[Lletya General Store]], south-east of [[Lletya Seamstress]] and north-east of [[Lletya Archery Shop]]. |
||
| − | |[[File:Scan clue Tirannwn south of Lletya General Store.png|300px|center]] |
||
| − | |- id="North-east corner of Lletya" |
||
| − | |Inside [[Lletya]]. In the north-east corner of the village, east of [[Lletya General Store]]. |
||
| − | |[[File:Scan clue Tirannwn north-east corner of Lletya.png|300px|center]] |
||
| − | |- id="Other possible locations (Tirannwn)" |
||
| − | |colspan="2"| |
||
| − | '''Other possible locations''' |
||
| − | |||
| − | *South-west of [[Lletya mining site]] and north-east of Tirannwn [[lodestone]]. |
||
| − | * West of the [[Arandar]] mountain pass's southern end and east of the central bridge. East of a [[leaf trap]]. |
||
| − | *Inside [[Lletya]]. In the north-west corner of the village, near the sheep pen. |
||
|} |
|} |
||
| − | ==Varrock== |
+ | ====Varrock and the Grand Exchange==== |
| − | ''Area Information: [[Varrock]]'' |
+ | ''Area Information: [[Varrock]]'' |
'''Scan range: 16 paces''' |
'''Scan range: 16 paces''' |
||
| − | ''Click [[Map:Varrock scan|here]] for full size of the map.'' |
||
{{Map:Varrock_scan}} |
{{Map:Varrock_scan}} |
||
| − | {|class="wikitable" |
+ | {| class="wikitable" |
| − | !style="width: 300px;"|Possible locations |
+ | ! style="width: 300px;" |Possible locations |
!Image |
!Image |
||
|- id="West side of Grand Exchange" |
|- id="West side of Grand Exchange" |
||
|West side of the [[Grand Exchange]]. |
|West side of the [[Grand Exchange]]. |
||
|[[File:Scan clue Varrock west side of Grand Exchange.png|300px|center]] |
|[[File:Scan clue Varrock west side of Grand Exchange.png|300px|center]] |
||
| + | |- id="South-east corner of the Grand Exchange" |
||
| + | |In the south-east corner of the [[Grand Exchange]]. |
||
| + | |[[File:Scan clue Varrock south-east corner of the Grand Exchange.png|300px|center]] |
||
|- id="North-east corner of Grand Exchange" |
|- id="North-east corner of Grand Exchange" |
||
|In the north-east corner of the [[Grand Exchange]], by the [[spirit tree]] unlocked after completing the [[Tree Gnome Village]] quest. |
|In the north-east corner of the [[Grand Exchange]], by the [[spirit tree]] unlocked after completing the [[Tree Gnome Village]] quest. |
||
| Line 1,196: | Line 1,784: | ||
|[[File:Scan clue Varrock east side of Grand Exchange.png|300px|center]] |
|[[File:Scan clue Varrock east side of Grand Exchange.png|300px|center]] |
||
|- id="North-east of Varrock Palace" |
|- id="North-east of Varrock Palace" |
||
| − | |North-east of [[Varrock Palace]], in the palace's grounds north of the garden used in the [[Garden of Tranquillity]] quest. East of the rare trees icon indicating the presence of [[Yew Tree|yew trees]] and south of the cage containing a [[ |
+ | |North-east of [[Varrock Palace]], in the palace's grounds north of the garden used in the [[Garden of Tranquillity]] quest. East of the rare trees icon indicating the presence of [[Yew Tree|yew trees]] and south of the cage containing a [[grizzly bear]]. One pace south of the location pictured. |
|[[File:Scan clue Varrock north-east of Varrock Palace.png|300px|center]] |
|[[File:Scan clue Varrock north-east of Varrock Palace.png|300px|center]] |
||
|- id="In Varrock Palace courtyard" |
|- id="In Varrock Palace courtyard" |
||
| Line 1,207: | Line 1,795: | ||
|West of Varrock square. South-east of Varrock's west bank, just west of the tent containing [[Gypsy Aris]]. |
|West of Varrock square. South-east of Varrock's west bank, just west of the tent containing [[Gypsy Aris]]. |
||
|[[File:Scan clue Varrock south-east of west bank.png|300px|center]] |
|[[File:Scan clue Varrock south-east of west bank.png|300px|center]] |
||
| + | |- id="North of the Apothecary" |
||
| + | |North of the [[Apothecary]]. |
||
| + | |[[File:Scan clue Varrock North of the Apothecary.png|300px|center]] |
||
|- id="West of general store" |
|- id="West of general store" |
||
|South of Varrock square. West of [[Varrock General Store]] and south of [[Thessalia's Fine Clothes]] (the clothes shop where players can change their default clothing). |
|South of Varrock square. West of [[Varrock General Store]] and south of [[Thessalia's Fine Clothes]] (the clothes shop where players can change their default clothing). |
||
|[[File:Scan clue Varrock west of general store.png|300px|center]] |
|[[File:Scan clue Varrock west of general store.png|300px|center]] |
||
| − | |- id=" |
+ | |- id="West of Varrock Tanner" |
| − | |South-west of Varrock's west bank, within the south-west city wall. |
+ | |South-west of Varrock's west bank and west of Varrock Tanner, within the south-west city wall. |
| − | |[[File:Scan clue Varrock |
+ | |[[File:Scan clue Varrock west of Varrock Tanner.png|300px|center]] |
|- id="East of Black Arm Gang's headquarters" |
|- id="East of Black Arm Gang's headquarters" |
||
|In the south of the city. Just east of the [[Black Arm Gang]]'s headquarters used in the [[Shield of Arrav]] quest and north-west of Varrock [[lodestone]]. |
|In the south of the city. Just east of the [[Black Arm Gang]]'s headquarters used in the [[Shield of Arrav]] quest and north-west of Varrock [[lodestone]]. |
||
| Line 1,237: | Line 1,828: | ||
|South-east of Varrock square. In the area with pillories, east of [[Varrock General Store]]. |
|South-east of Varrock square. In the area with pillories, east of [[Varrock General Store]]. |
||
|[[File:Scan clue Varrock south-east of Varrock square.png|300px|center]] |
|[[File:Scan clue Varrock south-east of Varrock square.png|300px|center]] |
||
| + | |- id="North of Blue Moon Inn" |
||
| + | |Just north of the [[Blue Moon Inn]] and south of [[Varrock General Store]], south of Varrock square. |
||
| + | |[[File:Scan clue Varrock north of Blue Moon Inn.png|300px|center]] |
||
|- id="Inside platebody shop" |
|- id="Inside platebody shop" |
||
| − | |North-east of Varrock square inside [[Horvik's |
+ | |North-east of Varrock square inside [[Horvik's Armour Shop]] (the platebody shop). |
|[[File:Scan clue Varrock inside platebody shop.png|300px|center]]. |
|[[File:Scan clue Varrock inside platebody shop.png|300px|center]]. |
||
|- id="North of estate agent" |
|- id="North of estate agent" |
||
| − | |In north-east Varrock. Just north of the [[ |
+ | |In north-east Varrock. Just north of the [[estate agent]] and west of Varrock chapel. |
|[[File:Scan clue Varrock north of estate agent.png|300px|center]] |
|[[File:Scan clue Varrock north of estate agent.png|300px|center]] |
||
| − | |- id=" |
+ | |- id="Entrance of the Varrock Museum" |
| + | |At the entrance of the [[Varrock Museum]]. |
||
| − | |colspan="2" | |
||
| + | |[[File:Scan clue Varrock museum entrance.png|300px|center]] |
||
| − | '''Other possible locations''' |
||
| + | |- id="South-west of west bank" |
||
| − | |||
| + | |South-west of Varrock's west bank, within the south-west city wall, five steps south of the northern ladder. |
||
| − | *In the south-east corner of the [[Grand Exchange]]. |
||
| − | + | |[[File:Scan clue Varrock south-west of west bank.png|300px|center]] |
|
|} |
|} |
||
| + | ====Wilderness, deep==== |
||
| − | ==White Wolf Mountain== |
||
| + | "This scroll will work in the deepest levels of the Wilderness." |
||
| − | ''Area Information: [[White Wolf Mountain]]''<br /> |
||
| − | Scans will either be on top of or under White Wolf Mountain, if the player is not on the right level for their scan they will be told "Try scanning another level".<br /> |
||
| + | ''Area Information: [[Wilderness]]'' |
||
| − | '''Scan range: 38 paces''' |
||
| + | Since the [[Wilderness and Free Trade Vote]], the chance of receiving a scan clue in the Wilderness has been very low. |
||
| − | ''Click [[Map:White Wolf Mountain scan|here]] for full size of the map.'' |
||
| − | {{Map:White_Wolf_Mountain_scan}} |
||
| + | '''Scan range: 25 paces''' |
||
| − | {|class="wikitable" |
||
| − | !style="width: 300px;"|Possible locations |
||
| − | !Image |
||
| − | |- id="On top of mountain, north-west of Taverley bank" |
||
| − | |On top of the mountain, on the mountain's southern tip. North-west of [[Taverley]] bank and just north of the shortcut icon that indicates a grapple shortcut from [[Catherby]] to Taverley. |
||
| − | |[[File:Scan clue White Wolf Mountain on top of mountain north-west of Taverley bank.png|300px|center]] |
||
| − | |- id="On top of mountain, north of Catherby fruit tree patch" |
||
| − | |On top of the mountain, near the mountain's southern tip. North of [[Catherby]]'s [[fruit tree patch]] and north-west of [[Taverley]] [[lodestone]]. |
||
| − | |[[File:Scan clue White Wolf Mountain on top of mountain north of Catherby fruit tree patch.png|300px|center]] |
||
| − | |- id="On top of mountain, north of Taverley lodestone" |
||
| − | |On top of the mountain, on the mountain's eastern side. North of [[Taverley]] [[lodestone]]. |
||
| − | |[[File:Scan clue White Wolf Mountain on top of mountain north of Taverley lodestone.png|300px|center]] |
||
| − | |- id="On top of mountain, north-east of Grimgnash" |
||
| − | |On top of the mountain, at the mountain's northeastern corner. Just north-east of [[Grimgnash]] the griffin and south of the [[Warriors' Guild]]. |
||
| − | |[[File:Scan clue White Wolf Mountain on top of mountain north-east of Grimgnash.png|300px|center]] |
||
| − | |- id="On top of mountain, north-east corner" |
||
| − | |On top of the mountain, at the mountain's northeastern corner. South-east of the [[Warriors' Guild]] and just west of [[Burthorpe]]. |
||
| − | |[[File:Scan clue White Wolf Mountain on top of mountain north-east corner.png|300px|center]] |
||
| − | |- id="On top of mountain, south of Burthorpe mine entrance" |
||
| − | |On top of the mountain, just east of the northeastern corner of the mountain. South of [[Burthrope]]'s dungeon mine entrance. |
||
| − | |[[File:Scan clue White Wolf Mountain on top of mountain south of Burthorpe mine entrance.png|300px|center]] |
||
| − | |- id="On top of mountain, west of gnome glider" |
||
| − | |On top of the mountain, west of the [[Gnome Glider|gnome glider]]. |
||
| − | |[[File:Scan clue White Wolf Mountain on top of mountain west of gnome glider.png|300px|center]] |
||
| − | |- id="On top of mountain, in central group of ladders" |
||
| − | |On top of the mountain, on the mountain's northern side. In the centre of the mountain's central group of 3 ladders. Access the area at its west, by mining the rocks that are blocking the path (requires 50 [[Mining]]). |
||
| − | |[[File:Scan clue White Wolf Mountain on top of mountain in central group of ladders.png|300px|center]] |
||
| − | |- id="Under mountain, north of central group of ladders" |
||
| − | |Under the mountain, north of the central group of ladders. Access by climbing down the most northern ladder in the central group of ladders on top of the mountain. |
||
| − | |[[File:Scan clue White Wolf Mountain under mountain north of central group of ladders.png|300px|center]] |
||
| − | |- id="Under mountain, just west of central group of ladders" |
||
| − | |Under the mountain, just west of the central group of ladders. Access by climbing down the most southern ladder in the central group of ladders on top of the mountain. |
||
| − | |[[File:Scan clue White Wolf Mountain under mountain just west of central group of ladders.png|300px|center]] |
||
| − | |- id="Under mountain, in south-west group of ladders" |
||
| − | |Under the mountain, in south-west group of ladders. Access by climbing down the most southern ladder in the central group of ladders on top of the mountain and travelling west along the tunnel. |
||
| − | |[[File:Scan clue White Wolf Mountain under mountain in south-west group of ladders.png|300px|center]] |
||
| − | |- id="On top of mountain, west of west group of ladders" |
||
| − | |On top of the mountain, just west of the west group of ladders. Access by climbing down the most southern ladder in the central group of ladders on top of the mountain; travelling west along the tunnel under the mountain and climbing up the most southern ladder in the group of ladders south-west under the mountain. |
||
| − | |[[File:Scan clue White Wolf Mountain on top of mountain west of west group of ladders.png|300px|center]] |
||
| − | |- id="On top of mountain, south-west of west group of ladders" |
||
| − | |On top of the mountain, south-west of the west group of ladders. Access by climbing down the most southern ladder in the central group of ladders on top of the mountain; travelling west along the tunnel under the mountain and climbing up the most southern ladder in the group of ladders south-west under the mountain. |
||
| − | |[[File:Scan clue White Wolf Mountain on top of mountain south-west of west group of ladders.png|300px|center]] |
||
| − | |- id="Under mountain, north of south-west group of ladders" |
||
| − | |Under the mountain, north of the south-west group of ladders. Access by climbing down the most southern ladder in the central group of ladders on top of the mountain; travelling west along the tunnel under the mountain; climbing up the most southern ladder in the group of ladders south-west under the mountain and climbing down the most northern ladder in the west group of ladders on top of the mountain. |
||
| − | |[[File:Scan clue White Wolf Mountain under mountain north of south-west group of ladders.png|300px|center]] |
||
| − | |- id="Under mountain, north in tunnel" |
||
| − | |Under the mountain, north of the area in the tunnel leading to the [[Ice Queen]]. Access by climbing down the most southern ladder in the central group of ladders on top of the mountain; travelling west along the tunnel under the mountain; climbing up the most southern ladder in the group of ladders south-west under the mountain and climbing down the most eastern ladder in the west group of ladders on top of the mountain. |
||
| − | |[[File:Scan clue White Wolf Mountain under mountain north in tunnel.png|300px|center]] |
||
| − | |- id="Under mountain, north-east in tunnel" |
||
| − | |Under the mountain, north-east of the area in the tunnel leading to the [[Ice Queen]]. Access by climbing down the most southern ladder in the central group of ladders on top of the mountain; travelling west along the tunnel under the mountain; climbing up the most southern ladder in the group of ladders south-west under the mountain and climbing down the most eastern ladder in the west group of ladders on top of the mountain. |
||
| − | |[[File:Scan clue White Wolf Mountain under mountain north-east in tunnel.png|300px|center]] |
||
| − | |- id="Under mountain, east in tunnel" |
||
| − | |Under the mountain, east of the area in the tunnel leading to the [[Ice Queen]]. Access by climbing down the most southern ladder in the central group of ladders on top of the mountain; travelling west along the tunnel under the mountain; climbing up the most southern ladder in the group of ladders south-west under the mountain and climbing down the most eastern ladder in the west group of ladders on top of the mountain. |
||
| − | |[[File:Scan clue White Wolf Mountain under mountain east in tunnel.png|300px|center]] |
||
| − | |- id="Under mountain, just south of east ladders" |
||
| − | |Under the mountain, just south of the east group of ladders in the tunnel leading to the [[Ice Queen]]. Access by climbing down the most southern ladder in the central group of ladders on top of the mountain; travelling west along the tunnel under the mountain; climbing up the most southern ladder in the group of ladders south-west under the mountain and climbing down the most eastern ladder in the west group of ladders on top of the mountain. |
||
| − | |[[File:Scan clue White Wolf Mountain under mountain just south of east ladders.png|300px|center]] |
||
| − | |- id="Under mountain, south of Ice Queen" |
||
| − | |Under the mountain, just south of the [[Ice Queen]]'s chamber and north of the most northern ladder in the east group of ladders. Access by climbing down the most southern ladder in the central group of ladders on top of the mountain; travelling west along the tunnel under the mountain; climbing up the most southern ladder in the group of ladders south-west under the mountain; climbing down the most eastern ladder in the west group of ladders on top of the mountain; climbing up the most southern ladder in the east group of ladders under the mountain and climbing down the most northern ladder in the east group of ladders on top of the mountain. |
||
| − | |[[File:Scan clue White Wolf Mountain under mountain south of Ice Queen.png|300px|center]] |
||
| − | |- id="Other possible locations (White Wolf Mountain)" |
||
| − | |colspan="2" | |
||
| − | '''Other possible locations''' |
||
| − | *North-east corner of the chamber containing the [[Ice Queen]]. |
||
| − | |} |
||
| − | |||
| − | ==Wilderness, deep== |
||
| − | ''Area Information: [[Wilderness]]''<br /> |
||
| − | Since the [[Wilderness and Free Trade Vote]], the chance of receiving a scan clue in the Wilderness has been very low.<br /> |
||
| − | |||
| − | '''Orb scan range: 25 paces''' |
||
| − | |||
| − | ''Click [[Map:Deep Wilderness scan|here]] for full size of the map.'' |
||
{{Map:Deep Wilderness scan}} |
{{Map:Deep Wilderness scan}} |
||
| − | {|class="wikitable" |
+ | {| class="wikitable" |
| − | !style="width: 300px;"|Possible locations |
+ | ! style="width: 300px;" |Possible locations |
!Image |
!Image |
||
|- id="South-east of Wilderness Agility Course" |
|- id="South-east of Wilderness Agility Course" |
||
| Line 1,349: | Line 1,869: | ||
|[[File:Scan clue deep Wilderness north-west of Wilderness North Volcano.png|300px|center]] |
|[[File:Scan clue deep Wilderness north-west of Wilderness North Volcano.png|300px|center]] |
||
|- id="Other possible locations (deep Wilderness)" |
|- id="Other possible locations (deep Wilderness)" |
||
| − | |colspan="2" | |
+ | | colspan="2" | |
'''Other possible locations''' |
'''Other possible locations''' |
||
| + | *South-west corner of [[Frozen Waste Plateau]]. |
||
| − | |||
| − | * |
+ | *West of the gate in the fence in the north-west corner of the Wilderness. |
| + | *South-west of [[beacon]]. |
||
| − | *Just outside the hut containing the entrance to the [[Deep Wilderness Dungeon]]. South of the [[Pirates' Hideout]]. |
||
| − | *North-west of |
+ | *North-west of [[Wilderness Agility Course]]. |
| + | *South-west of Wilderness Agility Course. |
||
| − | *North-east of the entrance to the [[Mage Arena]]. Just east of the house containing a teleport lever which transports players to an area containing a bank run by [[Gundai]] the banker. |
||
| + | *Just south of entrance to Wilderness Agility Course. |
||
| − | *In the centre of the [[Deserted Keep]], north of the teleport lever. |
||
| − | * |
+ | *North-east of Wilderness Agility Course. |
| + | *West of [[Pirates' Hideout]]. |
||
| − | *Just south of the [[Axe Hut]] containing [[magic axe]]s. North-east of the [[Deserted Keep]] and north-west of the [[Scorpion Pit]]. |
||
| − | * |
+ | *West of hut containing the entrance to the [[Deep Wilderness Dungeon]]. |
| + | *Just west of hut containing the entrance to the Deep Wilderness Dungeon. Two paces north and one west of the small bush. |
||
| − | *North of the [[Scorpion Pit]], outside the pit. |
||
| + | *Inside hut containing the entrance to the Deep Wilderness Dungeon. |
||
| − | *South-west of [[Rogues' Castle]] and south of the aggressive [[Chaos Elemental]] boss monster located just east of Rogues' Castle. |
||
| + | *Just east of [[bloodwood tree]]. |
||
| − | *South-east of [[Rogues' Castle]] by a [[Wilderness obelisk]]. West of the aggressive [[Chaos Elemental]] boss monster located just east of Rogues' Castle. |
||
| + | *South-west of [[Mage Arena]]. |
||
| − | * North of the gate in the fence in the north-east corner of the [[Wilderness]]. South-east of [[Rogues' Castle]] and a [[Wilderness obelisk]] and south-west of the [[Wilderness North Volcano]]. |
||
| + | *South of [[Pirates' Hideout mining site]]. |
||
| − | *North-east of the [[Wilderness North Volcano]] in the north-east corner of the [[Wilderness]]. |
||
| + | *In the centre of Pirates' Hideout mining site. |
||
| + | *On northern side of Mage Arena. |
||
| + | *South-east of Mage Arena. |
||
| + | *In centre of the [[Deserted Keep]]. |
||
| + | *West of [[magic axe hut]] containing [[magic axe]]s. |
||
| + | *East of Deserted Keep. |
||
| + | *South-east of the Deserted Keep. |
||
| + | *South-west of [[Scorpion Pit]]. |
||
| + | *At west end of Scorpion Pit. |
||
| + | *In the centre of Scorpion Pit. |
||
| + | *North of Scorpion Pit. |
||
| + | *West of [[Rogues' Castle]]. |
||
| + | *South-west of Rogues' Castle. |
||
| + | *North-east of Rogues' Castle. |
||
| + | *Just south of Wilderness [[obelisk]]. |
||
| + | *South-east of Wilderness obelisk. |
||
| + | *North of the gate in the fence in the north-east corner of the Wilderness. |
||
| + | *South of central lava pool in [[Wilderness North Volcano]]. |
||
| + | *North-east of the Wilderness North Volcano. |
||
| + | *North of central lava poll in Wilderness North Volcano. |
||
| + | *North-west of central lava poll in Wilderness North Volcano. |
||
|} |
|} |
||
| − | ==Wilderness Volcano== |
+ | ====Wilderness Volcano==== |
| + | "This scroll will work in the crater of the Wilderness volcano." |
||
| − | ''Area Information: [[Wilderness Volcano]]'' <br /> |
||
| + | |||
| − | Since the [[Wilderness and Free Trade Vote]], the chance of receiving a scan clue in the Wilderness has been very low.<br /> |
||
| + | ''Area Information: [[Wilderness Volcano]]'' |
||
| + | |||
| + | Since the [[Wilderness and Free Trade Vote]], the chance of receiving a scan clue in the Wilderness has been very low. |
||
'''Scan range: 11''' |
'''Scan range: 11''' |
||
| − | + | {{Map:Wilderness Volcano scan}} |
|
| − | {{Map:Wilderness_Volcano_scan}} |
||
| − | {|class="wikitable" |
+ | {| class="wikitable" |
| − | !style="width: 300px;"|Possible locations |
+ | ! style="width: 300px;" |Possible locations |
!Image |
!Image |
||
|- id="South-east side of volcano" |
|- id="South-east side of volcano" |
||
|On the south-east side of the volcano, just north of the south-east entrance to the volcano. North-east of the Wilderness Volcano [[lodestone]]. |
|On the south-east side of the volcano, just north of the south-east entrance to the volcano. North-east of the Wilderness Volcano [[lodestone]]. |
||
|[[File:Scan clue Wilderness Volcano south-east side of volcano.png|300px|center]] |
|[[File:Scan clue Wilderness Volcano south-east side of volcano.png|300px|center]] |
||
| + | |- id="South-east of monolith" |
||
| + | |South-east of monolith. |
||
| + | |[[File:Scan clue Wilderness Volcano south-east of monolith.png|300px|center]] |
||
| + | |- id="North-west of south-east entrance" |
||
| + | |North-west of the south-east entrance of the Volcano. |
||
| + | |[[File:Scan clue Wilderness Volcano north-west of south-east entrance.png|300px|center]] |
||
|- id="South-west side of volcano" |
|- id="South-west side of volcano" |
||
|On the south-west side of the volcano, just east of the south-west entrance to the volcano. North-west of the Wilderness Volcano [[lodestone]]. |
|On the south-west side of the volcano, just east of the south-west entrance to the volcano. North-west of the Wilderness Volcano [[lodestone]]. |
||
|[[File:Scan clue Wilderness Volcano south-west side of volcano.png|300px|center]] |
|[[File:Scan clue Wilderness Volcano south-west side of volcano.png|300px|center]] |
||
| − | |- id=" |
+ | |- id="North of south-west entrance" |
| − | | |
+ | |North of the south-western entrance to the volcano. |
| − | |[[File:Scan clue Wilderness Volcano |
+ | |[[File:Scan clue Wilderness Volcano north of south-west entrance.png|300px|center]] |
|- id="North-west side of volcano" |
|- id="North-west side of volcano" |
||
|On the north-west side of the volcano, south-west of the volcano's north-west entrance. |
|On the north-west side of the volcano, south-west of the volcano's north-west entrance. |
||
| Line 1,394: | Line 1,943: | ||
|On the northern side of the volcano, just north of the monolith. |
|On the northern side of the volcano, just north of the monolith. |
||
|[[File:Scan clue Wilderness Volcano north of monolith.png|300px|center]] |
|[[File:Scan clue Wilderness Volcano north of monolith.png|300px|center]] |
||
| + | |- id="Centre of volcano" |
||
| + | |In the centre of the volcano, just north of the monolith. |
||
| + | |[[File:Scan clue Wilderness Volcano centre of volcano.png|300px|center]] |
||
| + | |- id="North-east of monolith" |
||
| + | |On the north-east side of the volcano, just north-east of the monolith. |
||
| + | |[[File:Scan clue Wilderness Volcano north-east of monolith.png|300px|center]] |
||
|- id="Other possible locations (Wilderness Volcano)" |
|- id="Other possible locations (Wilderness Volcano)" |
||
| − | |colspan="2" | |
+ | | colspan="2" | |
'''Other possible locations''' |
'''Other possible locations''' |
||
| + | *West of south-east entrance to volcano. |
||
| − | |||
| − | *On |
+ | *On southern side of volcano. |
| + | *On southern side of volcano, north-west of musician and the Wilderness [[lodestone]]. |
||
| + | *South-west of monolith. |
||
| + | *West of monolith. |
||
| + | *South of north-west entrance. Seven paces west and three paces south of the center of the northernmost of the ruins nearby. |
||
| + | *North-west of monolith. |
||
| + | *South-west of north-east entrance. |
||
| + | *South of north-east entrance. |
||
| + | *East side of volcano. |
||
|} |
|} |
||
| − | ==Zanaris== |
+ | ====Zanaris==== |
| − | ''Area Information: [[Zanaris]]'' |
+ | ''Area Information: [[Zanaris]]'' |
| − | ''' |
+ | '''Scan range: 16 paces''' |
| − | ''Click [[Map:Zanaris scan|here]] for full size of the map.'' |
||
{{Map:Zanaris_scan}} |
{{Map:Zanaris_scan}} |
||
| − | {|class="wikitable" |
+ | {| class="wikitable" |
| − | !style="width: 300px;"|Possible locations |
+ | ! style="width: 300px;" |Possible locations |
!Image |
!Image |
||
|- id="South of wheat field" |
|- id="South of wheat field" |
||
| Line 1,416: | Line 1,978: | ||
|[[File:Scan clue Zanaris south of wheat field.png|300px|center]] |
|[[File:Scan clue Zanaris south of wheat field.png|300px|center]] |
||
|- id="South-west of central fairy ring" |
|- id="South-west of central fairy ring" |
||
| − | |South-west of the [[fairy ring]] in the centre of Zanaris; this fairy ring is the main fairy ring in RuneScape through which a player can teleport to any other fairy ring. South-west of the wheat field. |
+ | |South-west of the [[fairy ring]] in the centre of Zanaris; this fairy ring is the main fairy ring in RuneScape through which a player can teleport to any other fairy ring. South-west of the wheat field. One pace north of the location pictured. |
|[[File:Scan clue Zanaris south-west of central fairy ring.png|300px|center]] |
|[[File:Scan clue Zanaris south-west of central fairy ring.png|300px|center]] |
||
| − | |- id=" |
+ | |- id="In passage north of Cosmic Altar" |
| − | |North |
+ | |North of the [[Cosmic Altar]]. North in the passage with Agility shortcuts leading to the altar. |
| − | |[[File:Scan clue Zanaris north |
+ | |[[File:Scan clue Zanaris in passage north of Cosmic Altar.png|300px|center]] |
| − | |- id=" |
+ | |- id="In passage north-west of Cosmic Altar" |
| − | | |
+ | |North of the [[Cosmic Altar]]. North-west in the passage with Agility shortcuts leading to the altar. |
| + | |[[File:Scan clue Zanaris in passage north-west of Cosmic Altar.png|300px|center]] |
||
| + | |- id="North-west corner of passage to cosmic altar" |
||
| + | |North of the [[Cosmic Altar]]. North-west in the passage with Agility shortcuts leading to the altar. |
||
| + | |[[File:Scan clue Zanaris northwest corner of passage to cosmic altar.png|300px|center]] |
||
| + | |- id="East of Cosmic Altar" |
||
| + | |Just north of the trees east of the [[Cosmic Altar]], in the chamber containing the altar. |
||
|[[File:Scan clue Zanaris east of Cosmic altar.png|300px|center]] |
|[[File:Scan clue Zanaris east of Cosmic altar.png|300px|center]] |
||
| + | |- id="South-east of Cosmic Altar" |
||
| + | |South-east of the Cosmic altar. |
||
| + | |[[File:Scan clue Zanaris south east of Cosmic altar.png|300px|center]] |
||
|- id="South-west of Chicken Shrine" |
|- id="South-west of Chicken Shrine" |
||
|South-west of the [[Chicken Shrine]] which can teleport players to the [[Evil Chicken's Lair]] containing [[black dragon]]s. North-east of the wheat field. |
|South-west of the [[Chicken Shrine]] which can teleport players to the [[Evil Chicken's Lair]] containing [[black dragon]]s. North-east of the wheat field. |
||
| Line 1,446: | Line 2,017: | ||
|[[File:Scan clue Zanaris west of Summoning obelisk.png|300px|center]] |
|[[File:Scan clue Zanaris west of Summoning obelisk.png|300px|center]] |
||
|- id="North-west of wheat field" |
|- id="North-west of wheat field" |
||
| − | |North-west of the wheat field. East of the building containing a [[ |
+ | |North-west of the wheat field. East of the building containing a [[dairy churn]]. |
|[[File:Scan clue Zanaris north-west of wheat field.png|300px|center]] |
|[[File:Scan clue Zanaris north-west of wheat field.png|300px|center]] |
||
| + | |- id="East of furnace" |
||
| + | |North of the wheat field entrance, east of the building containing a [[furnace]] and north-easy of the building containing a [[dairy churn]]. One step south of the location pictured. |
||
| + | |[[File:Scan clue Zanaris east of furnace.png|300px|center]] |
||
|- id="South of building with furnace" |
|- id="South of building with furnace" |
||
| − | |South of the building containing a [[ |
+ | |South of the building containing a [[furnace]] and north of the building containing a [[dairy churn]]. |
|[[File:Scan clue Zanaris south of building with furnace.png|300px|center]] |
|[[File:Scan clue Zanaris south of building with furnace.png|300px|center]] |
||
| + | |- id="West of building with dairy churn" |
||
| + | |Just west of the building containing a [[dairy churn]] and south-east of the building containing a [[furnace]]. |
||
| + | |[[File:Scan clue Zanaris west of building with dairy churn.png|300px|center]] |
||
|- id="North-west of bank" |
|- id="North-west of bank" |
||
|In the west part of Zanaris, north-west of the bank. |
|In the west part of Zanaris, north-west of the bank. |
||
| Line 1,457: | Line 2,034: | ||
|In the west part of Zanaris. East of the [[general store]] run by the [[Fairy Shopkeeper]] and [[Fairy Shop Assistant]] and south of the bank. |
|In the west part of Zanaris. East of the [[general store]] run by the [[Fairy Shopkeeper]] and [[Fairy Shop Assistant]] and south of the bank. |
||
|[[File:Scan clue Zanaris east of general store.png|300px|center]] |
|[[File:Scan clue Zanaris east of general store.png|300px|center]] |
||
| − | |- id=" |
+ | |- id="In otherworldly beings area" |
| + | |In the area containing [[otherworldly beings]]. |
||
| − | |colspan="2" | |
||
| + | |[[File:Scan clue Zanaris south-west otherwordlies area.png|300px|center]] |
||
| − | '''Other possible locations''' |
||
| + | |- id="Just east of the Cosmic Altar" |
||
| + | |Just east of the Cosmic Altar. |
||
| + | |[[File:Scan clue Zanaris east next to the Cosmic altar.png|300px|center]] |
||
| + | |} |
||
| + | ===Former locations=== |
||
| − | *In the south-west part of Zanaris, in the area with [[Otherworldly beings|otherworldly beings]]. |
||
| + | * Scans for the [[Chaos Tunnels]] were [[Update:Patch Notes (10 July 2017)|removed]] on [[10 July]] [[2017]] due to player feedback. |
||
| − | |} |
||
| + | * Scans for [[White Wolf Mountain]] were replaced with [[Menaphos]] scans in the [[Update:Patch Notes (26 February 2018)|clue scroll rework]] on [[26 February]] [[2018]]. |
||
| + | * During the 2018 clue scroll rework all [[Kharidian Desert]] scan locations were made to be on the east side of the [[River Elid]] and any [[Kharazi Jungle]] locations were made to be inside the jungle; those in [[Herblore Habitat]] were removed. |
||
| + | <noinclude> |
||
| − | {{Clue}} |
||
| + | {{Clue}}</noinclude> |
||
| − | [[Category:Treasure Trail guides]] |
||
Latest revision as of 11:18, 8 June 2019
Scans
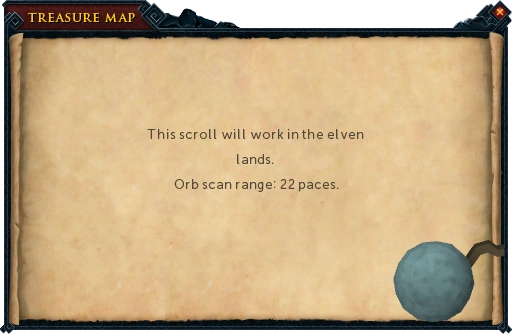
An example of a scan clue when the "Read" option has been selected.
Scans are a type of Treasure Trail clue that can only occur during elite and master clue scrolls. The first batch of scans came to the game as part of the Treasure Trail update on 4 August 2010, while the second batch came to the game as part of the clue scroll overhaul on 26 February 2018. They can be distinguished from other types of clues by the orb attached to the clue scroll. Scan clues require going to a particular region and scanning in order to find the next clue (or the casket).
Some scans may be found in multiple levels; so far to date, only Dorgesh-Kaan and Brimhaven Dungeon have scans which can be found on multiple levels. If the message "Try scanning another level." appears, players must go to the other level(s) and scan from there.
To start the clue, players must first right-click the scroll and select the "Read" option to find out which region they must search in. They must then go to this region and open the scroll's "Scan" interface to automatically scan the region for the correct spot. Upon starting the scan, a blue pulse appear around the player and "ping".
This blue pulse is extremely helpful for finding the scan's dig spot (it is not affected even if the scan is on another level) and has three stages:
- Low ping (stage 1) - the pulse emits very slowly. Occurs when the player is very far from the scan spot (double + 1 pace away from the spot)
- Medium ping (stage 2) - the pulse starts to emit faster (two pings). Occurs when the player is at least double the scan range from the spot. (e.g 28 paces away when the scan covers 14 paces)
- High ping (stage 3) - the pulse emits very fast pings. Occurs when the player is within range of the scan range of the spot.
Using the meerkat familiar will increase the scan range of all scans by 5.
When the player is standing on the exact spot indicated by the arrow they can use a spade to dig up the next clue or casket (a spade on the tool belt can be used by right-clicking Dig on the clue scroll). Alternatively a Meerkat familiar's fetch casket special move can be used (this requires level 4 Summoning and fetch casket scrolls). Use of a meerkat's special move is recommended in order to avoid the possibility of a wizard fight:
- On elite clues, players may fight a level 109 or 119 guthix wizard (109 in the Wilderness, 119 elsewhere)
- On master clues, players may fight a level 105 Cabbagemancer, a level 119 Bandosian wild mage, or a level 119 Armadylean shaman. These monsters are capable of using abilities in combat.
On 10 July 2017, the Chaos Tunnels were removed as a potential new scan location. However, any existing Chaos Tunnel scan clues remain until they are solved.
Details of possible locations for each region can be found below. The symbols on the maps represent:
![]() - An accurate location
- An accurate location
![]() - An approximate location or location without an in-game image
- An approximate location or location without an in-game image
Locations
Ardougne
Area Information: West Ardougne; East Ardougne
Scan range: 22 paces
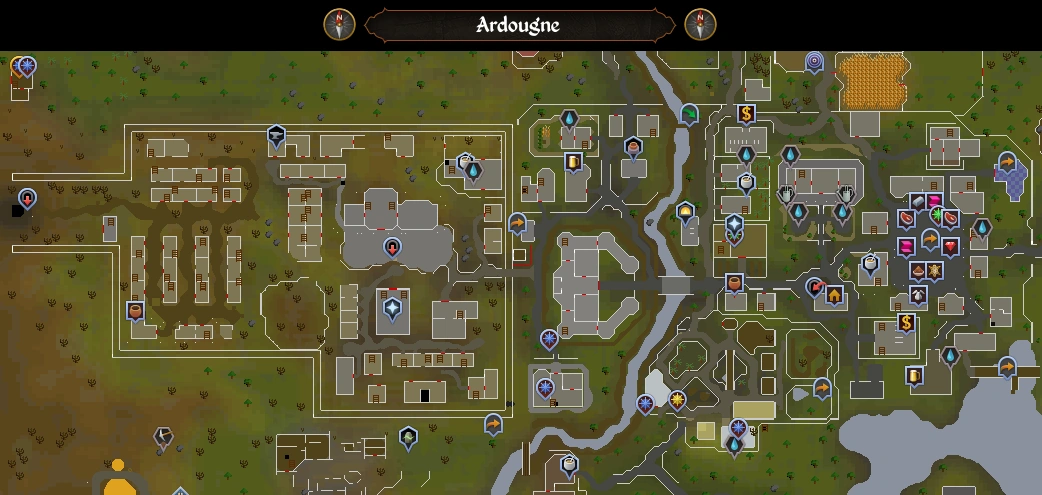
| Possible locations | Image |
|---|---|
| East Ardougne, just west of the Estate Agent and north-west of the southern bank. |  |
| East Ardougne, just south of Handelmort Mansion, and between Horacio's patch and the Jade vine patch. | 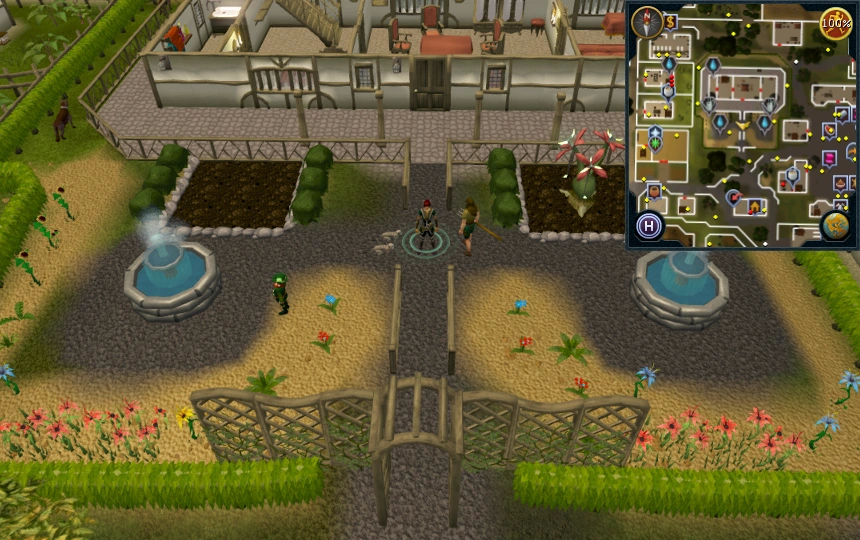 |
| East Ardougne, between Handelmort Mansion and East Ardougne church. | 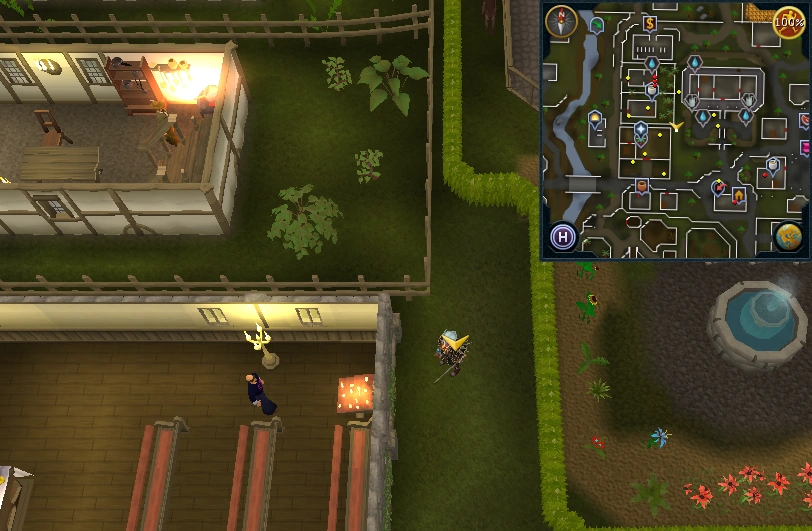 |
| East Ardougne, centre of the market. |  |
| East Ardougne, outside of the Servants' Guild. North of market. | 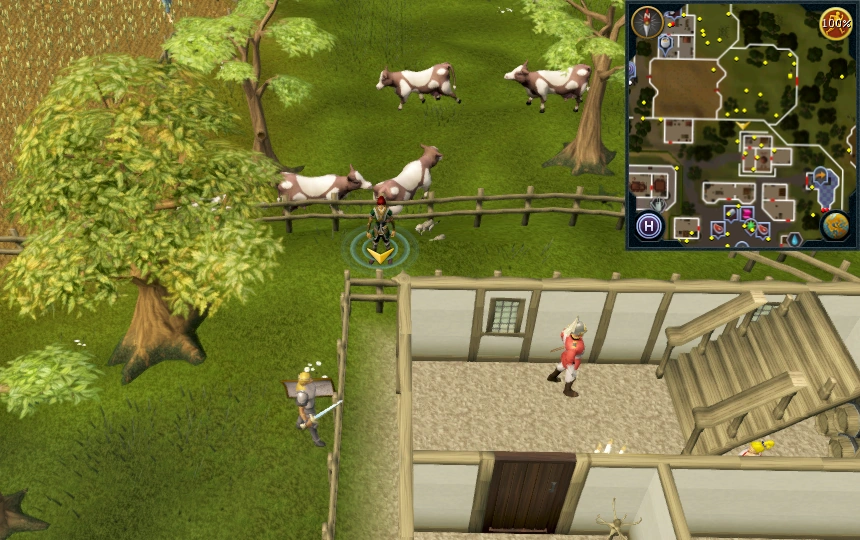 |
| East Ardougne, south of Ardougne lodestone. North of Handelmort Mansion. | 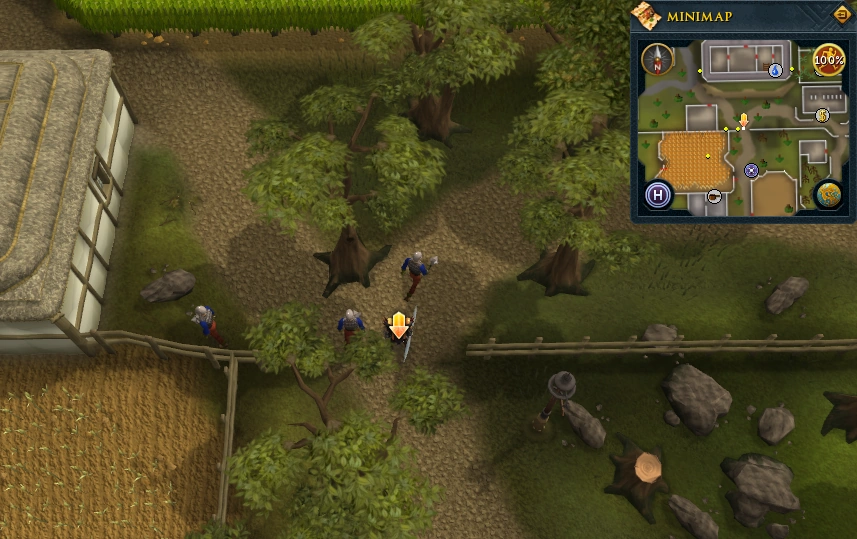 |
| East Ardougne, outside of the northern bank. Two steps south of the pictured location. |  |
| East Ardougne, north of house with pottery wheel. One step south of the location pictured. | 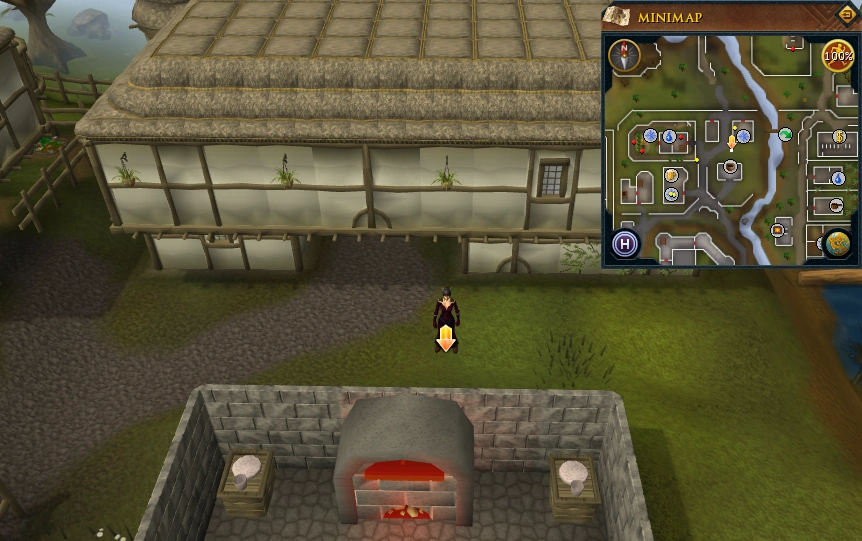 |
| East Ardougne, south of house with pottery wheel. One pace south of the location pictured. |  |
| East Ardougne, west of Flying Horse Inn. | 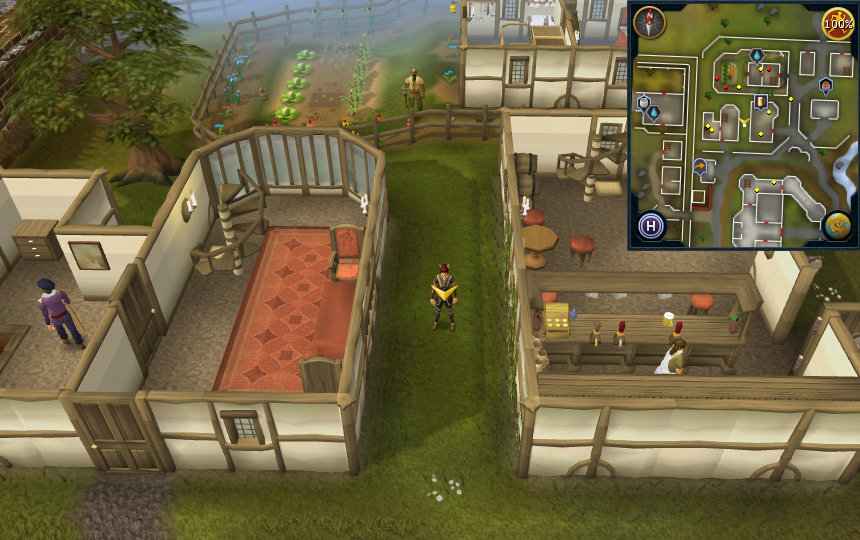 |
| East Ardougne, north of Flying Horse Inn and Elena's house (after the Plague City quest has been completed). |  |
| East Ardougne, just north of Ardougne Castle. One pace south of the location pictured. |  |
| East Ardougne, east of Carnillean Mansion and south of Ardougne Castle. |  |
| West Ardougne, outside the mourners' headquarters. | 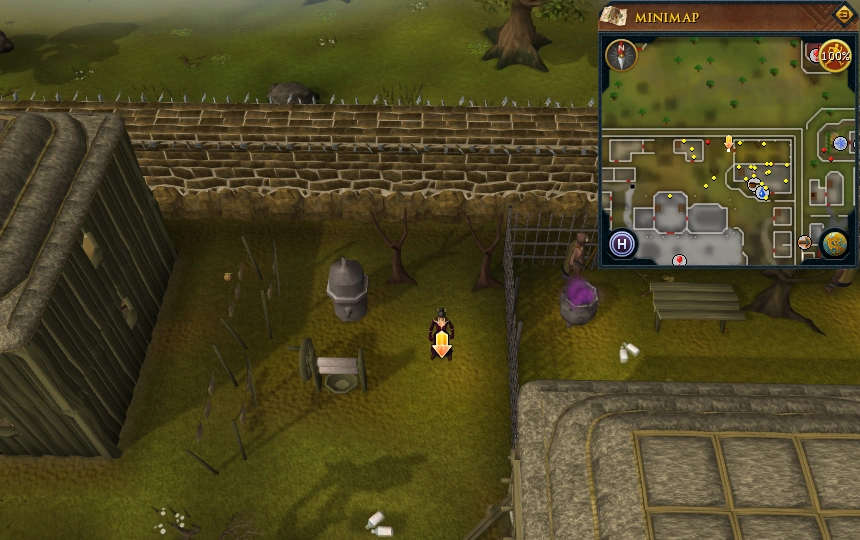 |
| West Ardougne, in town square. | 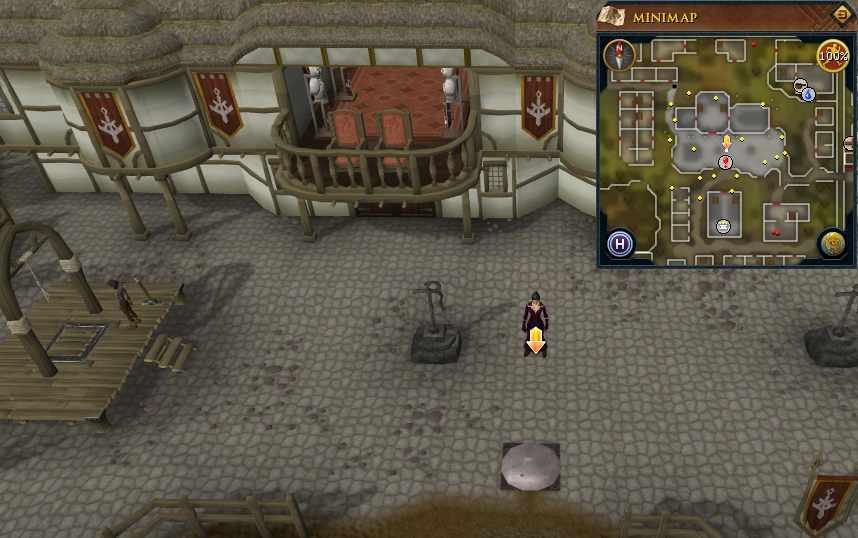 |
| West Ardougne, south of the town square and the chapel. | 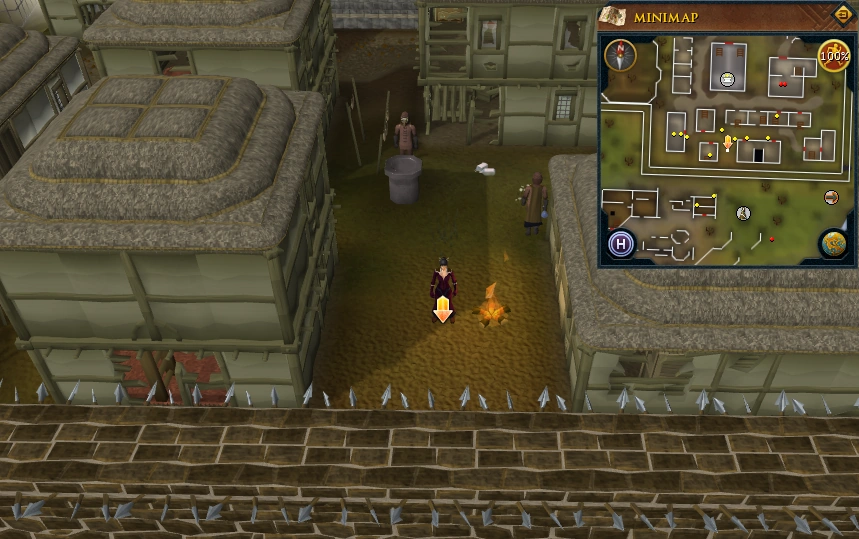 |
| West Ardougne, in corner just south of graveyard. | 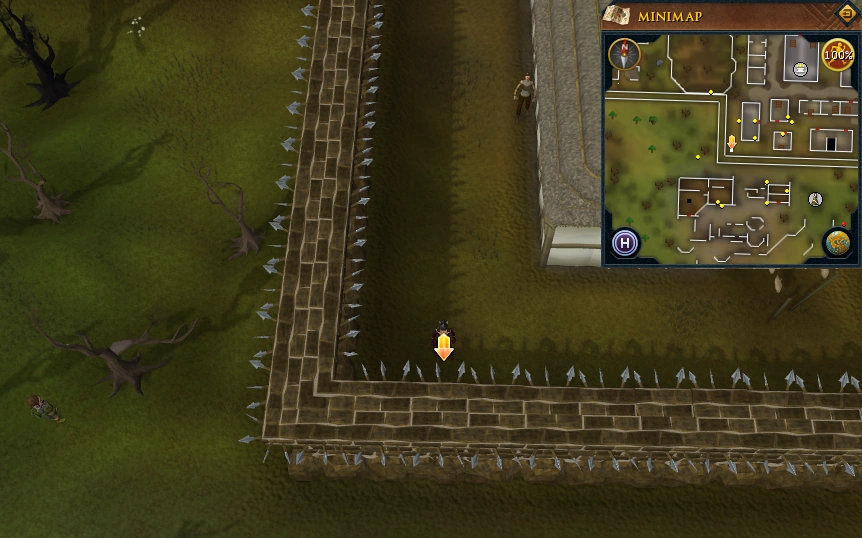 |
| West Ardougne, between chapel and graveyard. | 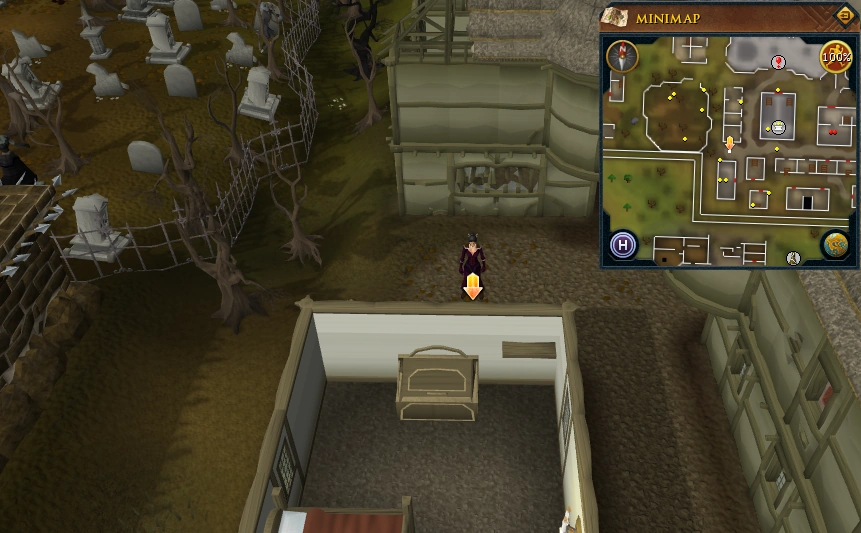 |
| West Ardougne, inside graveyard. | 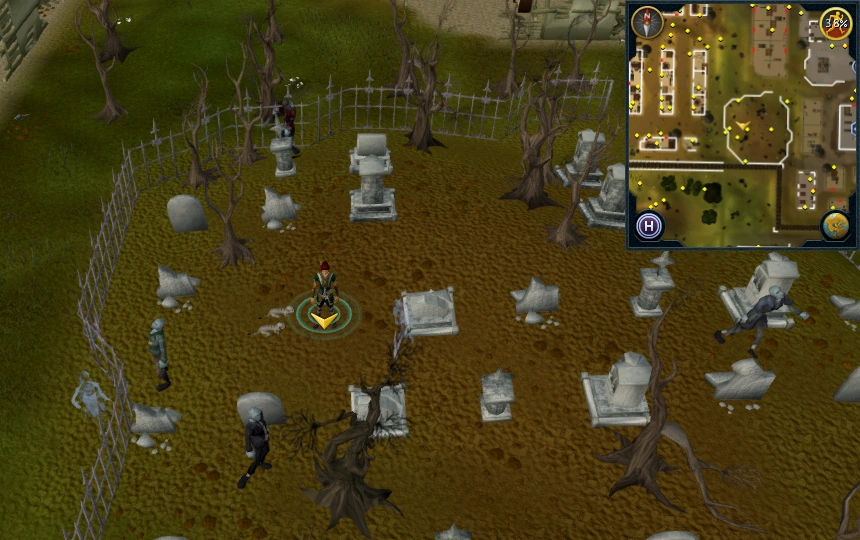 |
| West Ardougne, southwest of the graveyard. | 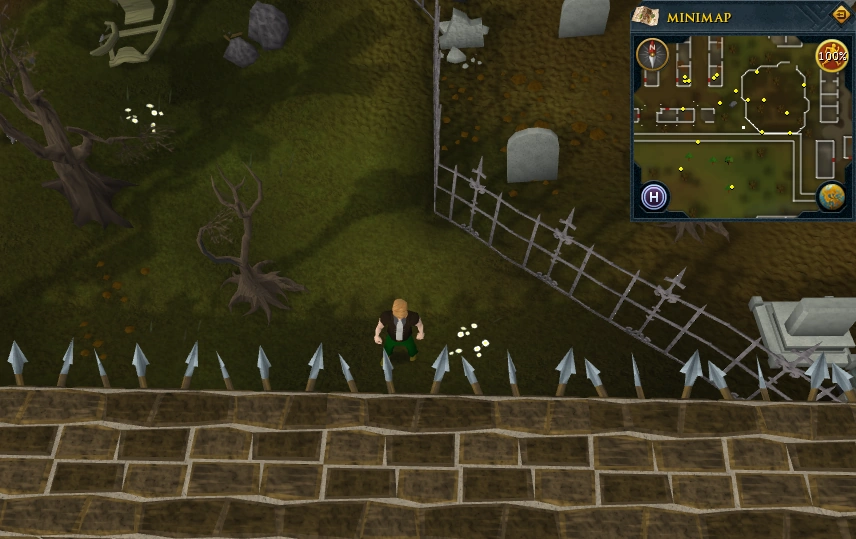 |
| West Ardougne, just east of building with anvil. | 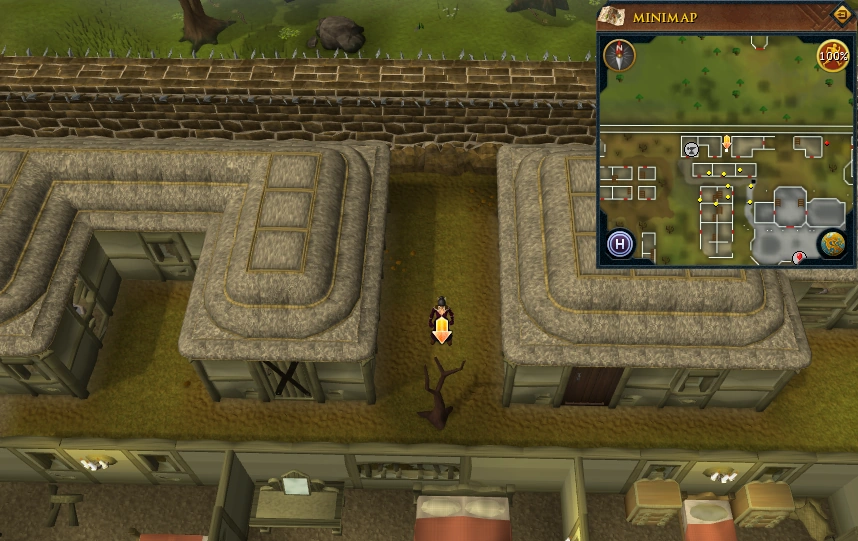 |
| West Ardougne, inside northernmost house of housing area. |  |
| West Ardougne, just west of the northern housing area. |  |
| South of northwestern housing area. | 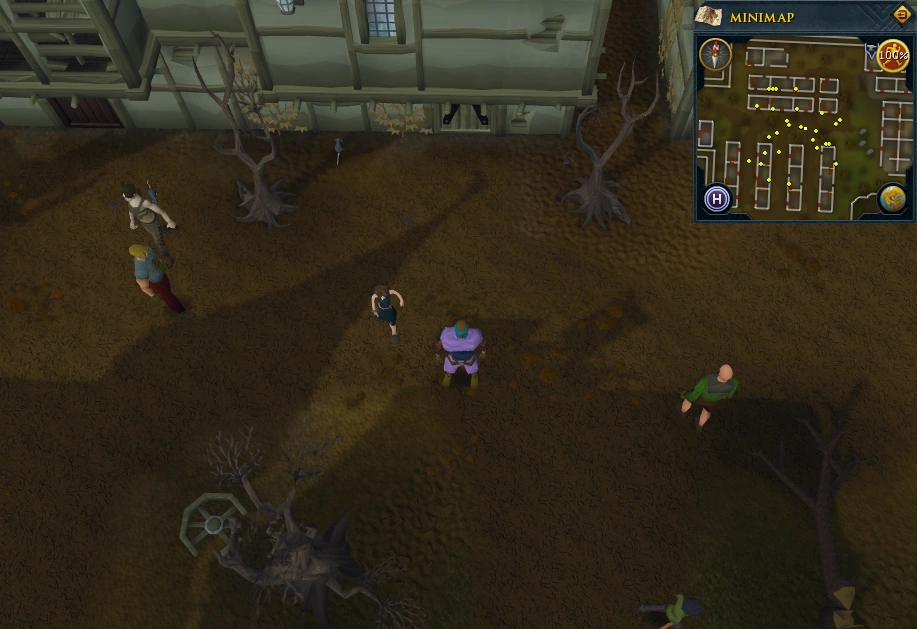 |
| West Ardougne, outside general store. | 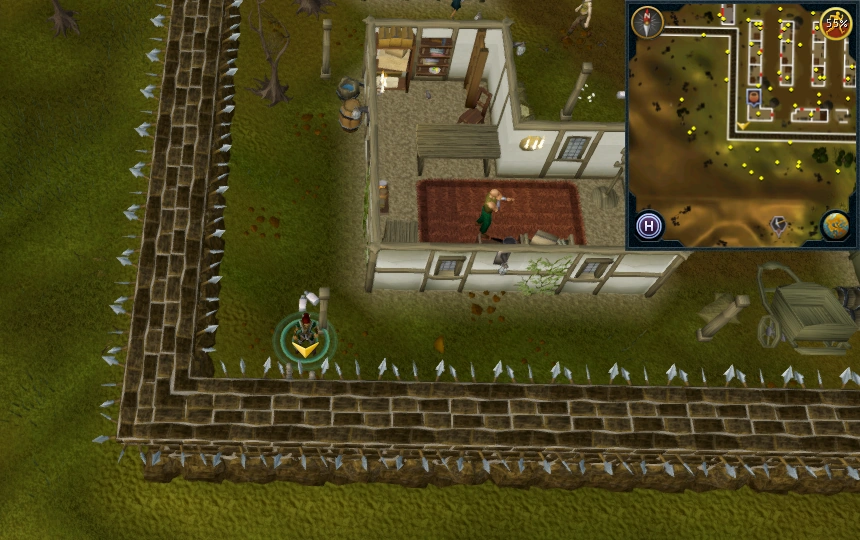 |
| West Ardougne, outside Underground Pass entrance. | 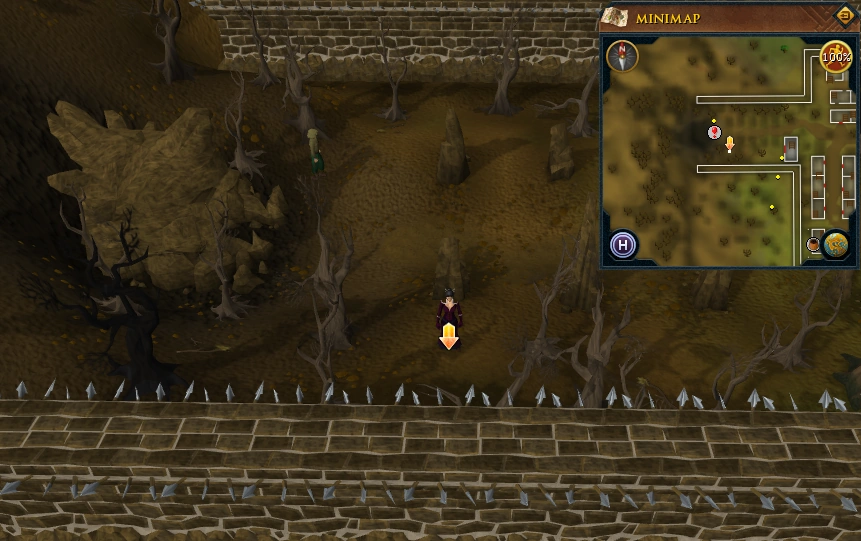 |
| West Ardougne, north-east of the Underground Pass entrance. | 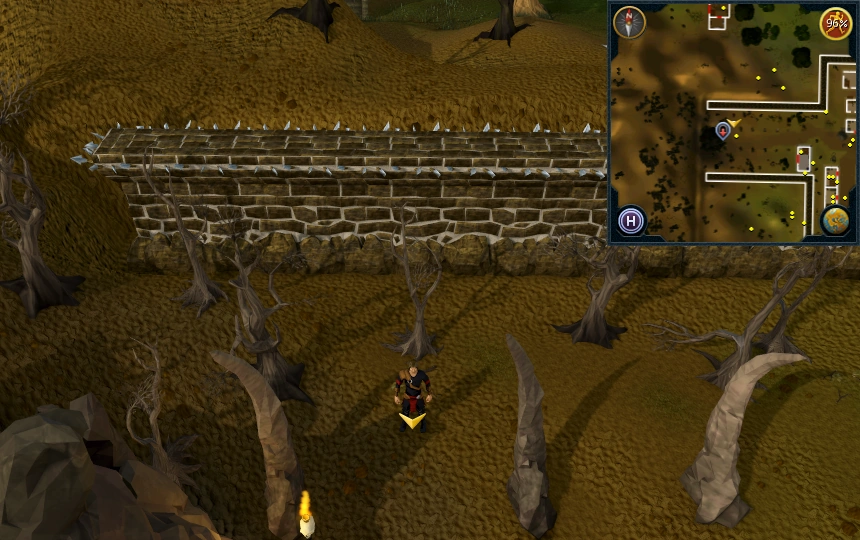 |
| West Ardougne, north-west of the Civic Office. |  |
Brimhaven Dungeon
Area Information: Brimhaven Dungeon
To enter the dungeon players will need 875 coins unless they own Karamja gloves 3 or 4 (to gain free access to the dungeon it is not necessary to have the gloves with you). A hatchet is also needed to cut through the obstructing vines within the dungeon (a hatchet on the tool belt will work). Scans will either be on the upper or lower level of Brimhaven Dungeon, if the player is not on the right level for their scan they will be told "Try scanning another level". Players may also find Map:Brimhaven Dungeon showing the dungeon's monsters, useful.
Scan range: 14 paces

Lower level
| Possible locations | Image |
|---|---|
| Lower level, just west of the dungeon's entrance. | 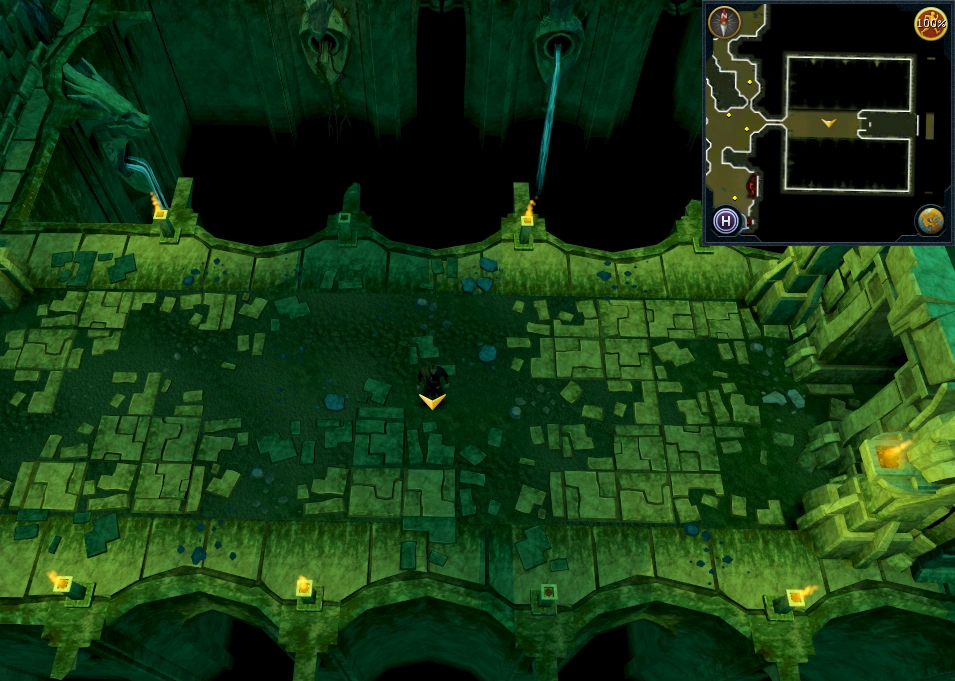 |
| Lower level, east of vine near the dungeon entrance. One pace south-east of the location pictured. |  |
| Lower level, north-west of the dungeon's entrance. In the passage leading north from the entrance. | 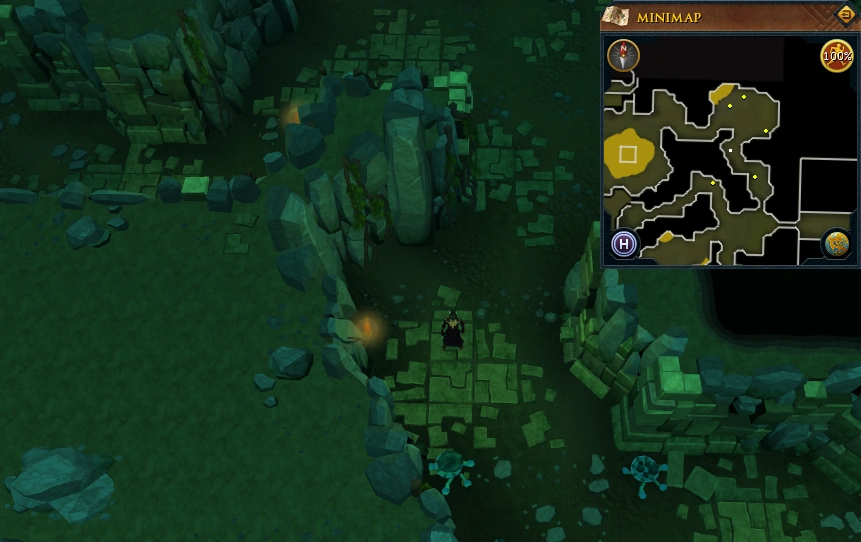 |
| Lower level, in the passage east of north-west chamber with a pool of lava containing a pillar statue in its centre. |  |
| Lower level, in north-west chamber with a pool of lava containing a pillar statue in its centre. | 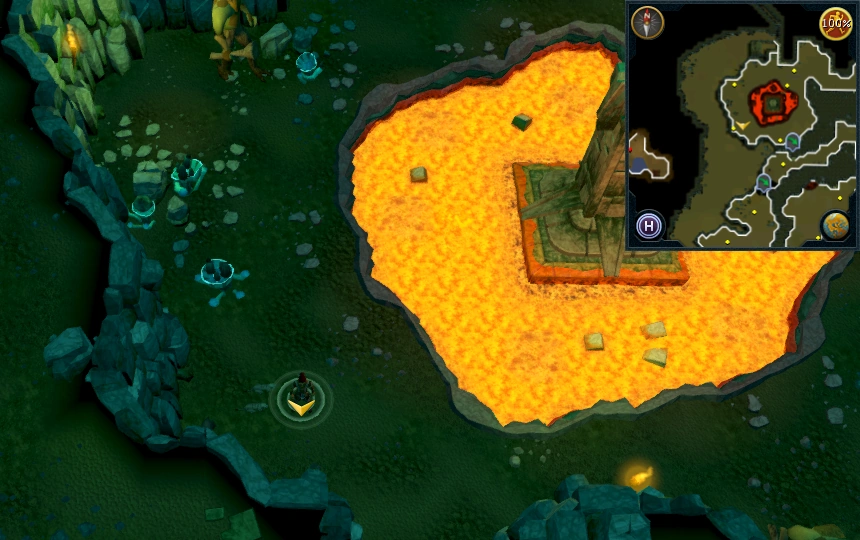 |
| Lower level, south of the dungeon's entrance in the small moss giant room with the shortcut to red dragons. | 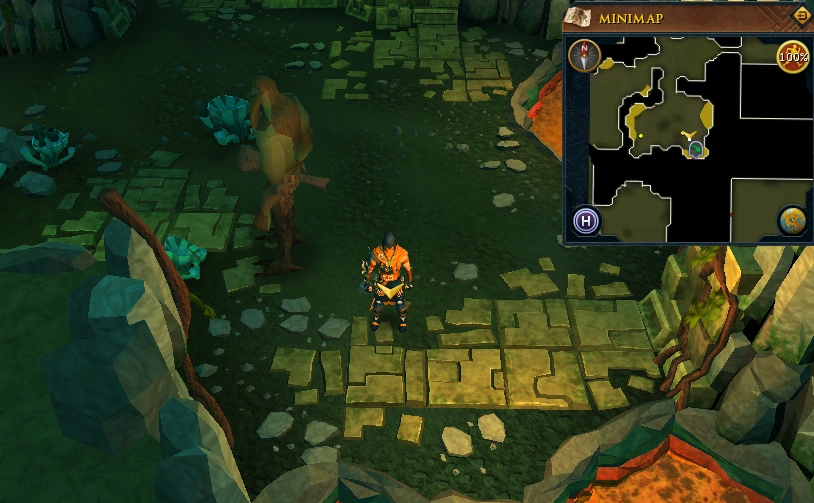 |
| Lower level, near the north of the moss giants chamber. | 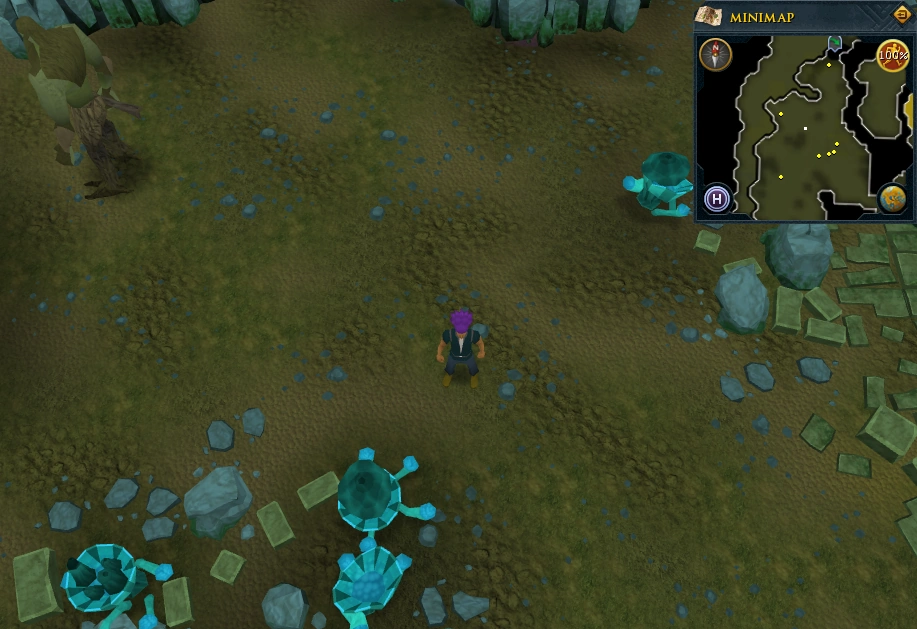 |
| Lower level, at the centre of the moss giant room. | 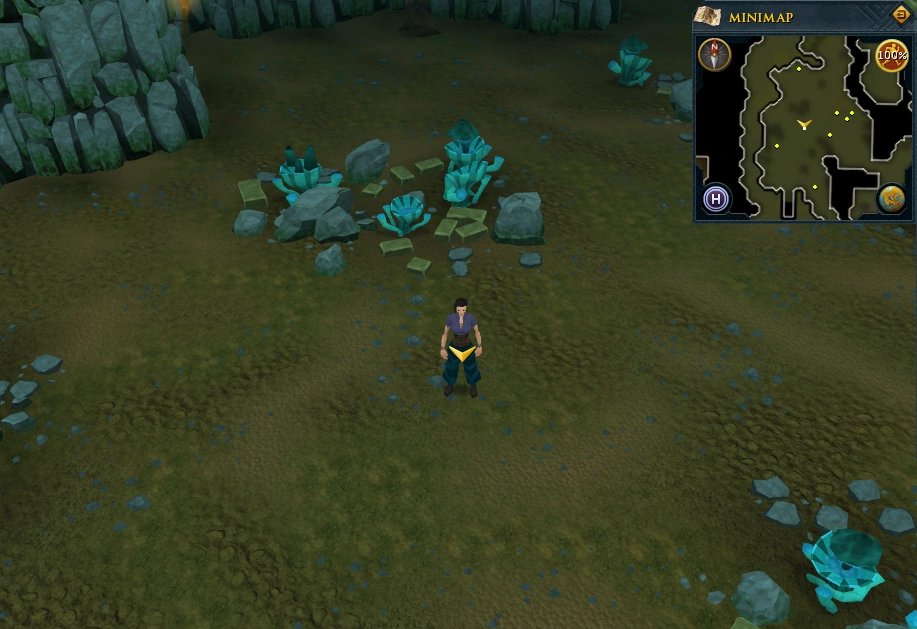 |
| Lower level, in west chamber containing moss giants, wild dogs and a staircase to the upper level. |  |
| Lower level, in a central chamber containing wild dogs. |  |
| Lower level, in passage south of the west chamber containing moss giants, wild dogs and a staircase to the upper level and north of the chamber containing fire giants. | 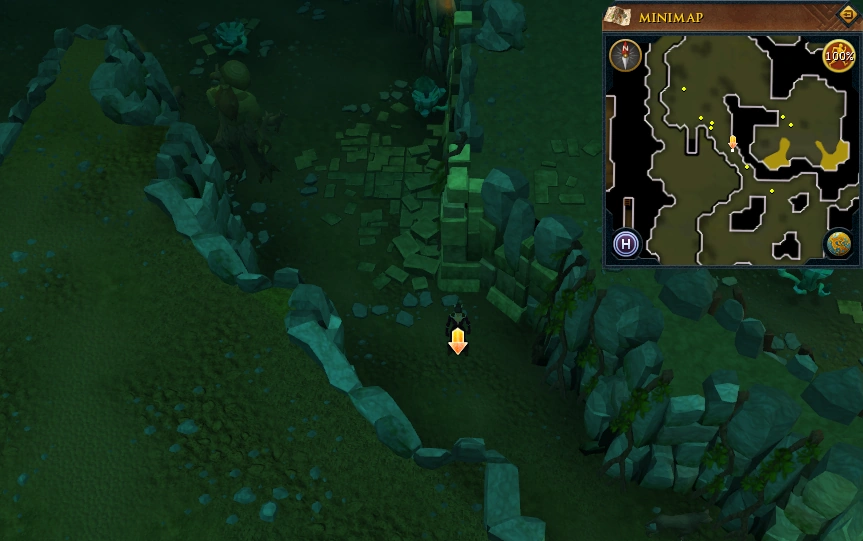 |
| Lower level, on the north-west side of the chamber containing fire giants. One step south of the location pictured. | 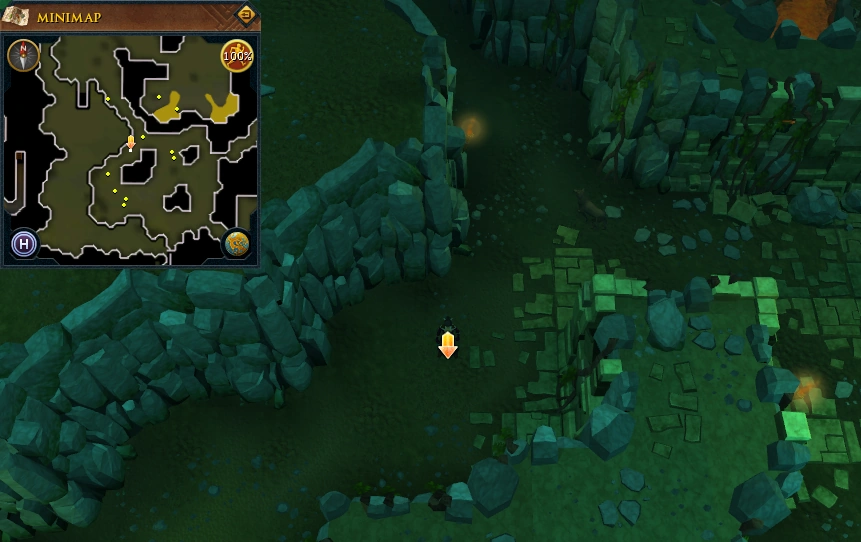 |
| Lower level, on the west side of the fire giant chamber, between the fire giants and moss giants. |  |
| Lower level, on the north-east side of the chamber containing fire giants. | 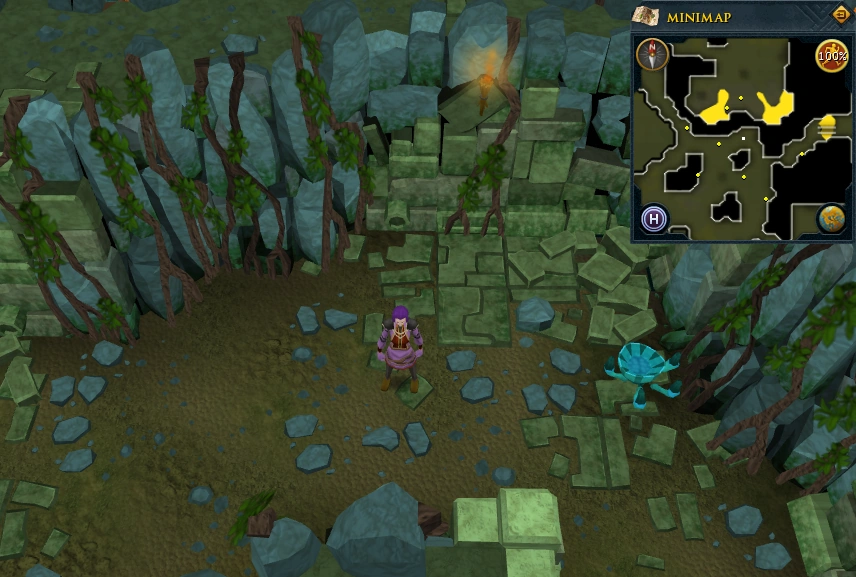 |
| Lower level, on the north side of the chamber containing red dragons and baby red dragons. |  |
| Lower level, near the eastern wall of the chamber containing red dragons and baby red dragons. |  |
| Lower level, in southern part of the chamber containing red dragons and baby red dragons. | 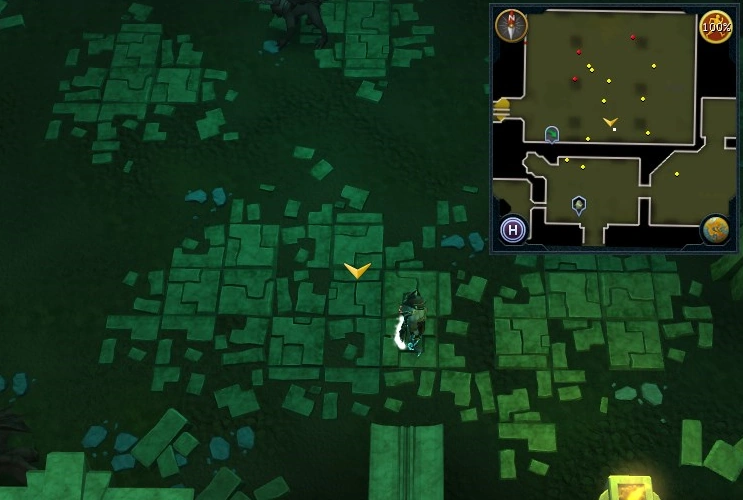 |
| Lower level, stair room between fire giants and black demons. | 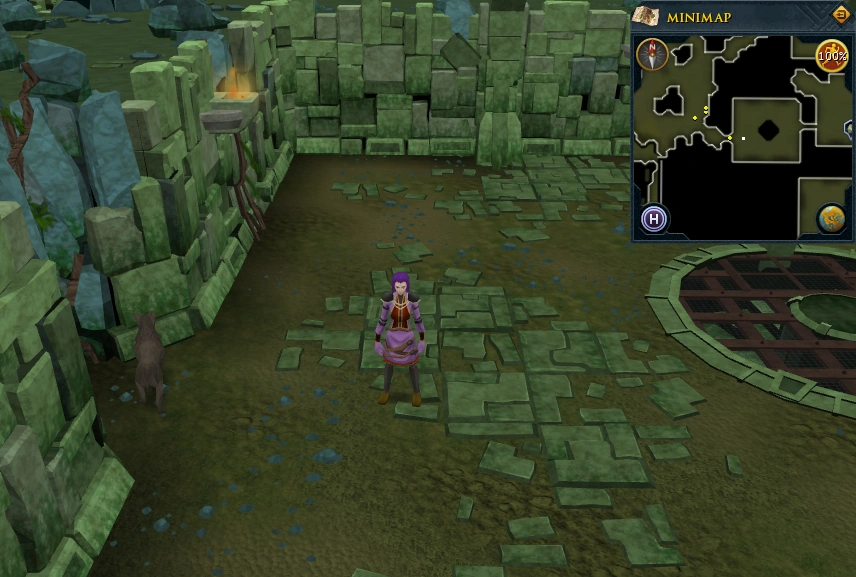 |
| Lower level, between the vines and Summoning obelisk. | 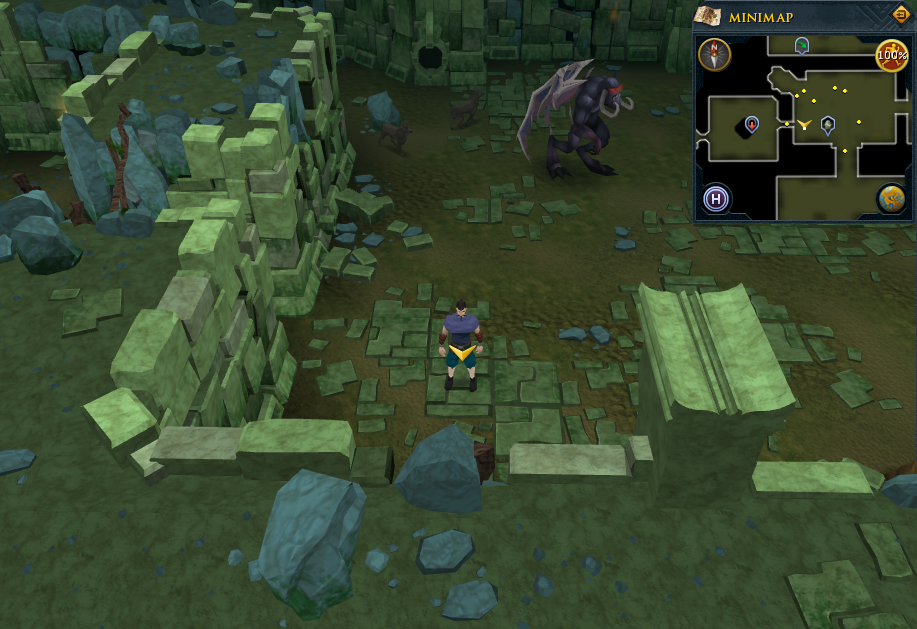 |
| Lower level, north of the Summoning obelisk in the chamber containing black demons and wild dogs. North of the chamber containing iron and steel dragons. | 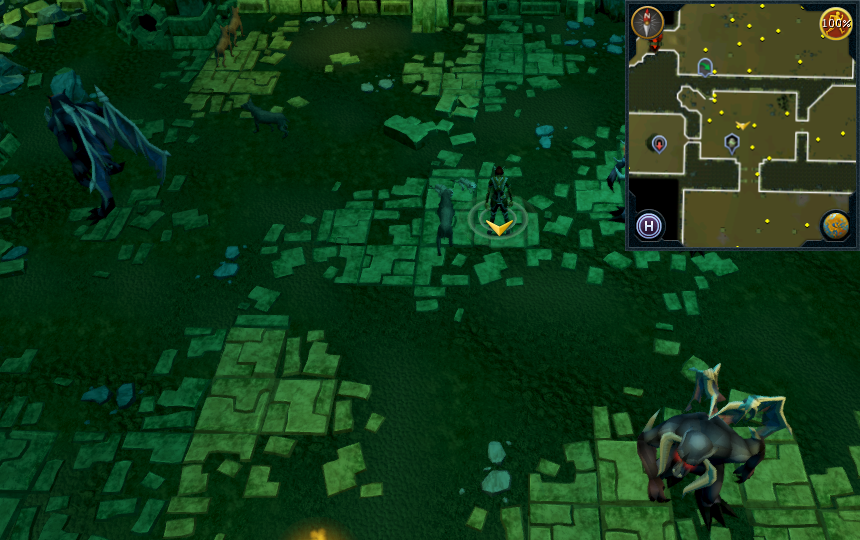 |
| Lower level, On the east side of the chamber containing bronze dragons. North of the chamber containing iron and steel dragons. | 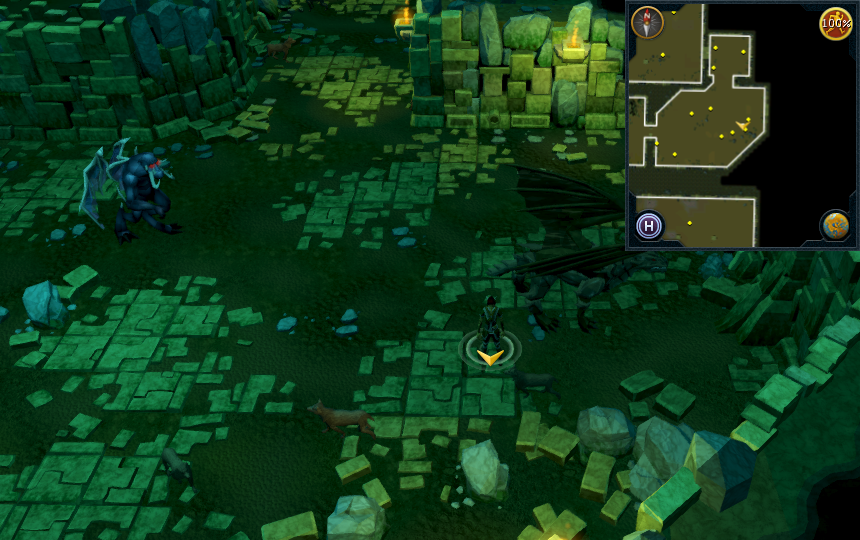 |
| Lower level, north of entrance to Brimhaven resource dungeon. | 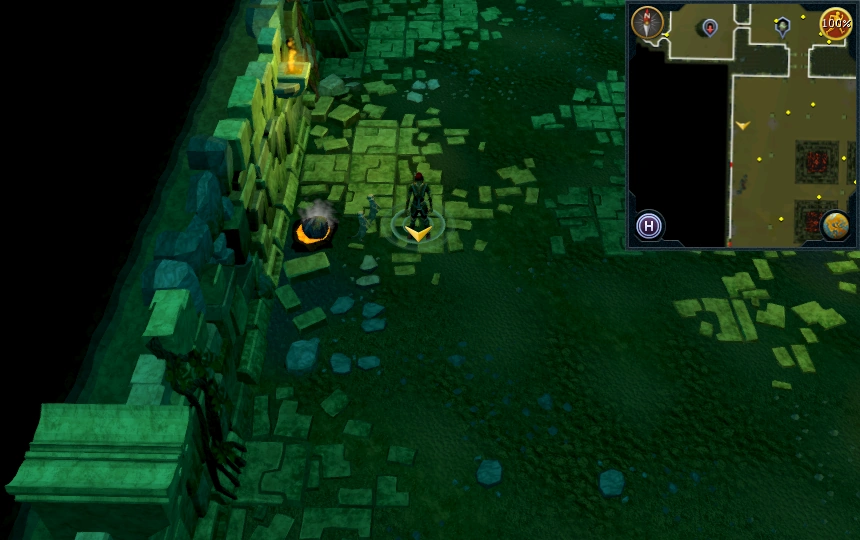 |
| Lower level, west side of iron and steel dragon chamber. Just south-east of the Brimhaven Dungeon resource dungeon entrance. | 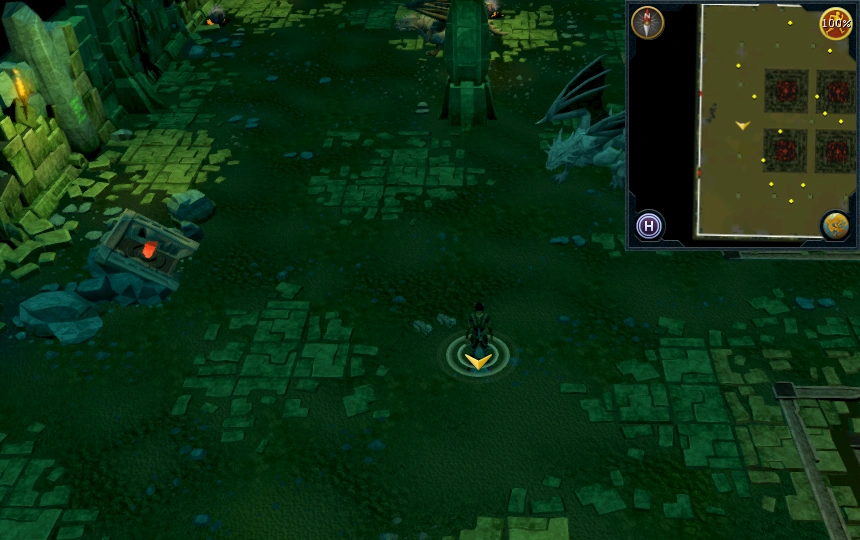 |
| Lower level, at the centre of the iron and steel dragon chamber. | 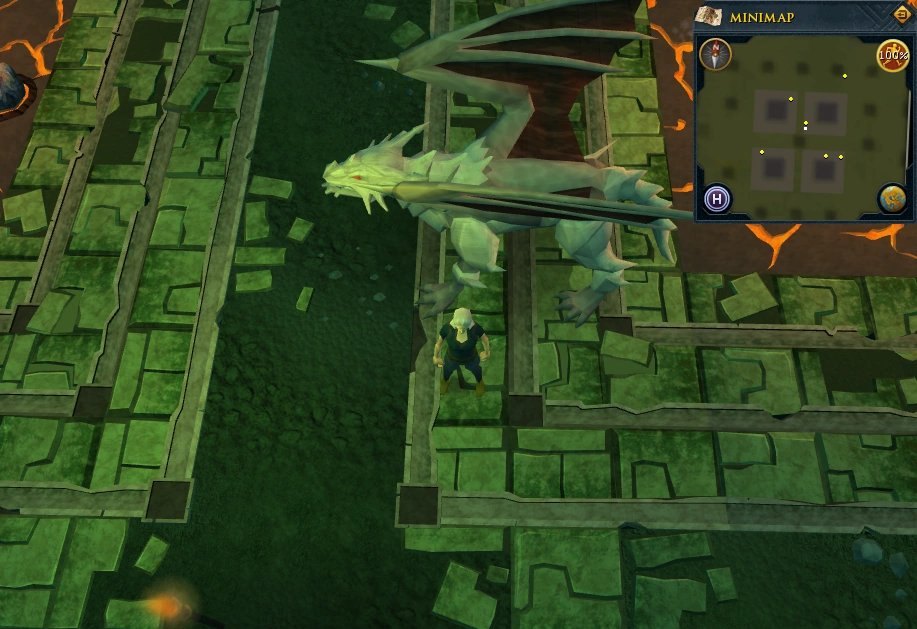 |
| Lower level, south-east corner of iron and steel dragon chamber. Just south of the south-eastern pool of lava. | 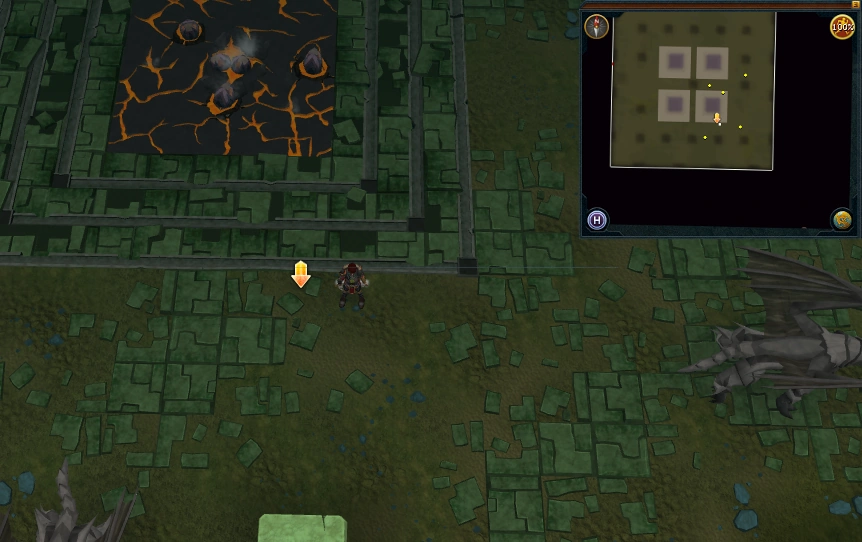 |
| Lower level, south-east corner of iron and steel dragon chamber. Just east of the south-eastern pool of lava. | 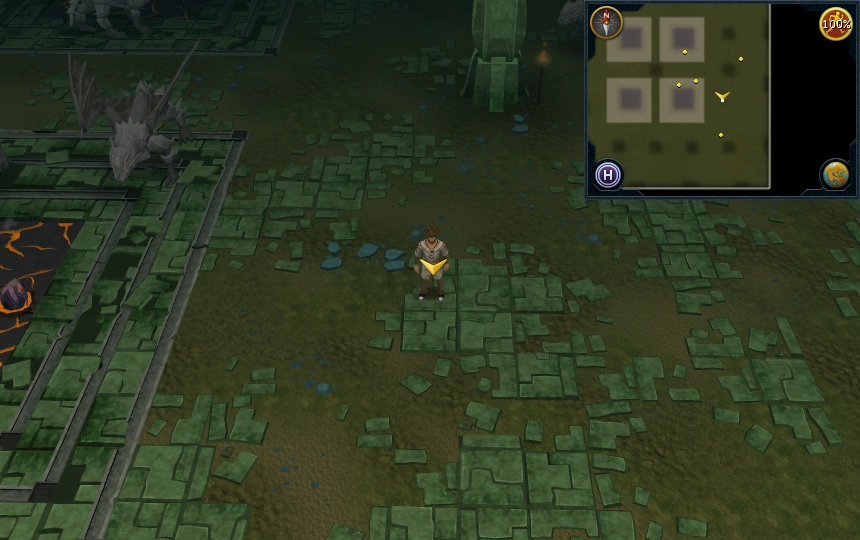 |
| Lower level, north-east corner of the chamber containing iron and steel dragons. Three steps south of the torch at the north-eastern pillar. | 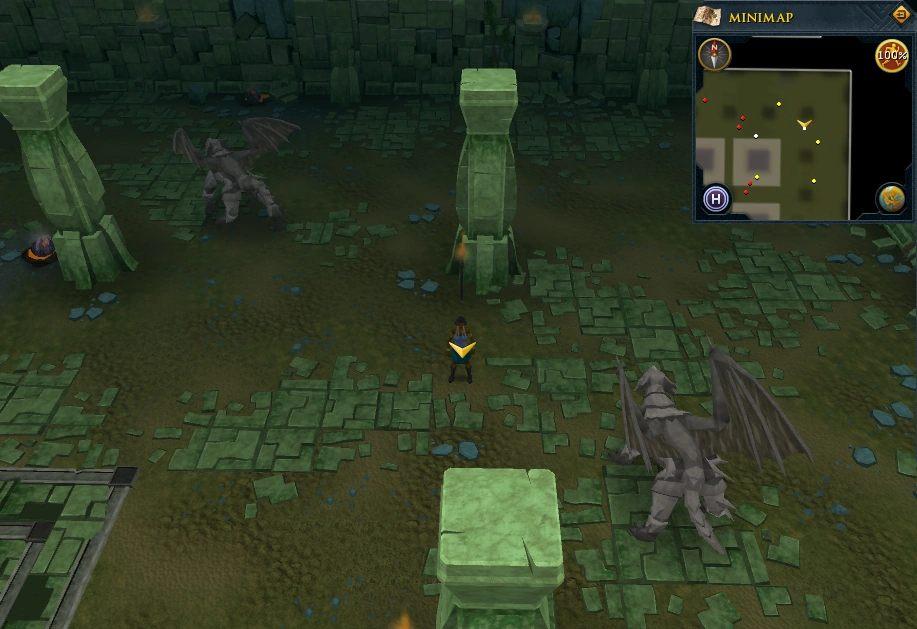 |
|
Other possible locations
| |
Upper level
| Possible locations | Image |
|---|---|
| Upper level, west of the northern staircase to the level. North-east of the area containing fire giants and wild dogs. | 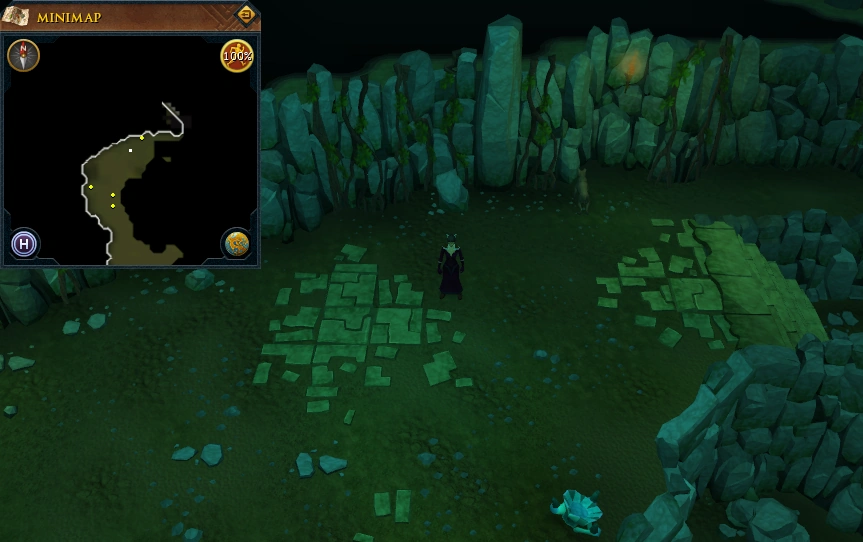 |
| Upper level, centre of the area containing fire giants and wild dogs. | 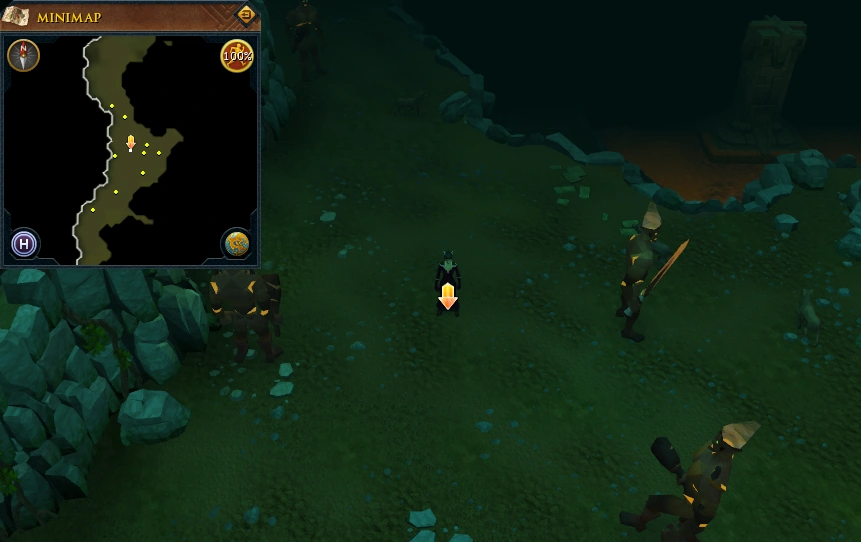 |
| Upper level, south of the area containing fire giants and wild dogs. | 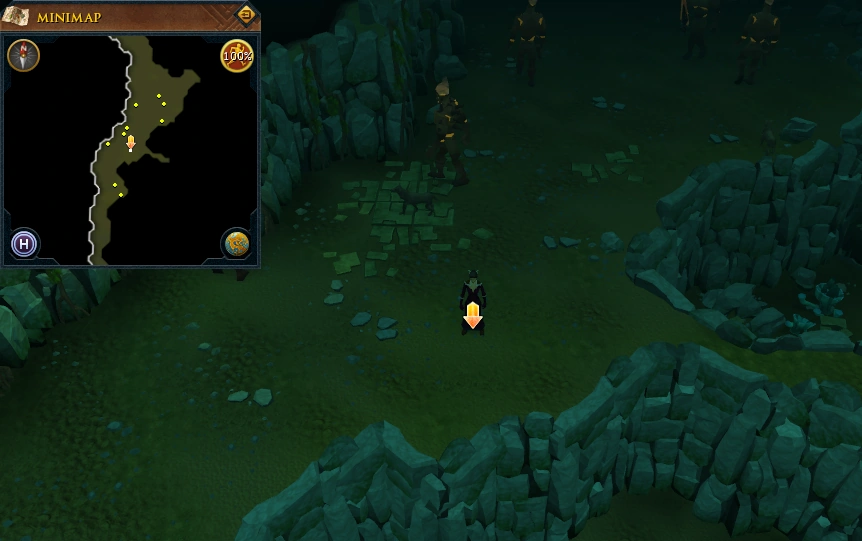 |
| Upper level, north of the area containing greater demons and wild dogs and south of the area containing fire giants and wild dogs. | 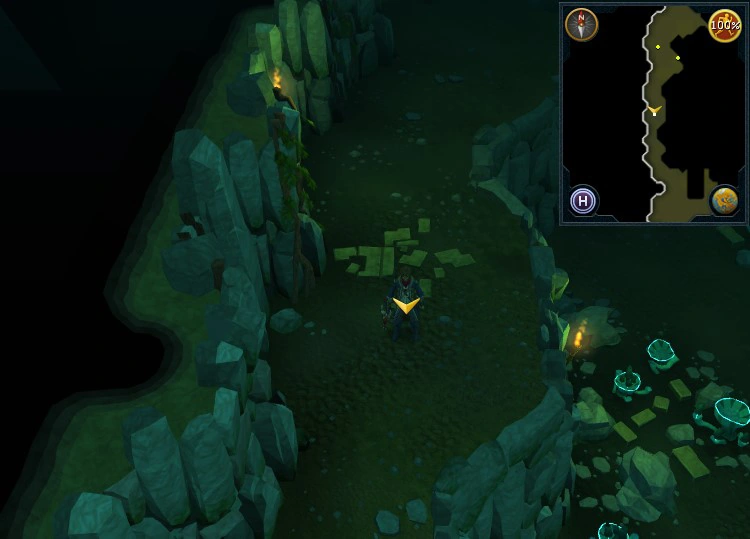 |
| Upper level, south of the southern staircase to the level. North of the area containing greater demons and wild dogs. |  |
| Upper level, west of the southern staircase to the level. North of the area containing greater demons and wild dogs. | 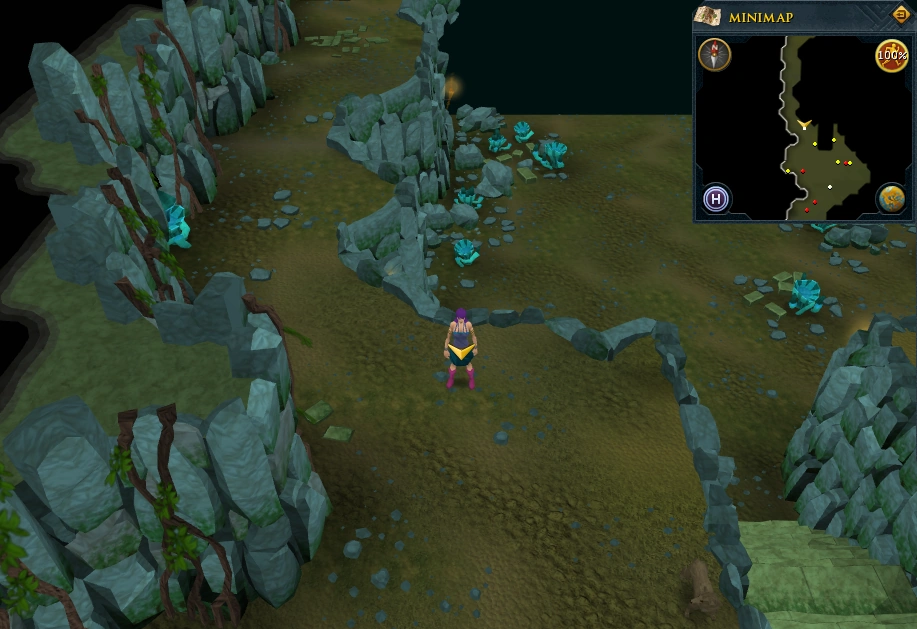 |
| Upper level, south-east corner of the level. South-east of the area containing greater demons and wild dogs. | 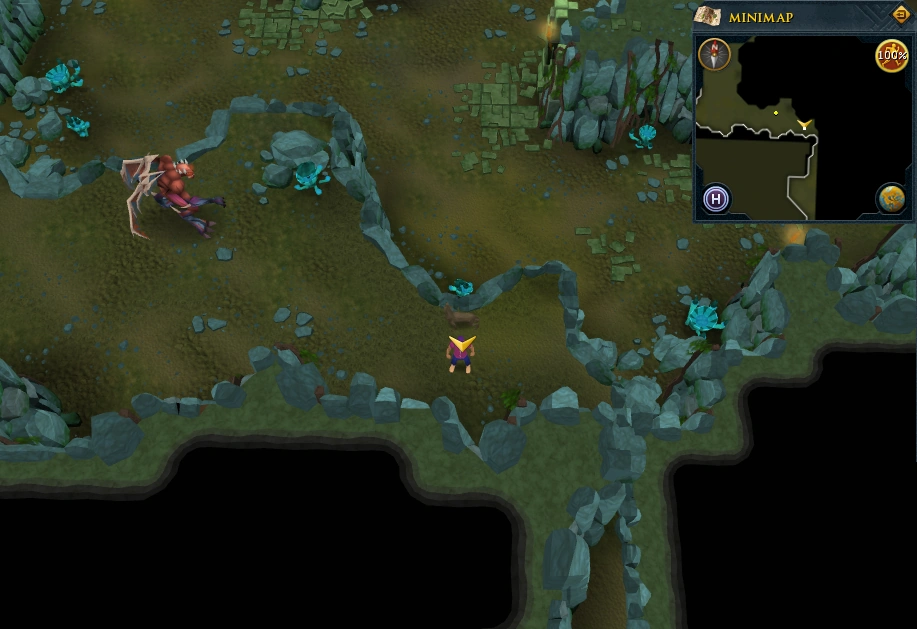 |
| Upper level, west side of the greater demon area. | 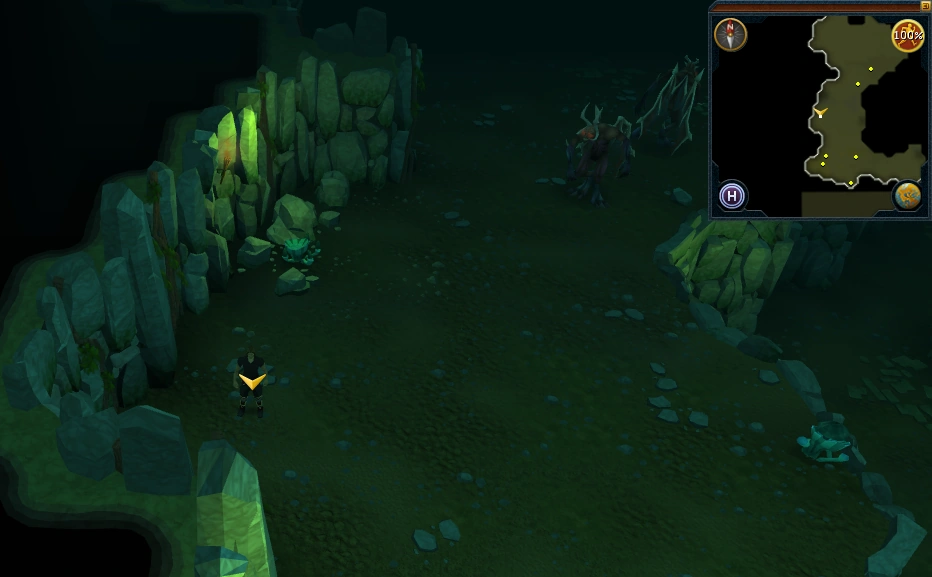 |
|
Other possible locations
| |
Darkmeyer
Area Information: Darkmeyer
To access Darkmeyer the player must have partially completed The Branches of Darkmeyer.
Fastest way to get here: use Drakan's medallion. To prevent the vyres from getting aggressive, wear the Darkmeyer disguise or the House Drakan outfit (obtained during The Lord of Vampyrium).
Scan range: 16 paces
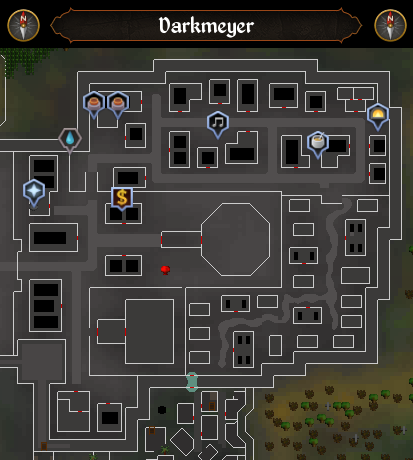
| Possible locations | Image |
|---|---|
| Just west of the bloodwood tree, outside the Arboretum. | 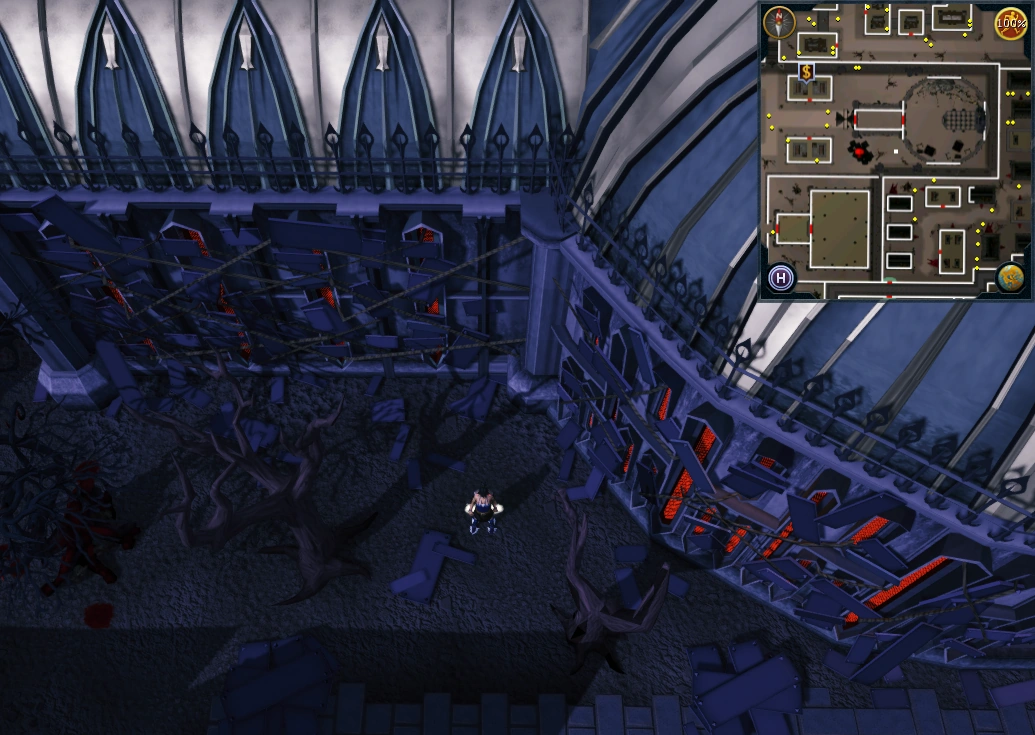 |
| Outside house south of Castle Drakan entrance in the south-west corner of Darkmeyer. | 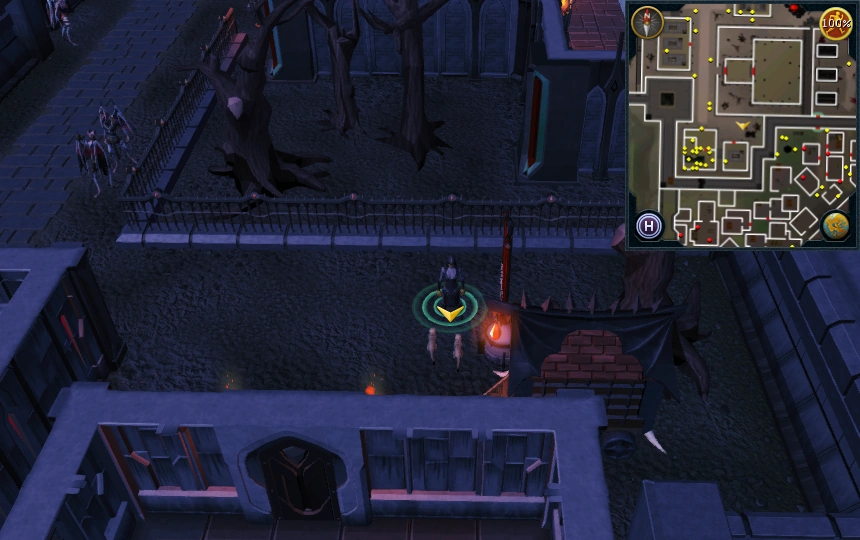 |
| Just north of the prison in the south west corner of Darkmeyer. |  |
| In the building with three coffins, south of the entrance to Castle Drakan and opposite Vanstrom Klause's house, against the west wall level with the south coffin. | 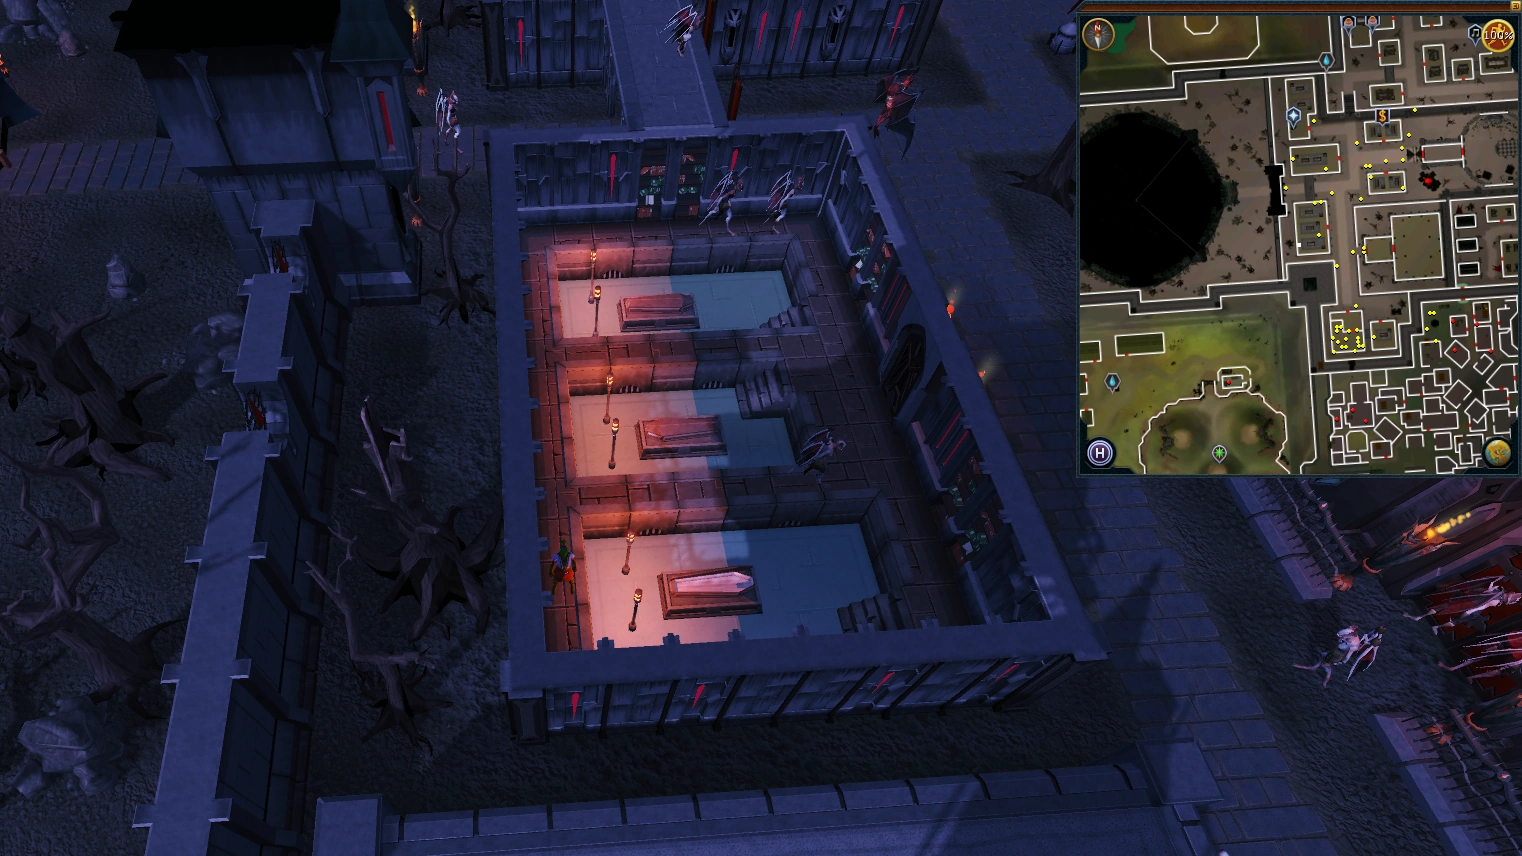 |
| Just outside the building with a Prayer altar, in the north-west of the city. | 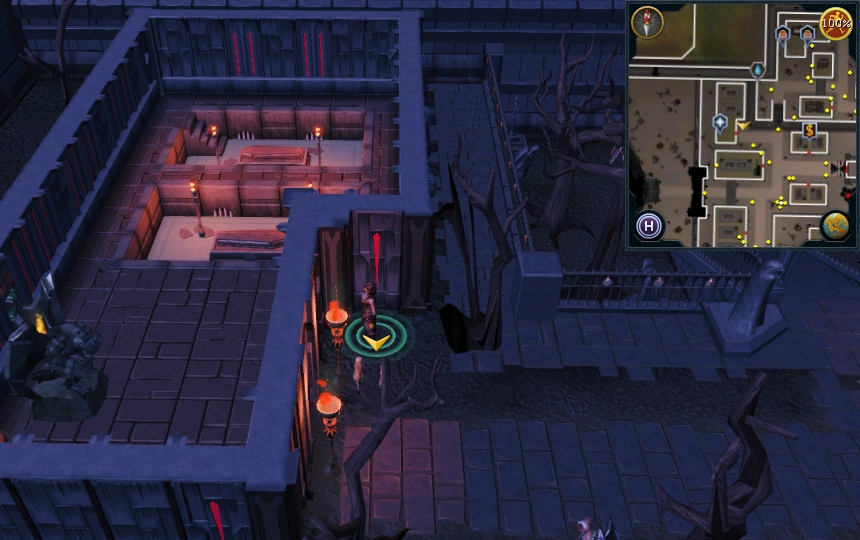 |
| Next to Boris Barrington, the musician. | 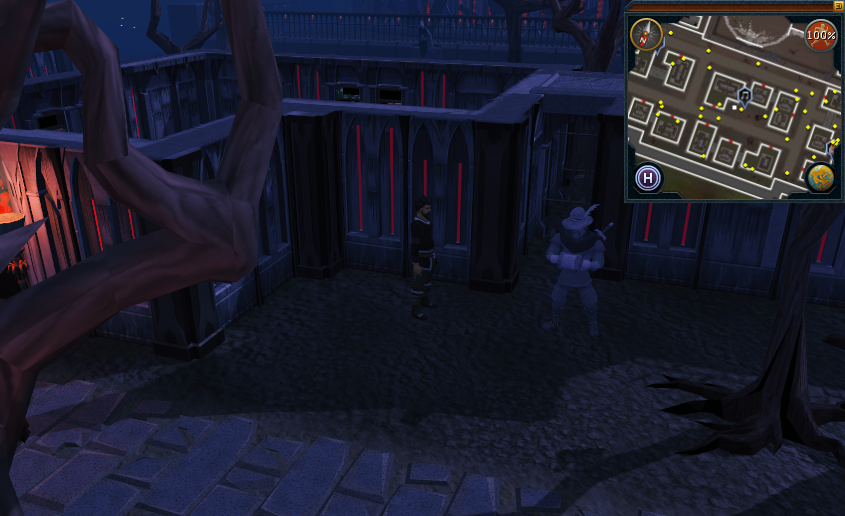 |
| In the north of the city, south-west of the Port Phasmatys Hunter area. | 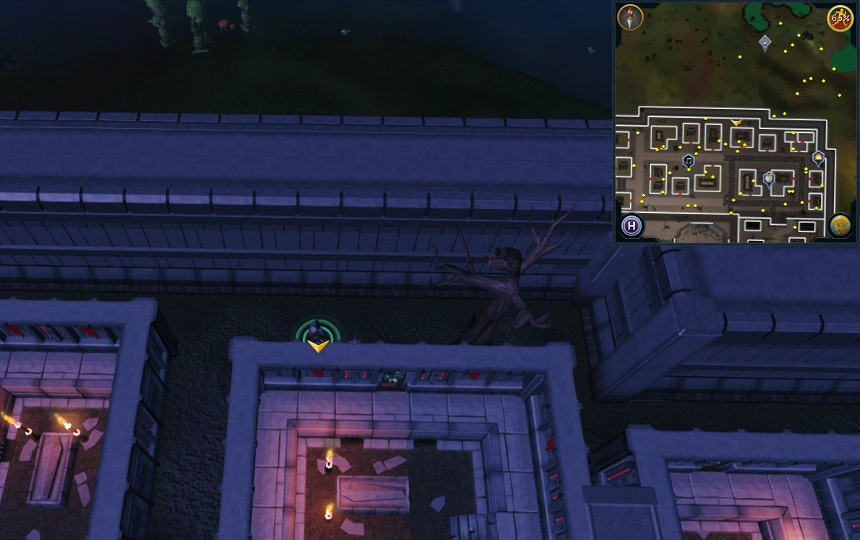 |
| In the north-east corner of Darkmeyer, next to the furnace. |  |
| South-west of the building with a range, next to the north-east stairs. | 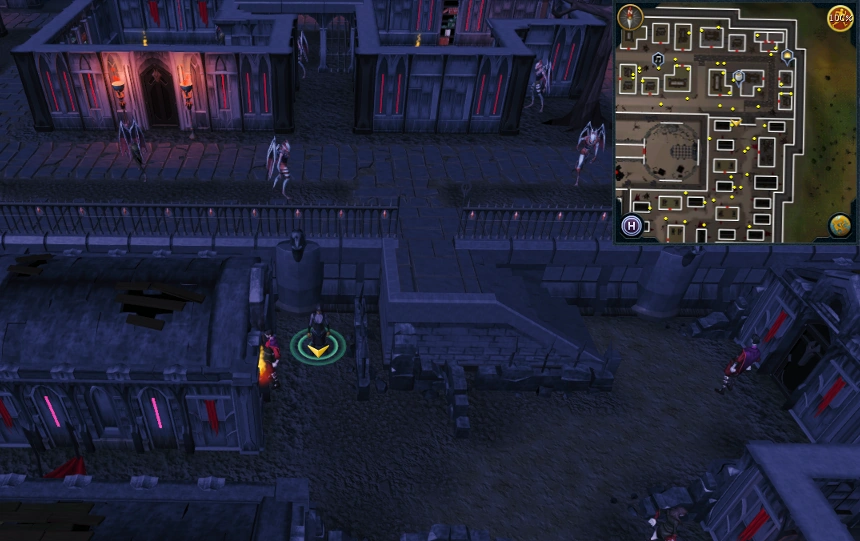 |
| South-east of the building with a range, next to the north-east stairs. | 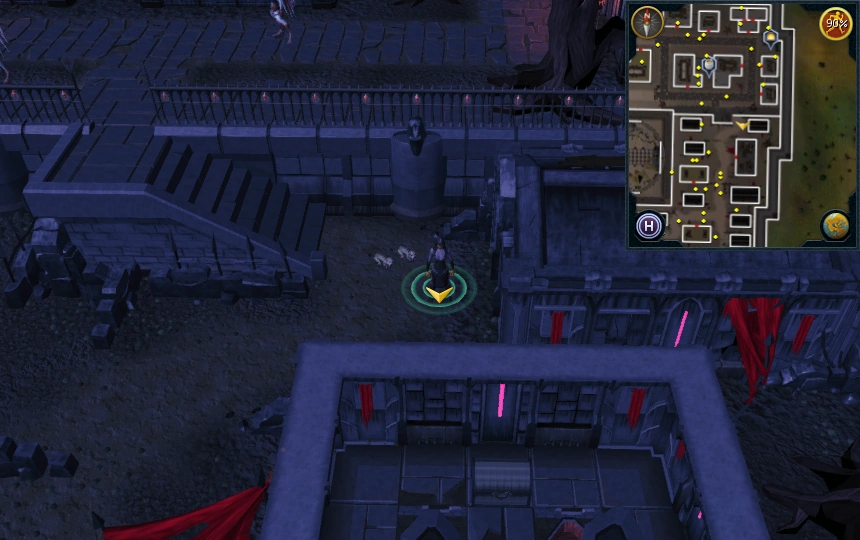 |
| Inside building with 4 coffins in it, south-east of the north-east stairs. | 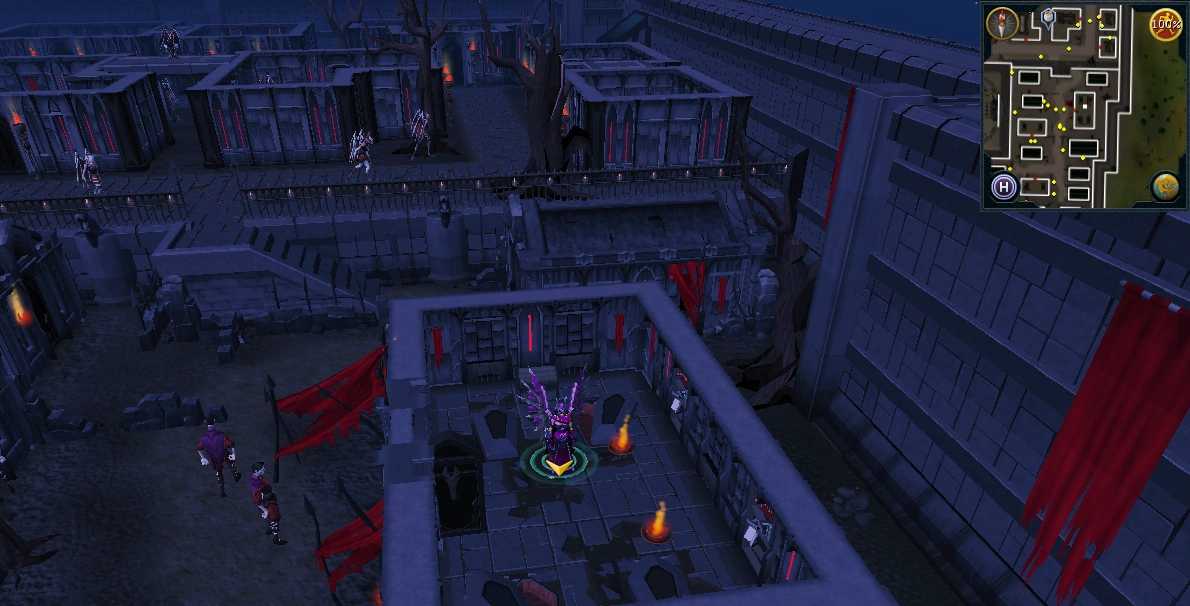 |
| Just south-east of the Arboretum, beyond the fence. | 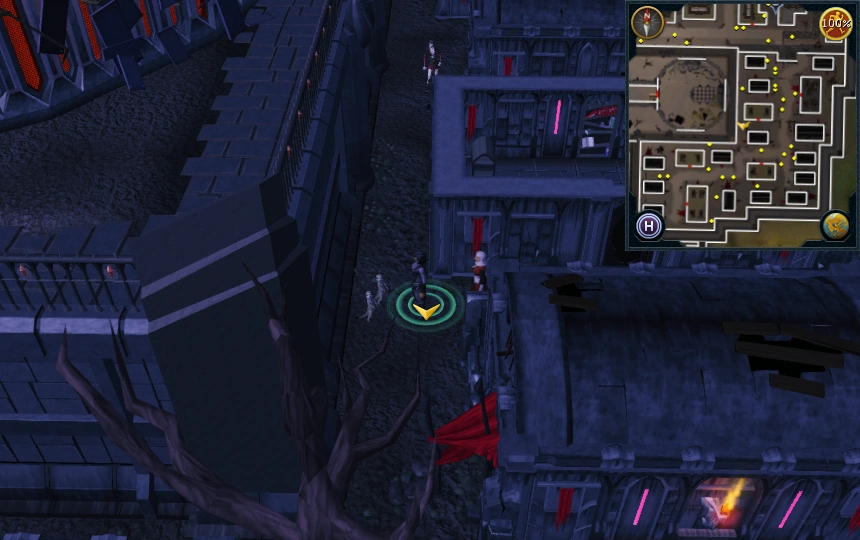 |
| In the south-east corner of Darkmeyer. | 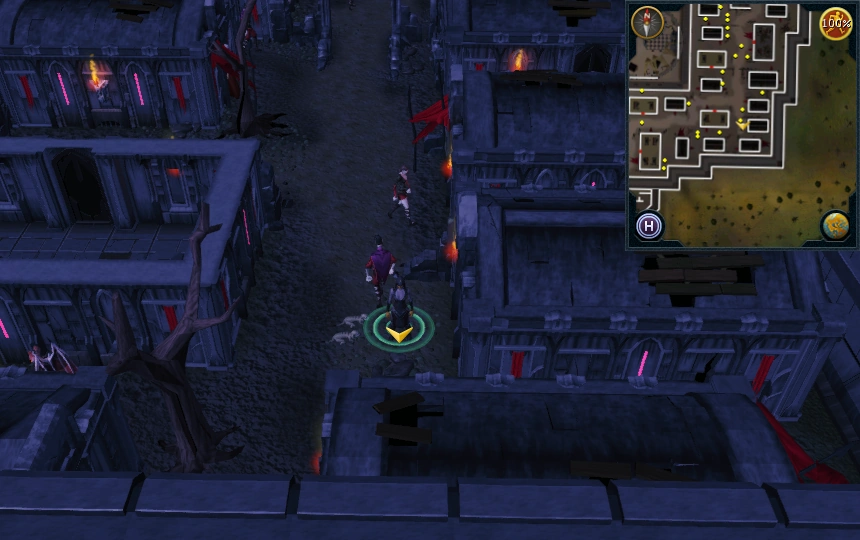 |
| North of the entrance from Meiyerditch, between buildings in group of 3 buildings. | 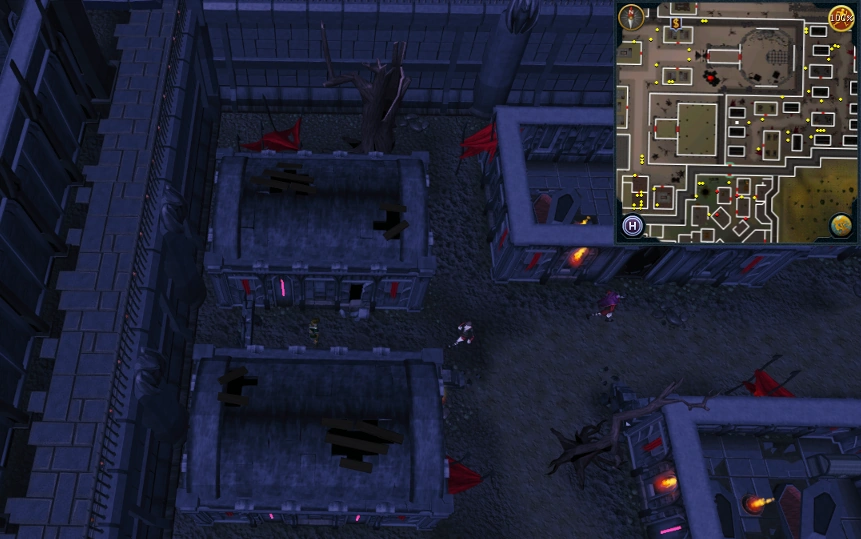 |
|
Other possible locations
| |
Dorgesh-Kaan
"This scroll will work in the cave goblin city of Dorgesh-Kaan."
Area Information: Dorgesh-Kaan
Scans will either be on the upper or lower level of Dorgesh-Kaan, if the player is not on the right level for their scan they will be told "Try scanning another level".
Scan range: 16 paces
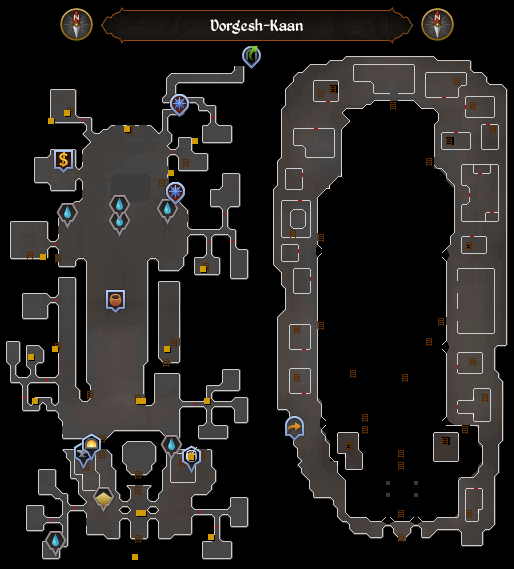
Lower level
| Possible locations | Image |
|---|---|
| Lower level, inside the bank. | 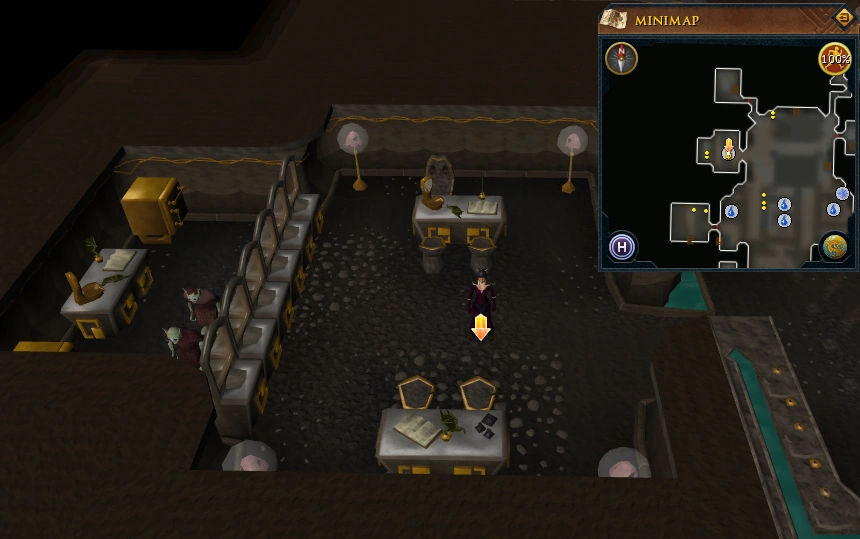 |
| Lower level, south-east of the group of four fountains. Just east of Ur-Vass. | 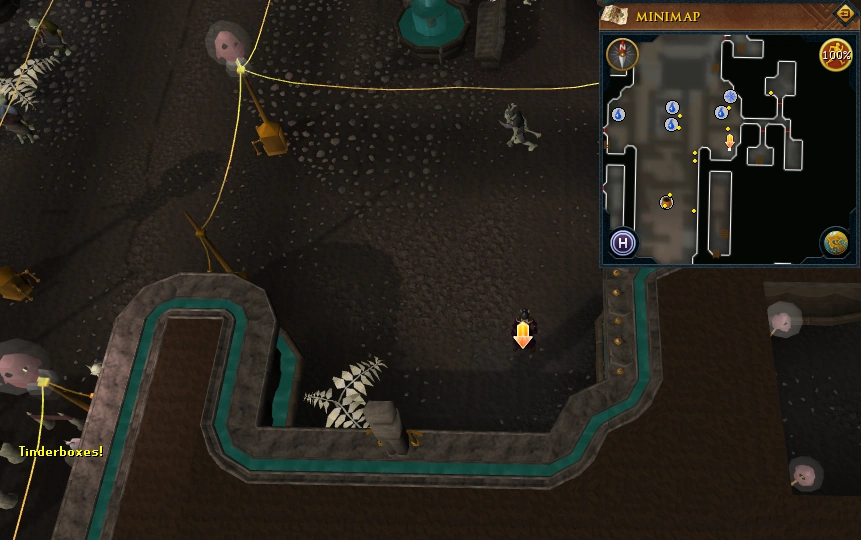 |
| Lower level, centre of marketplace. Close to Lurgon and Reldak who run Dorgesh-Kaan General Supplies and Reldak's Leather Armour. | 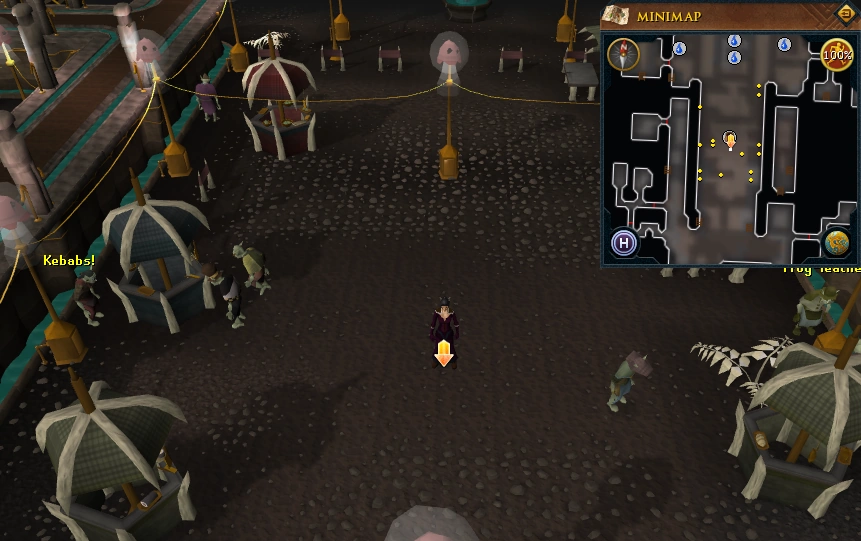 |
| Lower level, in chamber south-east of the marketplace that branches into three rooms. | 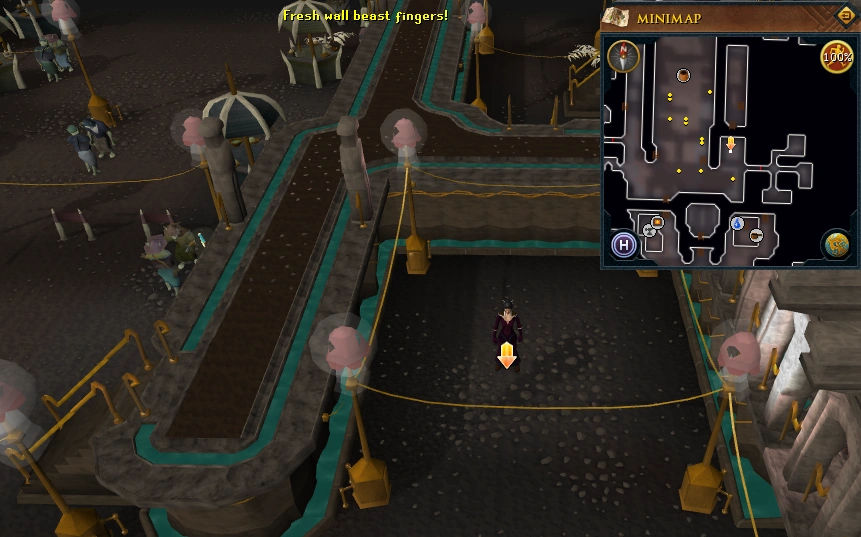 |
| Lower level, inside isolated room east of the marketplace. Access via staircase in chamber south-east of marketplace. | 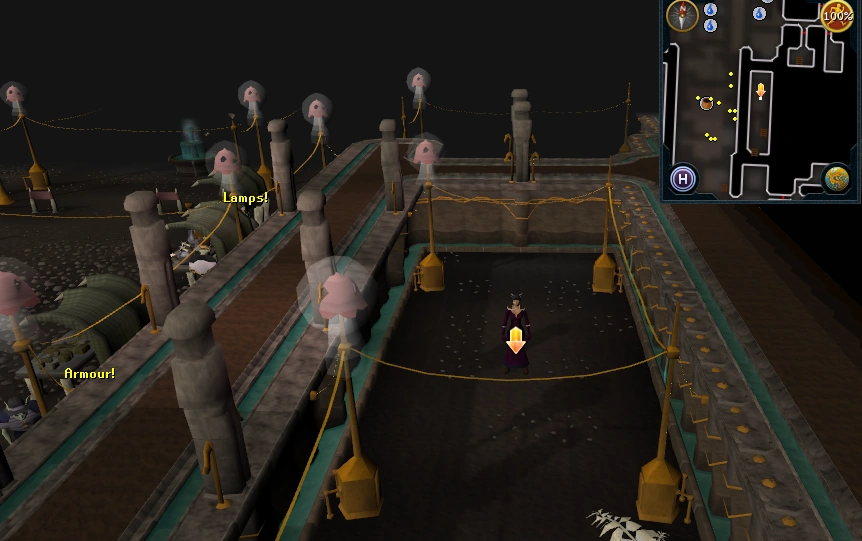 |
| Lower level, in corridor outside Barlak's room. | 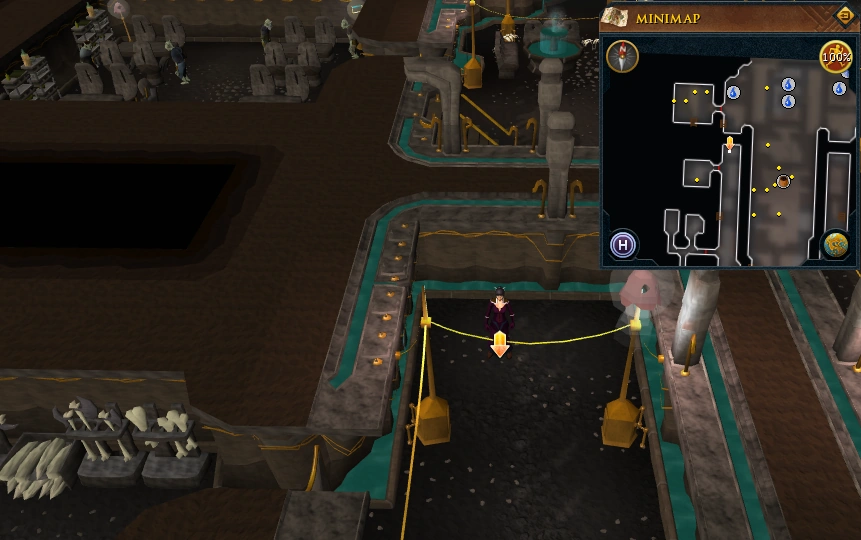 |
| Lower level, south of marketplace by staircase. | 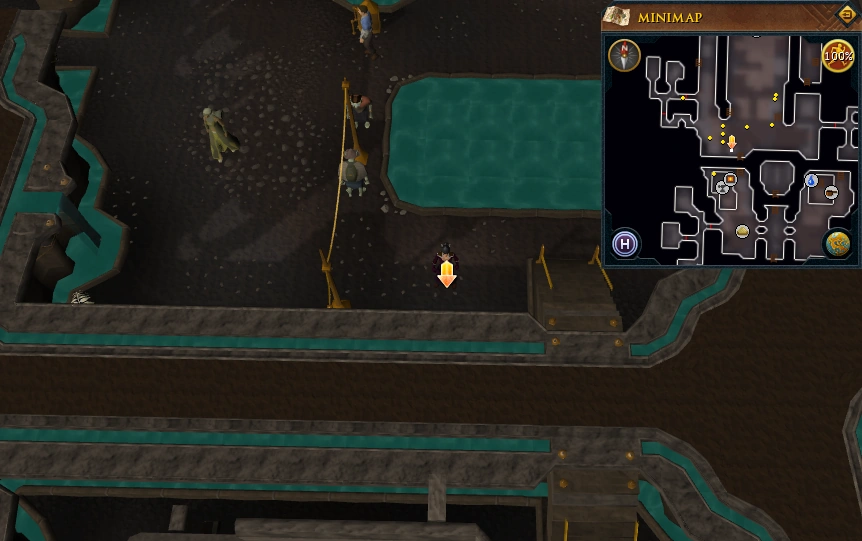 |
| Lower level, inside the building with a furnace. | 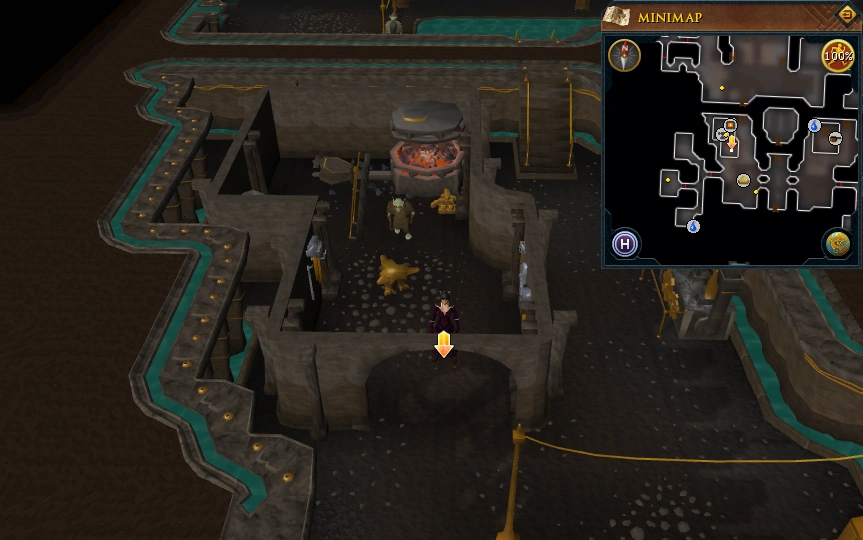 |
| Lower level, inside isolated room south of marketplace and east of furnace and sandpit. Access via staircase from chamber just south of the isolated room. | 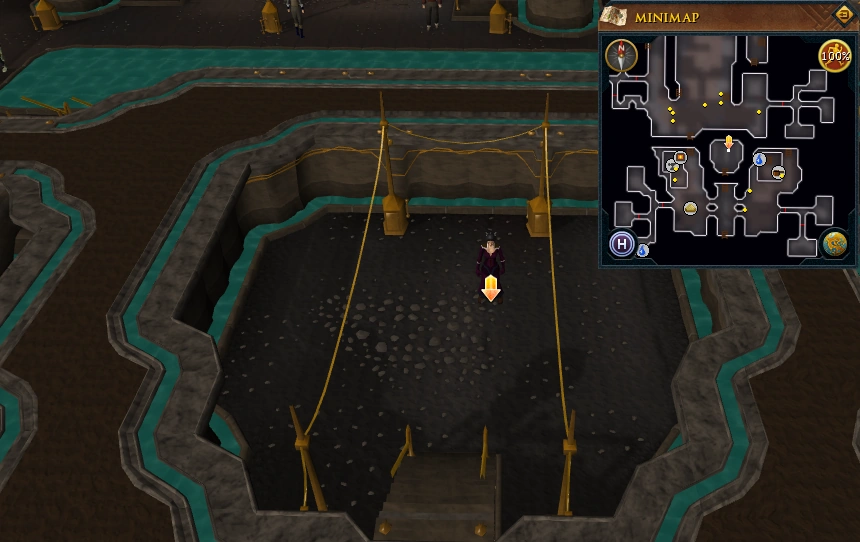 |
| Lower level, east of sandpit and south of building with range and sink and the spit goblin. | 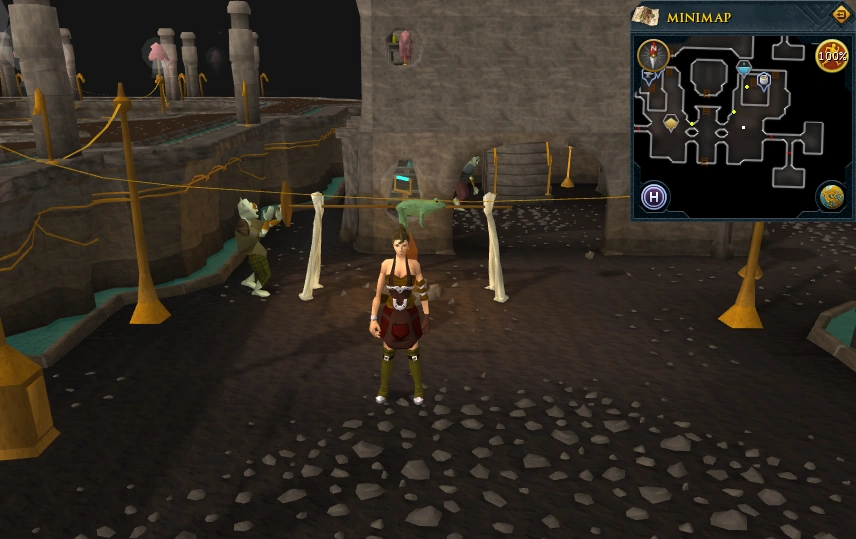 |
| Lower level, in the southern part of the level, east of building with range and sink, by the staircase. | 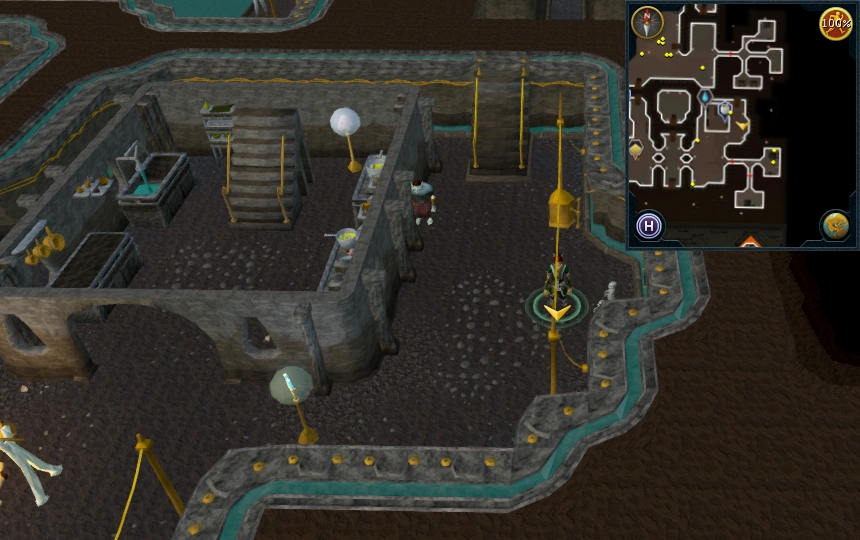 |
| Lower level, inside southeastern room containing Ur-Pel and Ur-Lun. | 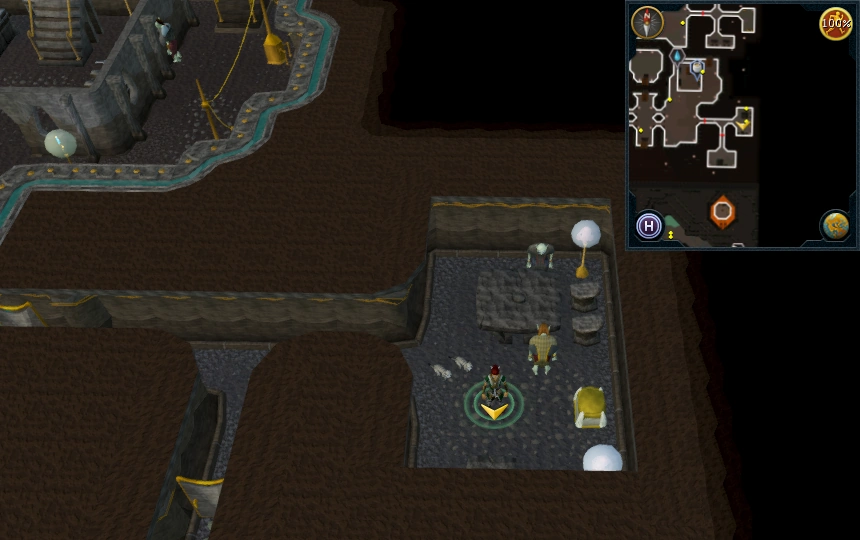 |
Upper level
| Possible locations | Image |
|---|---|
| Upper level, south-east corner of the level. | 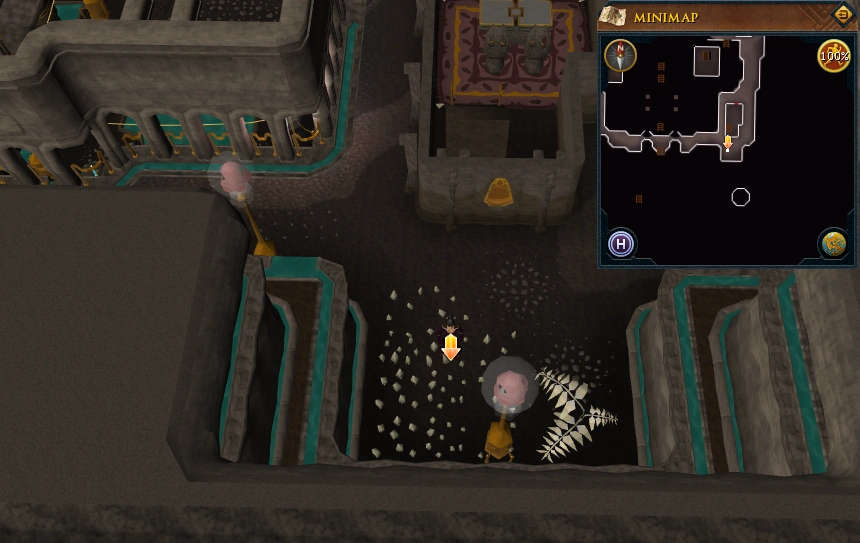 |
| Upper level, east side of level. Just south of a large, empty rectangular building. |  |
| Upper level, just south-east of the nursery. |  |
| Upper level, north of Ur-tag's room and east of the Council chamber. | 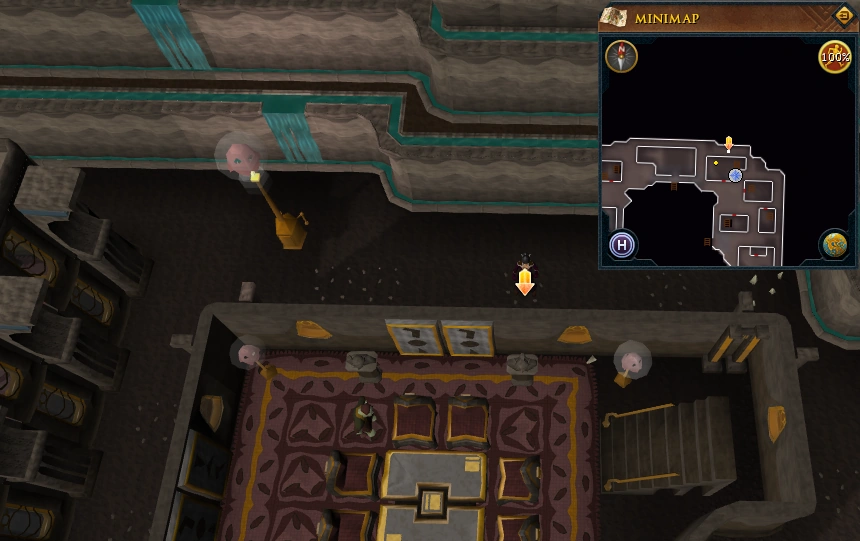 |
| Upper level, between two houses west of Council chamber. |  |
| Upper level, outside of a house in north-west corner of level. | 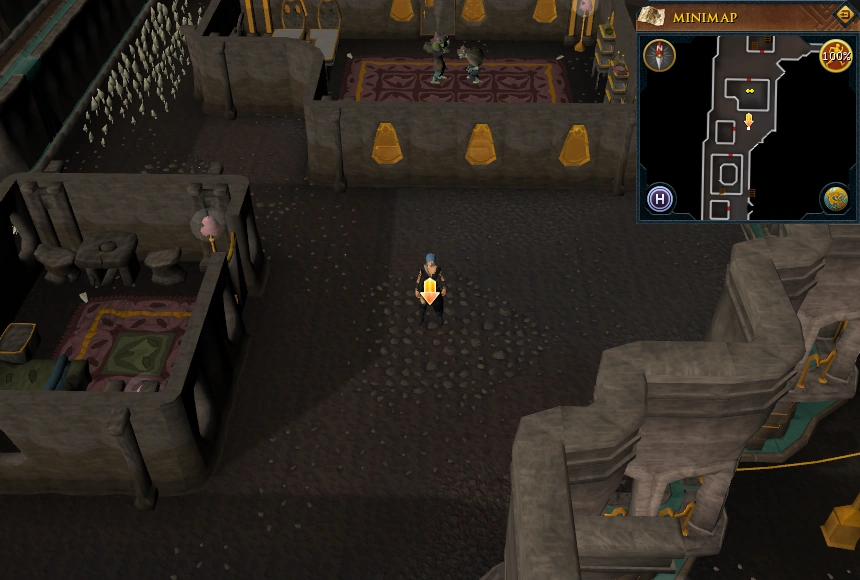 |
| Upper level, inside a house on western side of the level. | 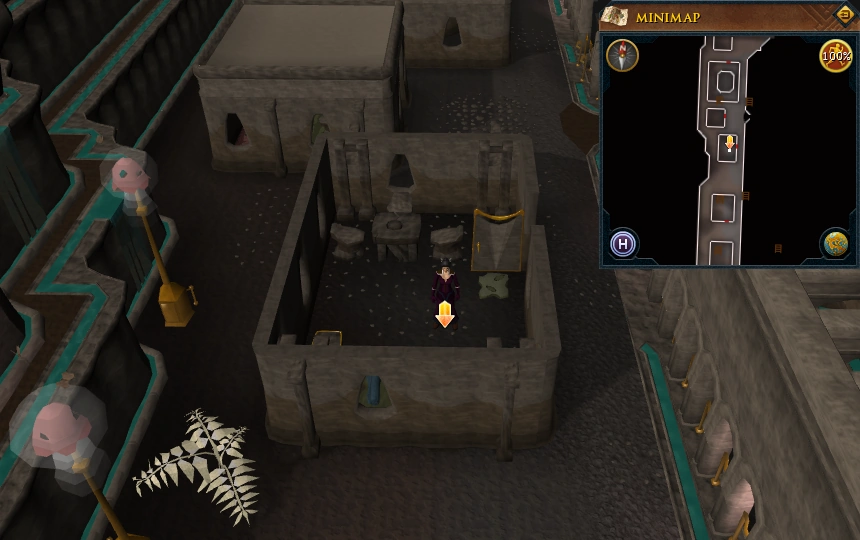 |
| Upper level, near station for the Dorgesh-Kaan - Keldagrim Train System. |  |
Falador
Area Information: Falador
Scan range: 22 paces
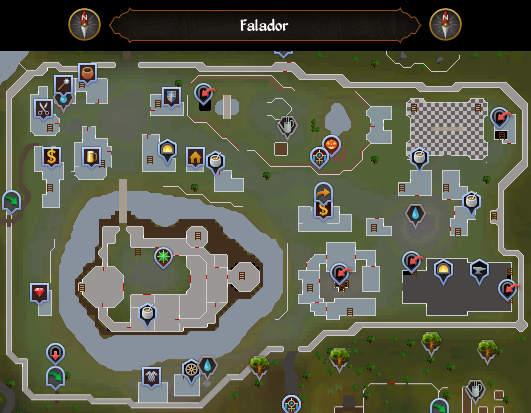
| Possible locations | Image |
|---|---|
| South of the Falador General Store and north-east of Falador's west bank. |  |
| In the centre of the courtyard of the White Knights' Castle. | 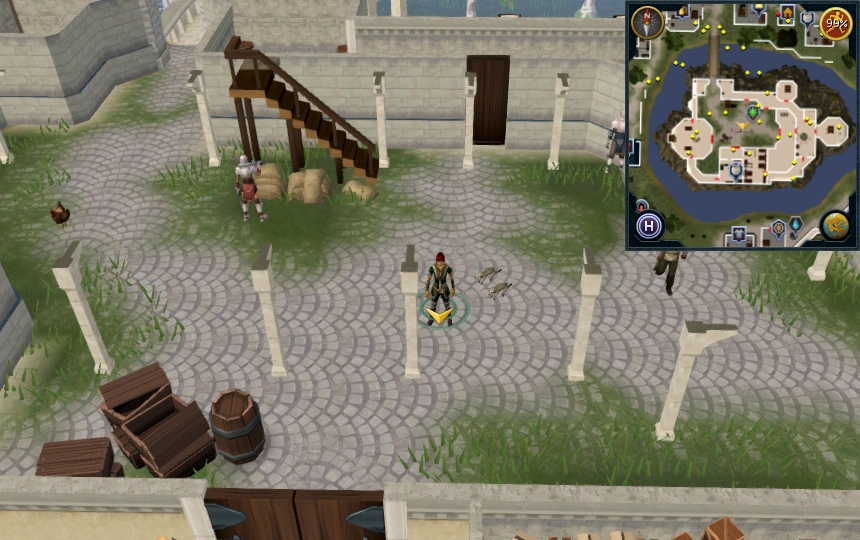 |
| Just north-west of the Hairdresser and north of Falador's west bank. |  |
| Northwest of Flynn's Mace Market, in the middle of the corner. |  |
| South-west of Falador's west bank. Just east of the crumbling wall Agility shortcut between Falador and southern Taverley which requires level 5 Agility to use. | 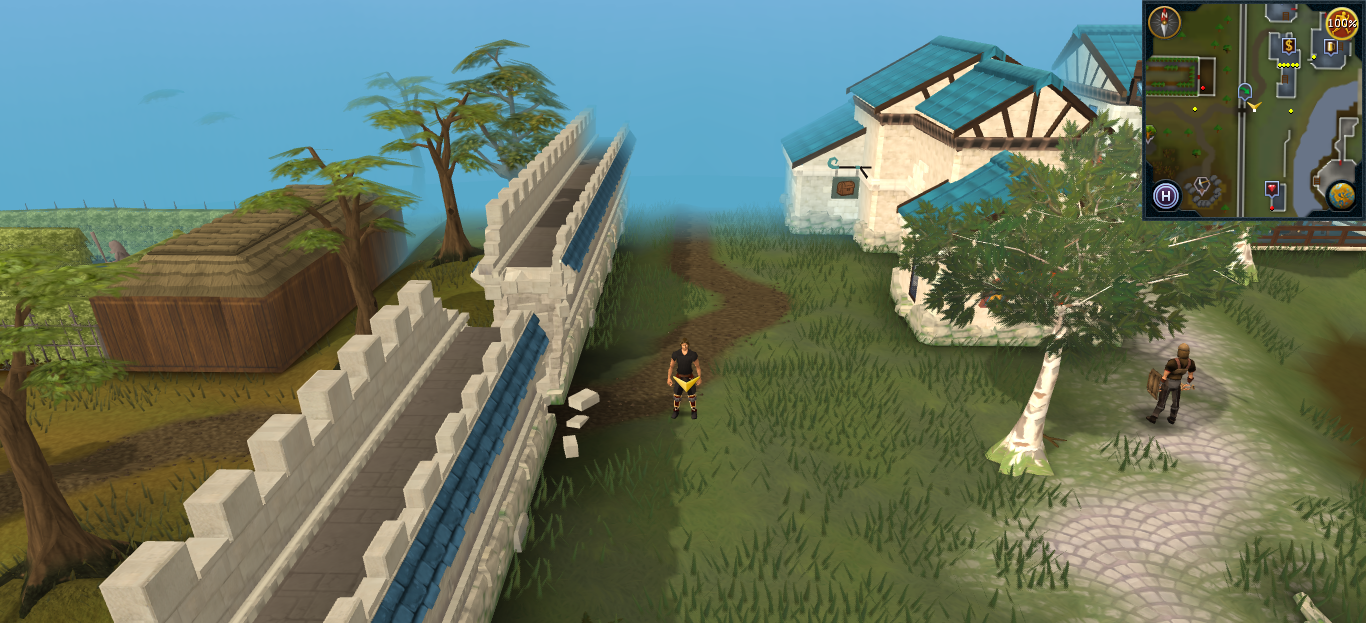 |
| Just north of Herquin's Gems (the gem shop) and south of Falador's west bank. | 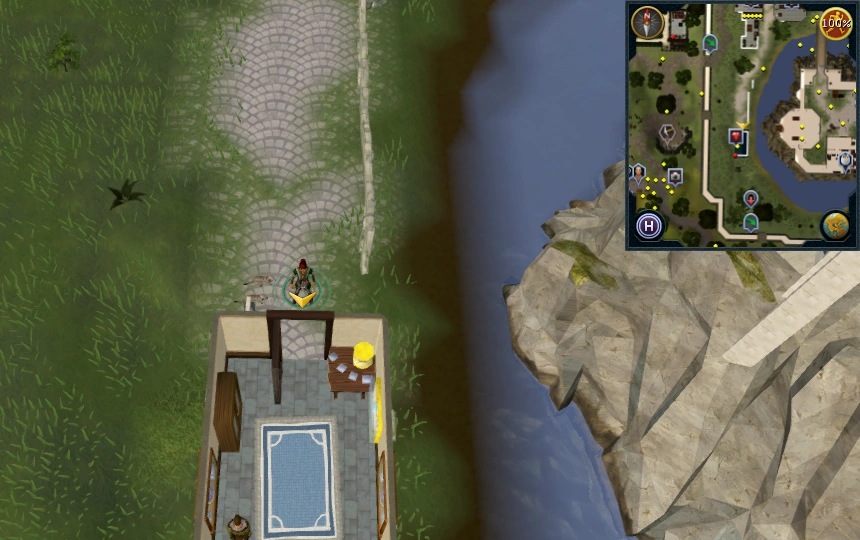 |
| Inside the city walls, south-west of White Knights' Castle and east of the Makeover Mage and Photo Booth. | 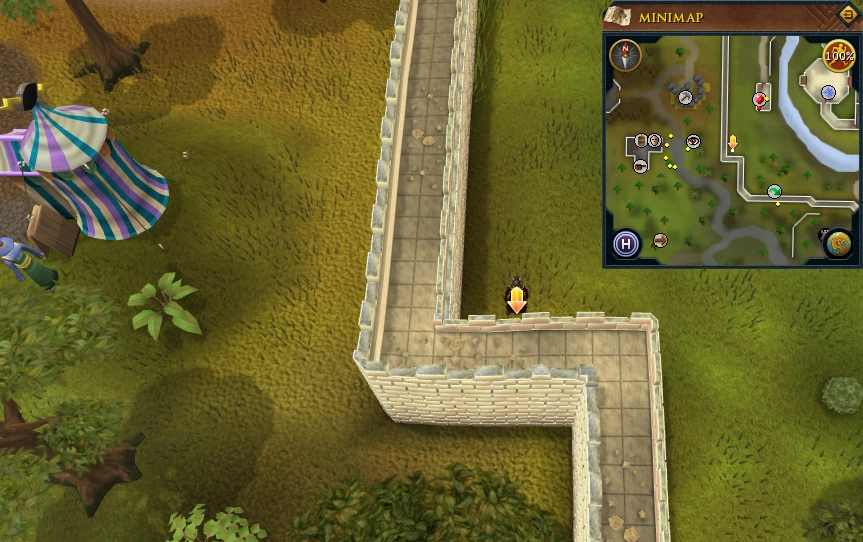 |
| South of Herquin's Gems (the gem shop). Just north of the underwall tunnel Agility shortcut between Falador and the Clan Camp that requires level 26 Agility to use. One pace west of the location pictured. | 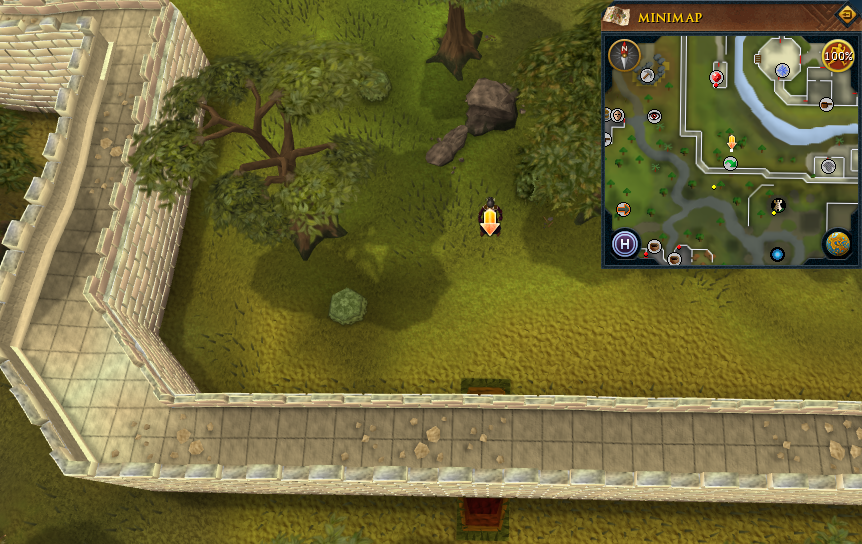 |
| Just north-east of Wayne's Chains (the chainmail shop) and just west of the building with a spinning wheel. South of the White Knights' Castle. | 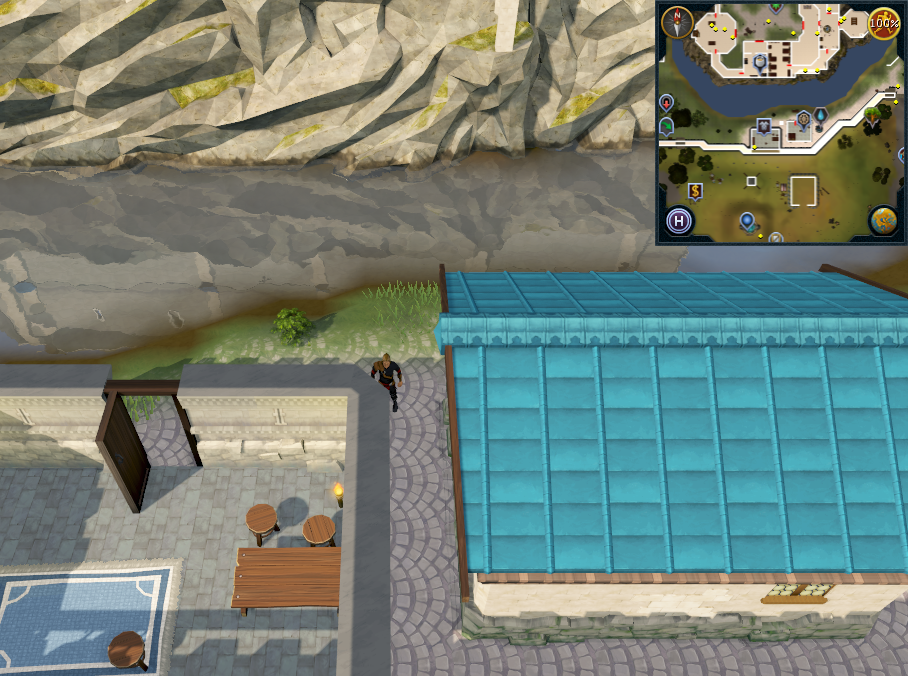 |
| At the south entrance to the city, south-west of the Mining Guild. | 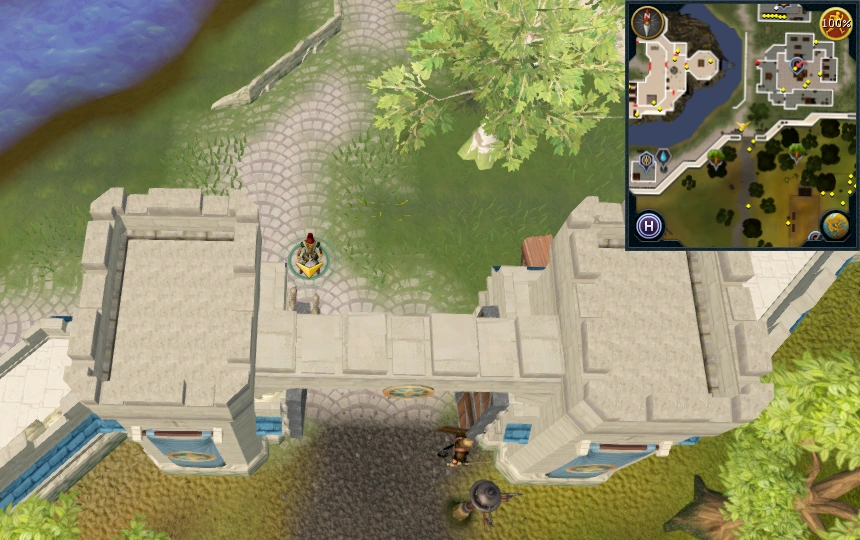 |
| In the centre of the Mining Guild, just west of the ladders. | 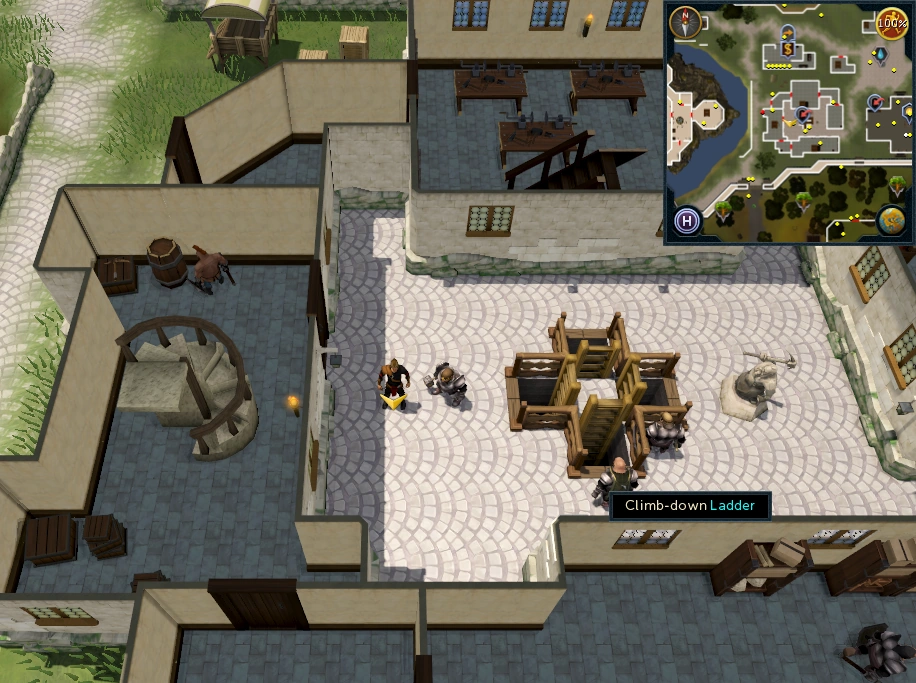 |
| South of Artisan's Workshop in the south-east corner of the city. | 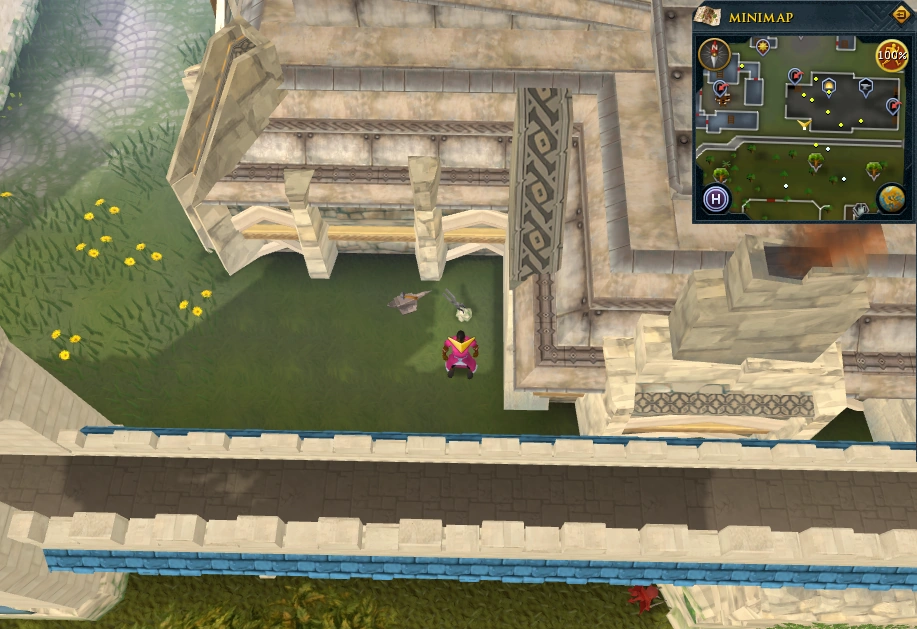 |
| North of Artisan's Workshop in the south-east corner of the city. | 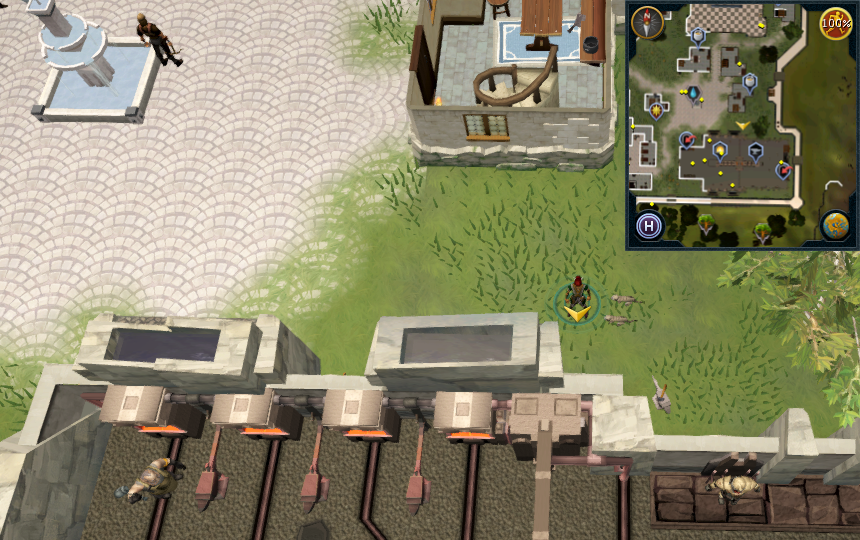 |
| In the north-east corner of Falador. Just north-east of the Party Room. | 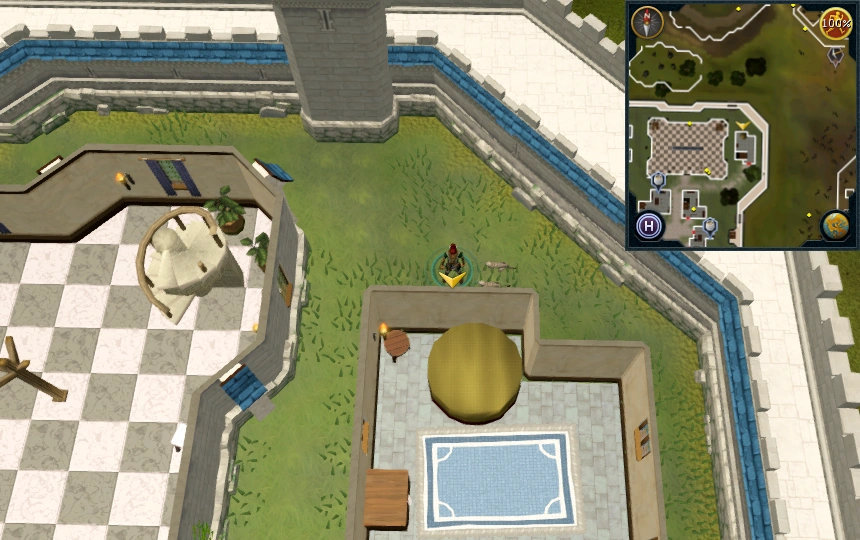 |
| Just east of the house outside the eastern side of Falador Park. This house belongs to Wyson the gardener who can sell the player woad leaves and trade the skin and claws of the Giant Mole for bird's nests. |  |
| South of the house outside the eastern side of Falador Park. This house belongs to Wyson the gardener who can sell the player woad leaves and trade the skin and claws of the Giant Mole for bird's nests. | 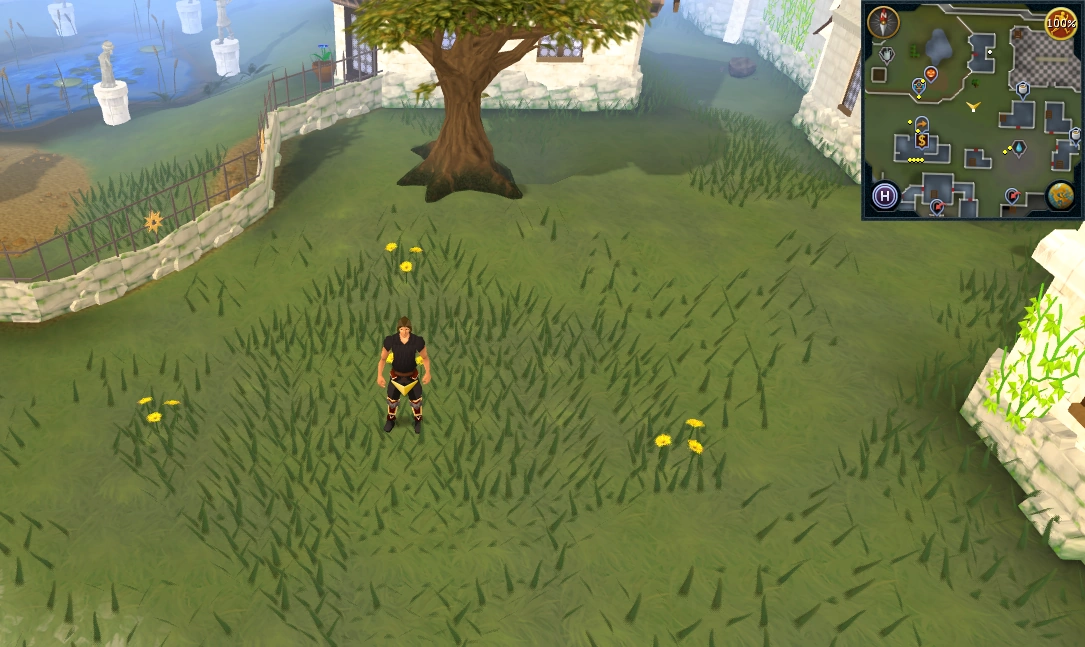 |
| In the centre of Falador Park, north-east of the tree patch for Farming wood trees. | 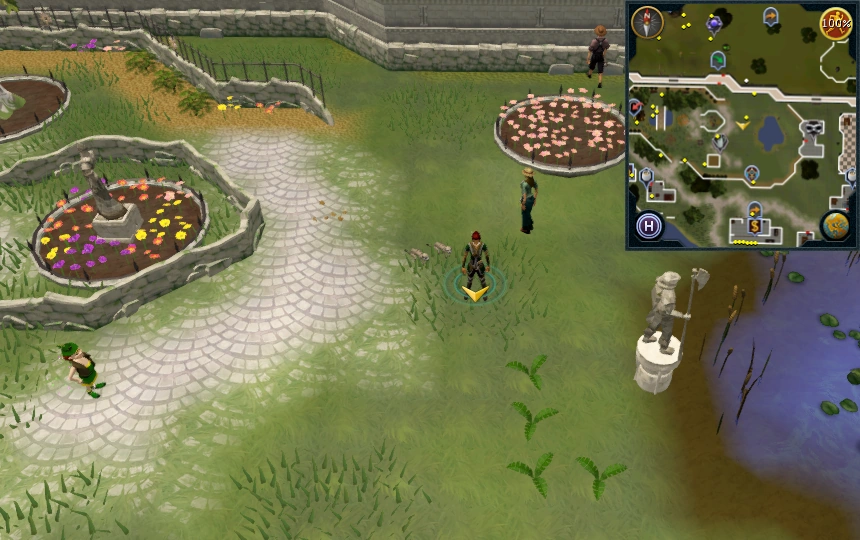 |
| On the eastern side of Falador Park, within the park's fence. West of the house outside the eastern side of Falador Park. This house belongs to Wyson the gardener who can sell the player woad leaves and trade the skin and claws of the Giant Mole for bird's nests. | 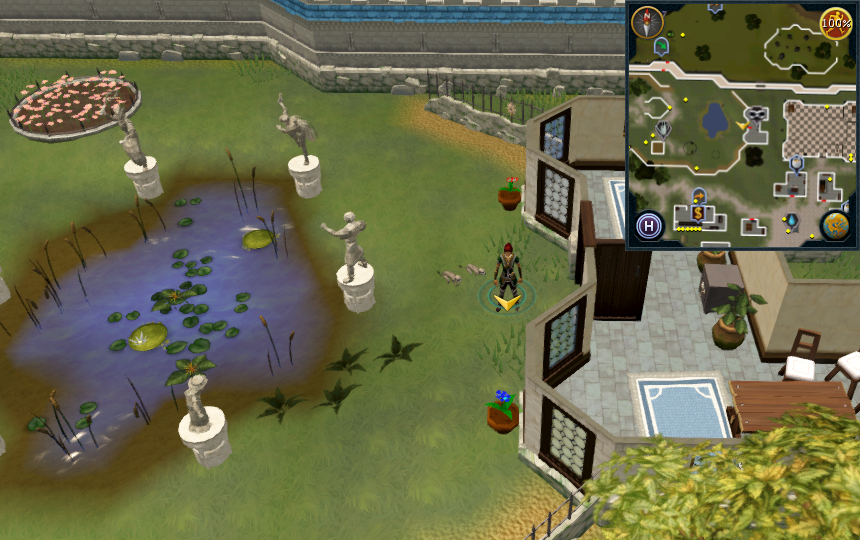 |
Fremennik Isles (Neitiznot and Jatizso)
Area Information: Neitiznot; Jatizso
Scan range: 16 paces

| Possible locations | Image |
|---|---|
| Neitiznot, inside the yak pen. | 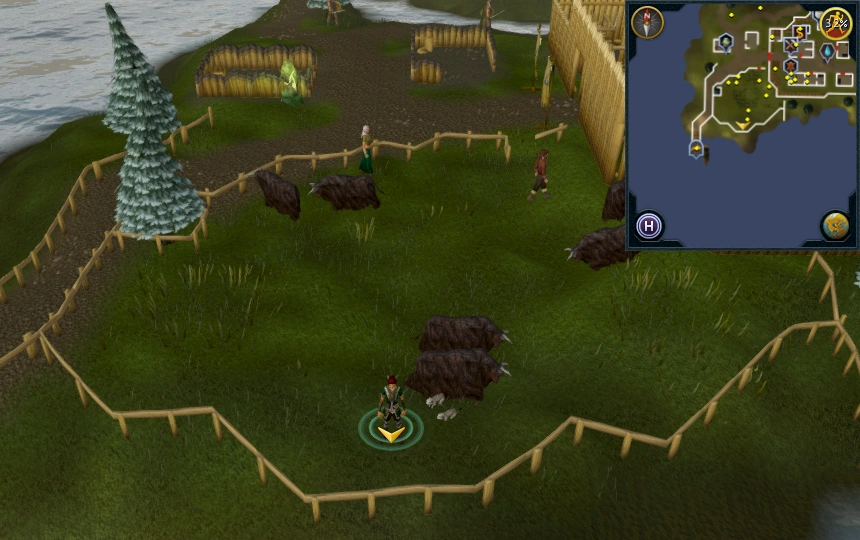 |
| Neitiznot, south-west of the Summoning obelisk. |  |
| Neitiznot, inside broken building between the town gates and a Summoning obelisk. | 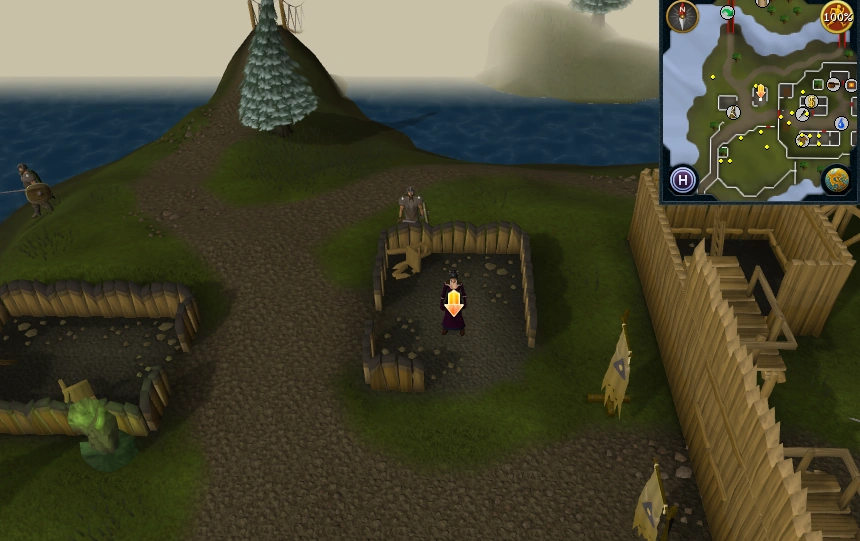 |
| Neitiznot, just south of a building with a spinning wheel in the south-eastern part of the town. |  |
| On western tip of the grassy island north of Neitiznot. North of the west bridge between the grassy island and Neitiznot. Two steps west of the location pictured. | 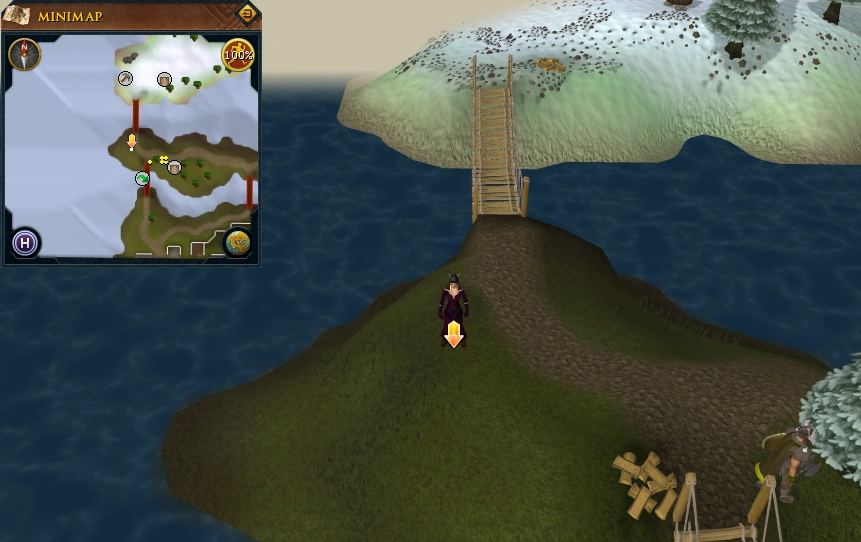 |
| In the centre of a ring of five Arctic Pine trees on the grassy island north of Neitiznot. | 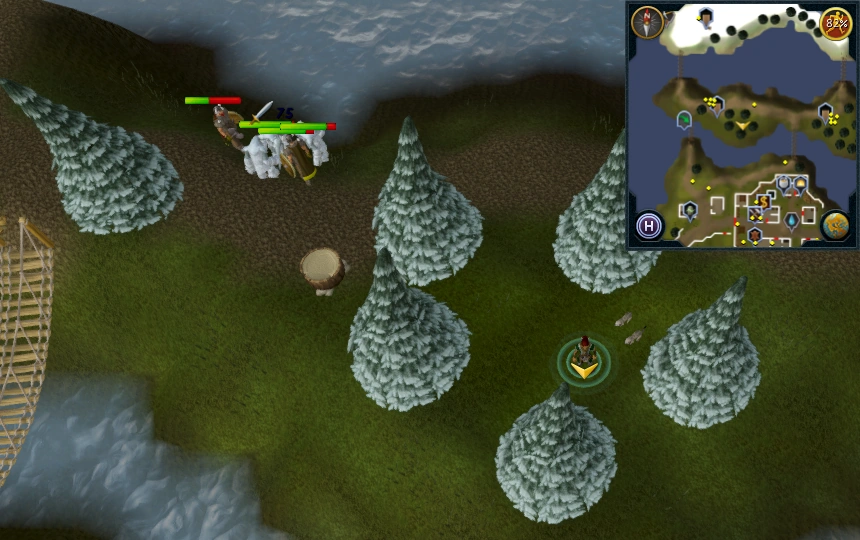 |
| On eastern tip of the grassy island north of Neitiznot. South of the central island. |  |
| On the smallest island with in the centre of the other Fremennik isles with 7 coal rocks and 1 Runite rock (the Central Fremennik Isles mining site). One pace south of the location pictured. |  |
| On south-west snowy island, by the eastern Woodcutting stump. | 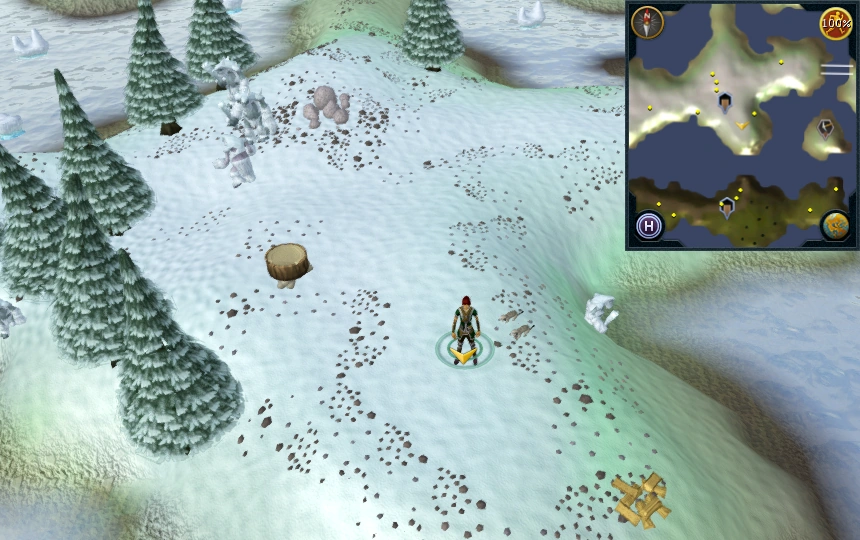 |
| On south-west snowy island, west of the bridge connecting Neitiznot with Jatizso. | 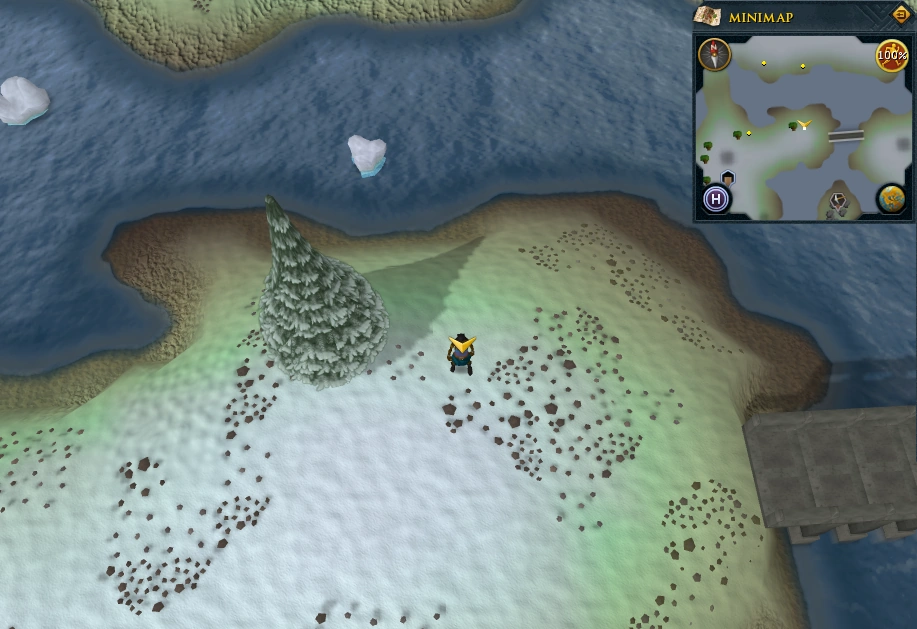 |
| On south-west snowy island, on the west tip of the island. By copper rocks and west Woodcutting stump. One pace east of the location pictured. | 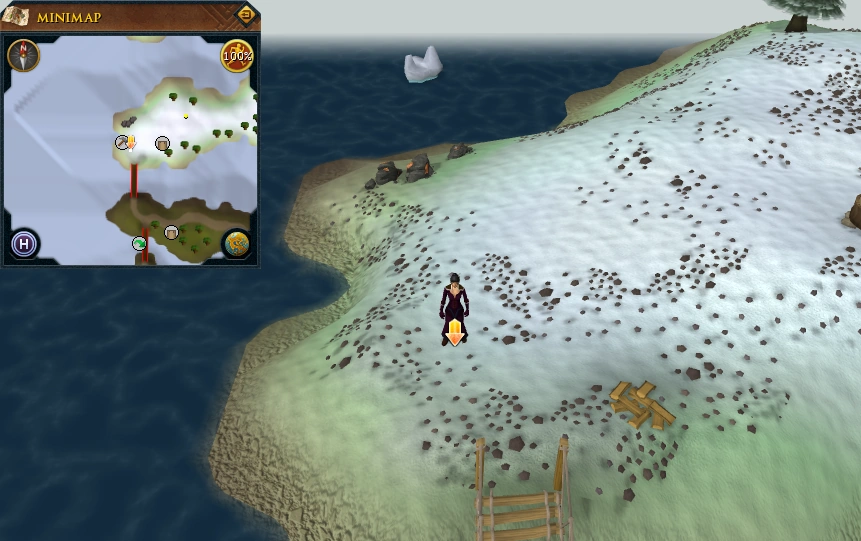 |
| East of bridge to south-west snowy island. |  |
| Just north of land bridge connecting north snowy island and south-west snowy island. | 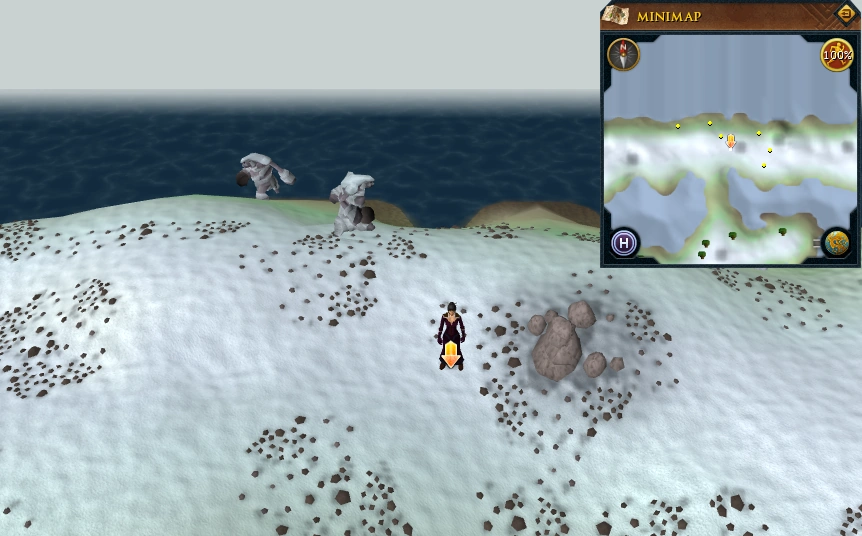 |
| On the land bridge connecting the north snowy island and south-west snowy island. | 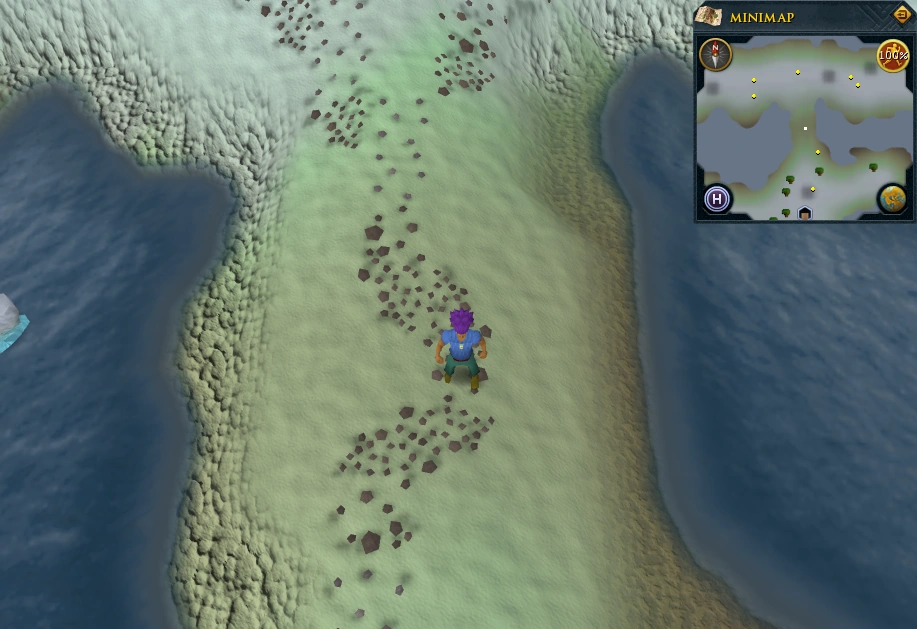 |
| On north snowy island, west tip. By west cave entrance. | 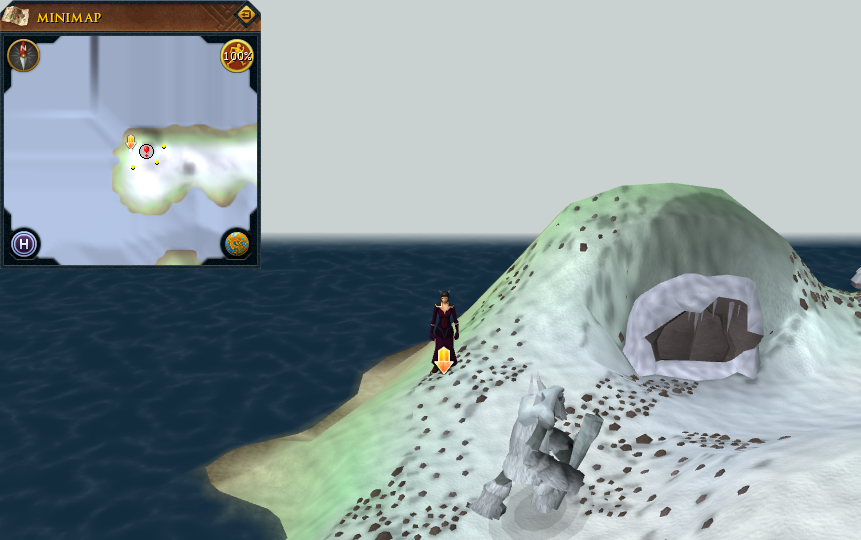 |
| On north snowy island, just north-west of east cave entrance. | 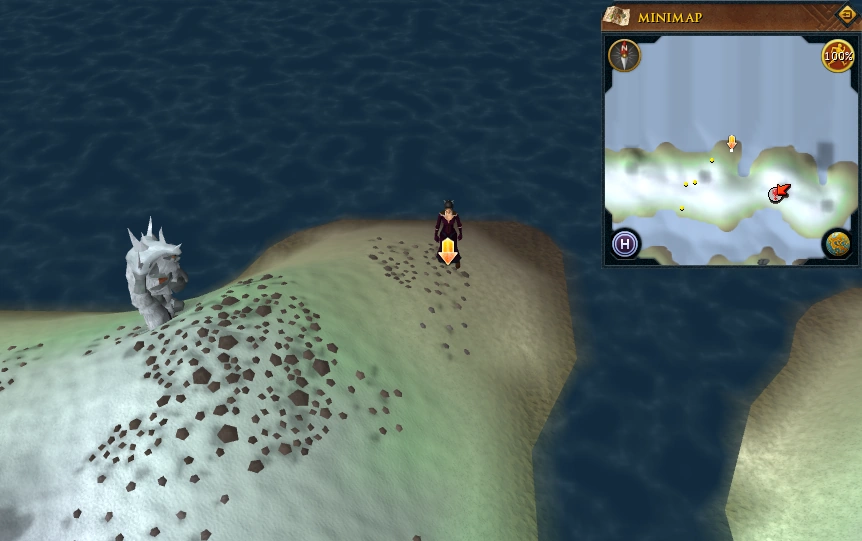 |
| On north snowy island, just outside east cave entrance. |  |
| On north snowy island, east tip. | 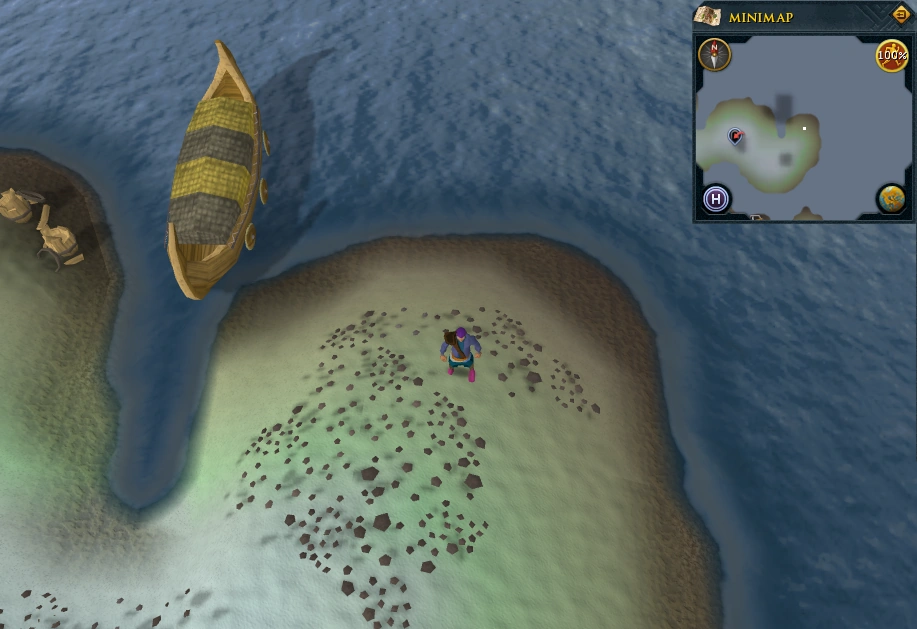 |
| On south-east snowy island, by coal rocks just west of Mining site icon. | 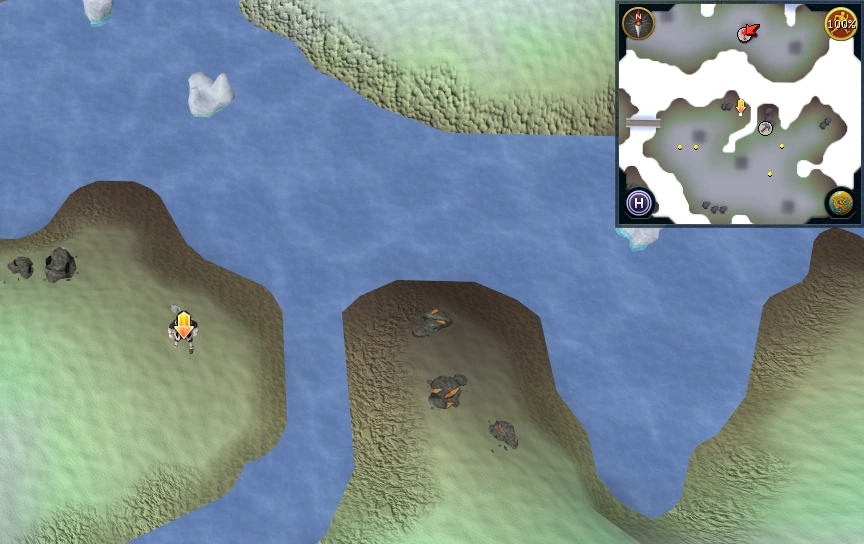 |
| On south-east snowy island, by coal rocks east of the Mining site icon. | 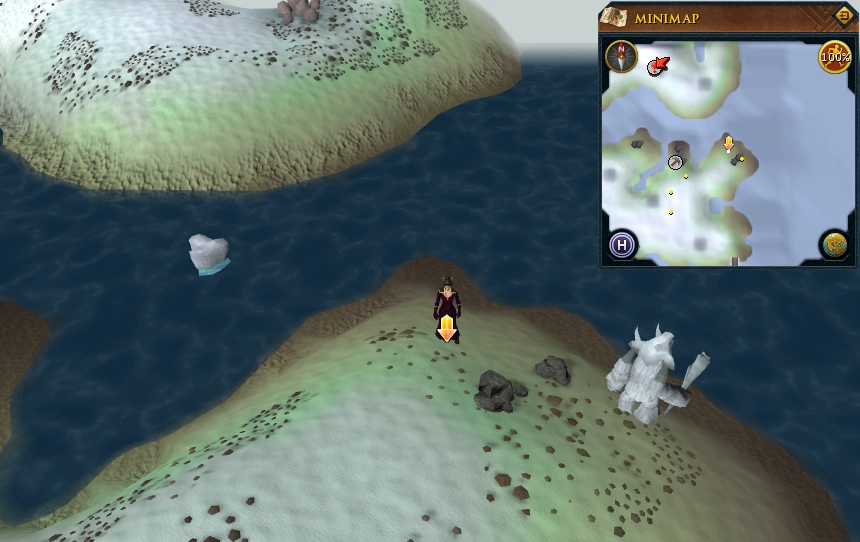 |
| On south-east snowy island, north west of the Jatizso bridge. |  |
| Jatizso, just outside north gates to the town. South of bridge between south-west snowy island and Jatizso. |  |
| Jatizso, between two buildings with anvils. East of the town's west gate and west of Jatizso Hall, containing King Gjuki Sorvott IV. |  |
| Jatizso, south of town wall and north-west of fishing spots. | 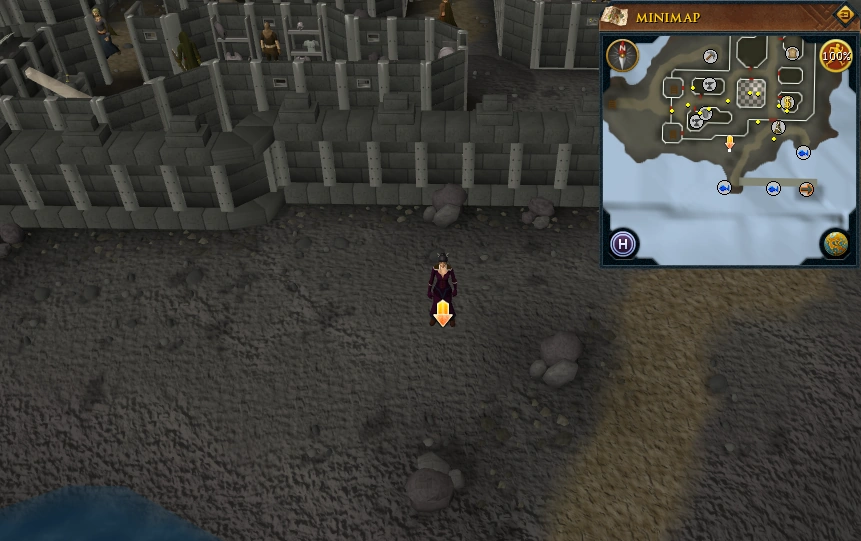 |
| Just south-east of the guard tower on Jatizso. | 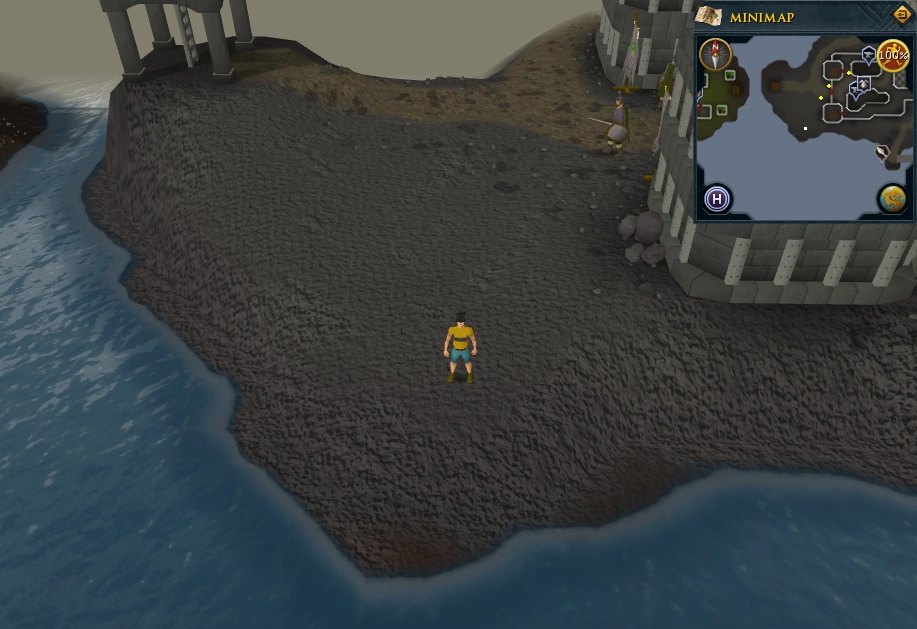 |
| Just east of the guard tower on the western tip of Jatizso |  |
| Immediately west of the guard tower in Neitiznot. |  |
| A couple steps west of the mine entrance in Jatizso. | 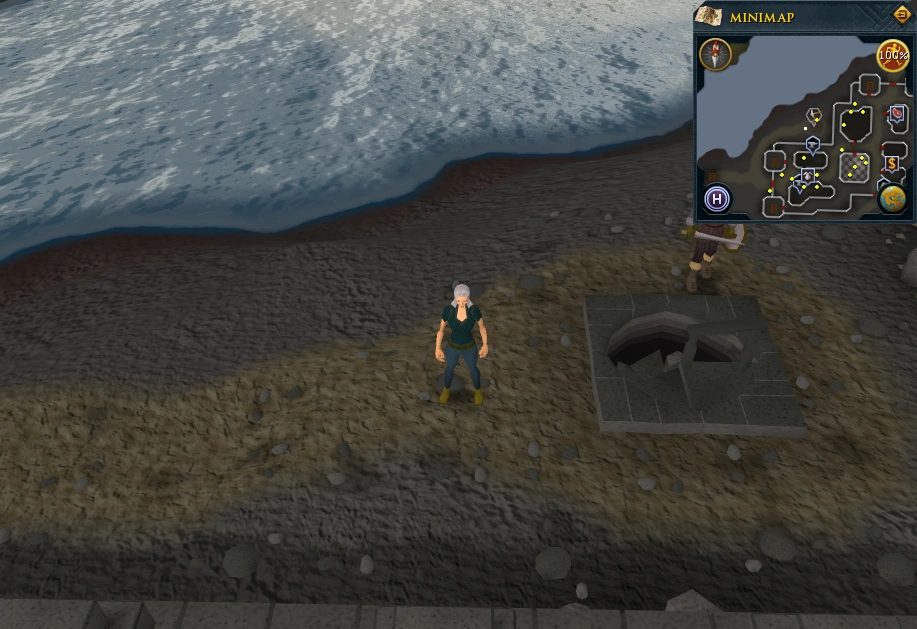 |
| Jatizso, south-east of the southern town entrance. | 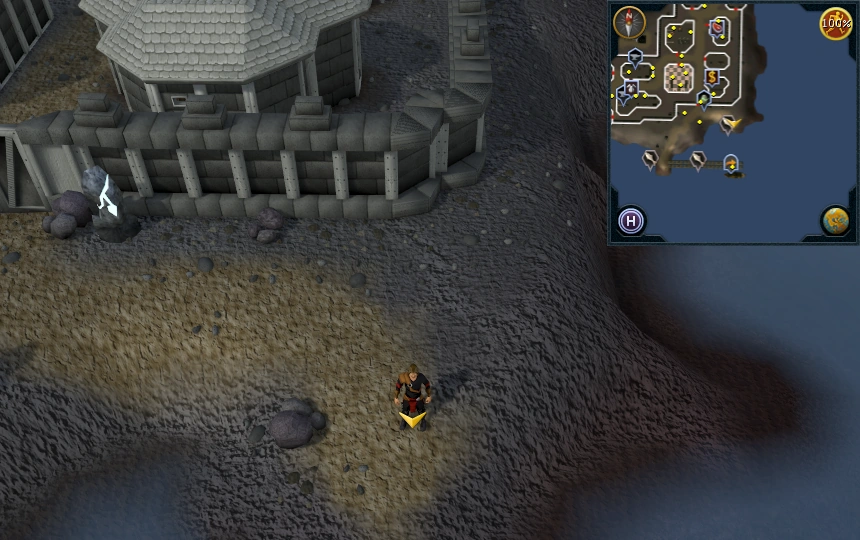 |
| North between 2 Arctic Pines on south-west snowy island | 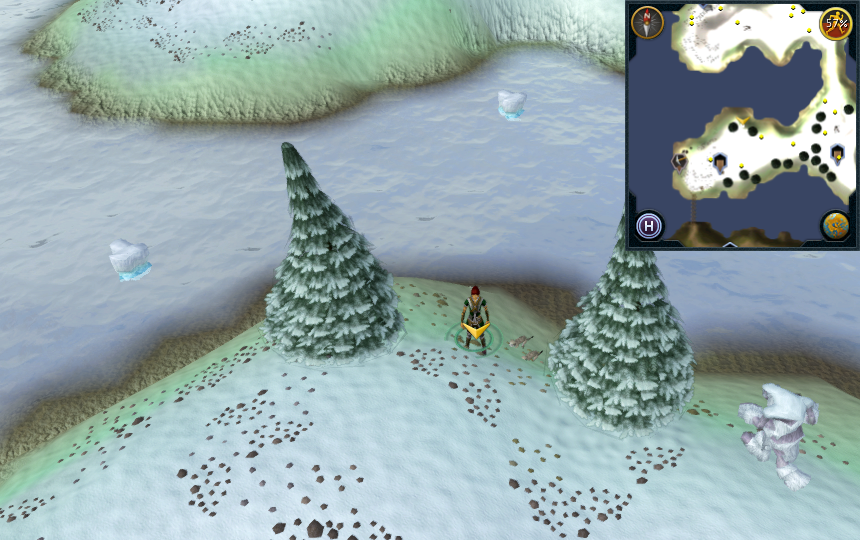 |
| In the centre of Neitiznot, just south of the oven. | 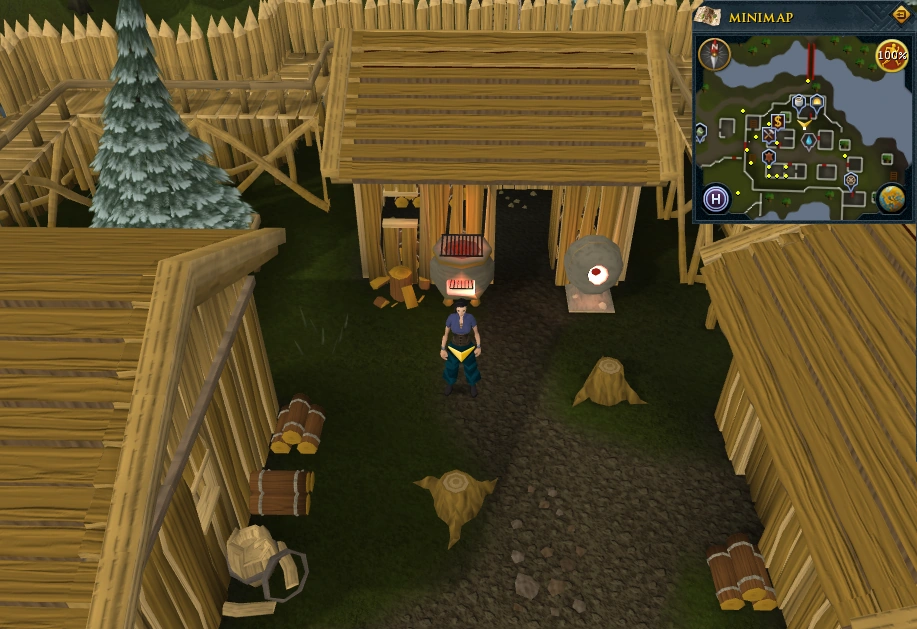 |
| In the centre of Neitiznot, just east of the fountain. | 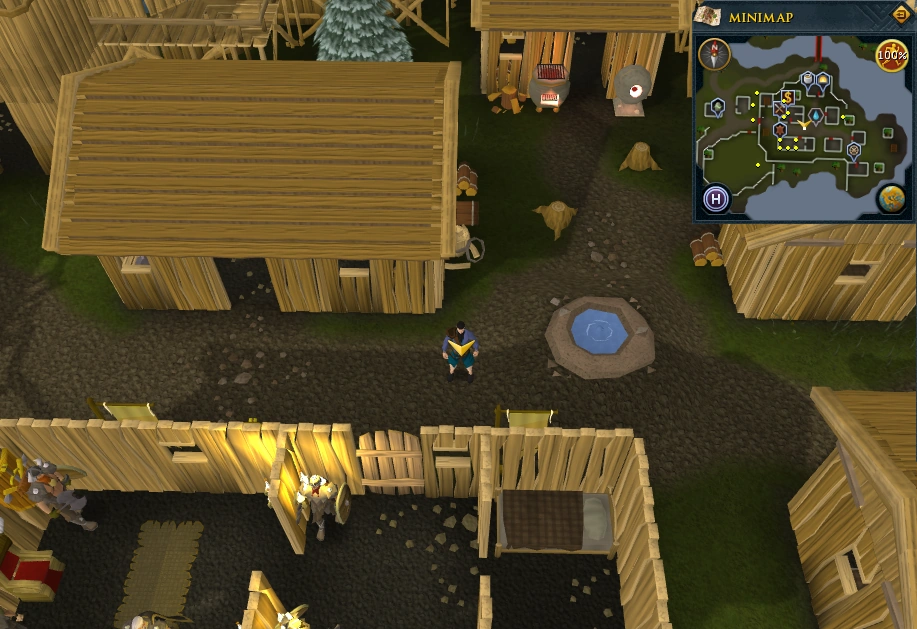 |
|
Other possible locations
| |
Fremennik Slayer Dungeons
Area Information: Fremennik Slayer Dungeon
Players may find this map, showing the locations of the dungeon's monsters, useful when navigating the area.
Scan range: 16 paces
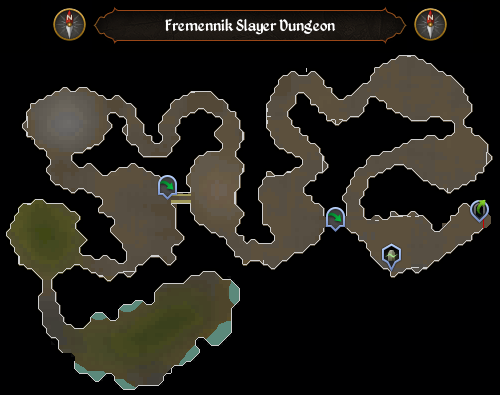
| Possible locations | Image |
|---|---|
| Near the dungeon entrance, in the cave crawler chamber. | 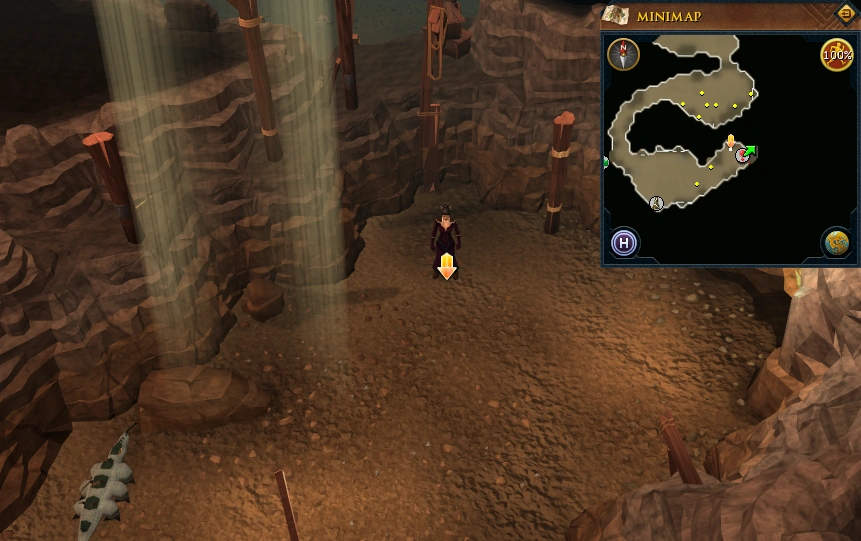 |
| East side of rock slug chamber. | 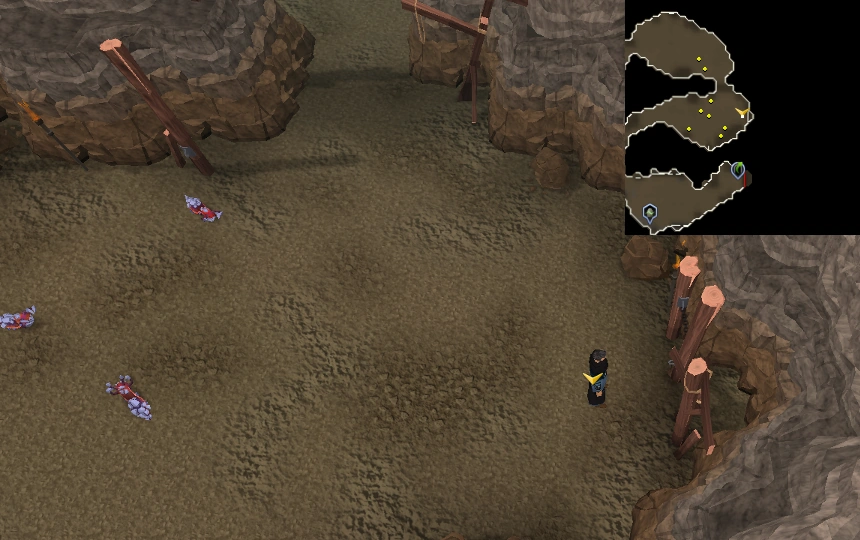 |
| On the northern side of the cockatrice chamber. | 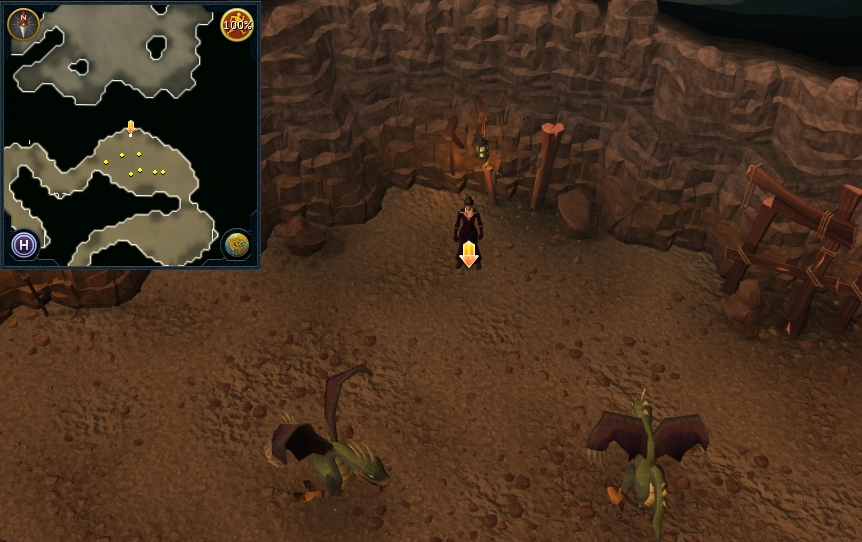 |
| In the passage between the cockatrice and pyrefiend chambers, just west of the cockatrice chamber. |  |
| In the passage between the cockatrice and pyrefiend chambers, just north of the pyrefiend chamber. | 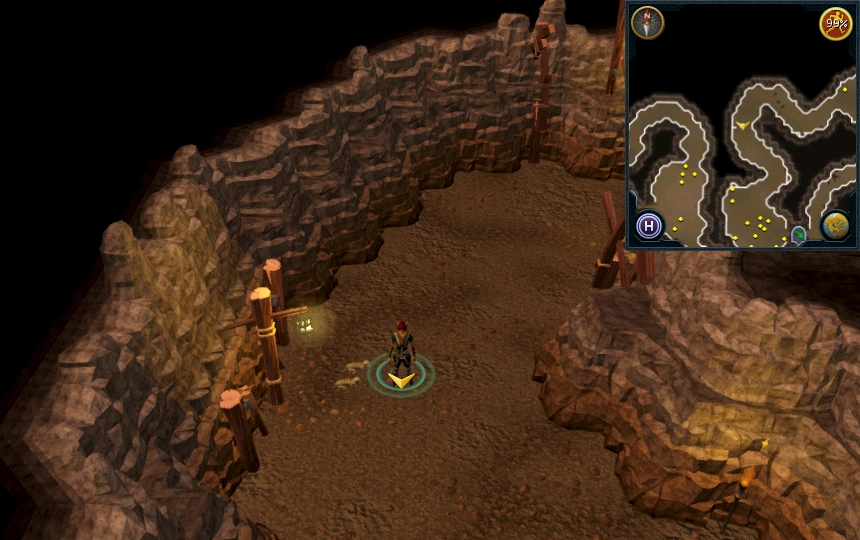 |
| On the western side of the pyrefiend chamber. | 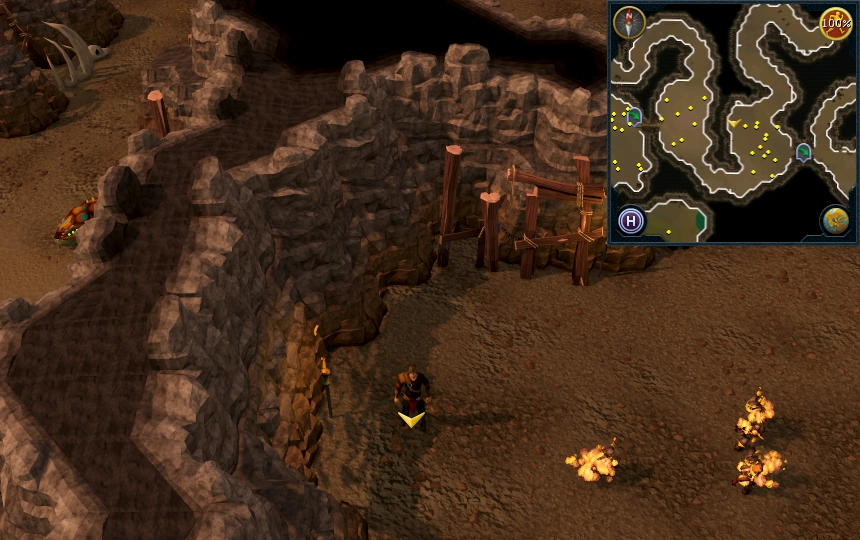 |
| In the pyrefiend chamber. Just west of the level 62 narrow crevice Agility shortcut between the cave crawler and pyrefiend chambers. | 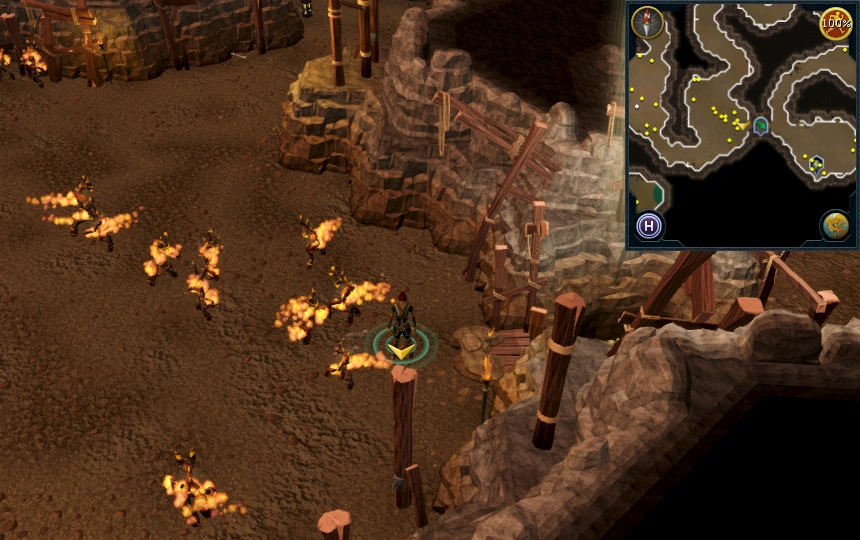 |
| In the passage between the pyrefiend and basilisk chambers. | 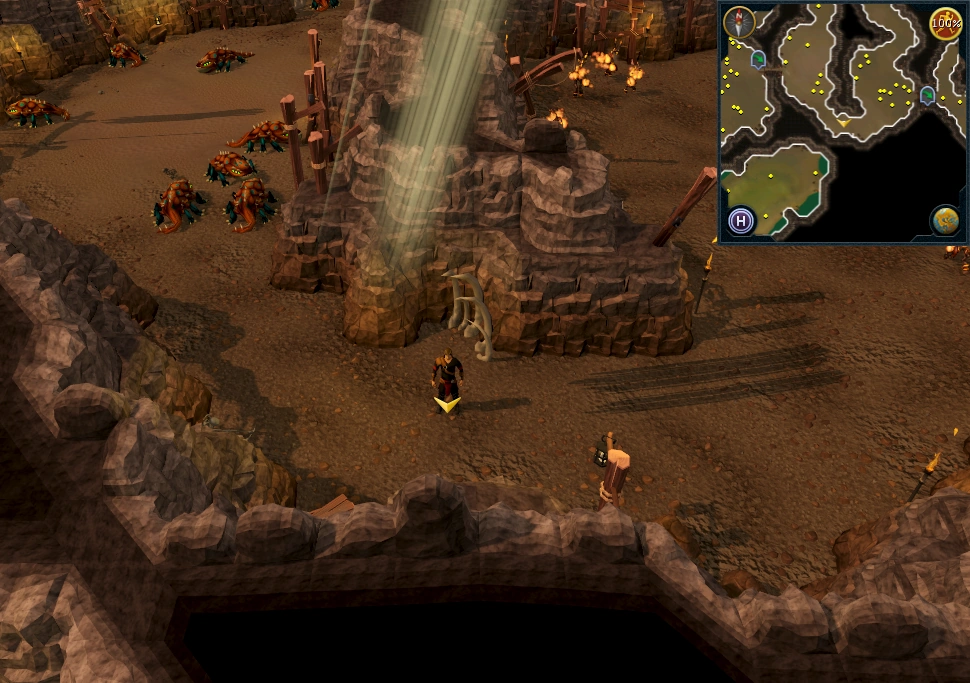 |
| In the passage between the basilisk and jelly chambers. | 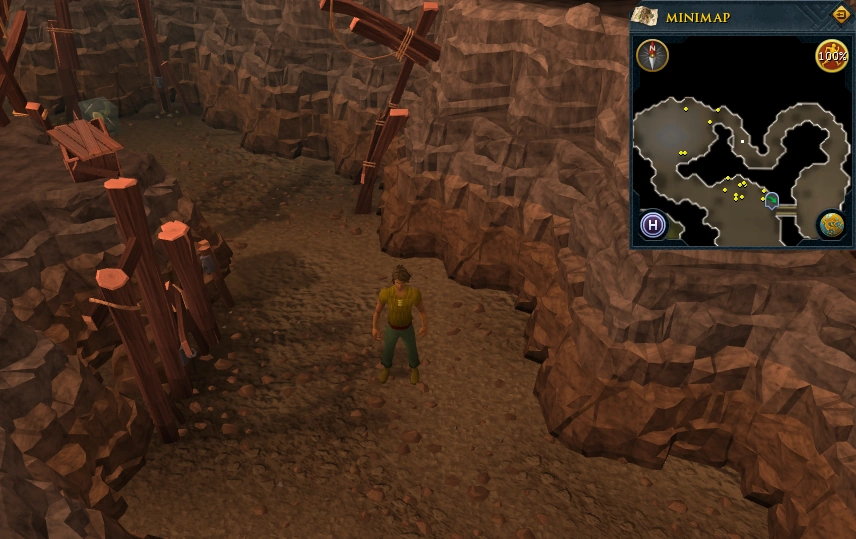 |
| In the centre of the jelly chamber. |  |
| On west side of the turoth chamber. |  |
| On south-east side of turoth chamber. | 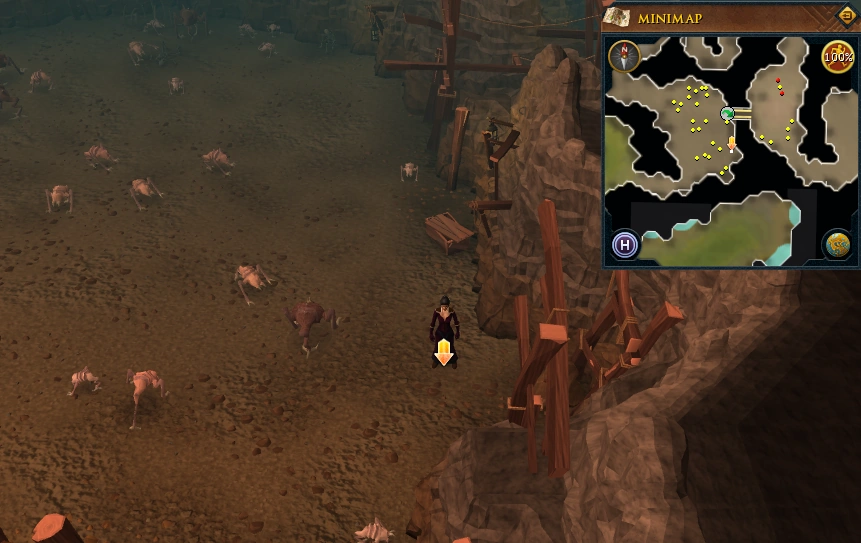 |
| In the passage between the turoth and kurask chambers. |  |
| In the passage between the kurask and aquanite chambers. | 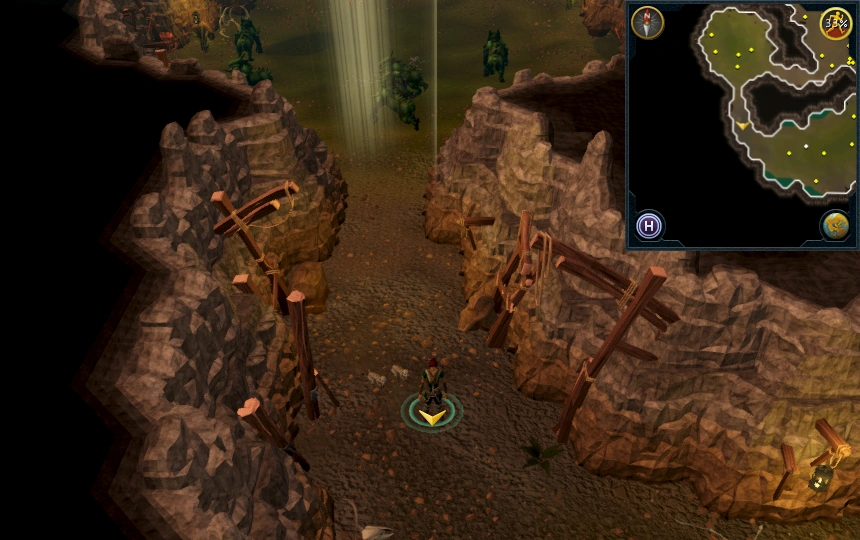 |
| In the centre of the aquanite chamber. | 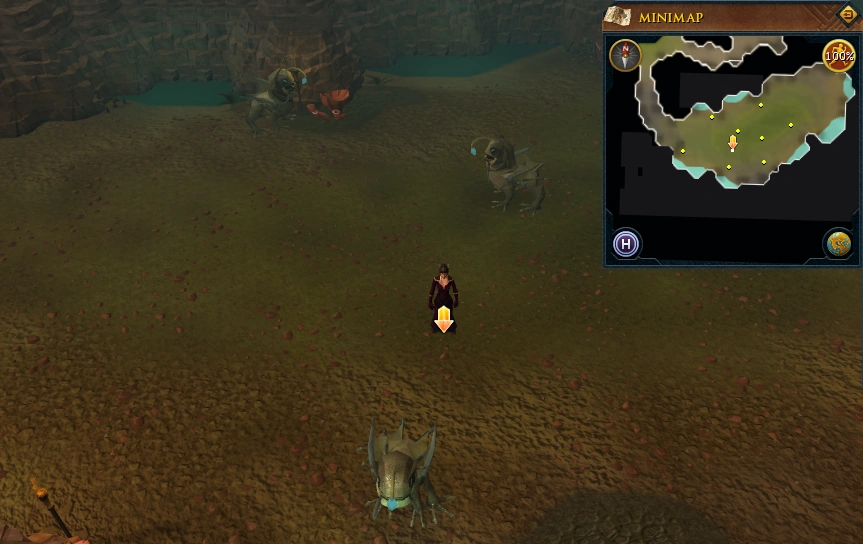 |
| Slightly north east of the centre of the aquanite chamber. | 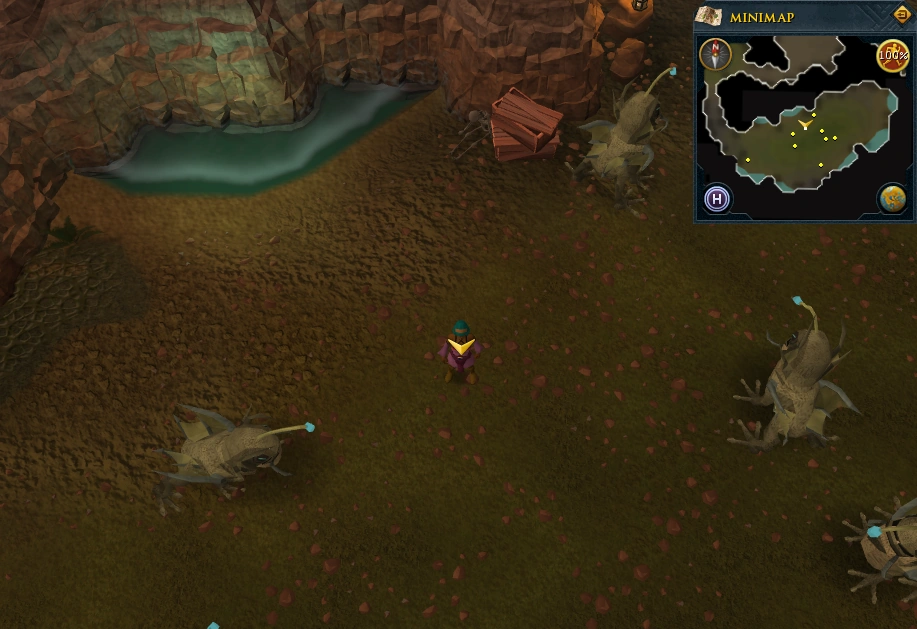 |
| East tip of the aquanite chamber. |  |
| Southeast side of aquanite chamber. | 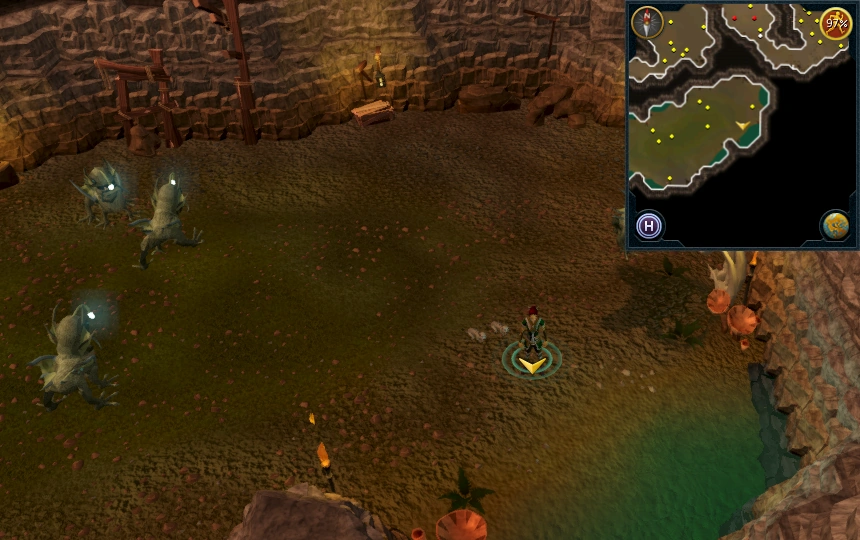 |
| Just north of the basilisk chamber. |  |
Haunted Woods
Area Information: Haunted Woods
This area contains aggressive leeches and vampyres.
Scan range: 11 paces
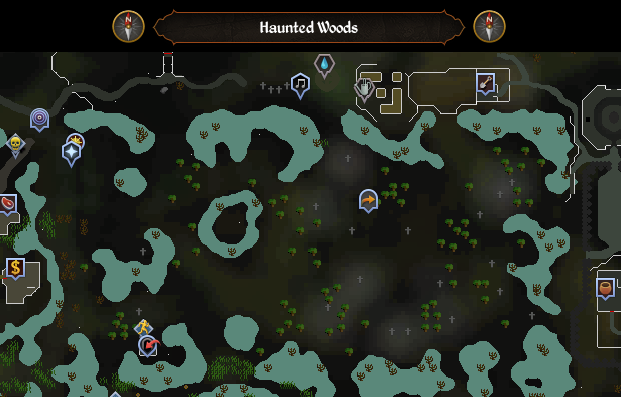
| Possible locations | Image |
|---|---|
| South-west of Alice's Farming Shop and the pen where Alice's husband keeps undead chickens and undead cows. |  |
| South of Alice's Farming Shop and the pen where Alice's husband keeps undead chickens and undead cows. | 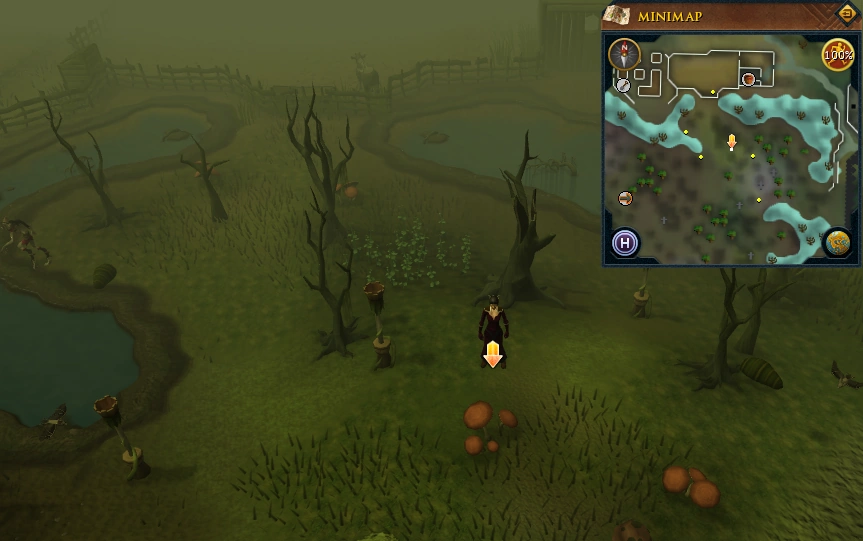 |
| West of the west entrance to Port Phasmatys. | 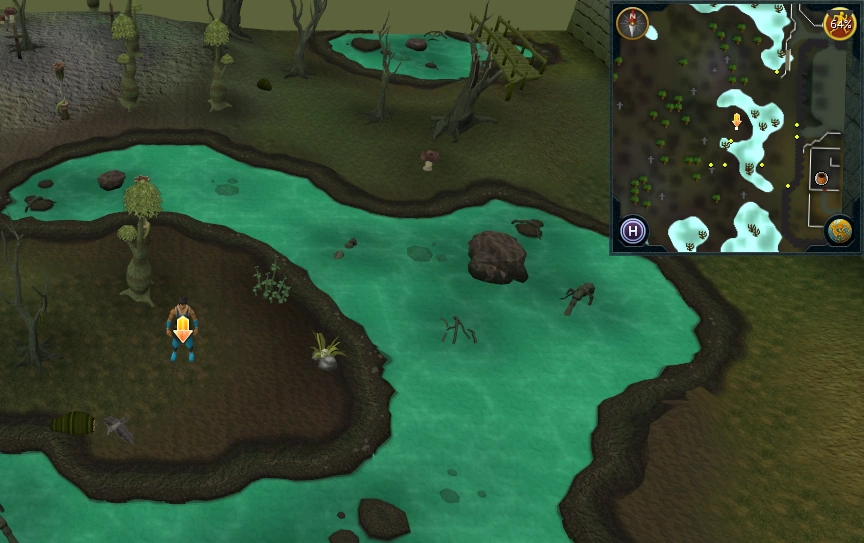 |
| West of Port Phasmatys General Store, outside the walls of Port Phasmatys. |  |
| In southern part of the Haunted Woods. Far south of the fairy ring (code ALQ). | 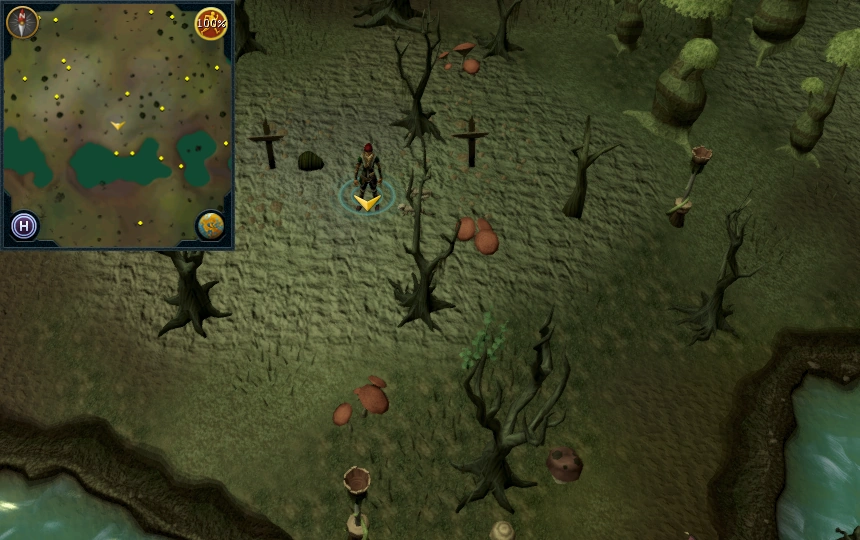 |
| South of Morytania allotment patch. | 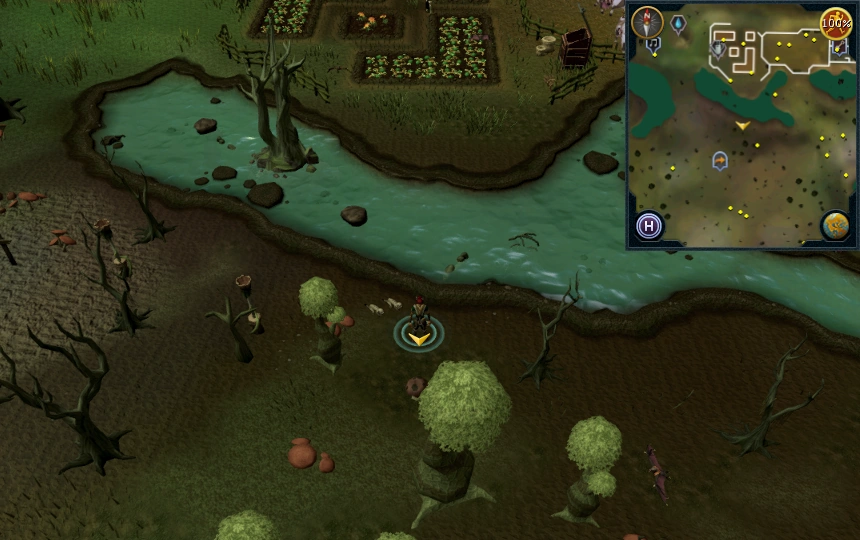 |
| Just north-west of fairy ring (code ALQ). |  |
| Just east of the fairy ring (code ALQ). |  |
| South-west of musician. | 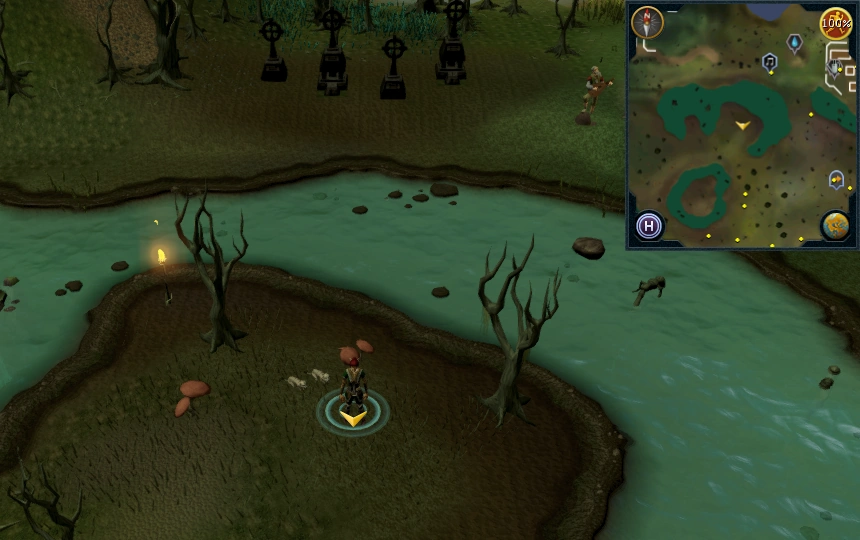 |
| Just south-east of the lake containing an island that cannot be reached. |  |
| South-west of fairy ring (code ALQ). |  |
| South of fairy ring (code ALQ). | 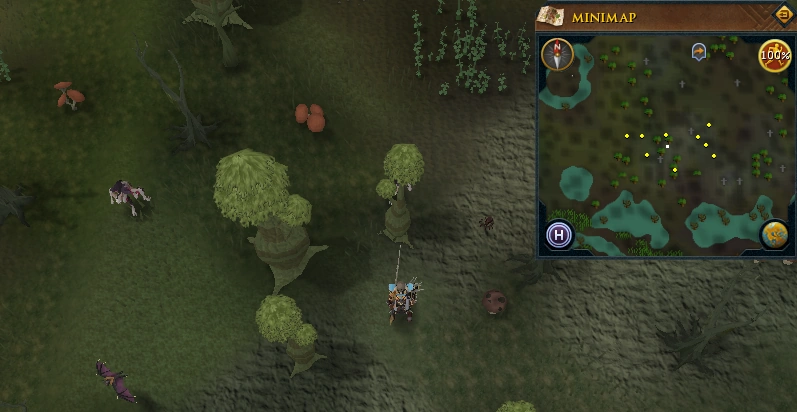 |
| In south-western part of the Haunted Woods. Far south-west of the fairy ring (code ALQ) and south-east of the lake containing an island. |  |
| South of the lake containing an island that cannot be reached. | 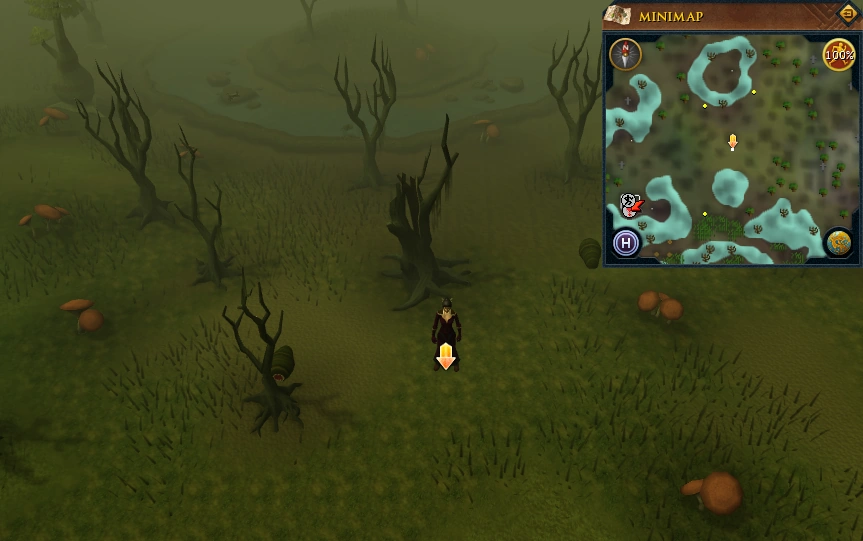 |
| South-west of the lake containing an island that cannot be reached. | 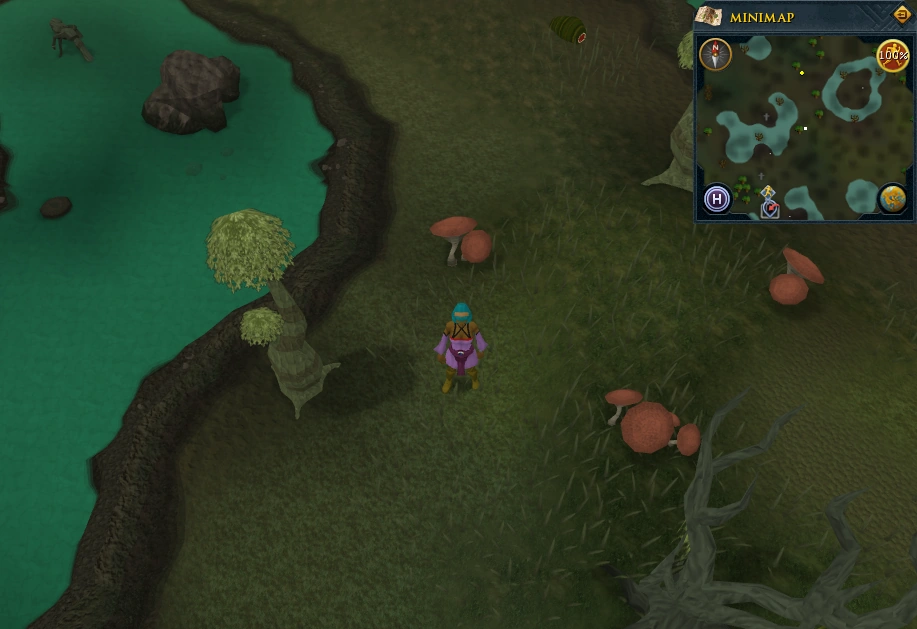 |
| North-west of the entrance to the Werewolf Agility Course and Werewolf Skullball. | 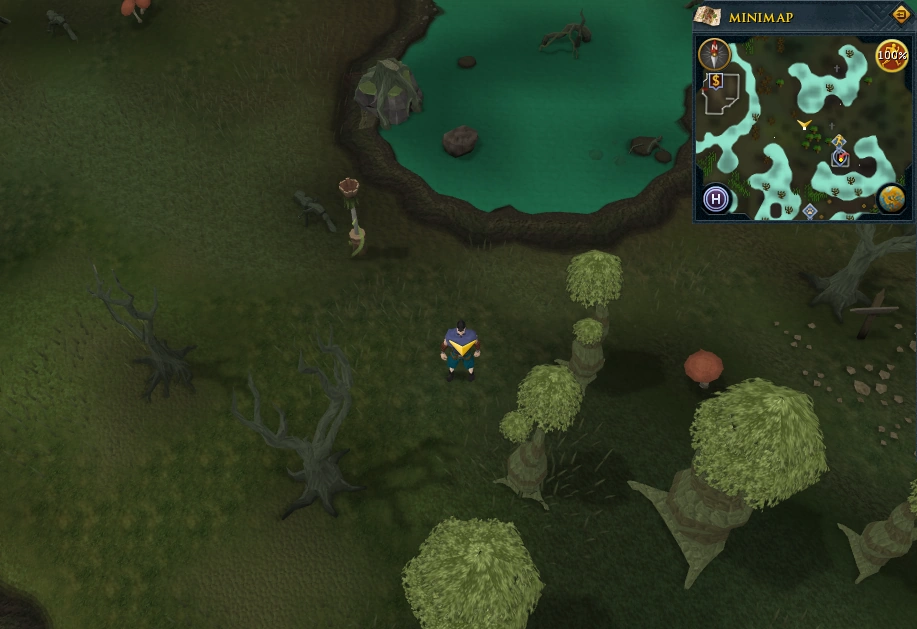 |
| South-east of Canifis bank and east of the Hair of the Dog inn. | 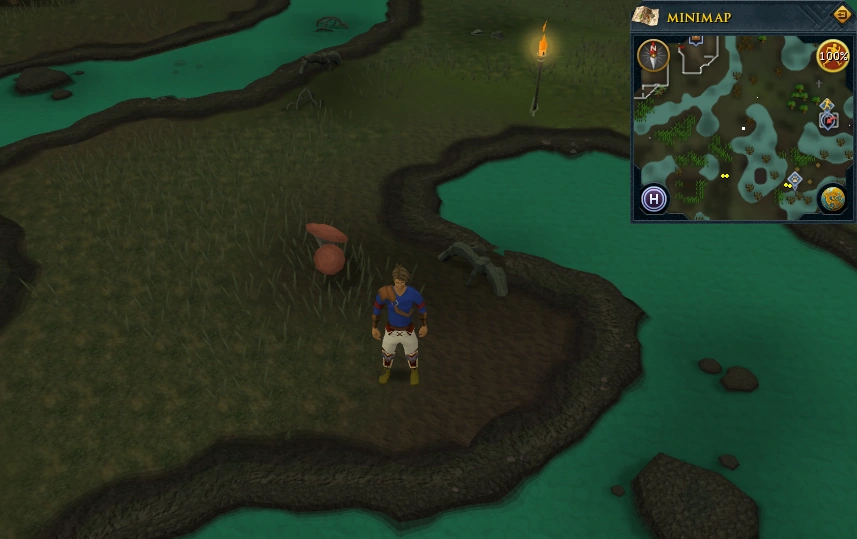 |
| South-east of Canifis lodestone, Mazchna the Slayer Master and the Canifis site for the God Statues Distraction and Diversion. | 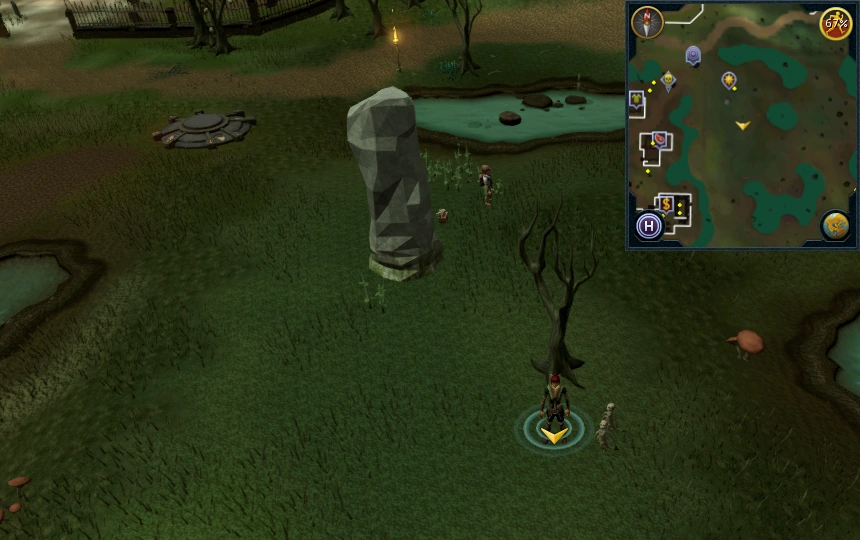 |
| South of Fenkenstrain's Castle. |  |
| South-east of Fenkenstrain's Castle and south-west of the musician. |  |
| Just north of the agility training icon indicating the entrance to the Werewolf Agility Course. |  |
The Heart of Gielinor
Area Information: Heart of Gielinor
Scan range: 49 paces
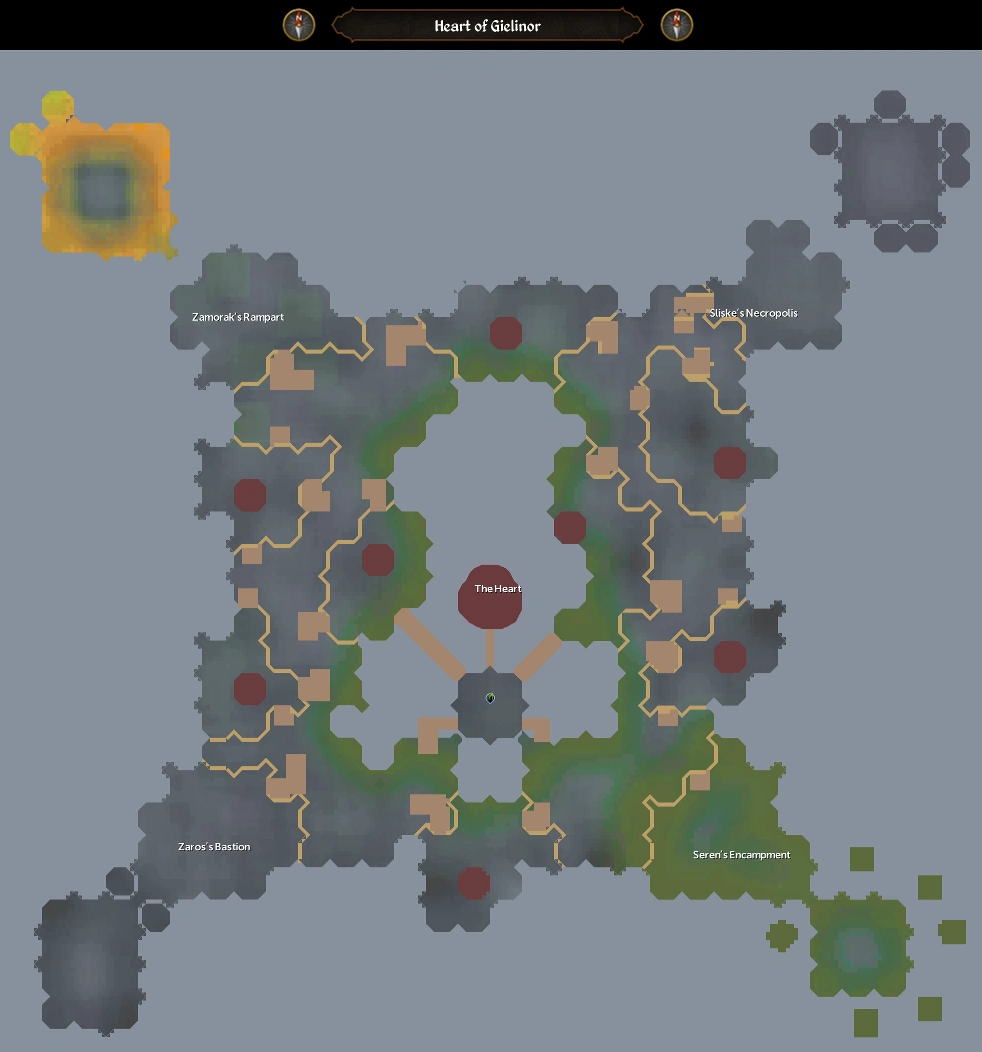
| Possible locations | Image |
|---|---|
| North-west of The Heart on the left side, between Zamorak's rampart and Sliske's necropolis. Just south-west of a node. | 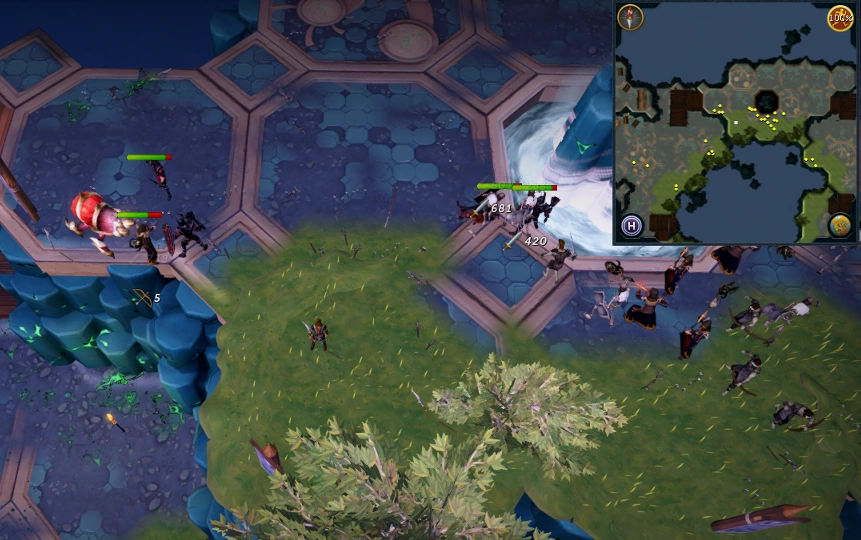 |
| North-west of The Heart on the right side, between Zamorak's rampart and Sliske's necropolis. Just south-west of a node. | 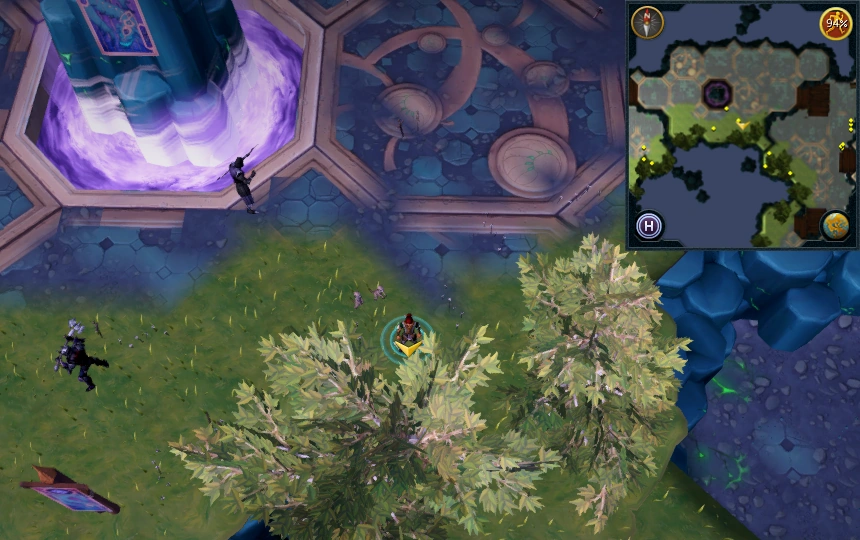 |
| In Sliske's Necropolis, just south-west of the slope to Gregorovic's area. Seven paces north and four east of the location pictured. | 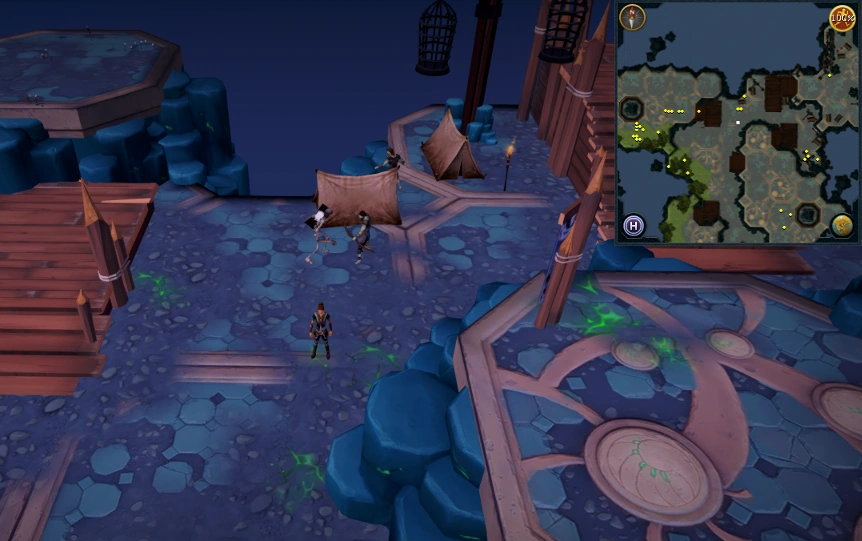 |
| In Sliske's necropolis, just west of the 40 killcount threshold to Gregorovic's area. |  |
| North of The Heart, south-west of Sliske's Necropolis. North of a node. One pace north of the location pictured. | 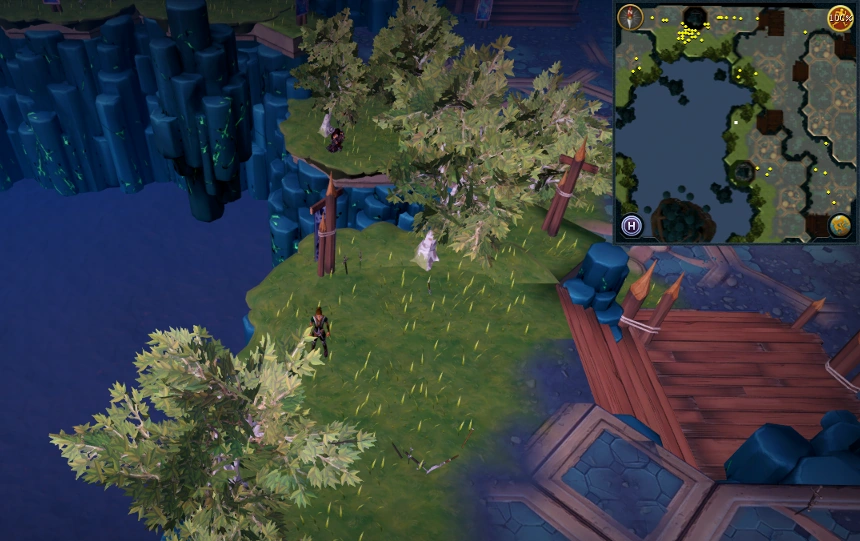 |
| Directly east of Telos entrance, just south-east of a node. | 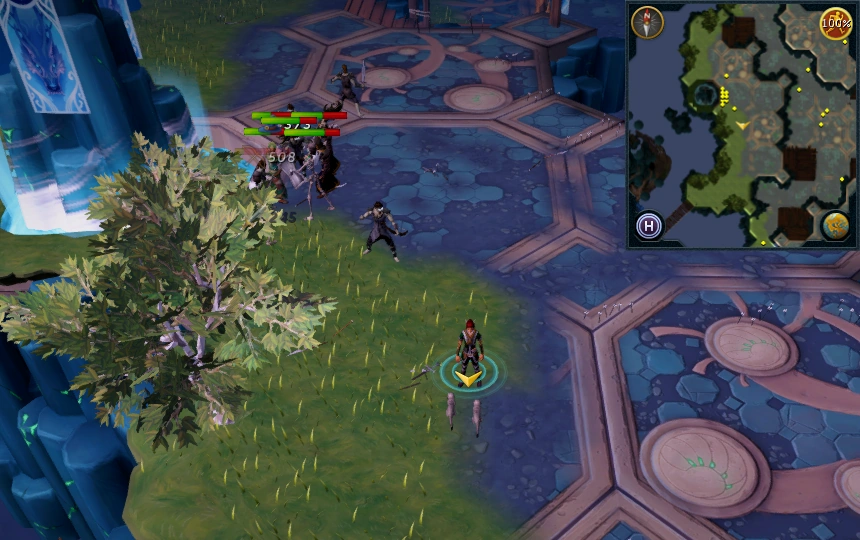 |
| In Seren's encampment, just west of the slope leading to Helwyr's area, near a rock shaped like a mushroom. | 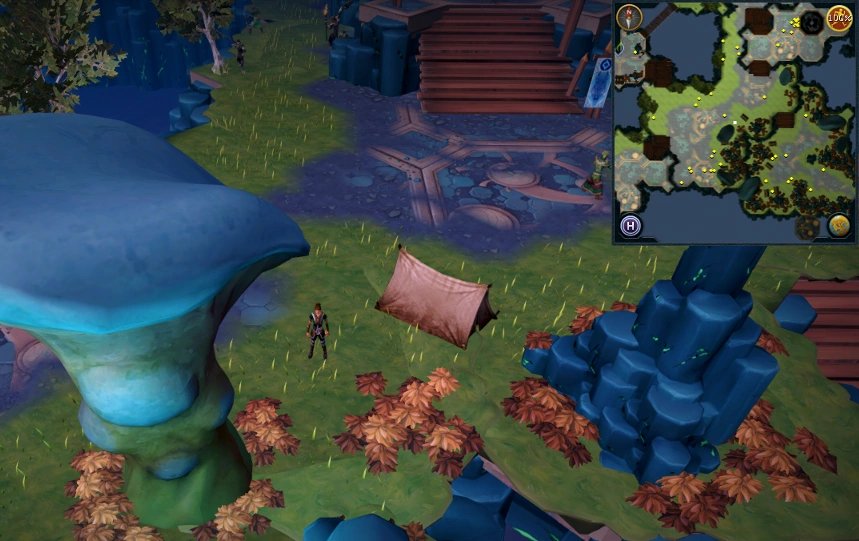 |
| In Seren's encampment, just east of the slope leading to Helwyr's area. | 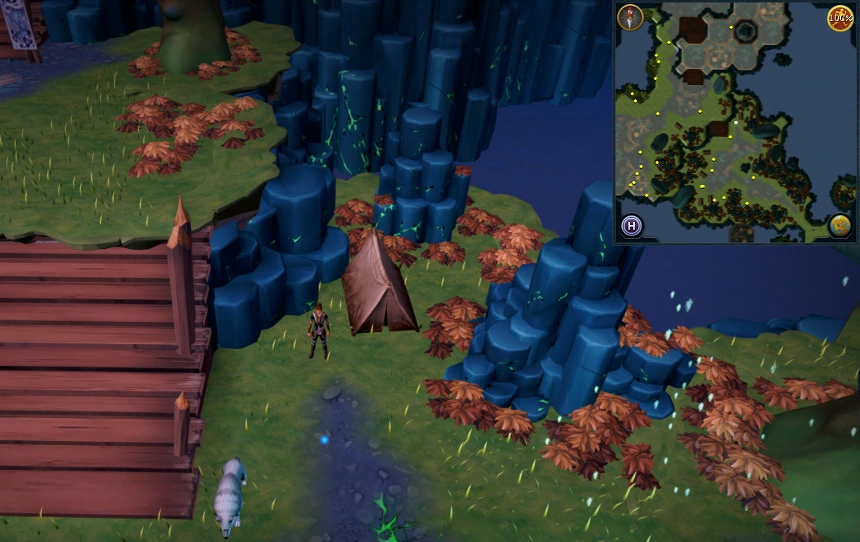 |
| In Seren's encampment, south of the slope leading to Helwyr's area. Next to the banner of Helwyr. |  |
| In Zaros's bastion, south-east of the slope leading of Vindicta's area. | 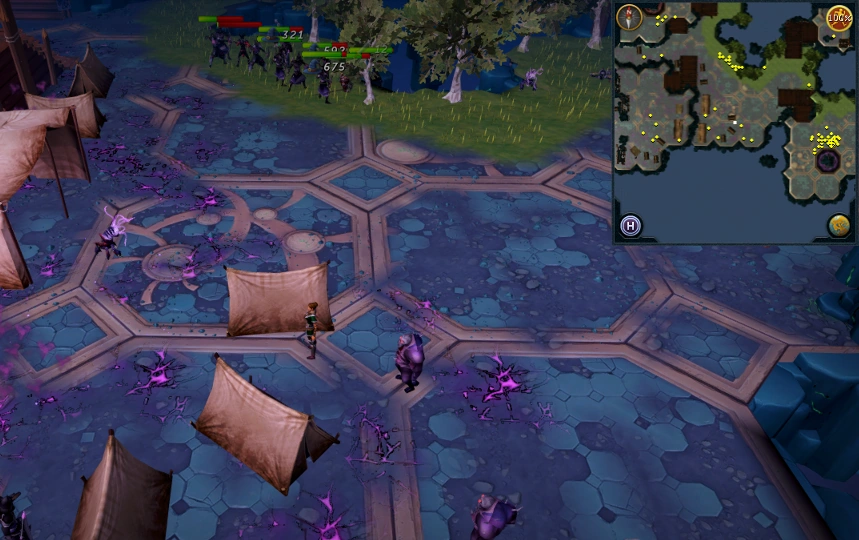 |
| In Zaros's bastion, south-west of the entrance platform. | 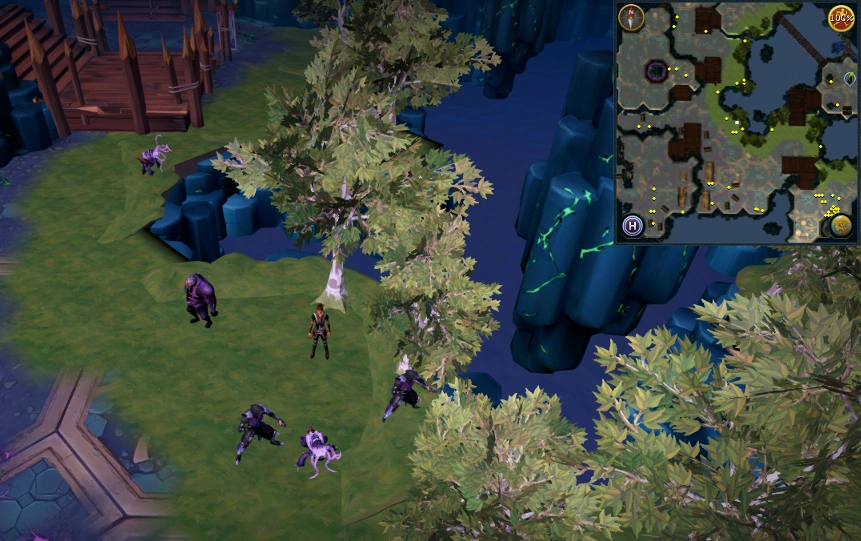 |
| Between two platforms north-east of Zaros' Bastion |  |
| In Zaros's bastion, south of the slope leading of Vindicta's area. | 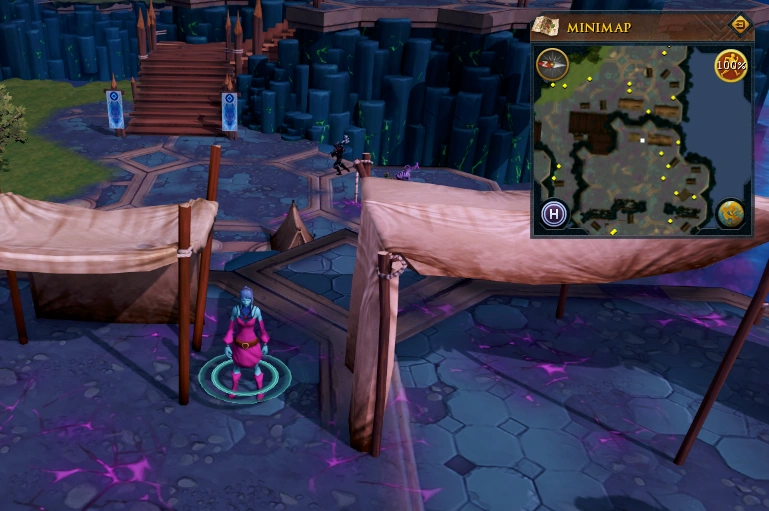 |
| In Zaros's bastion, just north-east of the 40 killcount threshold to Vindicta's area. | 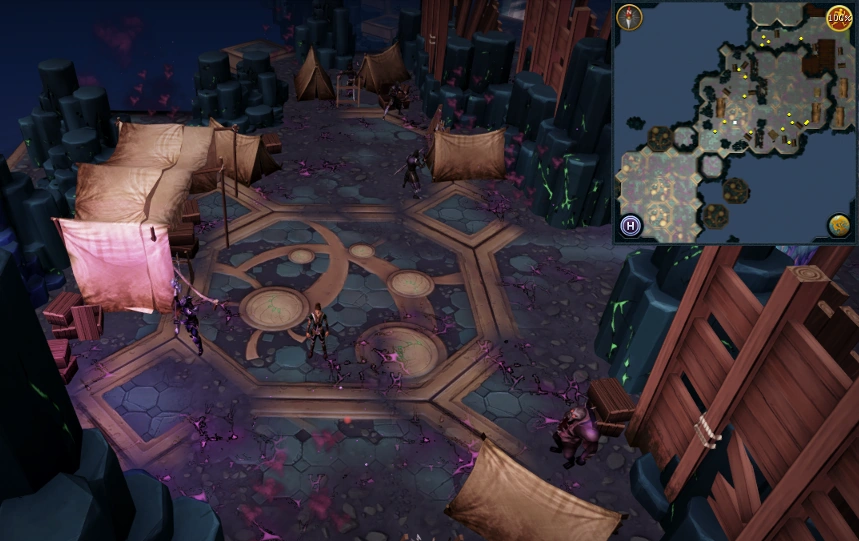 |
| North-west of The Heart. | 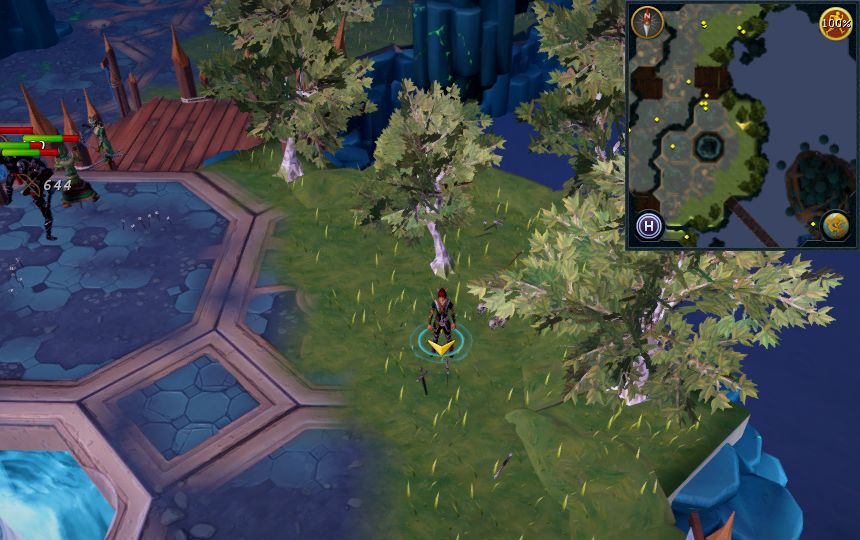 |
| South-west of Zamorak's rampart, west of a node. | 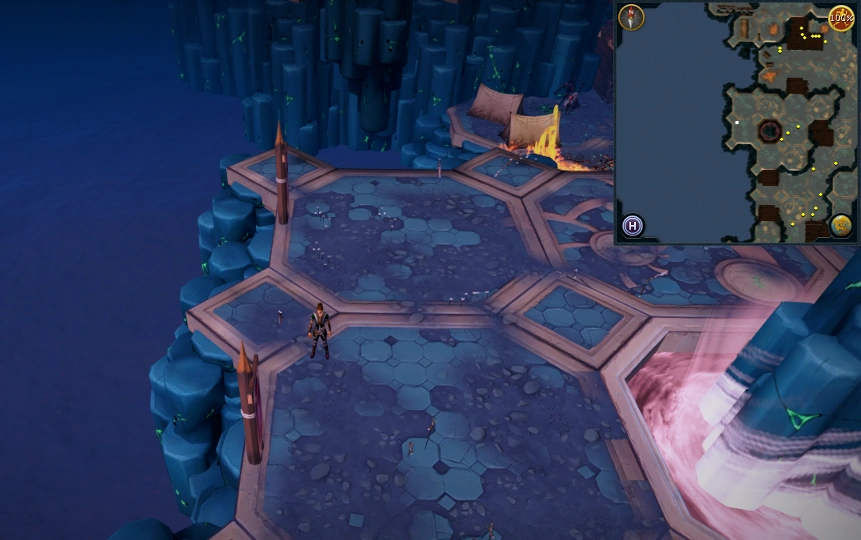 |
| Near 3 tents, south-east of first threshold to Twin Furies area | 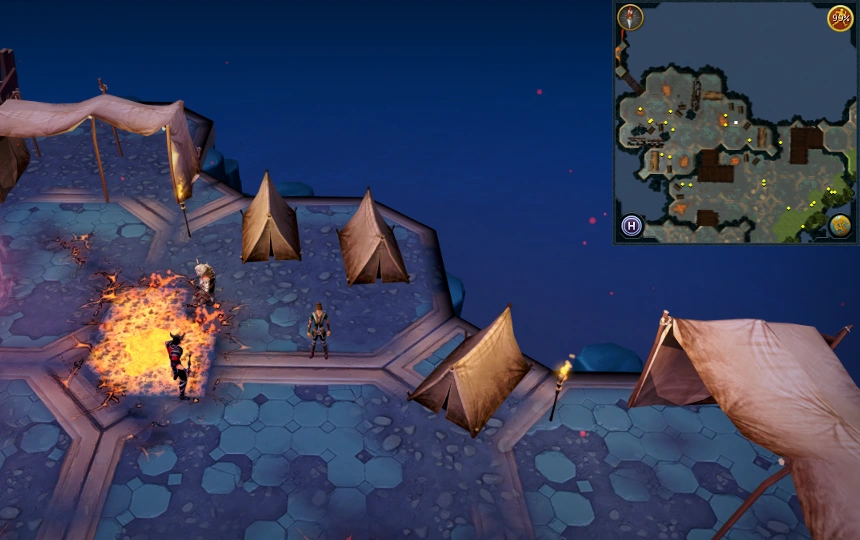 |
|
Other possible locations
| |
Isafdar and Lletya
Area Information: Tirannwn, Lletya
Players may also find it helpful to use this map, showing the routes through and obstacles of Tirannwn, when navigating the area.
Scan range: 22 paces
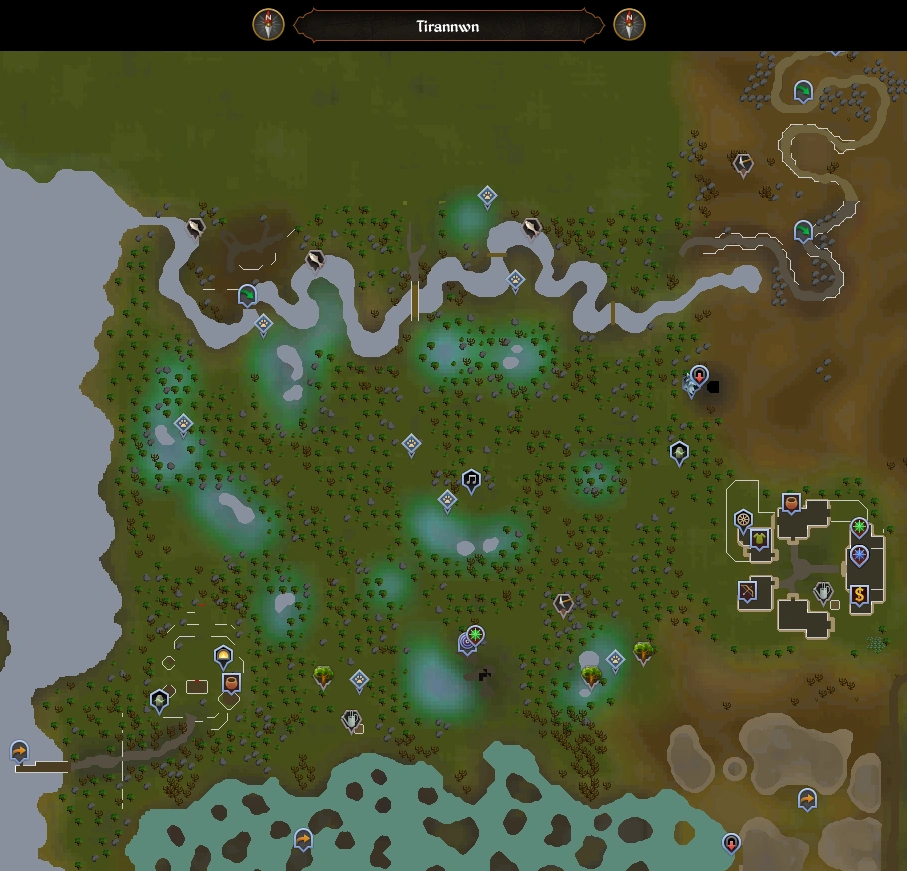
| Possible locations | Image |
|---|---|
| East of the charter ship, in Port Tyras. South-west of Tyras Camp. |  |
| Centre of Tyras Camp. | 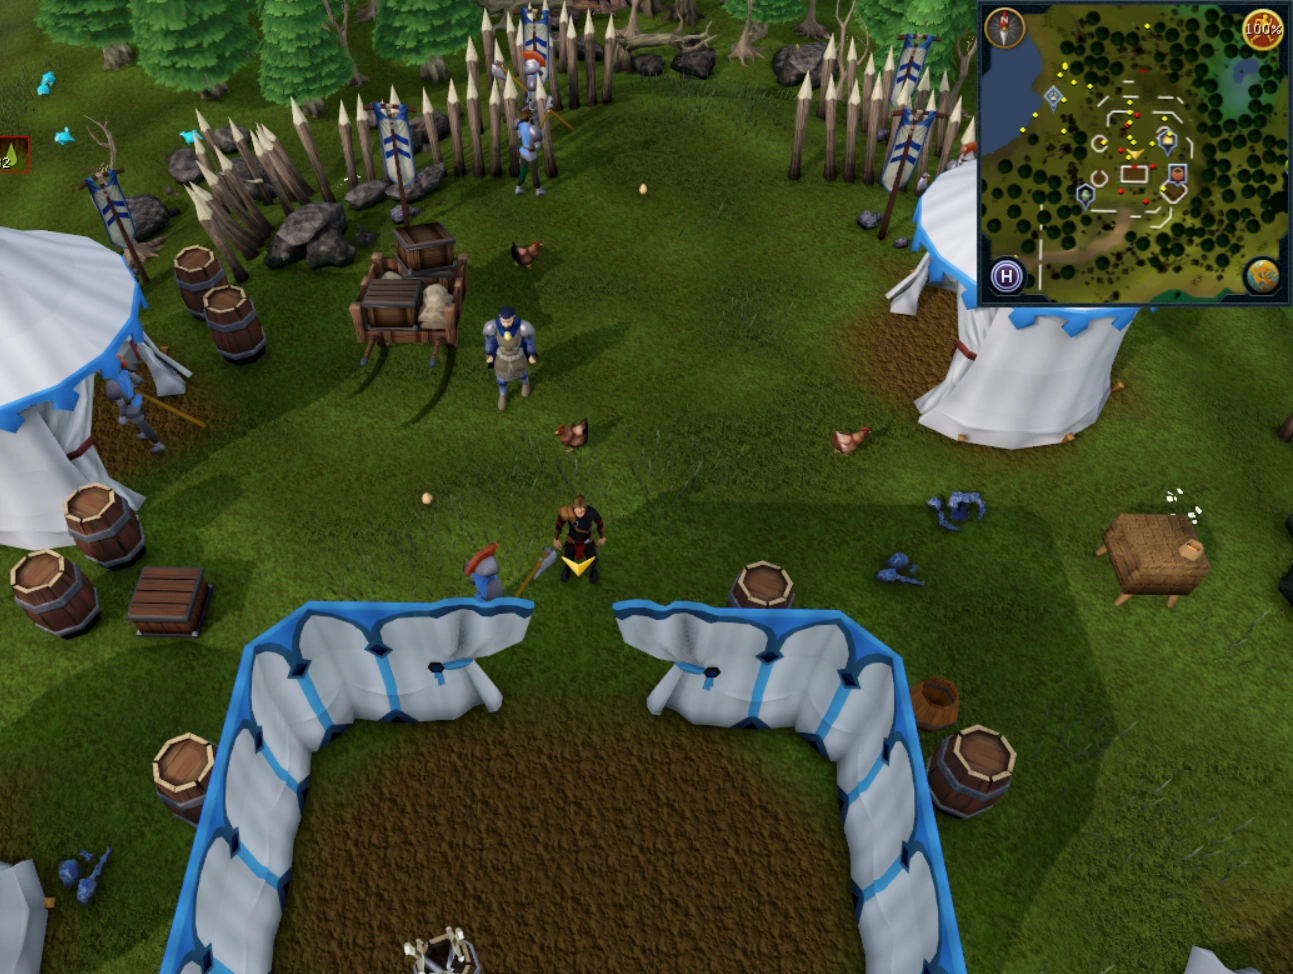 |
| North of Tyras Camp, through the dense forest obstacle. Just north-west of the catapult used in the Catapult Construction quest. |  |
| Southwest of a pond in the Pawya hunter clearing, across the river from the Elf Camp. Accessed by stepping over a Stick trap. |  |
| East of Tyras Camp, just north of two adjacent trip wire obstacles. Accessed by leaving the camp through the dense forest obstacle and going south through a second patch of dense forest to the east of the camp. | 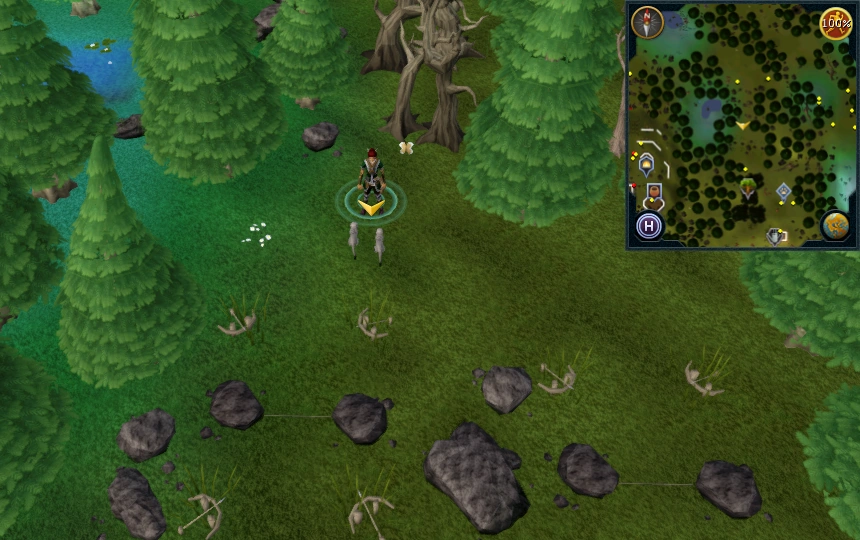 |
| In small clearing north of the Hunter training icon, east of Tyras Camp. The clearing can be entered at its south, south of the two adjacent trip wire obstacles. | |
| North of the mushroom patch | 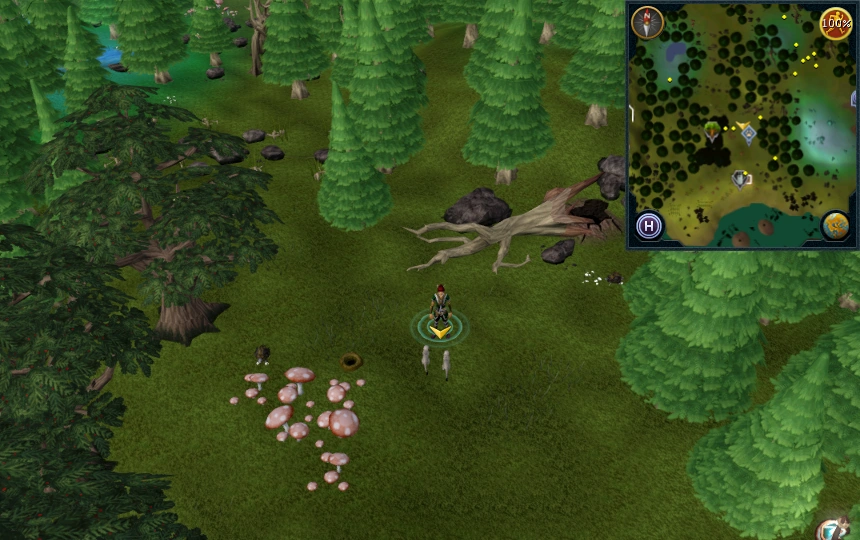 |
| In the centre of a ring of mushrooms south-west of the Hunter training icon, east of Tyras Camp. South of a group of yew trees indicated by a rare trees icon. | |
| South-west of Tirannwn lodestone and the Elf Tracker. | 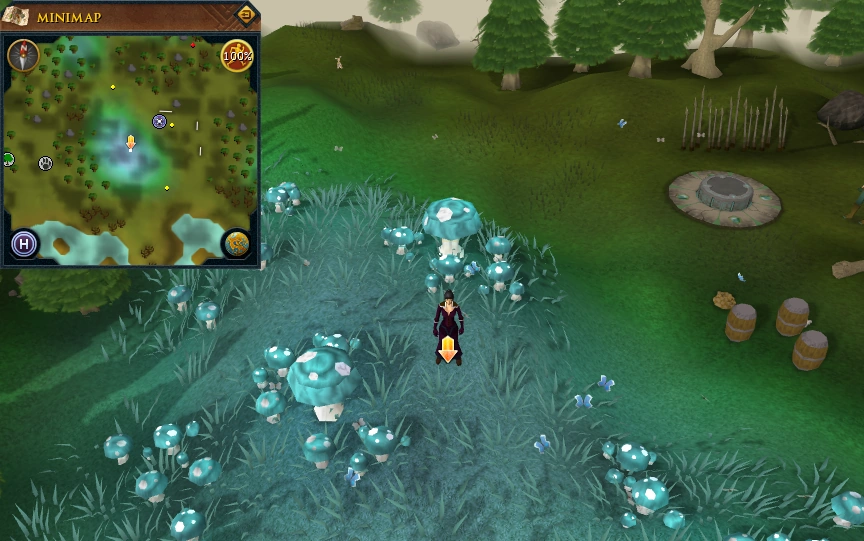 |
| North of Poison Waste and south of Tirannwn lodestone. |  |
| North-east of Tirannwn lodestone and just north-west of the Lletya mining site which contains 7 adamantite ore rocks. | 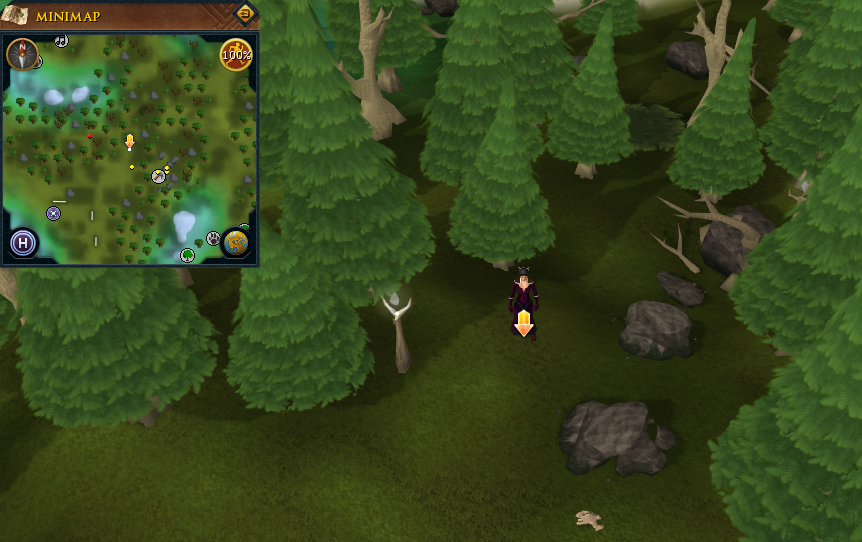 |
| In the middle of grenwalls, grizzly bear cubs and rabbits south of the Elf Camp. |  |
| South-east of the Hunter training icon, which indicates the presence of grenwalls and pawya, south of Elf Camp. This clearing can be accessed just south of a patch of dense forest; it is not necessary to travel through the dense forest to get to the clearing. | |
| South of Elf Camp fishing spot. |  |
| On the southern tip of the Elf Camp. Just west of the log balance crossing to the camp. |  |
| In the centre of the Elf Camp, between the two tents. |  |
| Just south of the main entrance to Prifddinas (the elf city that cannot be accessed by players). |  |
| West of the Arandar mountain pass's southern end and east of the central bridge. East of the leaf trap. Three tiles north and one tile east of the location pictured. | 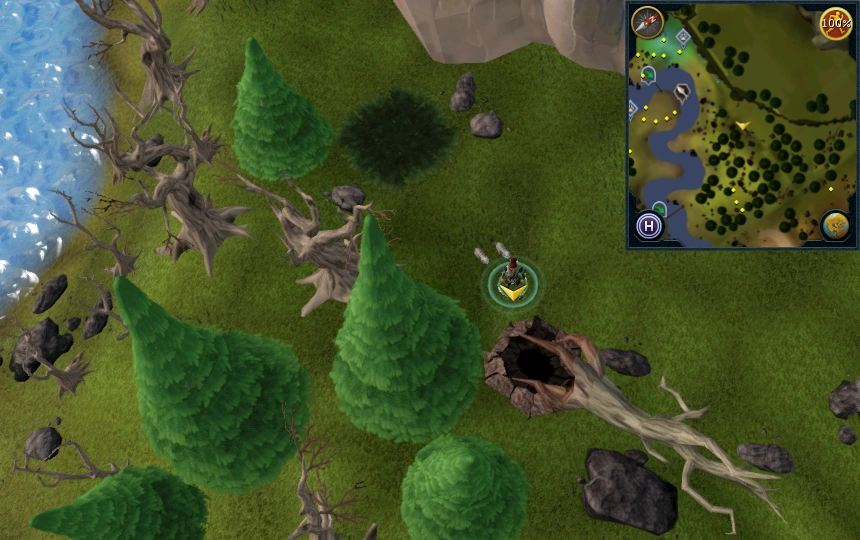 |
| North-west of the area's central bridge, south of the main entrance to Prifddinas (the elf city that cannot be accessed by players). This location can be accessed by travelling through a dense forest obstacle. | 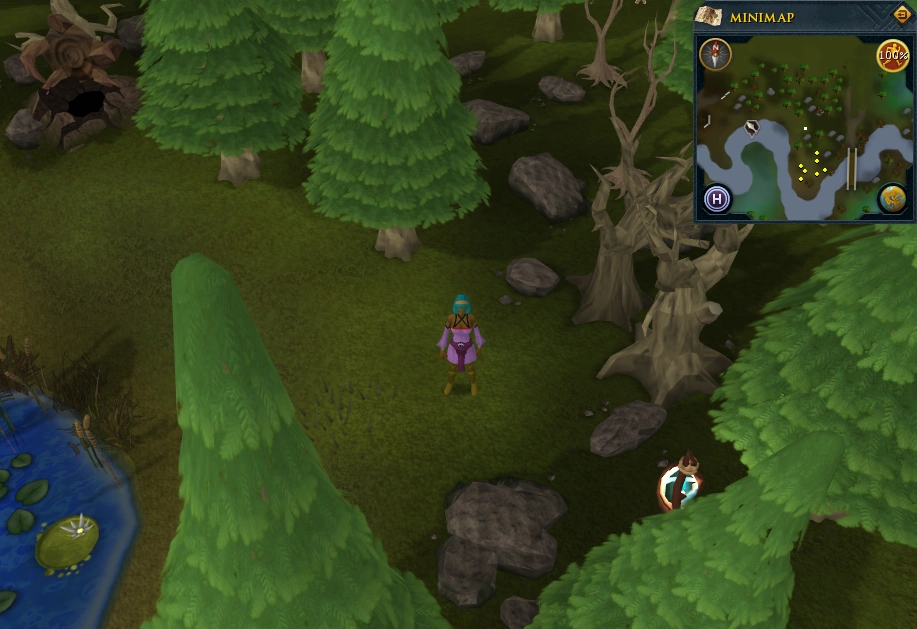 |
| In a clearing south-east of the area's central bridge and south-west of one the quest start points for the Roving Elves and Mourning's Ends Part 1 quests. This clearing can be entered at its south, just west of a leaf trap obstacle. |  |
| In a clearing south of the most eastern bridge in the area. This clearing cannot be entered by travelling south from the bridge; it can be accessed at its south-west near a dense forest obstacle (it is not necessary to travel through the dense forest to get to the clearing). | 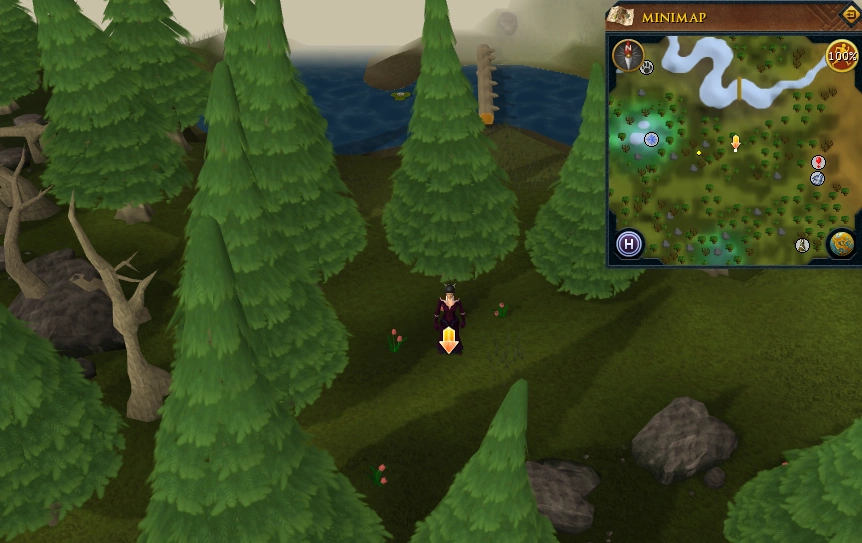 |
| In a clearing south-east of the most eastern bridge in the area. This clearing cannot be entered by travelling south from the bridge; it can be accessed at its south-west near a dense forest obstacle (it is not necessary to travel through the dense forest to get to the clearing). |  |
| In a group of 3 magic trees west of Lletya. Exit Lletya through the village's gates and travel south to find the magic trees. |  |
| Inside Lletya. On the west side of the village, south of Lletya General Store, south-east of Lletya Seamstress and north-east of Lletya Archery Shop. |  |
| Inside Lletya. In the north-east corner of the village, east of Lletya General Store. |  |
| Right outside Lletya just south east of the gate made of trees. | 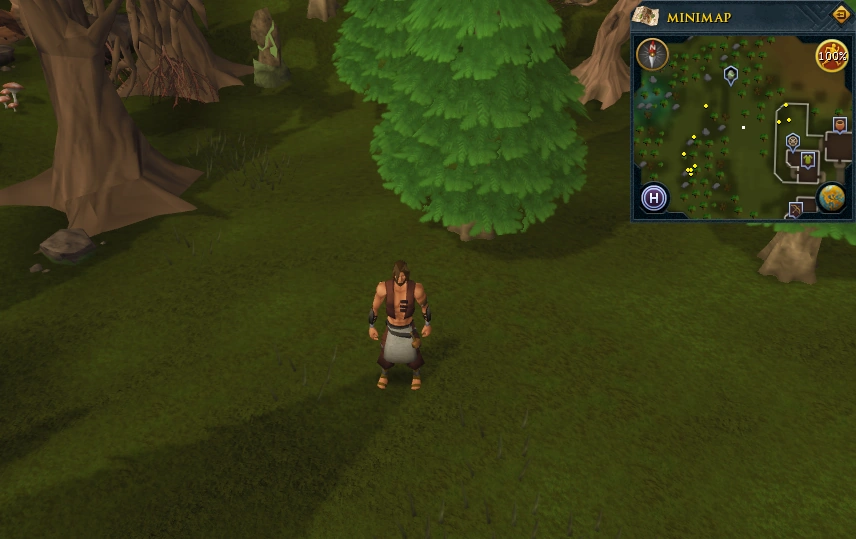 |
|
Other possible locations
| |
The Islands That Once Were Turtles
Area Information: The Islands That Once Were Turtles
To access The Islands That Once Were Turtles the player must have completed Impressing the Locals. 90 Divination may also be needed to harvest ancestral energy for access to the Second and Third Island. Ancestral energy can be harvested at 95 Divination, or positive/negative energy can be channeled if the other energy is present in the inventory. 50 ancestral energies are needed to charge a portal.
Scan range: 27 paces
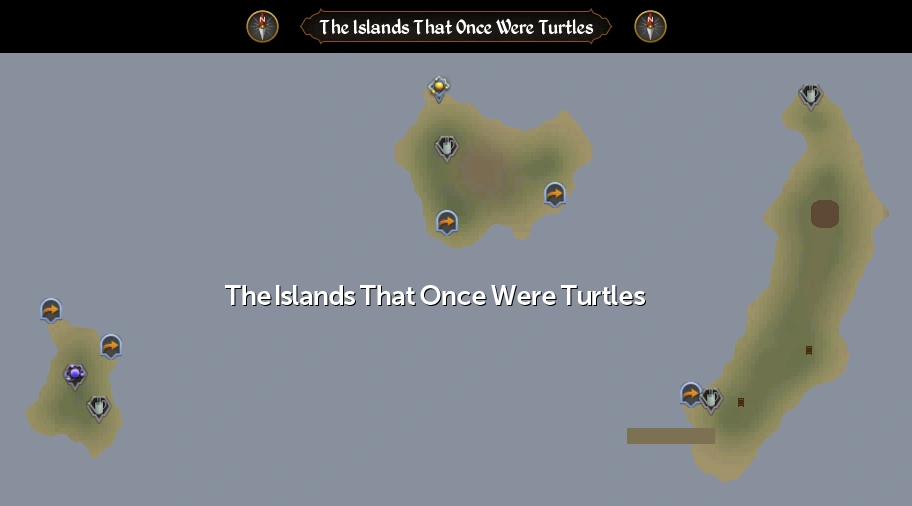
| Possible locations | Image |
|---|---|
| First island, south of the tortle portal, right by the docks. | 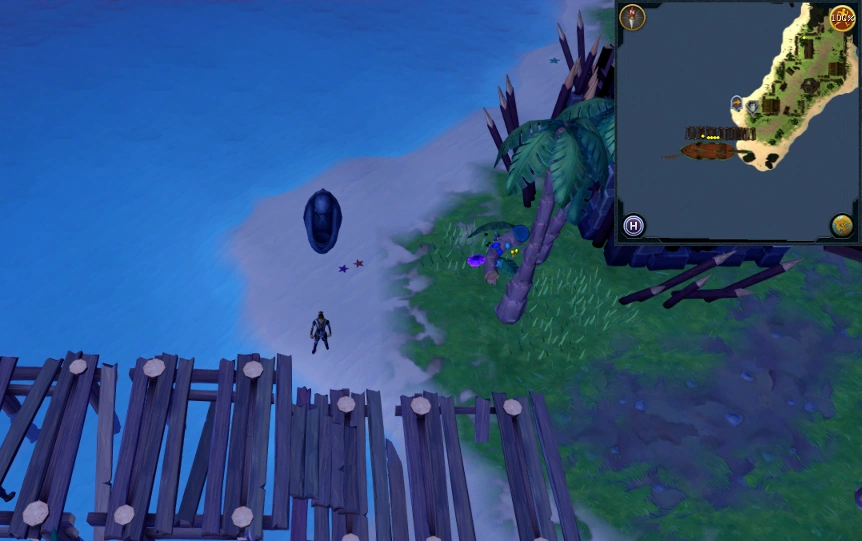 |
| First island, inside the encampment, one pace north and four west of the entrance to the damaged tent. | |
| First island, inside the encampment, two paces south of the barrel. | |
| First island, in the middle of west coast of the island. North-east of the southern Farming patch. |  |
| First island, northernmost coast, south of mushroom cluster. | 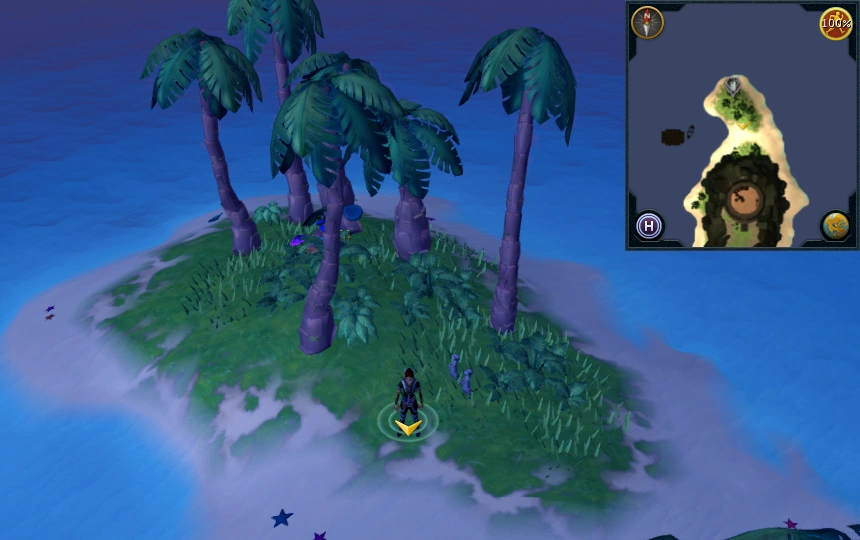 |
| First island, in the middle of the east coast and north-east of the watchtower. |  |
| First island, in the middle of the east coast and south-east of the watchtower. One pace west of the southern set of starfish. | |
| First island, just outside the broken lighthouse | 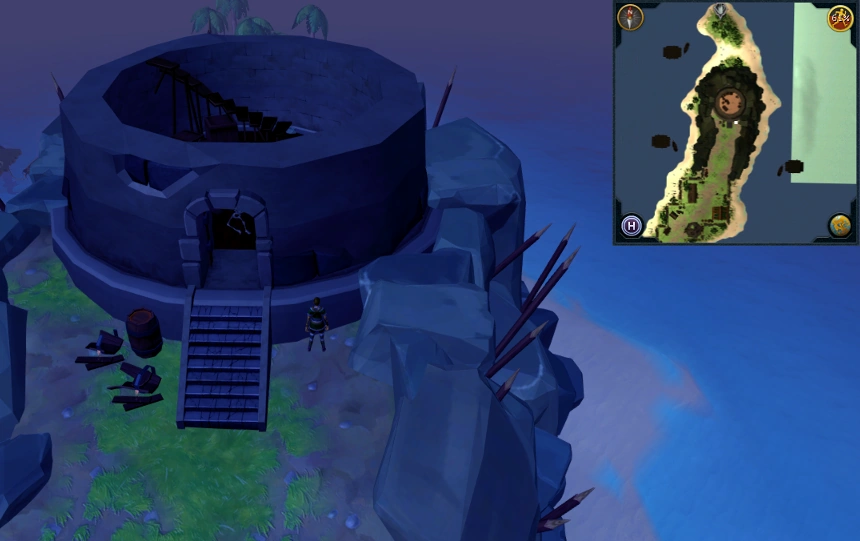 |
| Second island, on east coast of island, north-east of the tortle portal from the first island. | 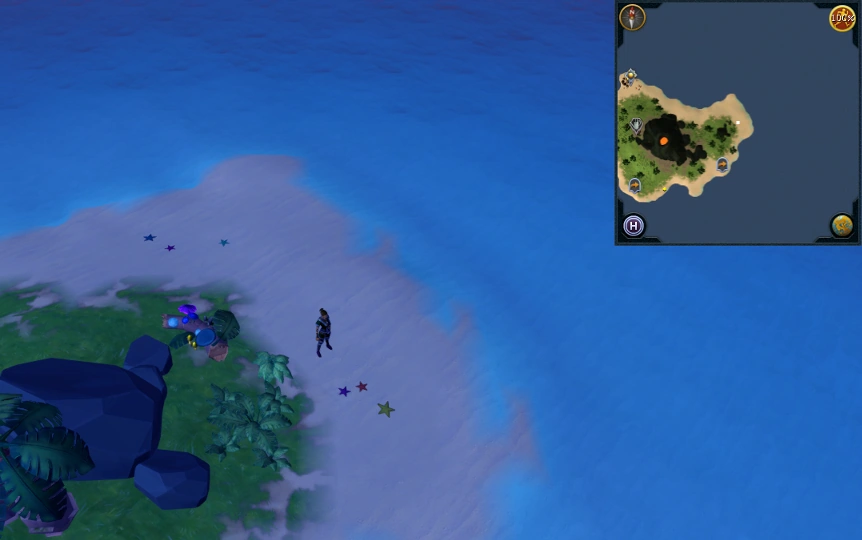 |
| South-east of Halia (divine merchant) |  |
| Second island, south-east of the volcano near the teleport to the third island | 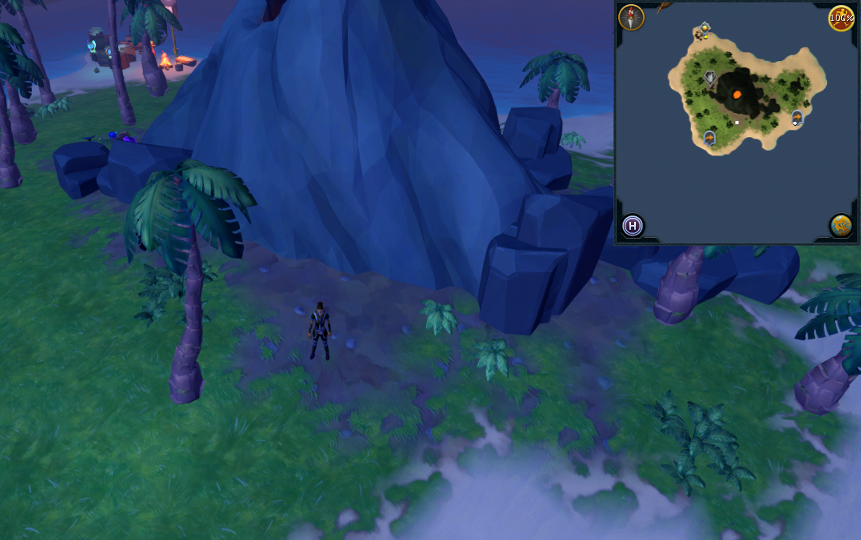 |
| Third island, between the portals. |  |
| Third island, south-west of the eastern tortle portal. Five paces west and four south of the portal. | |
| Third island, north-west of mushroom cluster. | 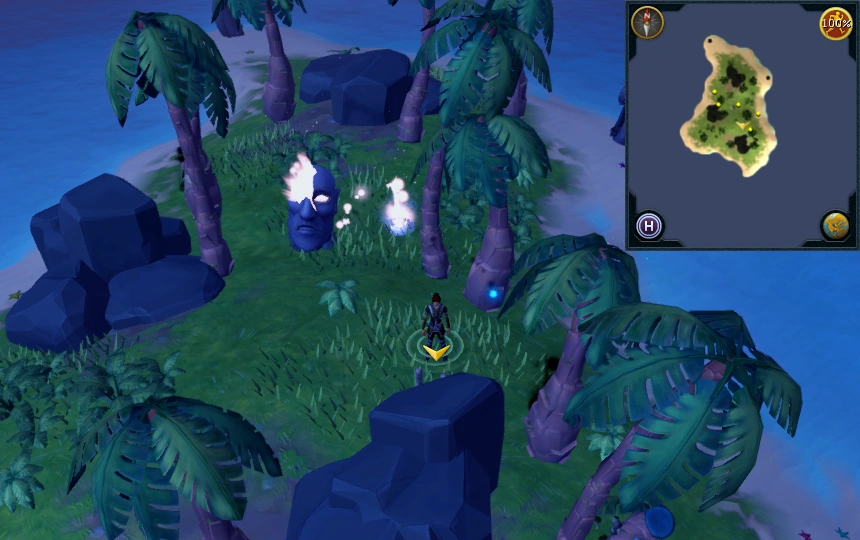 |
| Third island, three paces south of the southern edge of the mushroom cluster. |
Keldagrim
Area Information: Keldagrim
Scan range: 11 paces

| Possible locations | Image |
|---|---|
| East Keldagrim, south-west of the mine cart tracks hub. | 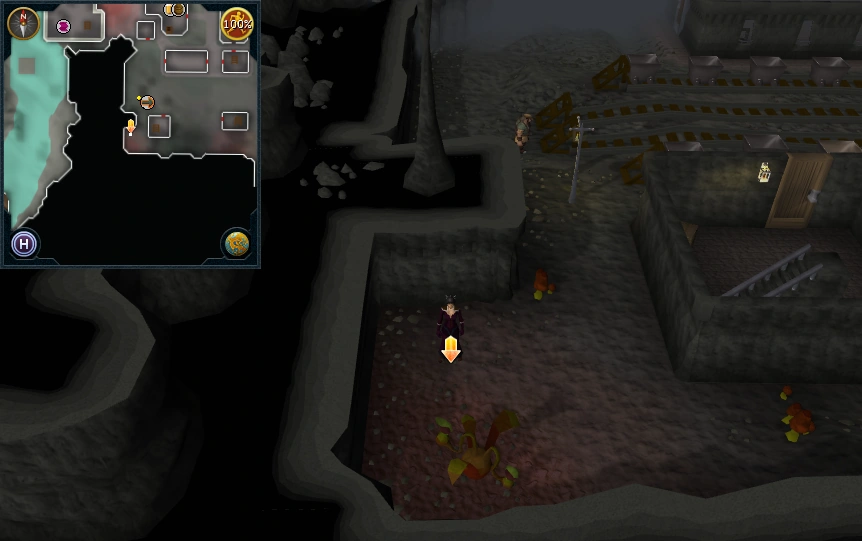 |
| East Keldagrim, south of the mine cart tracks hub. | 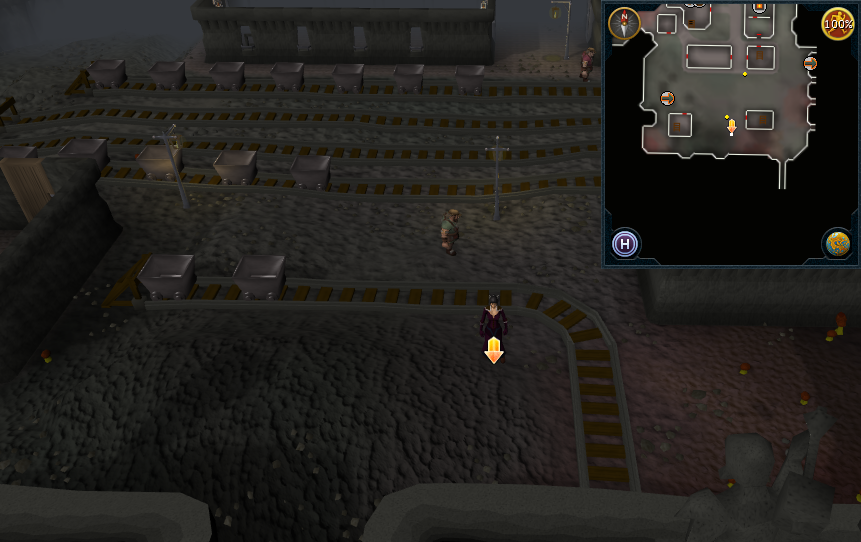 |
| East Keldagrim, south-east of the mine cart tracks hub (between the tracks). | 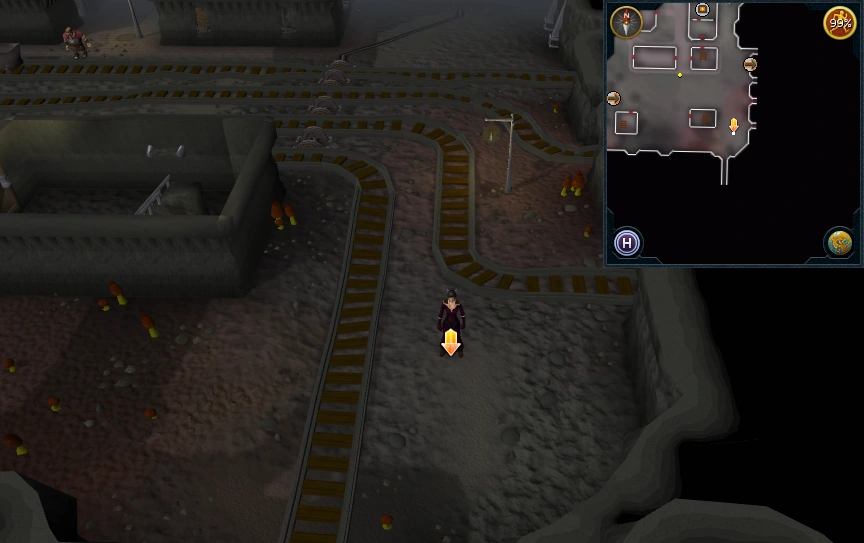 |
| East Keldagrim, inside long thin building just north of the mine cart tracks hub. One pace south of the location pictured. |  |
| East Keldagrim, south-east of the Blast Furnace entrance and just west of the Lava Flow Mine entrance. | 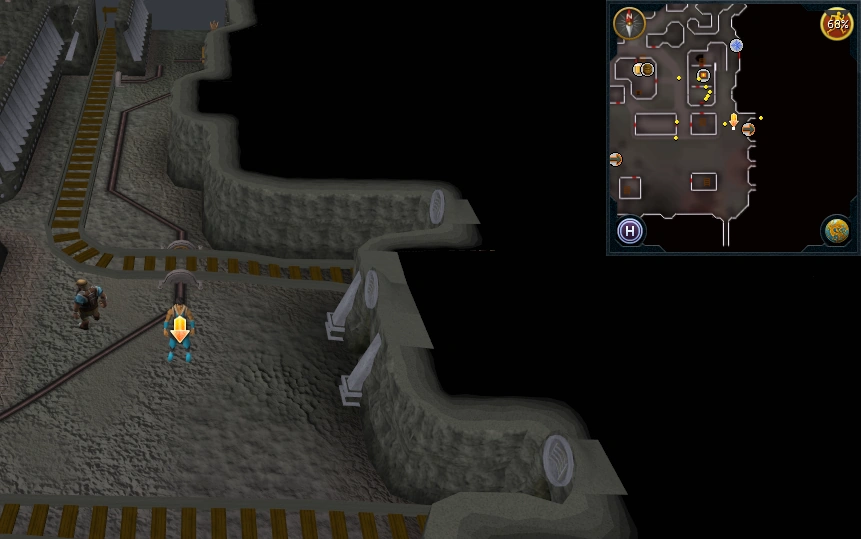 |
| East Keldagrim, west of the Laughing Miner Pub and east of east marketplace. | 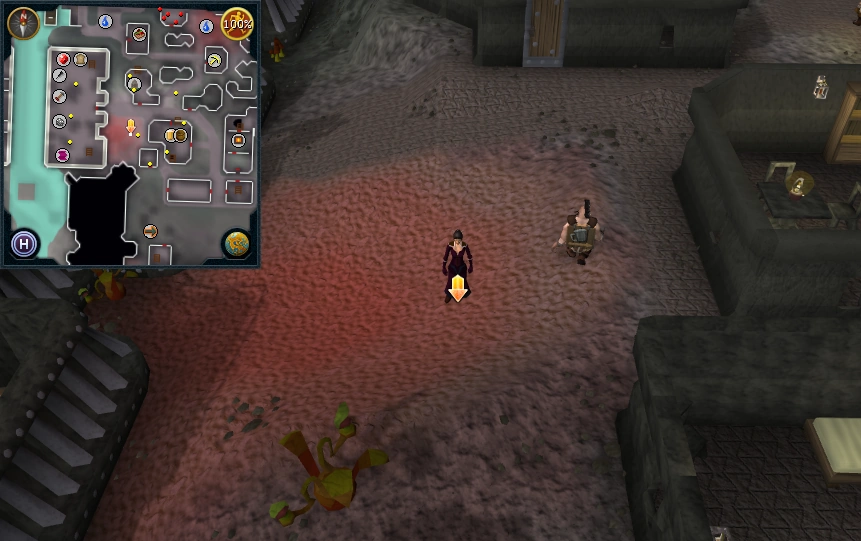 |
| East Keldagrim, inside Blasidar's Gravestones. This shop contains Blasidar the Sculptor and Riki the sculptor's model. | 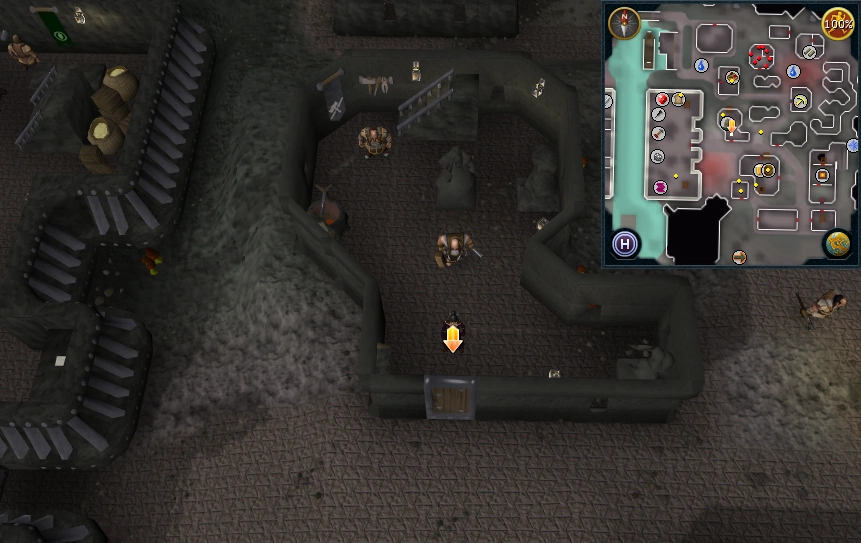 |
| East Keldagrim, east of the Laughing Miner Pub and west of the Blast Furnace entrance. | 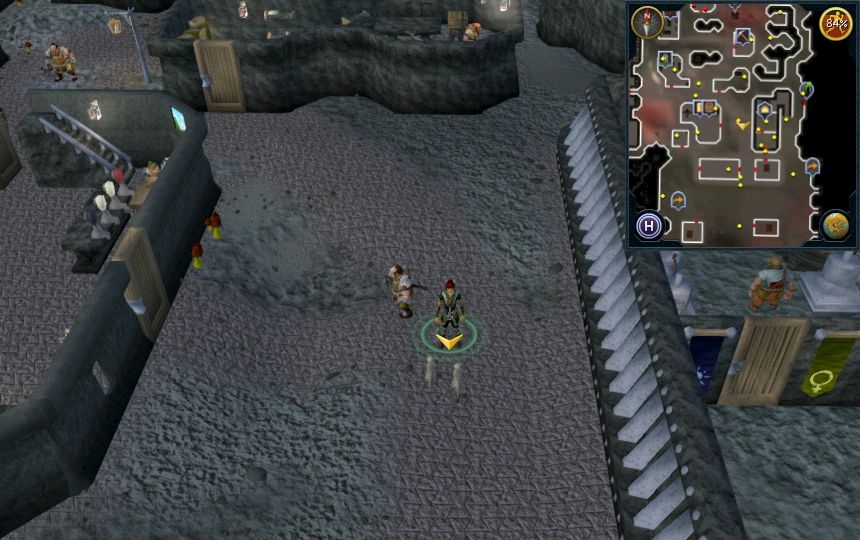 |
| East Keldagrim, just east of the Blast Furnace entrance. | 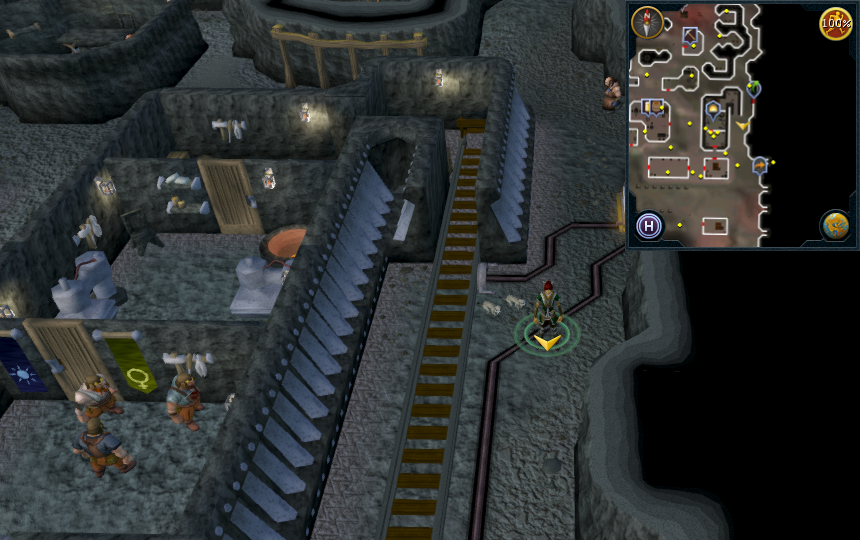 |
| East Keldagrim, north-east of the Blast Furnace entrance. |  |
| West Keldagrim, north of the area and west of the bridge joining east and west Keldagrim. | 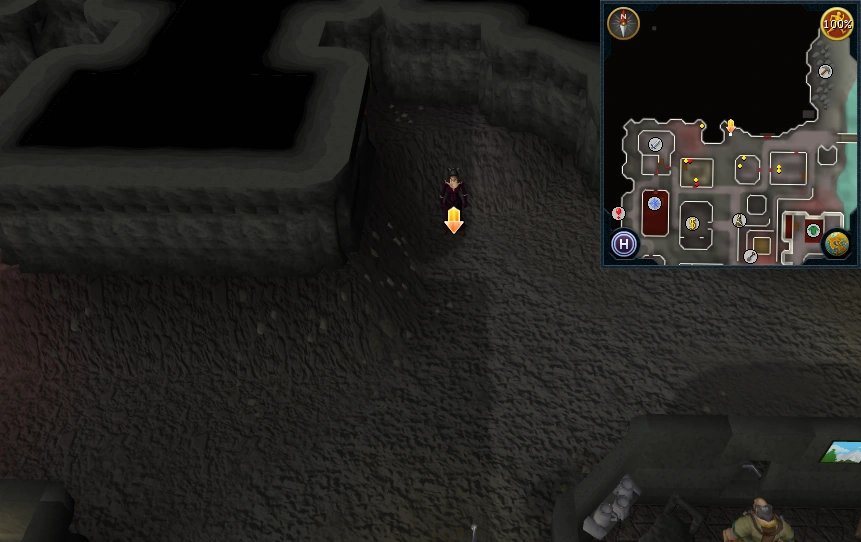 |
| West Keldagrim, just outside the north-west corner of west marketplace. | 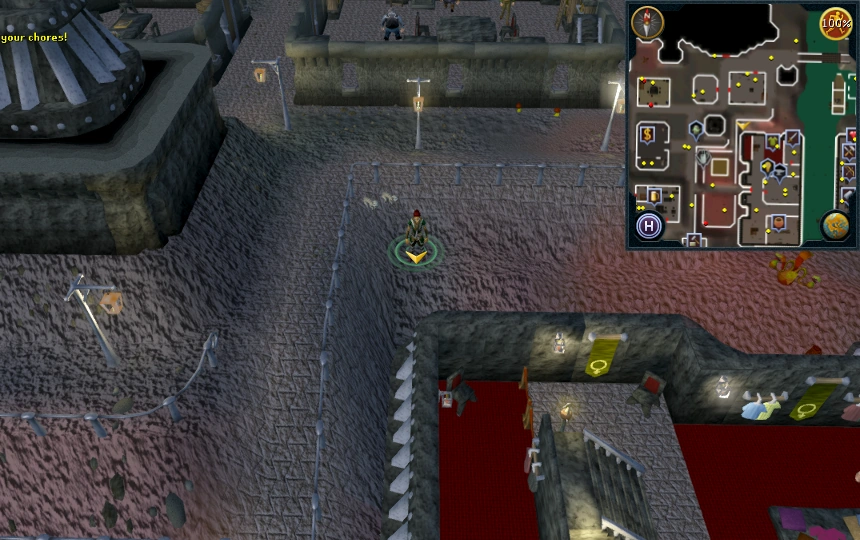 |
| Inside the bank. |  |
| West Keldagrim, south-west of the Quality Armour Shop and the bank. | 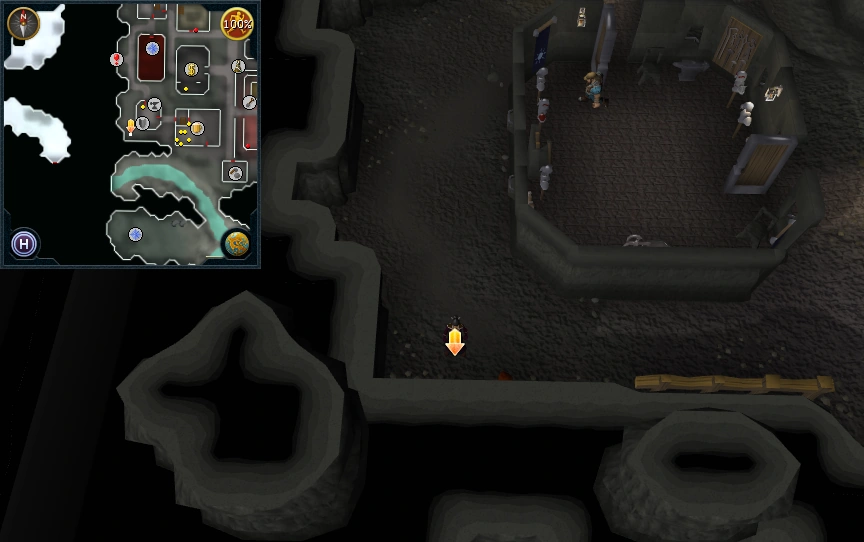 |
| West Keldagrim, south of King's Axe Inn and the bank. | 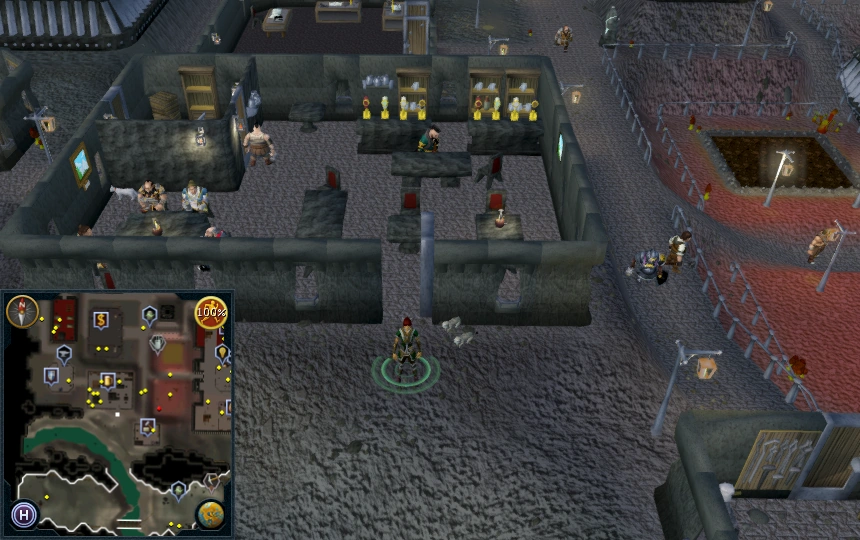 |
| West Keldagrim, south of the hops patch and west of the west marketplace. | 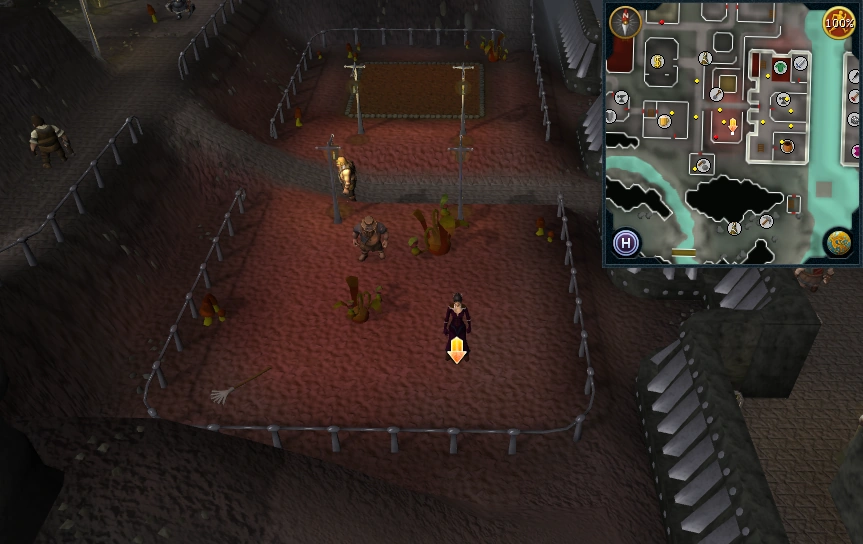 |
| West Keldagrim, inside west marketplace. North of Gunslik's Assorted Items (general store) and south of the room with an anvil. | 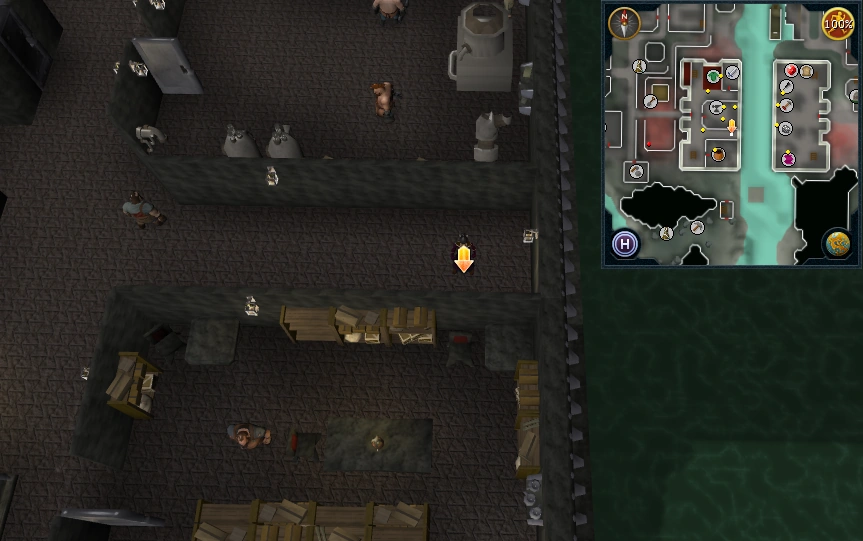 |
| West Keldagrim, south of Gunslik's Assorted Items (general store) outside west marketplace and north of Keldagrim Watchtower. | 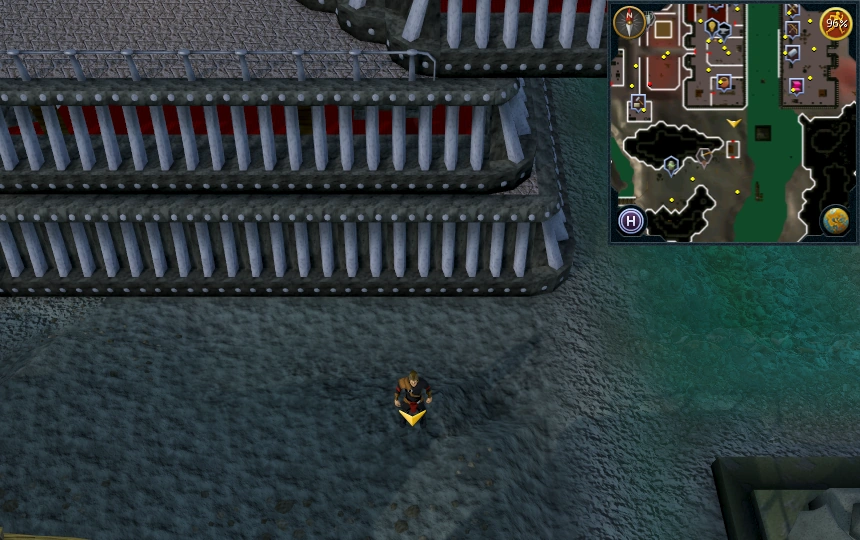 |
Kharazi Jungle
Area Information: Kharazi Jungle
To enter the Kharazi Jungle the player must have started Legends' Quest and have a hatchet and machete (ones on the tool belt will work) to cut through the dense jungle blocking its entrances. The jungle contains aggressive wolves.
Scan range: 14 paces

| Possible locations | Image |
|---|---|
| On the top of ridge in the jungle south-east of Shilo Village. | 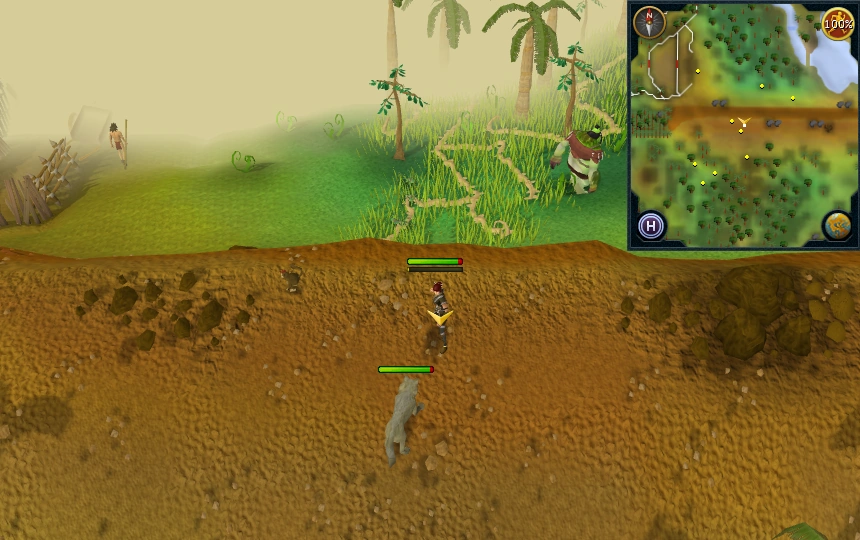 |
| On the top of ridge in the north-east corner of the jungle. | 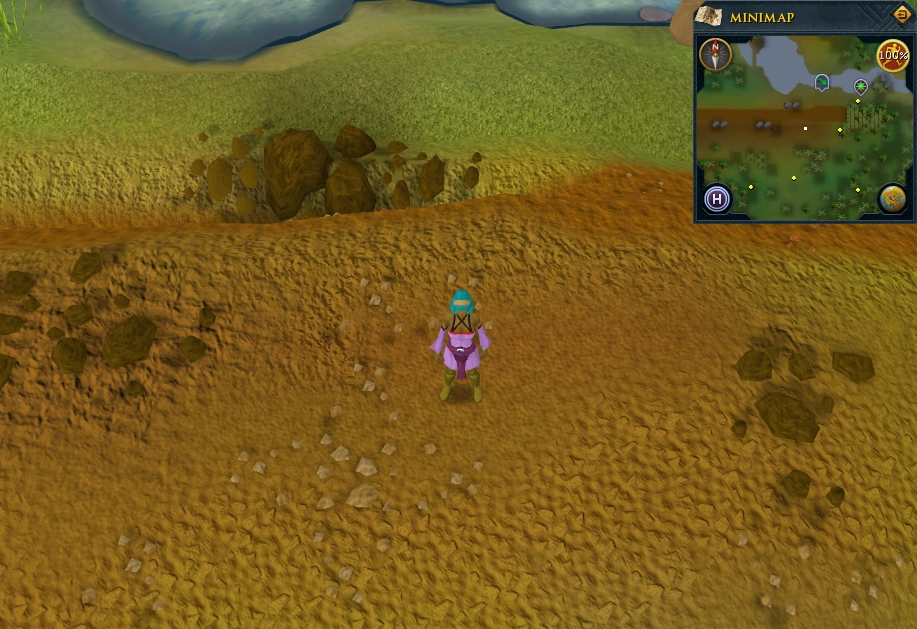 |
| In the north-east corner of the jungle, just south-west of Papa Mambo's Shop. | 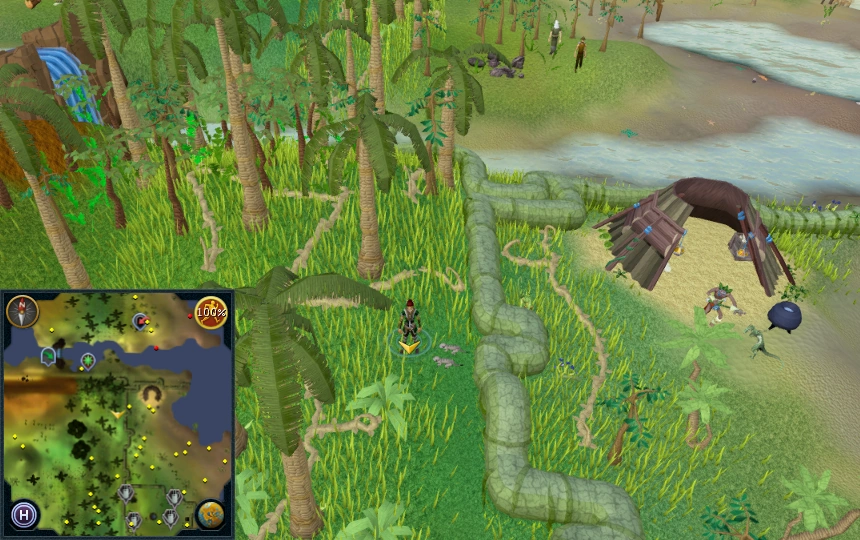 |
| In the eastern edge of the jungle, west of Herblore Habitat (cannot be accessed by travelling through Herblore Habitat). | 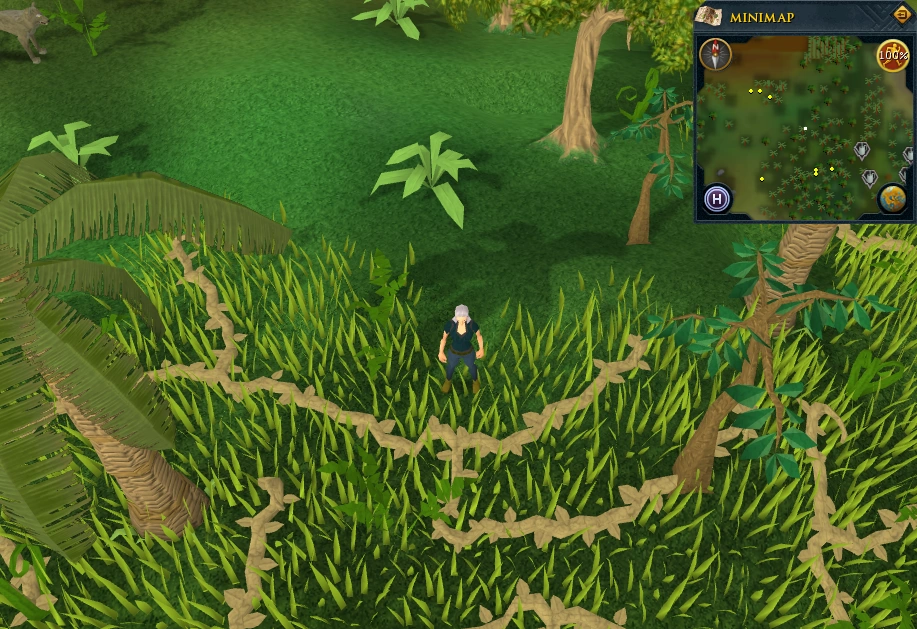 |
| In the south-east corner of the jungle, west of the Jadinko Lair entrance in Herblore Habitat south camp. | 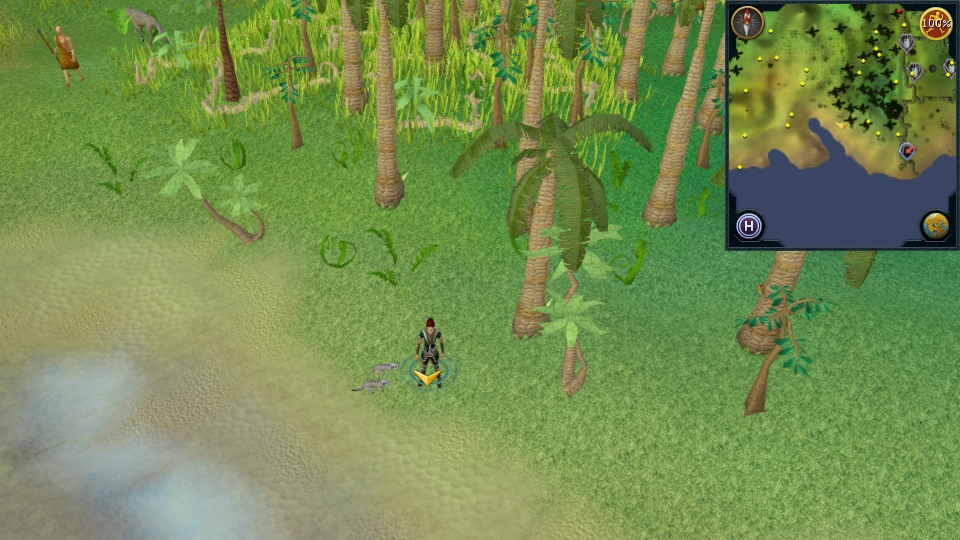 |
| On peninsula south of the eastern edge of the jungle. | 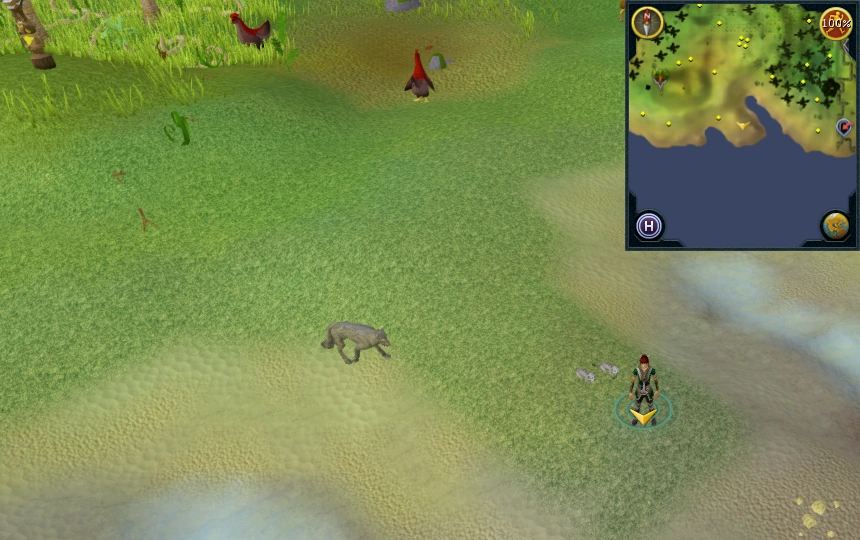 |
| North-west of the eastern rare trees map icon that indicates the presence of the nearby teak trees. | |
| West of the eastern rare trees map icon that indicates the presence of the nearby teak trees, near a central peninsula. | |
| South-east of the water pool which is used to obtain Holy water in Legends' Quest. West of the western rare trees map icon that indicates the presence of the nearby teak trees. | 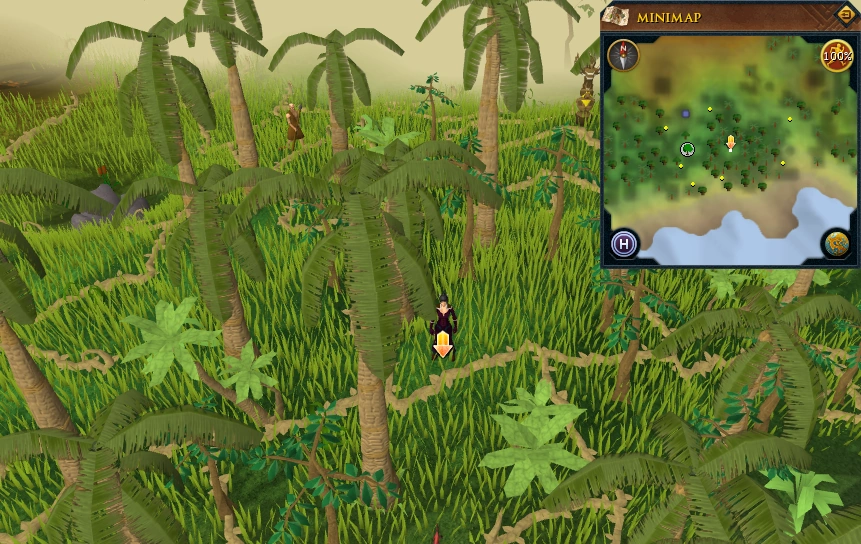 |
| Just east of the water pool which is used to obtain Holy water in Legends' Quest. West of the western rare trees map icon that indicates the presence of the nearby teak trees. | 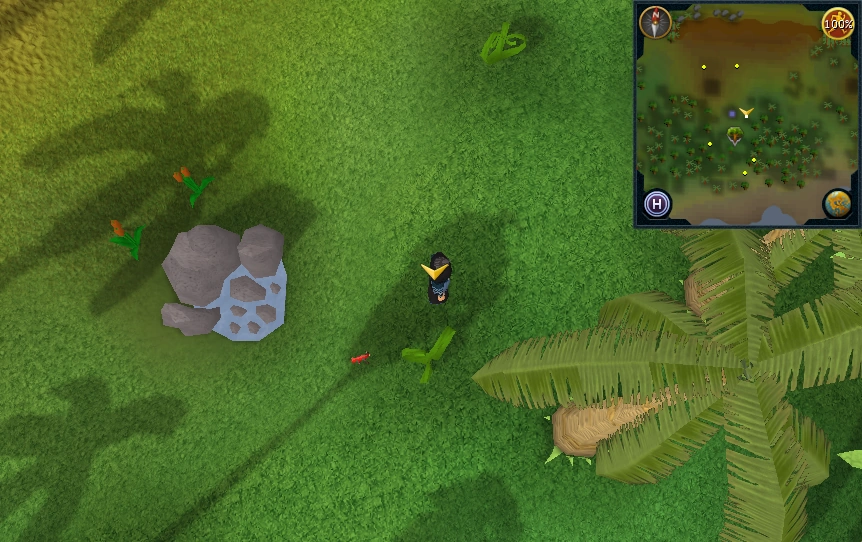 |
| In centre of the jungle, east of water pool and totem pole. | 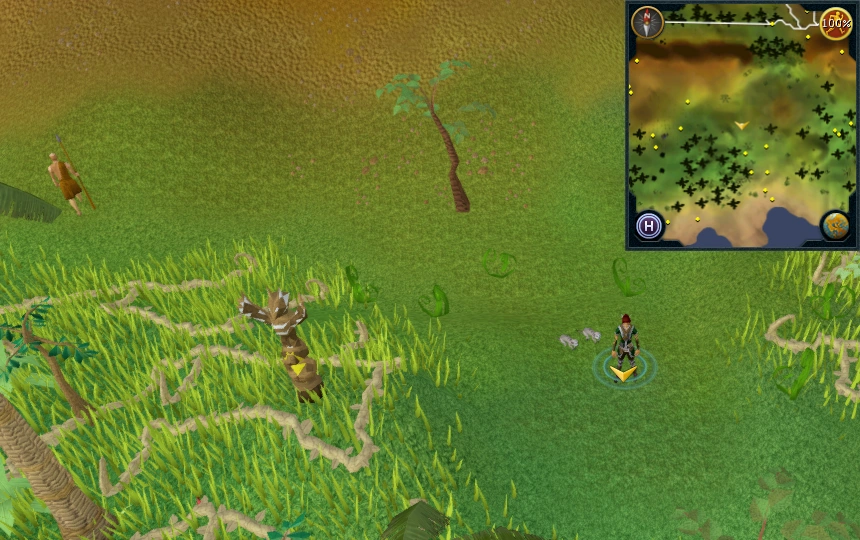 |
| On the southern coast of the jungle; south-west of the western rare trees map icon that indicates the presence of the nearby teak trees. | |
| On top of ridge inside the jungle, south of Obli's General Store (the general store in Shilo Village). |  |
| On top of the ridge inside the jungle, south of the Bank in Shilo Village. | 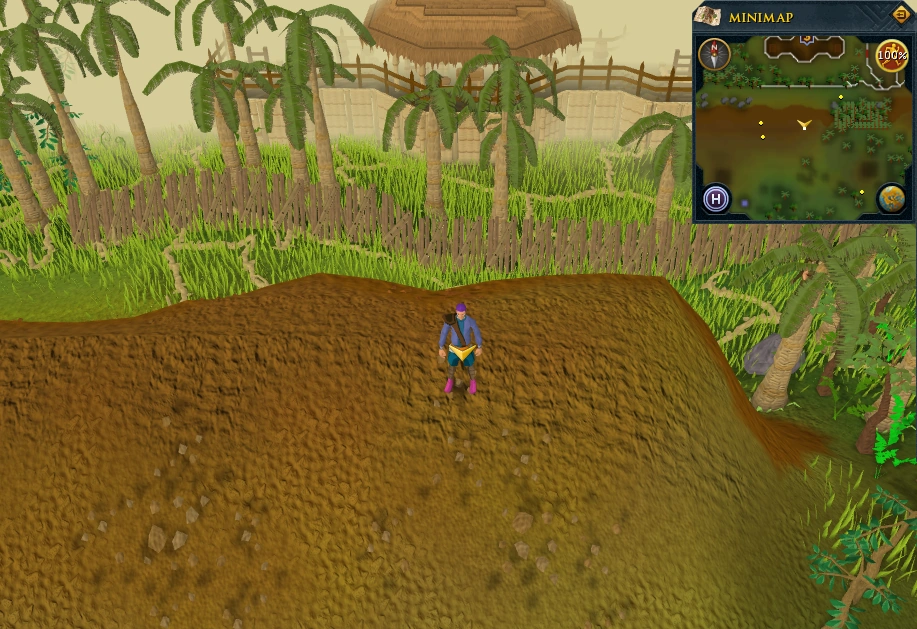 |
| Inside the jungle, south-west of the musician (drummer). | 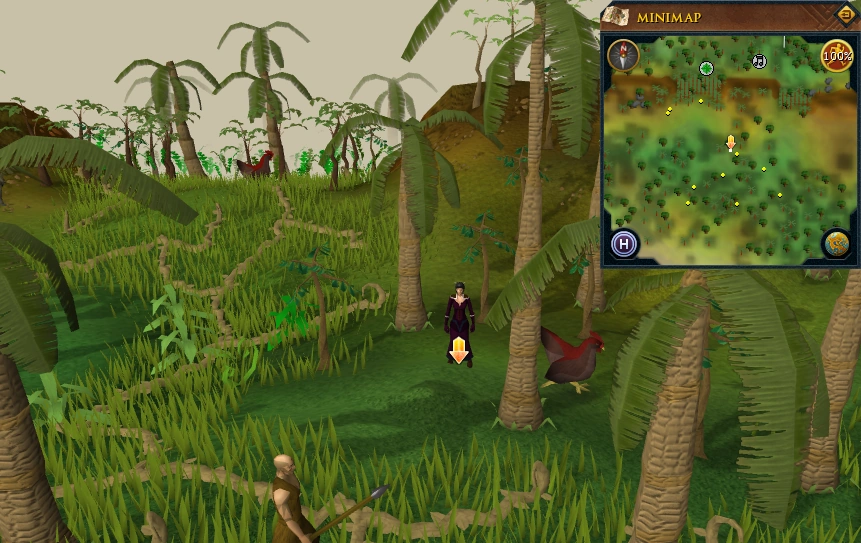 |
| On top of ridge in north-west corner of the jungle. One pace south of the location pictured. | 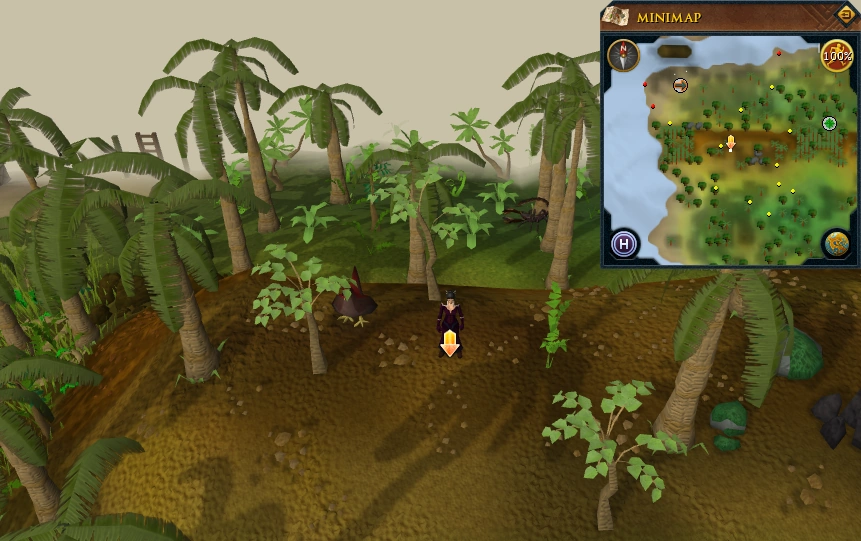 |
| In north-west corner of jungle, near coastline. | 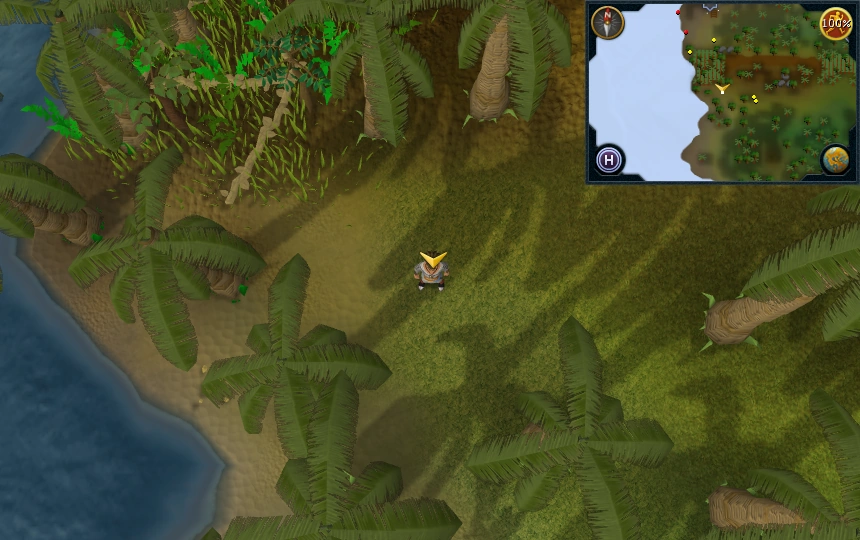 |
| Five paces east from the western coastline. |  |
| In the south-western corner of the jungle. | 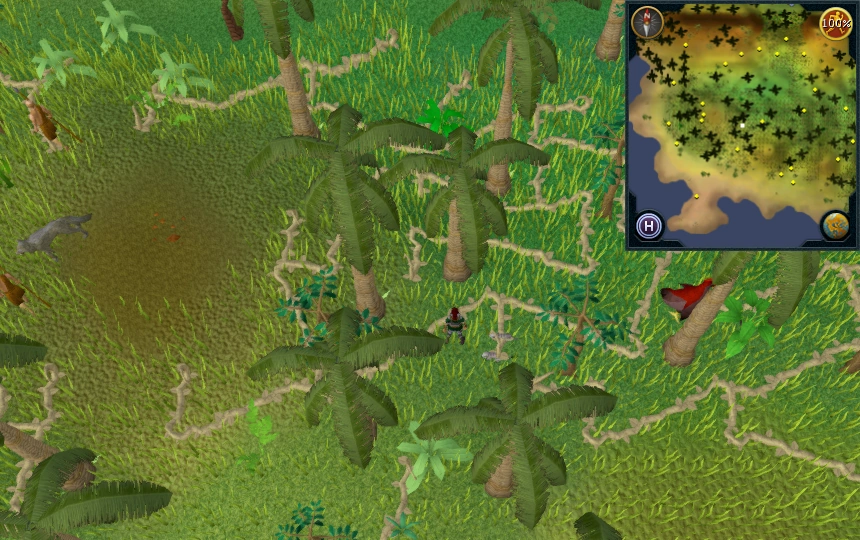 |
| On peninsula south of western edge of the jungle. | 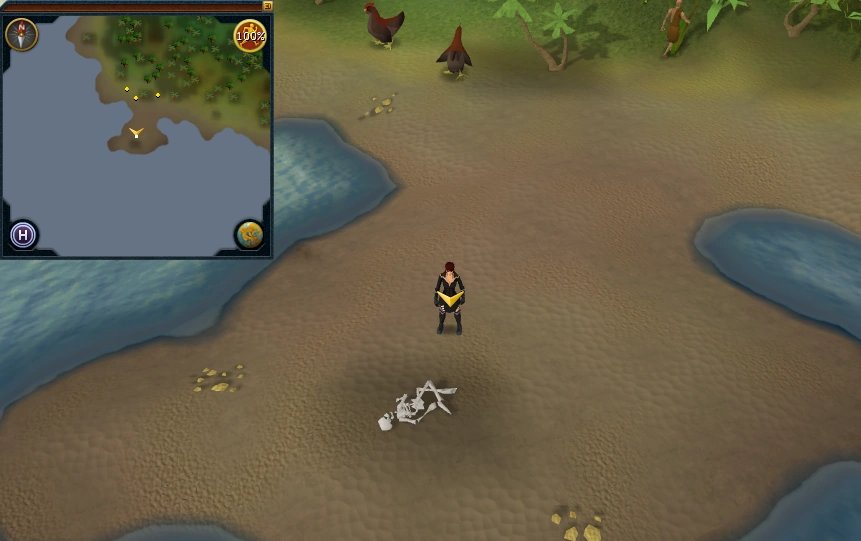 |
| On the peninsula south-east of the western rare tree map icon. | |
| On top of ridge inside the jungle, south-east of Obli's General Store (the general store in Shilo Village). 5 steps east of the other location nearby. | 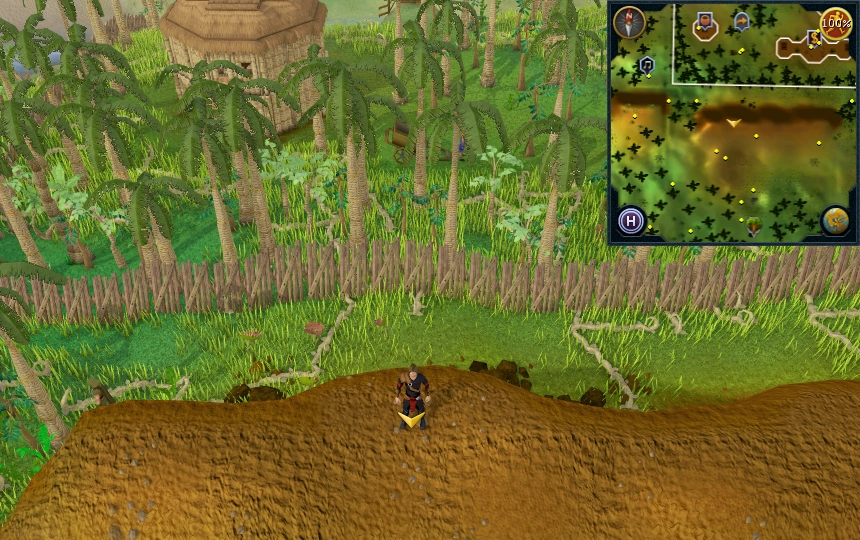 |
|
Other possible locations
| |
Kharidian Desert, east
"This scroll will work in the desert, east of the Elid and north of Nardah."
Area Information: Kharidian Desert
To avoid taking damage from the desert heat while in this area players will need waterskins, an enchanted water tiara, or a tome of frost. These are not necessary after the completion of Crocodile Tears.
Scan range: 27 paces

| Possible locations | Image |
|---|---|
| Just north of Nardah. North of the part of the city containing the Elidinis Statuette and Ali the Wise (the quest start point for The Curse Of Arrav quest). | 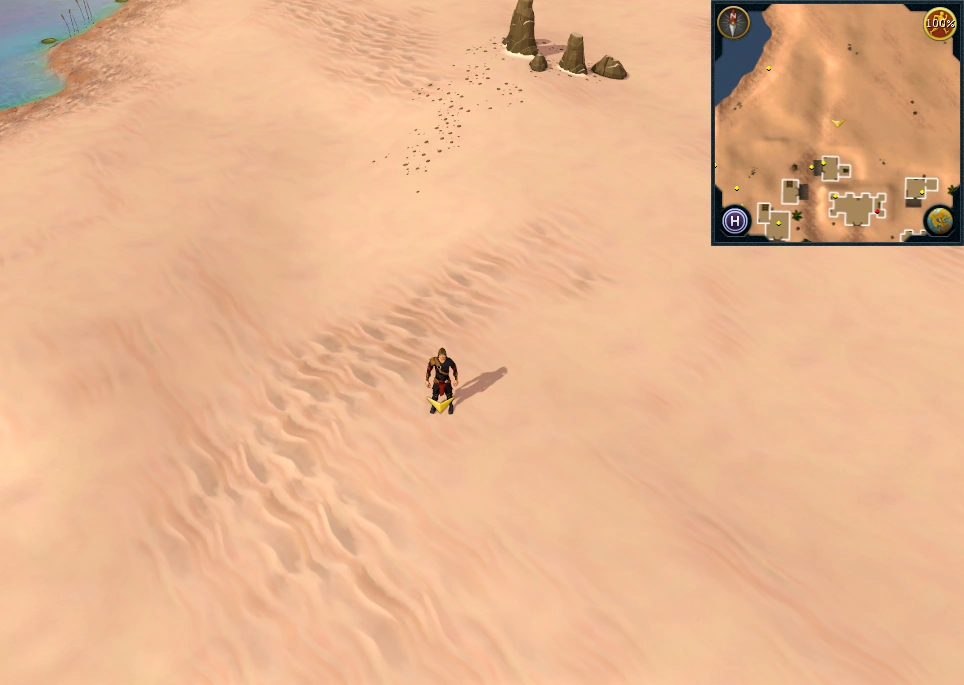 |
| North-east of Nardah, north of most northeastern building. | 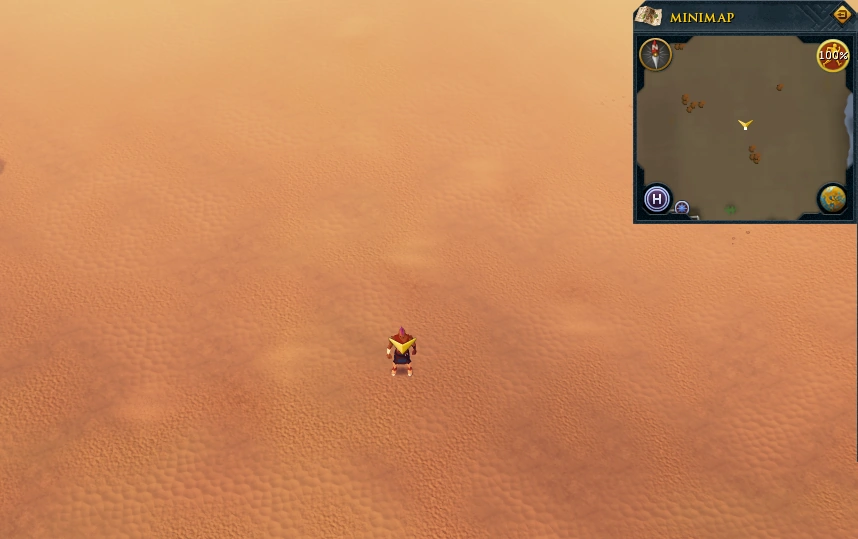 |
| Near a rock, north-east of Nardah. | 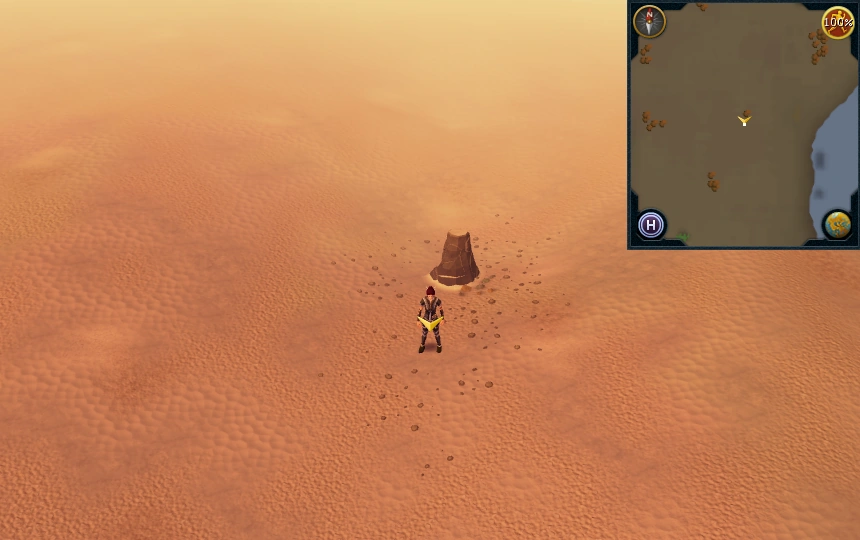 |
| Just north of Nardah, near to a group of rocks. | 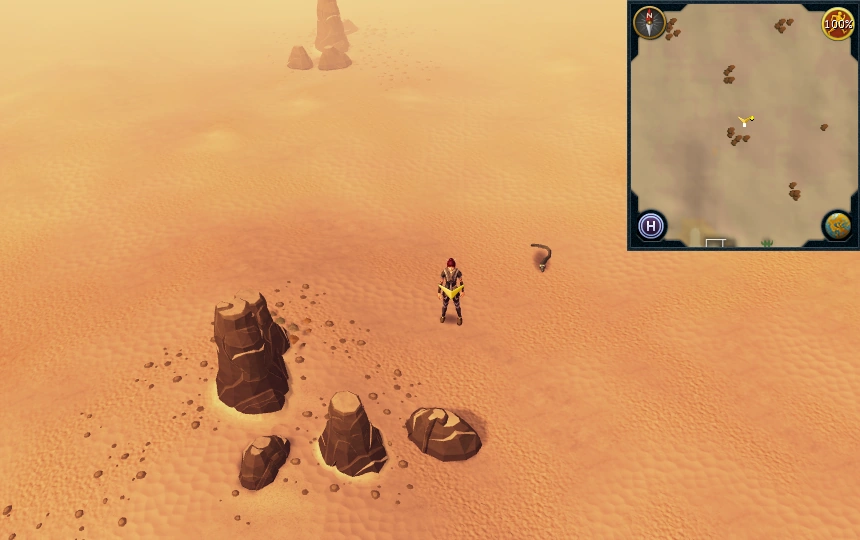 |
| On the shore east of Pollnivneach, east of Ali the Mayor's house. North-west of Nardah. | 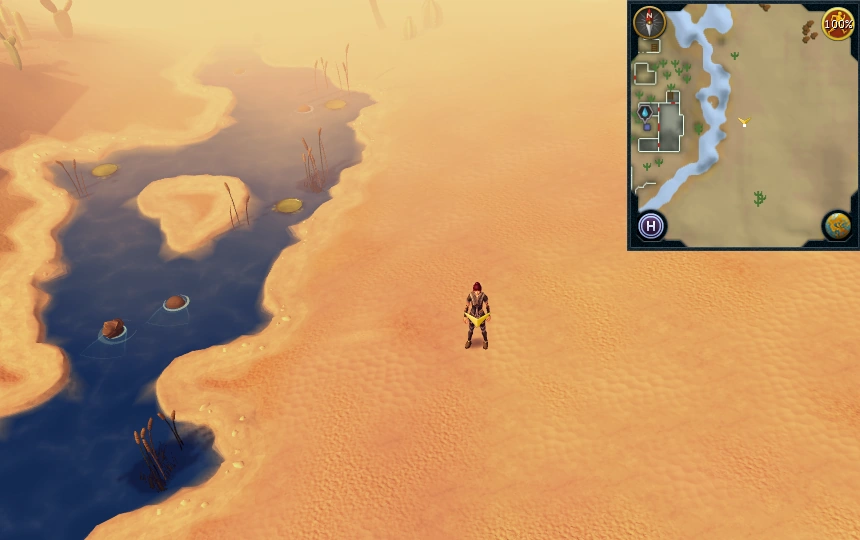 |
| On the shore east of Pollnivneach. Five paces north and six paces west of the larger of the round cacti. |  |
| On the shore north-east of Pollnivneach and south-west of the desert lizards. | 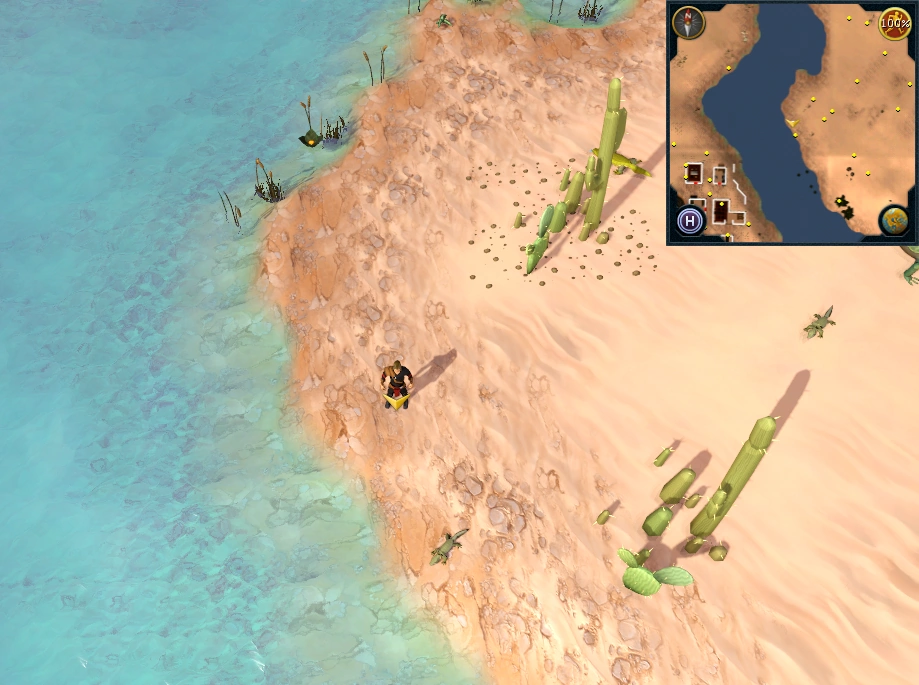 |
| On the shore west of the desert lizards. One pace south of the location pictured. | 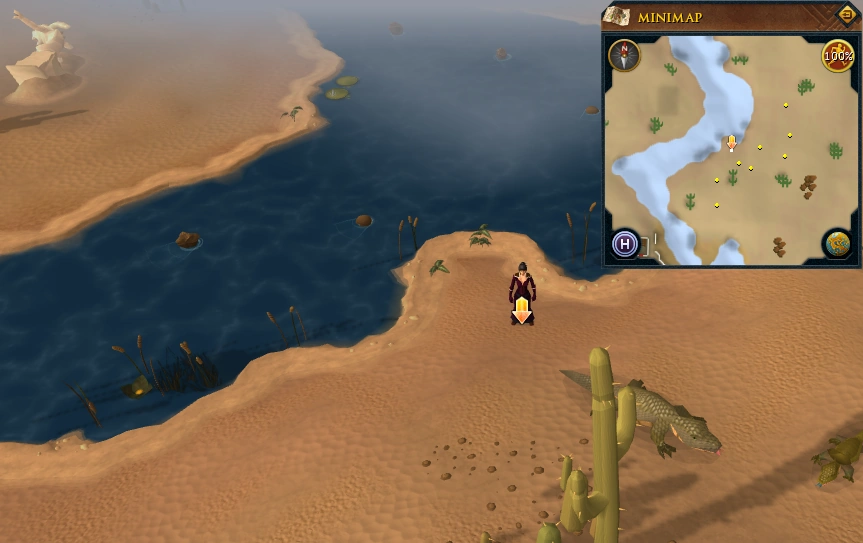 |
| Just west of the fairy ring (code DLQ). | 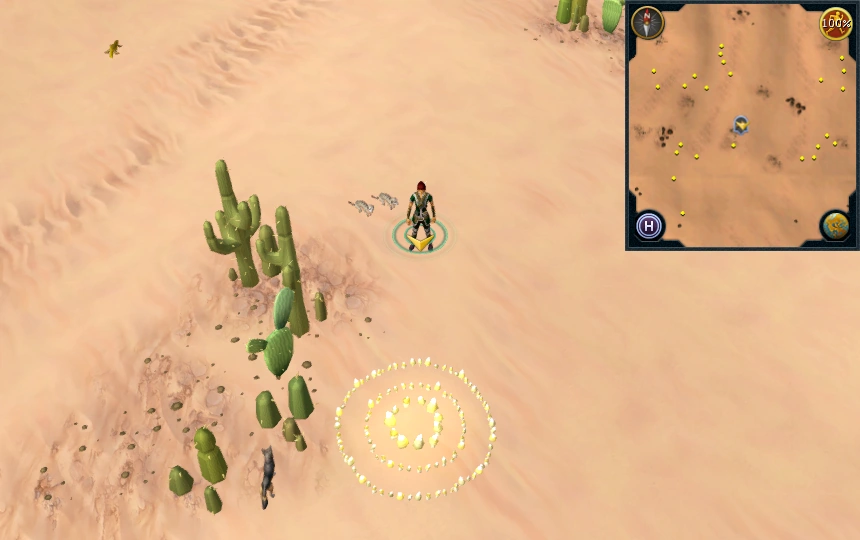 |
| South-west of the Desert Lizards and south of the fairy ring (code DLQ). |  |
| South-east of the fairy ring (code DLQ). North-east of Nardah and south-west of the Uzer Mastaba (pyramid building south of the Ruins of Uzer). One pace south of the location pictured. |  |
| West of the Uzer Mastaba (pyramid building south of the Ruins of Uzer). | 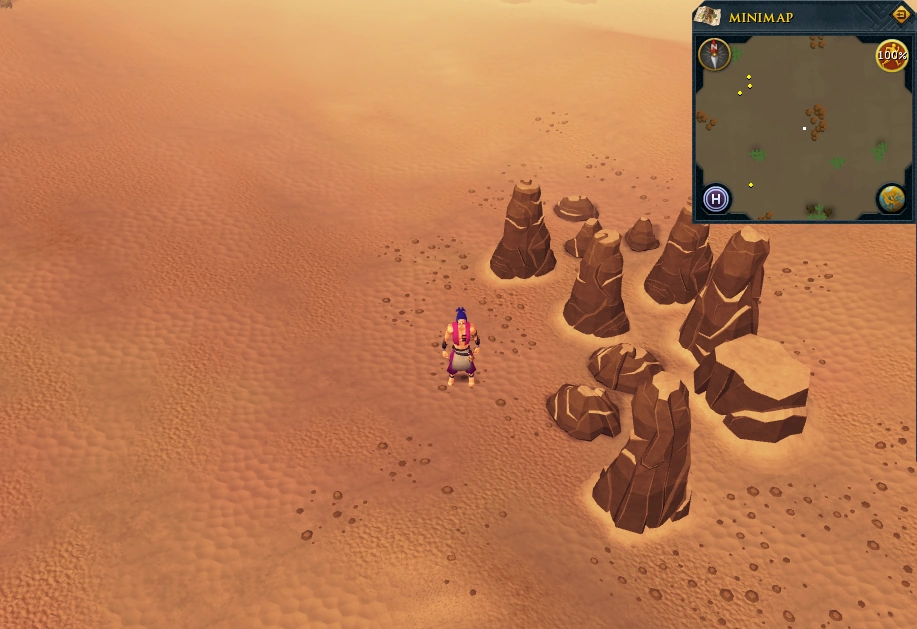 |
| North-west of the Uzer Mastaba (pyramid building south of the Ruins of Uzer) and south of the desert oasis. One pace south of the location pictured. |  |
| South-west of the desert oasis. | 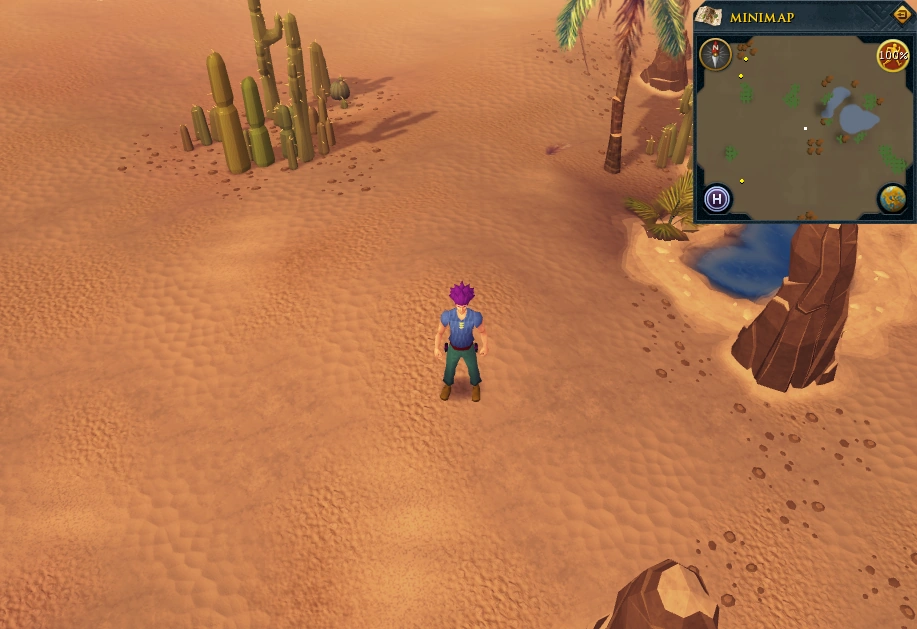 |
| North of the desert oasis and south of the Ruins of Uzer. | 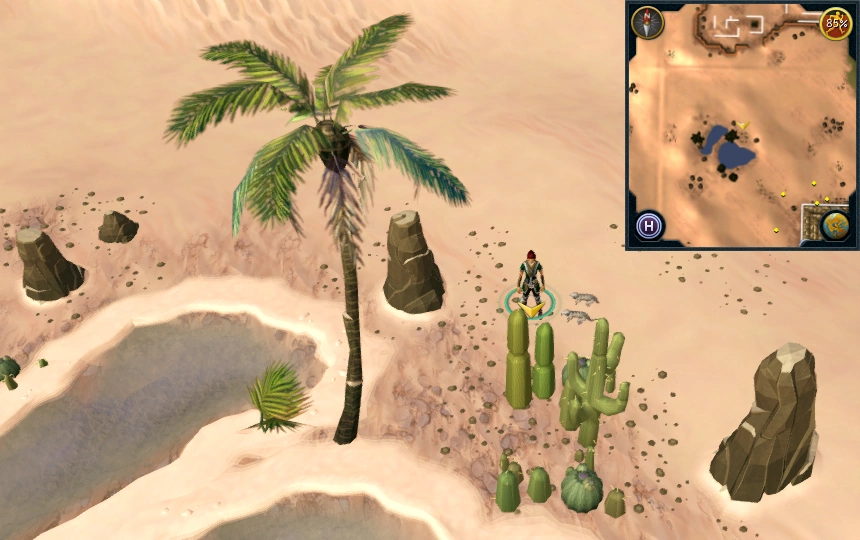 |
| North of the Uzer Mastaba (pyramid building south of the Ruins of Uzer). |  |
| North-east of the Uzer Mastaba (pyramid building south of the Ruins of Uzer). | 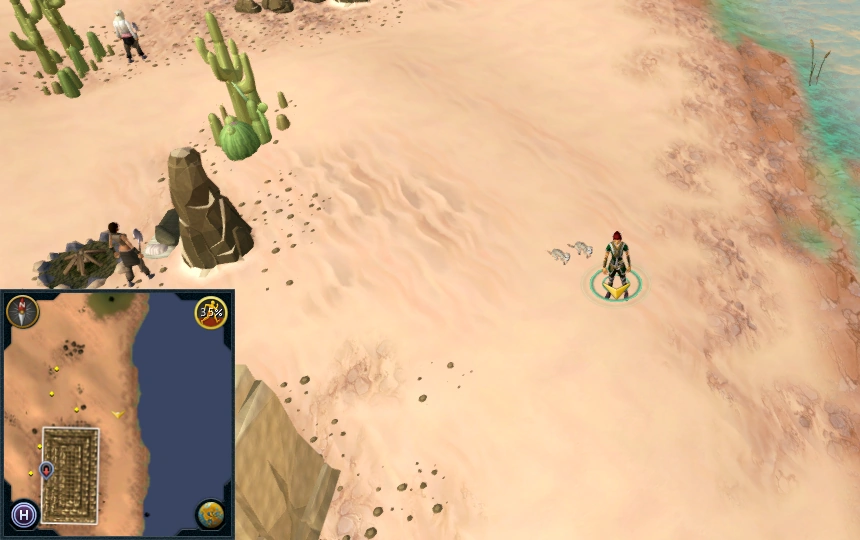 |
| Inside the southwestern house in the Ruins of Uzer. | 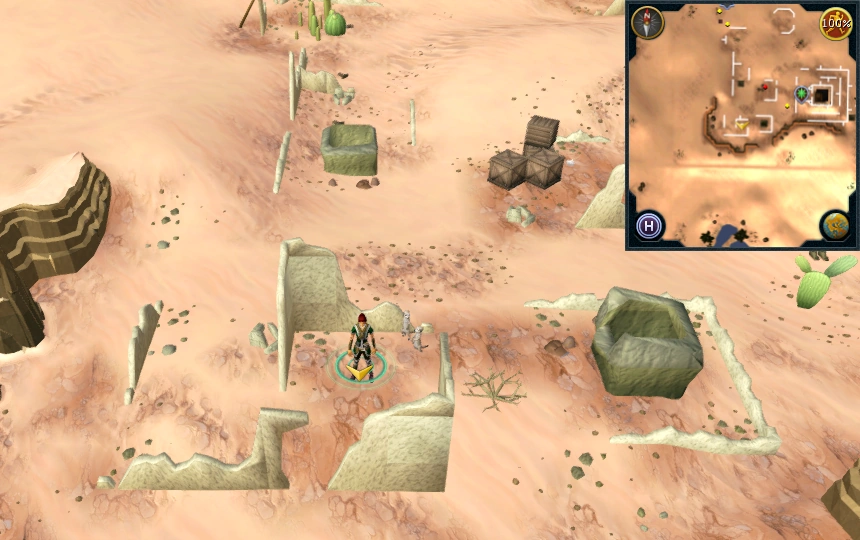 |
| East of the Ruins of Uzer. |  |
| North-east of the Ruins of Uzer. Two steps north of the location pictured. |  |
| North-east of the Ruins of Uzer, just east of the Uzer flying carpet. |  |
| By the Uzer mine. South-east of the cliff where the Abbey of St. Elspeth (used in the quest One Piercing Note) is located and north of the Ruins of Uzer. |  |
| South-west of north-western mine, near cacti. |  |
| In the desert, south of the cliff where the Abbey of St. Elspeth (used in the quest One Piercing Note) is located. | 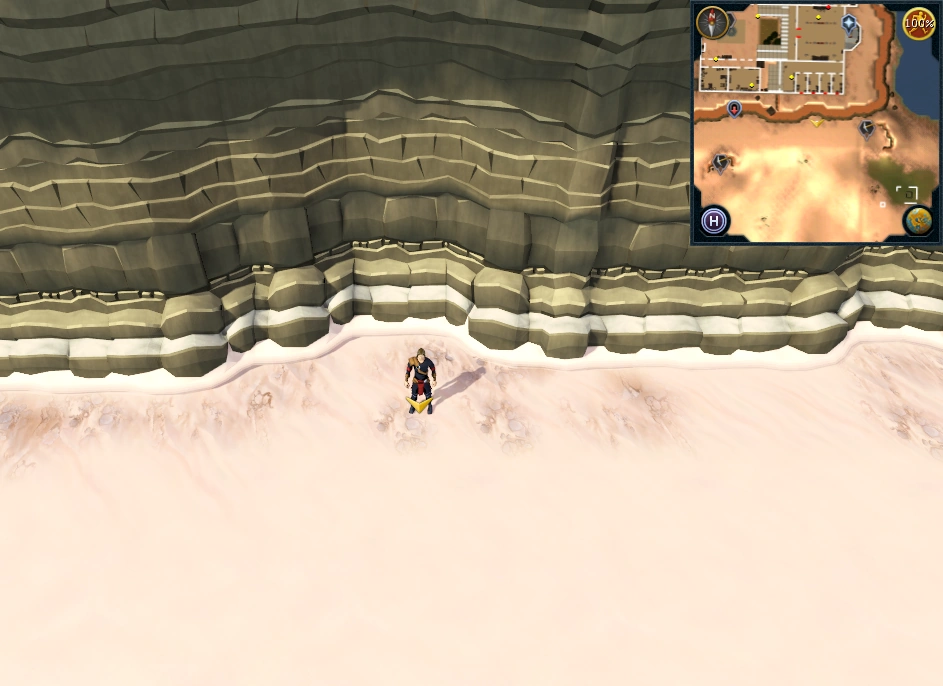 |
| Southeast of the entrance to the Eagle transport system (unlocked during Eagles' Peak quest). | 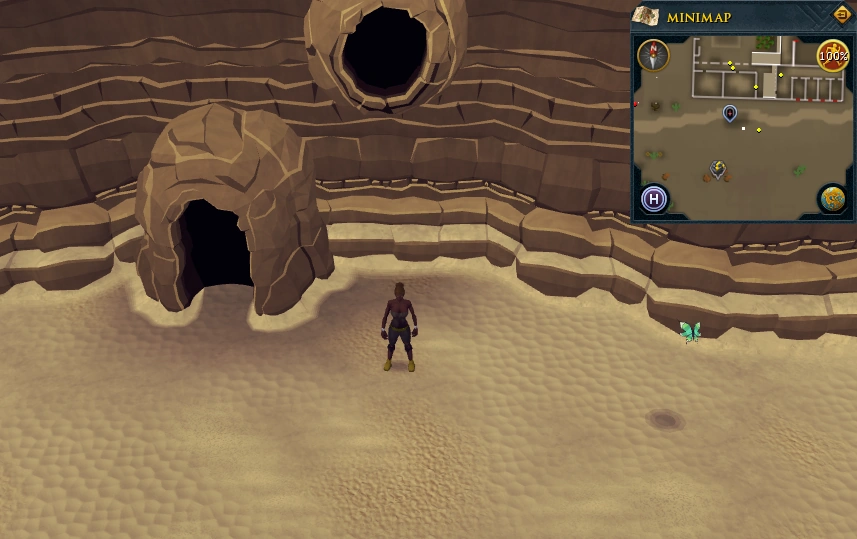 |
| South-east of the north-western mine. | 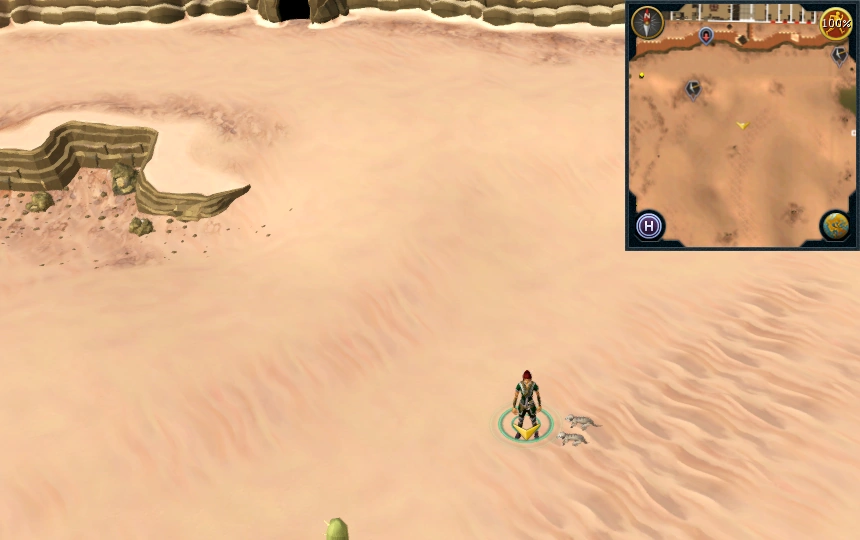 |
| North of Dominion Tower and south of the waterfall source of the River Elid. |  |
| North-east of Dominion Tower, two paces west of the shortbow spawn. |  |
| East of Dominion Tower and north-east of the Hunter training icon which indicates the Uzer Hunter Area. | |
| East of Dominion Tower. | 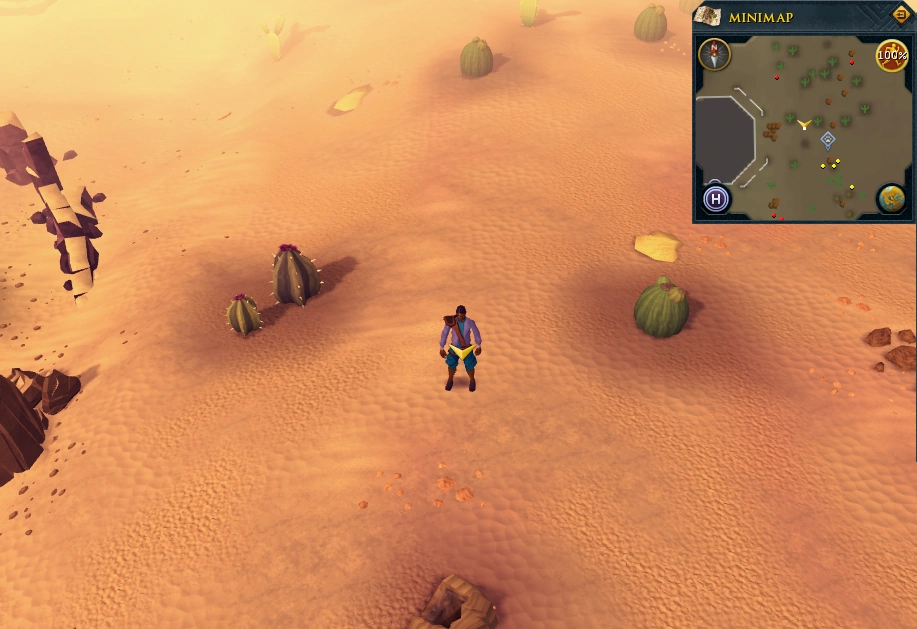 |
| East of Dominion Tower and south of the Hunter training icon which indicates the Uzer Hunter Area. | |
| South of the Dominion Tower. | 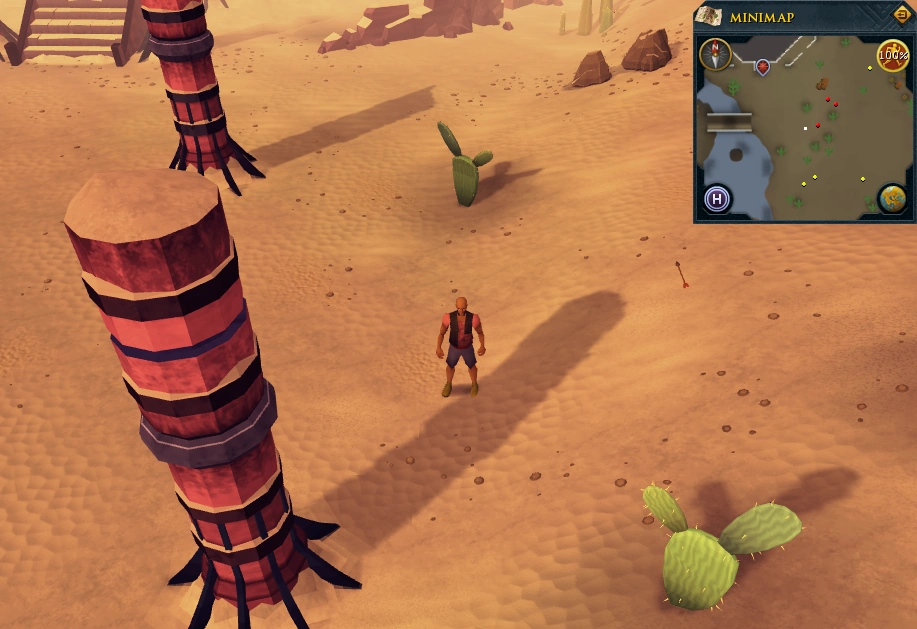 |
| South-west of Dominion Tower. North of the bridge connecting the eastern and western parts of the Kharidian Desert. One pace south of the location pictured. | 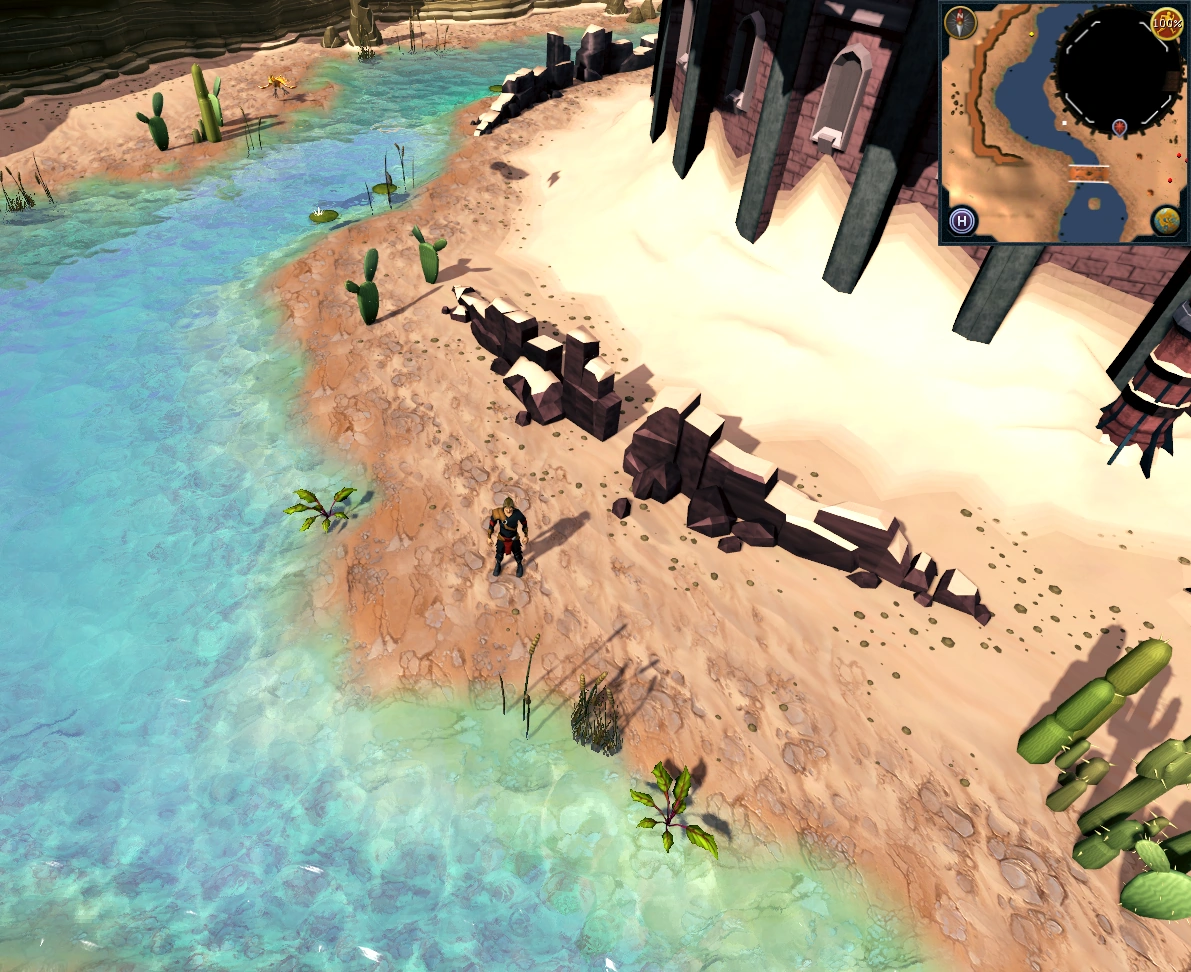 |
| West of the Ruins of Uzer and east of the Uzer Hunter Area. | 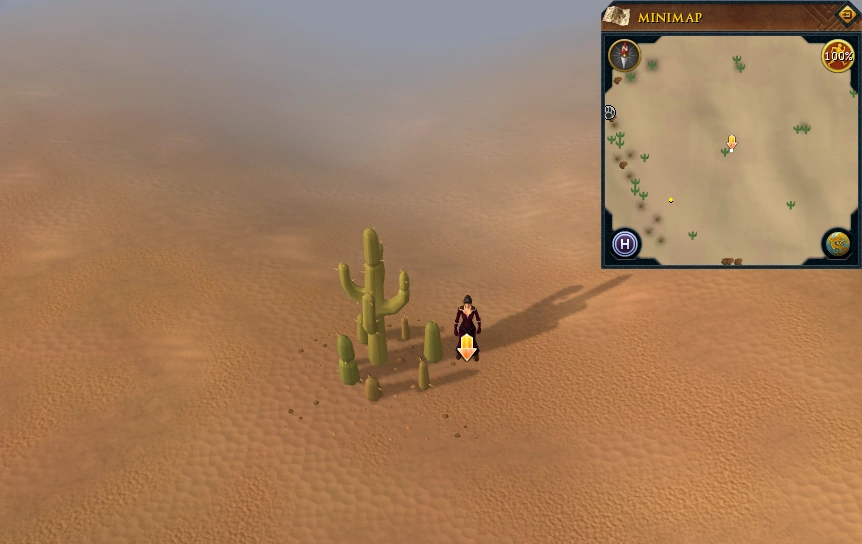 |
| North-west of the desert lizards and south of the Uzer Hunter Area. |  |
| North of desert lizards and south of the Uzer Hunter Area, west of the desert oasis. | 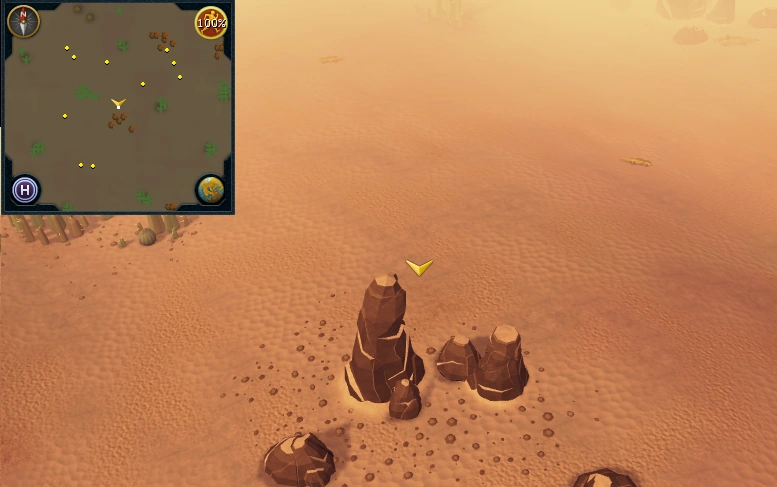 |
| North-west of the desert oasis and south-west of the Ruins of Uzer. | 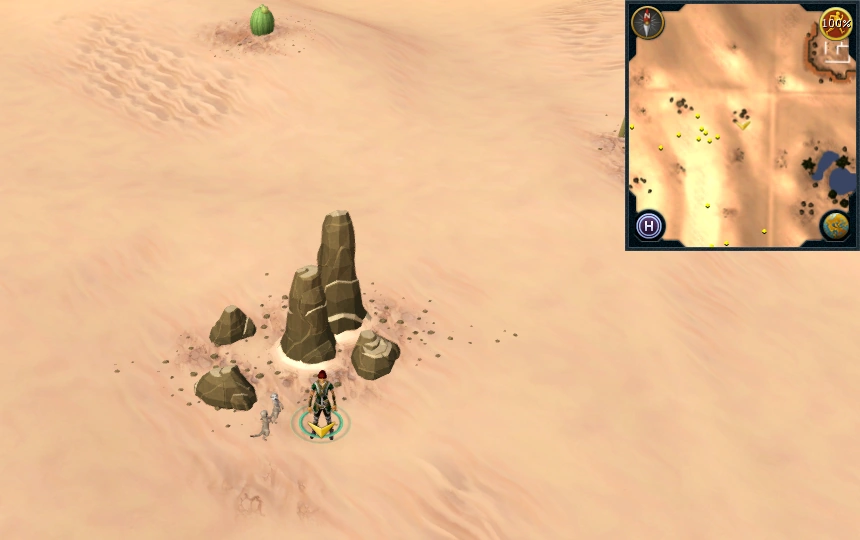 |
| South of fairy ring. Seven steps south and one step east of the southernmost rock in the second group of rocks from River Elid. | 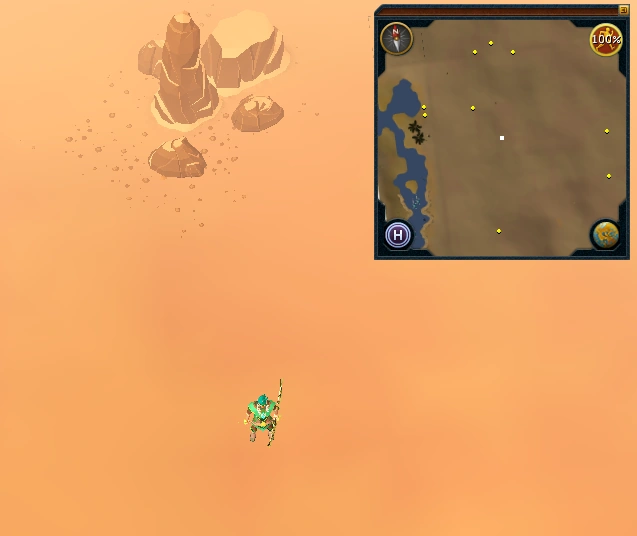 |
| Midway between Dominion Tower and the ruins of Uzer, ten paces south of the cuttable Kharidian cactus. |  |
|
Other possible locations
| |
Lumbridge Swamp Caves
"This scroll will work in the dark and damp caves below Lumbridge Swamp."
Area Information: Lumbridge Swamp Caves
While in the caves players must use a light source to avoid deadly, rapid attacks from insects that will otherwise attack them and a spiny helmet or slayer helmet if they wish to avoid taking damage from wall beasts.
- The scan may not work if the quest The Mighty Fall has not been started, and you haven't spoken to the bosses in the main chamber. However, certain players have reported success without beginning the quest.
Scan range: 11 paces

| Possible locations | Image |
|---|---|
| In the west part of the Lumbridge Swamp Caves, by the Lumbridge Swamp rope entrance. | 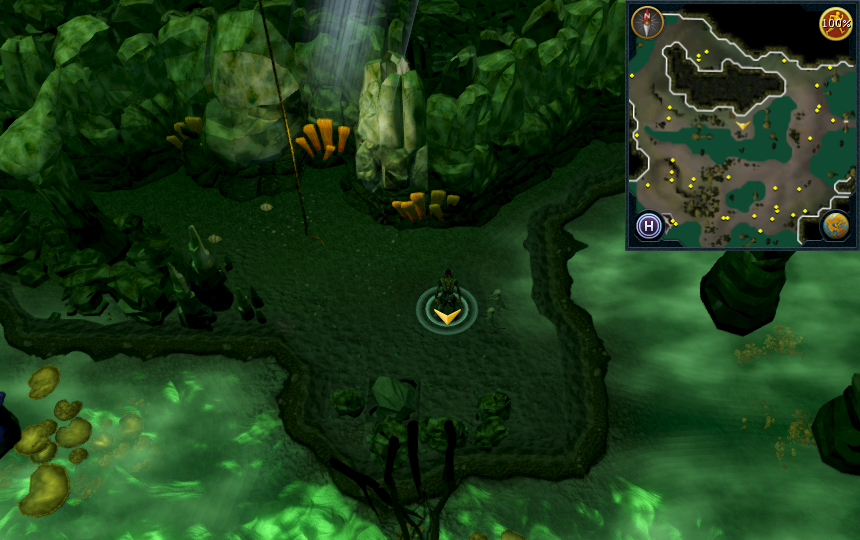 |
| In the north part of the Lumbridge Swamp Caves, south-west of the Dorgesh-Kaan mine entrance. One pace south-east of the location pictured. | 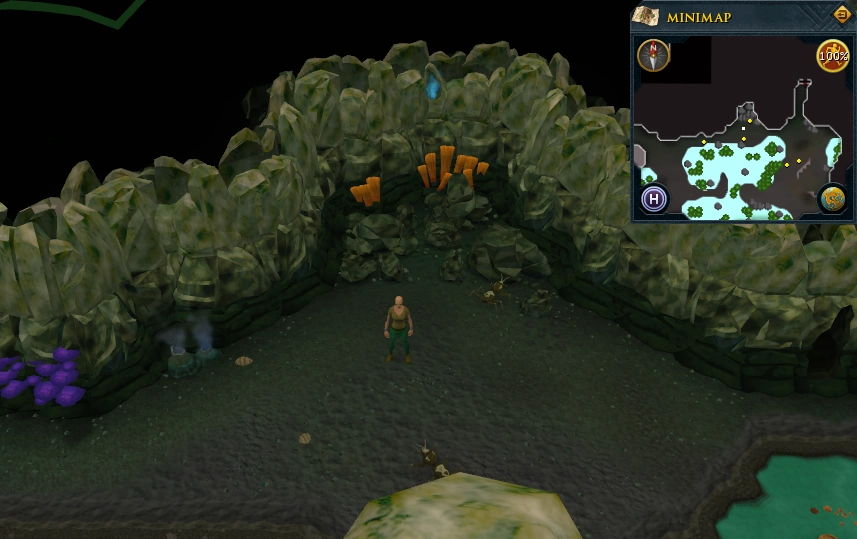 |
| In the north-east part of the Lumbridge Swamp Caves. South of the Dorgesh-Kaan mine entrance and west of the east Fishing spot, in the area with rockslugs. | 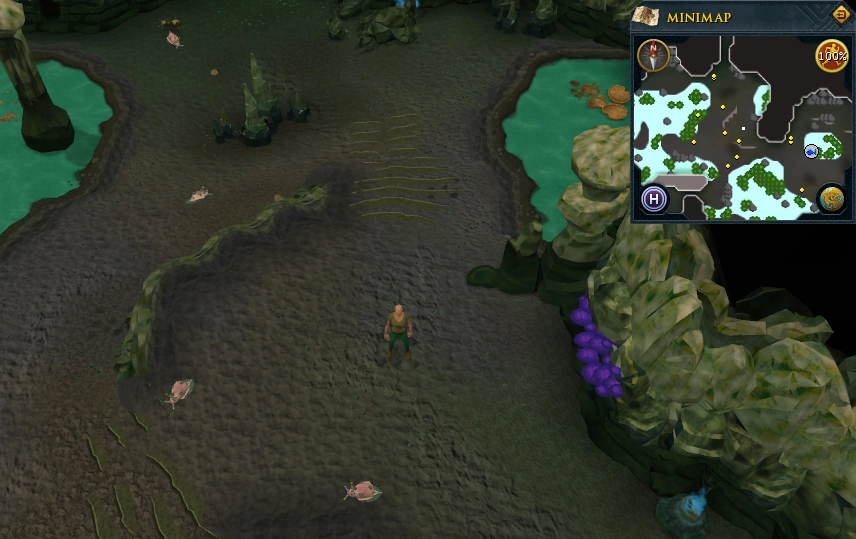 |
| In the centre of the Lumbridge Swamp Caves. East of the Lumbridge Swamp rope entrance and south of the Dorgesh-Kaan mine entrance. North of the Tears of Guthix Cavern entrance and west of the eastern Fishing spot. One step south of the location pictured. | 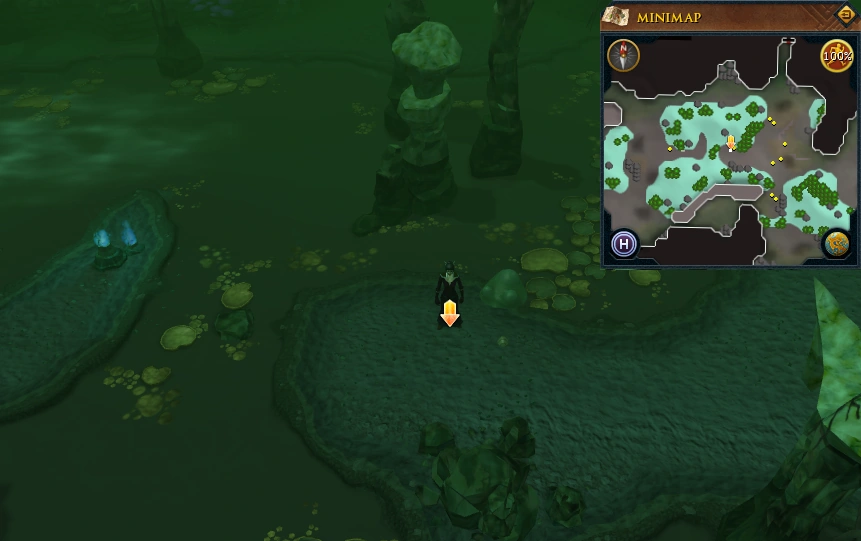 |
| In the east part of the Lumbridge Swamp Caves. North-east of the eastern Fishing spot, in the area with cave goblins. | 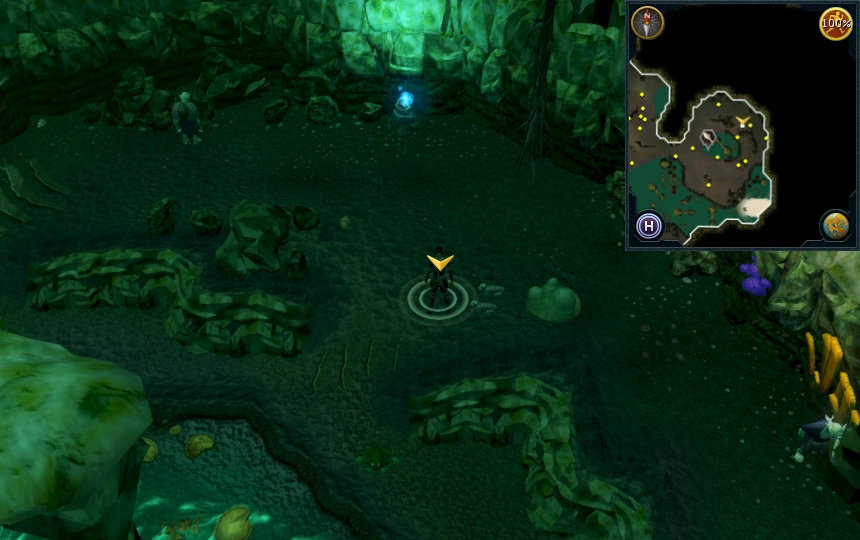 |
| In the east part of the Lumbridge Swamp Caves, just south of the eastern Fishing spot. Three steps east of the pictured location. |  |
| In the south-west part of the Lumbridge Swamp Caves. North-east of the Tears of Guthix Cavern entrance, in the area with big frogs and giant frogs. One step west of the location pictured. | 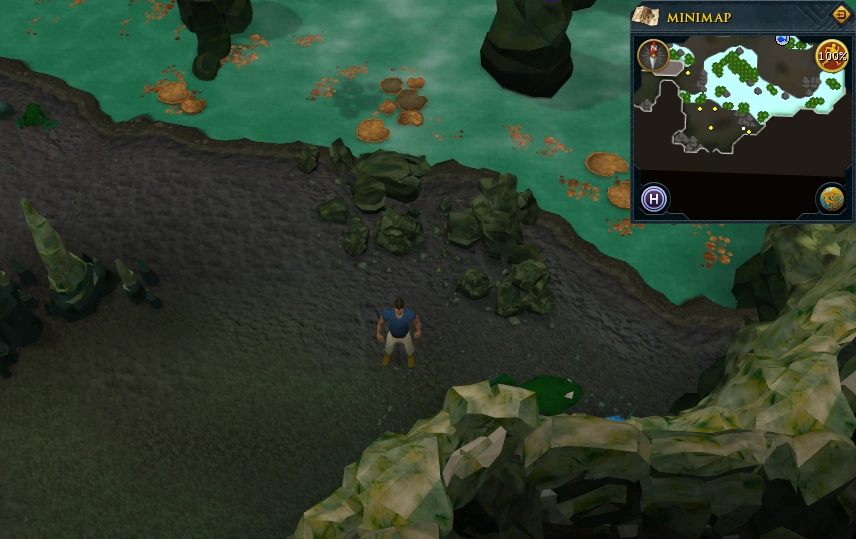 |
| In the south part of the Lumbridge Swamp Caves, north-west of the Tears of Guthix Cavern entrance. One pace south from the location pictured. | 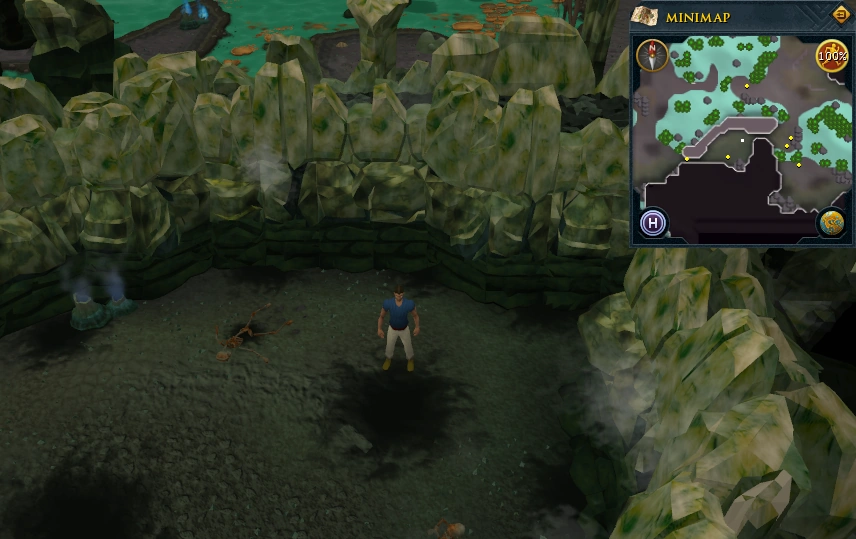 |
| In the south part of the Lumbridge Swamp Caves, just west of the area with wall beasts. |  |
| In the south part of the Lumbridge Swamp Caves. South of the Lumbridge Swamp rope entrance and north-east of the western Fishing spot. | 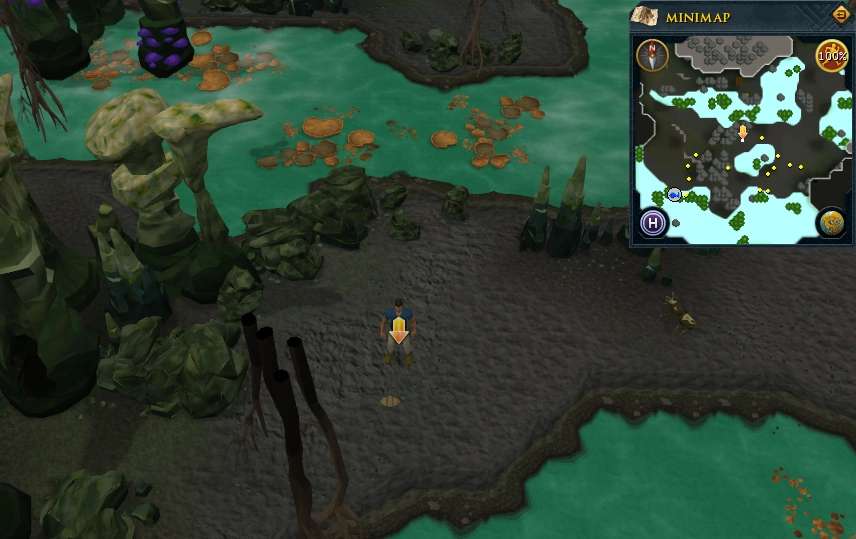 |
| In the south part of the Lumbridge Swamp Caves. South-east of the Lumbridge Swamp rope entrance and north-east of the western Fishing spot. | 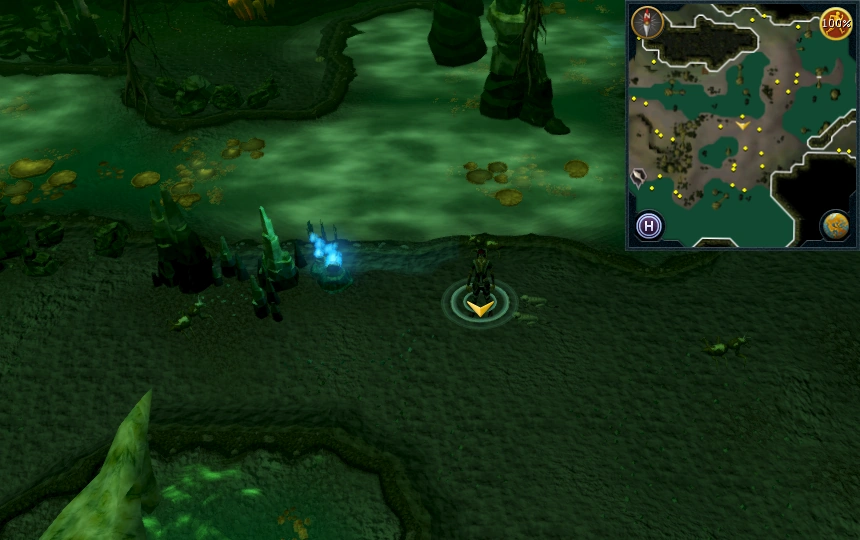 |
| In the south-west part of the Lumbridge Swamp Caves, east of the western Fishing spot. | 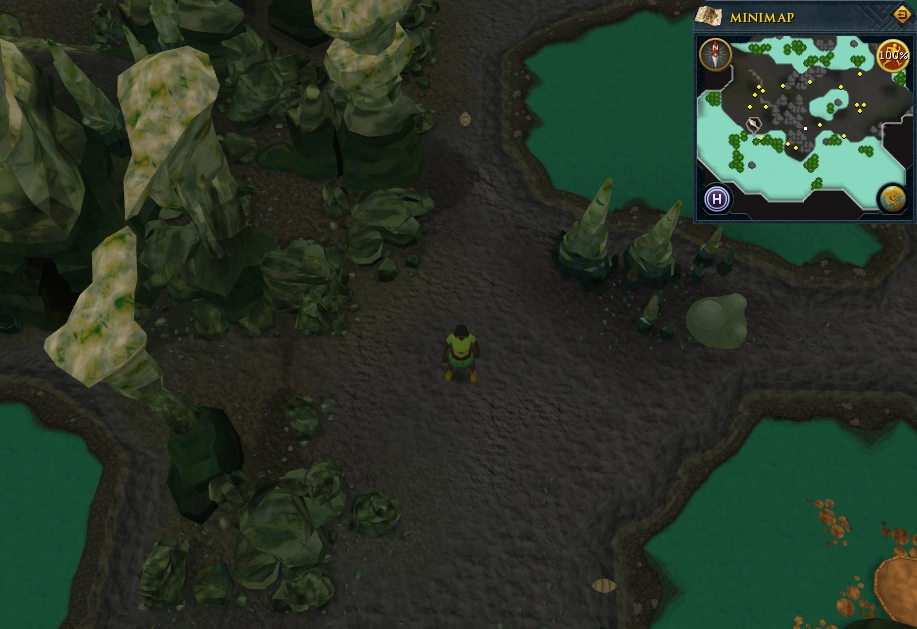 |
Menaphos
Area Information: Menaphos
Players must have completed part of The Jack of Spades to access Menaphos.
Scan range: 30 paces

| Possible locations | Image |
|---|---|
| Imperial district, just east of the entrance to Shifting Tombs, west of the Menaphos lodestone. | 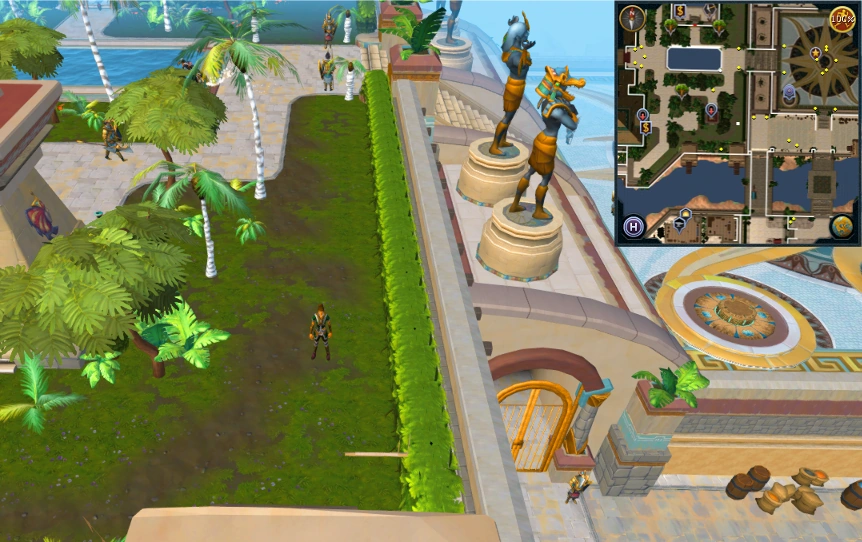 |
| Imperial district, south-east of the deposit box outside the entrance to the Grand Library of Menaphos. | 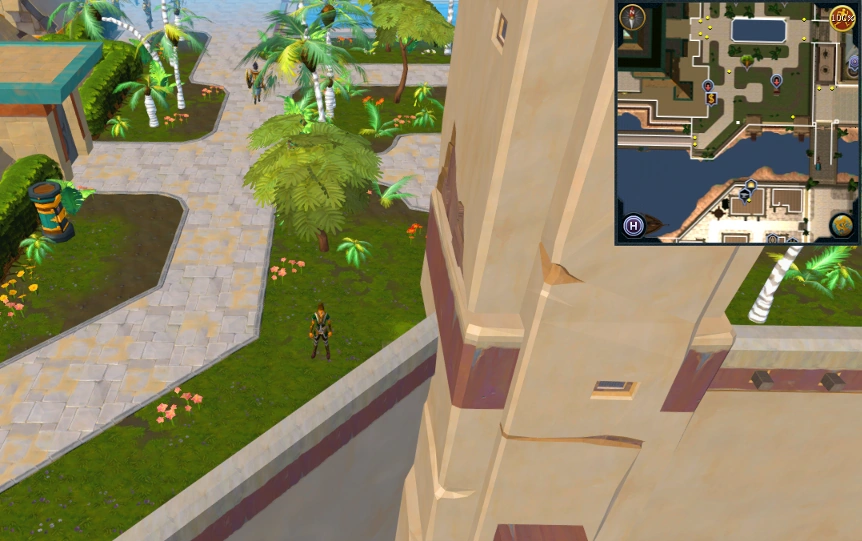 |
| Imperial district, south-west of the Grand Library of Menaphos. | 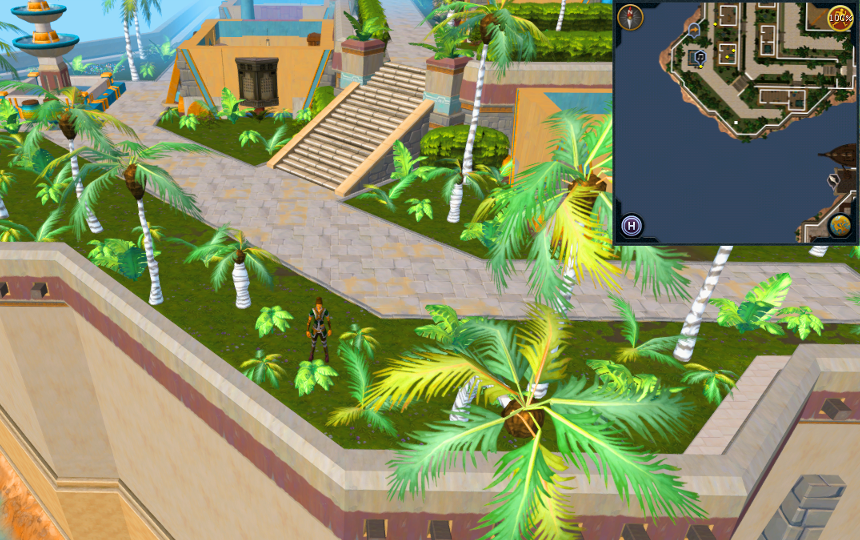 |
| Imperial district, east of the Imperial district musician and south-west of the Grand Library of Menaphos. |  |
| Imperial district, north of the Soul Altar entrance. |  |
| Imperial distict, north-west of Golden Palace. Three paces south of the second palm tree from the north. (The picture's location is incorrect.) |  |
| Imperial district, north of Golden Palace. |  |
| Imperial district, north-east of the VIP skilling area. | 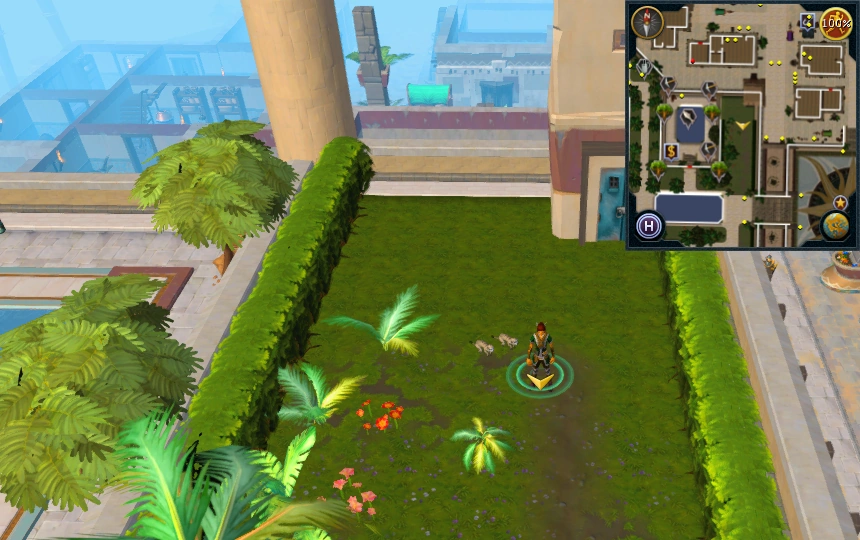 |
| Worker district, north-east of the concentrated sandstone rocks. | 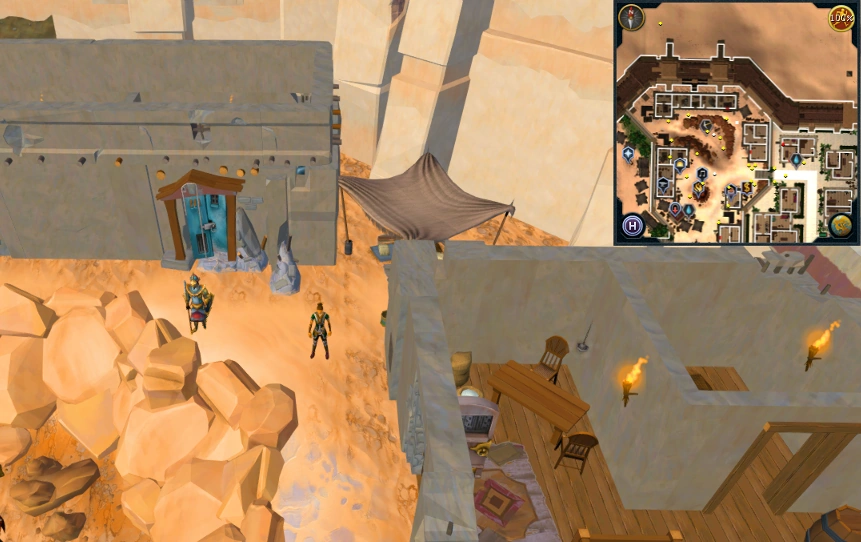 |
| Worker district, south-west of the concentrated sandstone rocks and east of the furnace. |  |
| Worker district, just west of Kharl on the southern end of the beach. |  |
| Worker district, in the middle of the beach. | 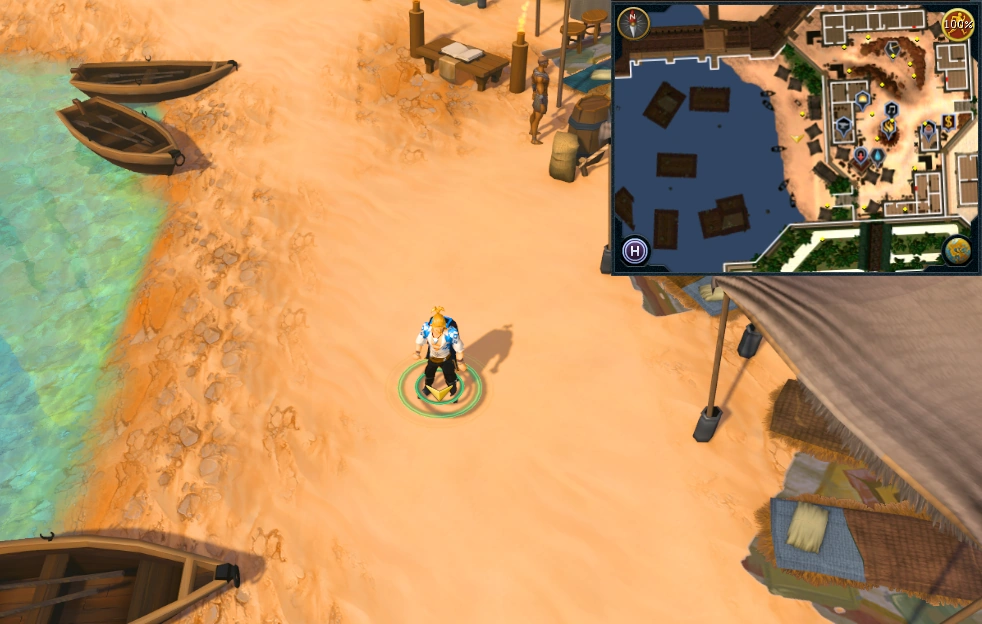 |
| Merchant district, just south-west of the main gate. |  |
| Merchant district, just south-west of fish cart. One pace south of the location pictured. | 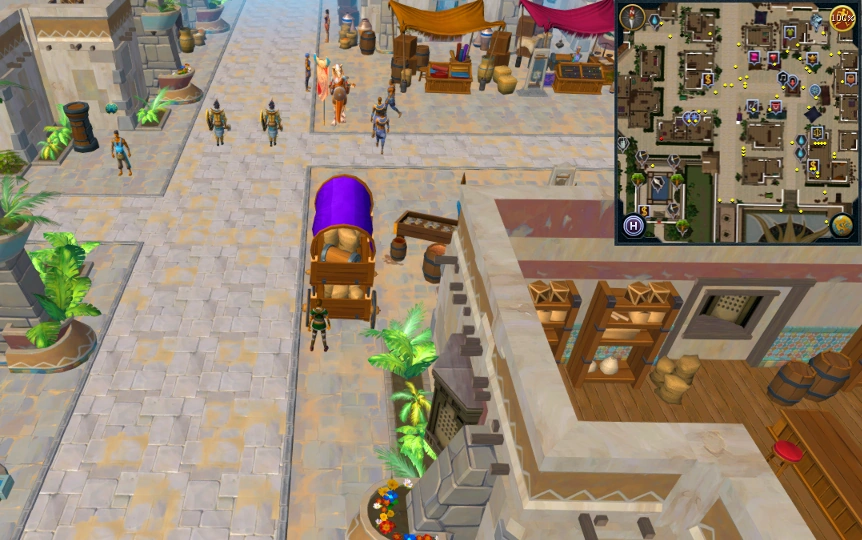 |
| Merchant district, just north-west of Grand Exchange. |  |
| Merchant district, just south-east of the general store. One pace south of the location pictured. | 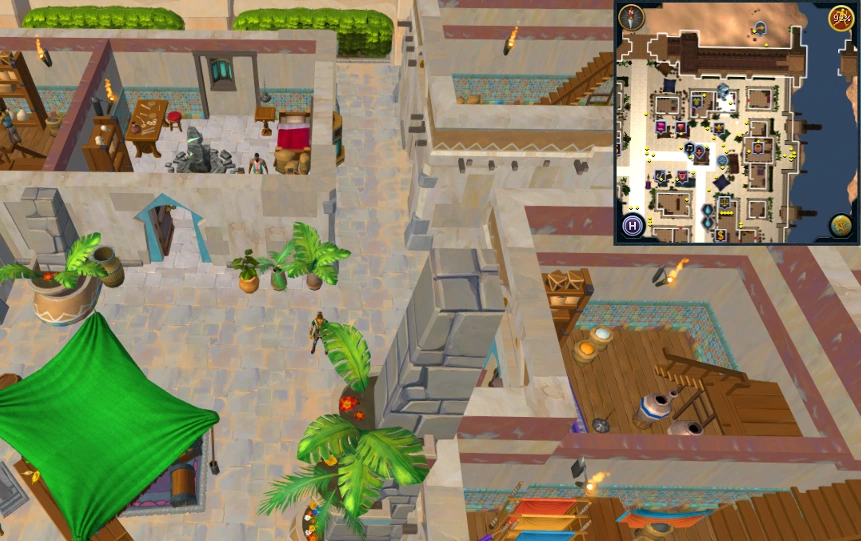 |
| Port district, next to Lookout Ekahi. | 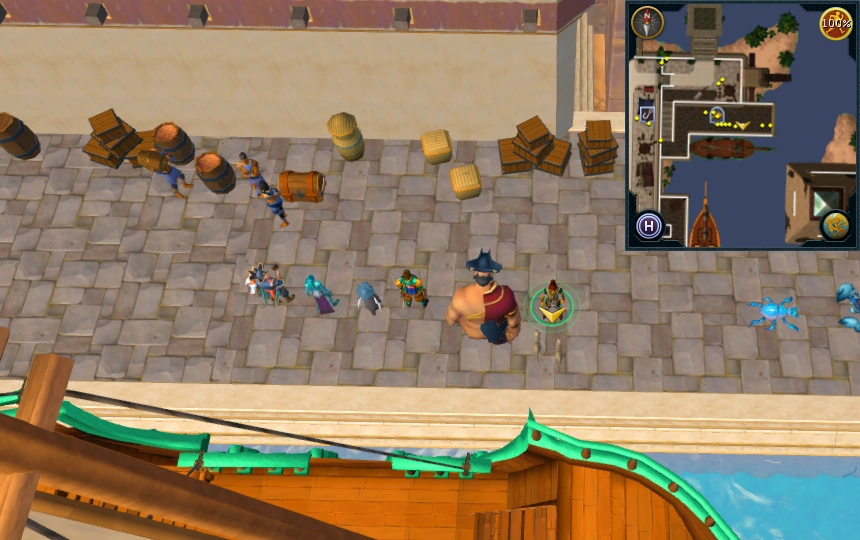 |
| Port district, outside of Rhotep's house (containing a furnace and anvil) and east of the crane. | 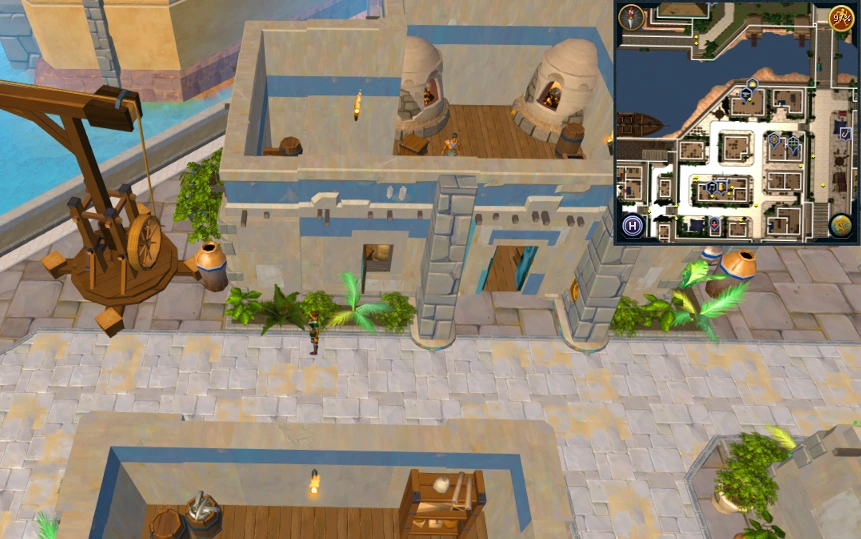 |
| Port district, west of Shifting Tombs entrance and south-east of musician. | 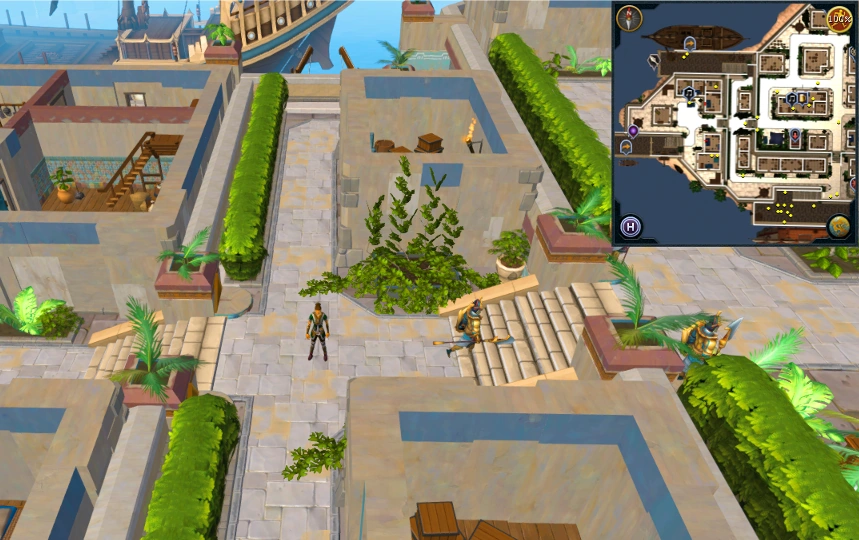 |
| Port district, on the dock just south of the charter ship. | 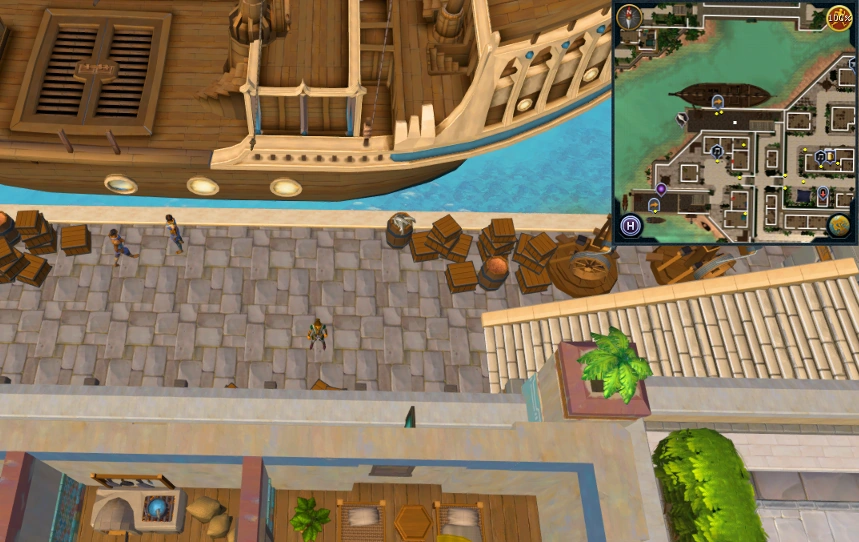 |
| Port district, on the platform just north-east of the POH portal. | 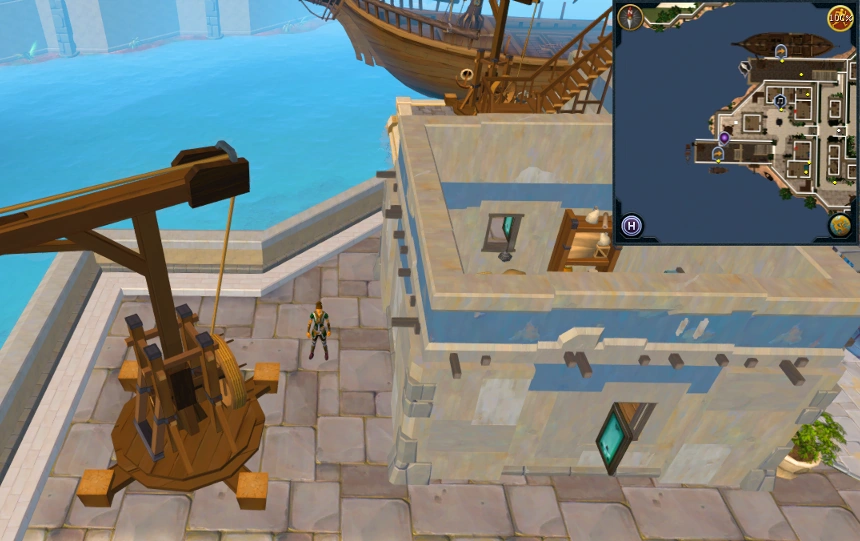 |
|
Other possible locations
| |
Mos Le'Harmless
Area Information: Mos Le'Harmless
Players must have completed the Cabin Fever quest to access Mos Le'Harmless. The area outside the base contains many aggressive jungle horrors and poisonous snakes.
Scan range: 27 paces

| Possible locations | Image |
|---|---|
| Inside the base's walls, west of the docks. |  |
| Inside the base's walls, along the western coastline. West of Harpoon Joe's House of 'Rum' and north-west of The Other Inn. | 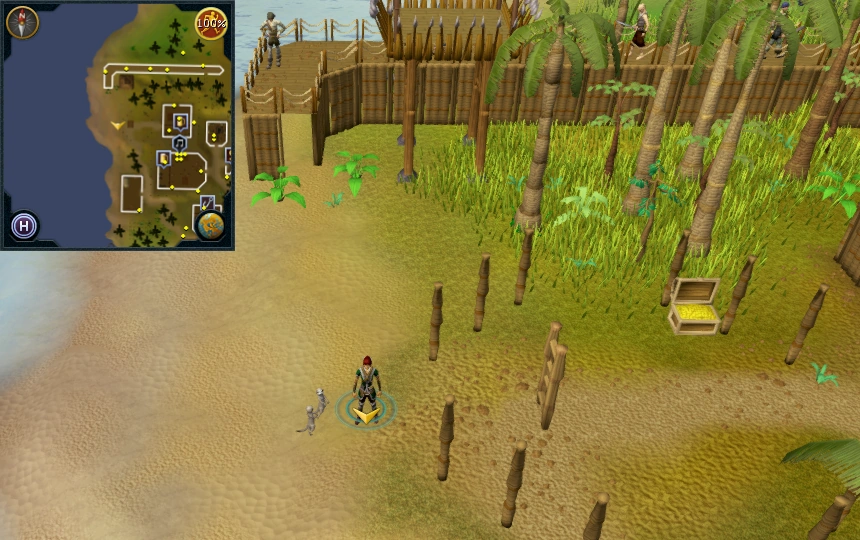 |
| Inside the base's walls, west of the bank. |  |
| Inside the base's walls, inside Dodgy Mike's Second-hand Clothing (clothes shop). One step southwest of the location pictured. |  |
| Inside the base's walls, east of Dodgy Mike's Second-hand Clothing (clothes shop). | 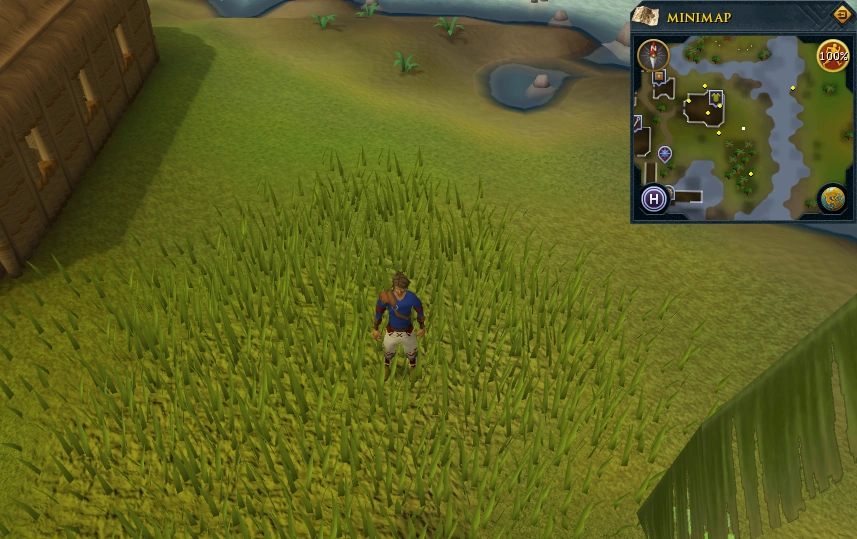 |
| Inside the base's walls, north-east of the bank and Dodgy Mike's Second-hand Clothing (clothes shop). | 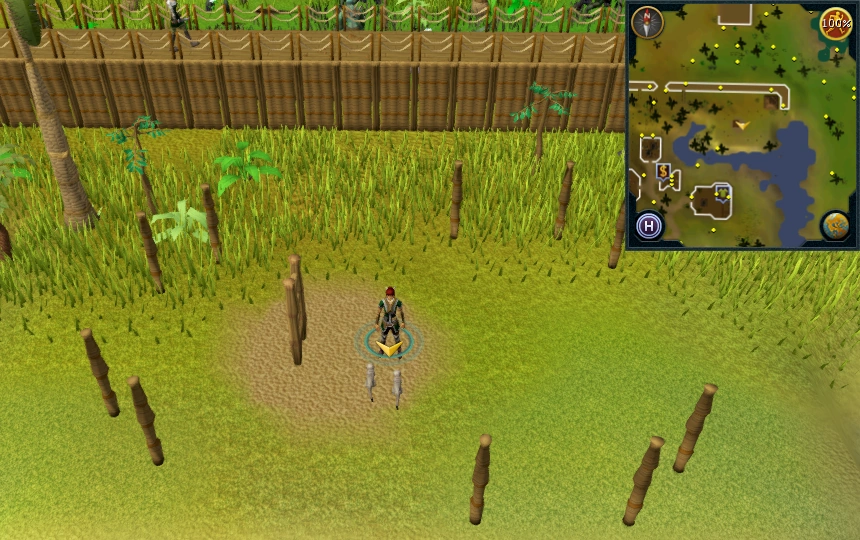 |
| North of the city outside the wall. | 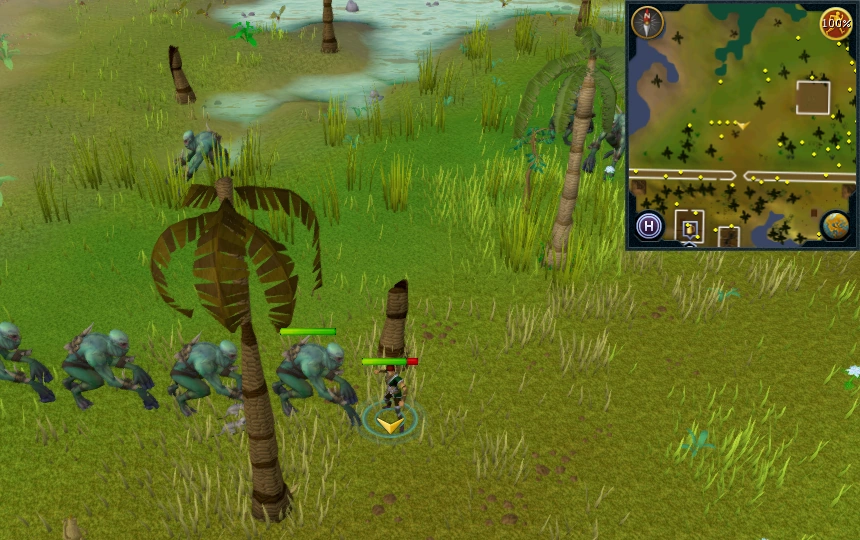 |
| Just east of the patch of wheat which is north-east outside the base. | 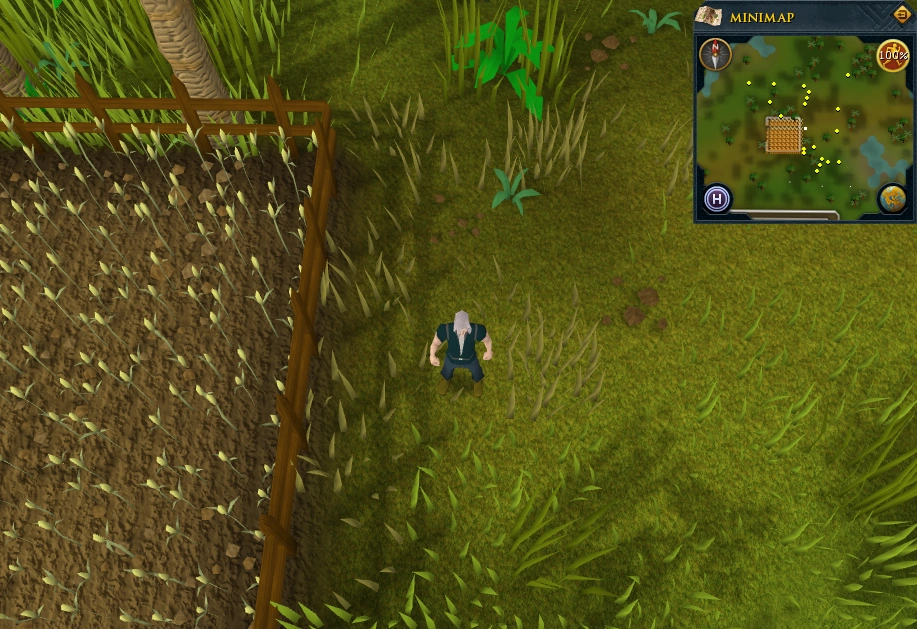 |
| North-east of the path of wheat which is north-east outside the base. |  |
| Just south-east of the most northwestern lake, north of the base. | 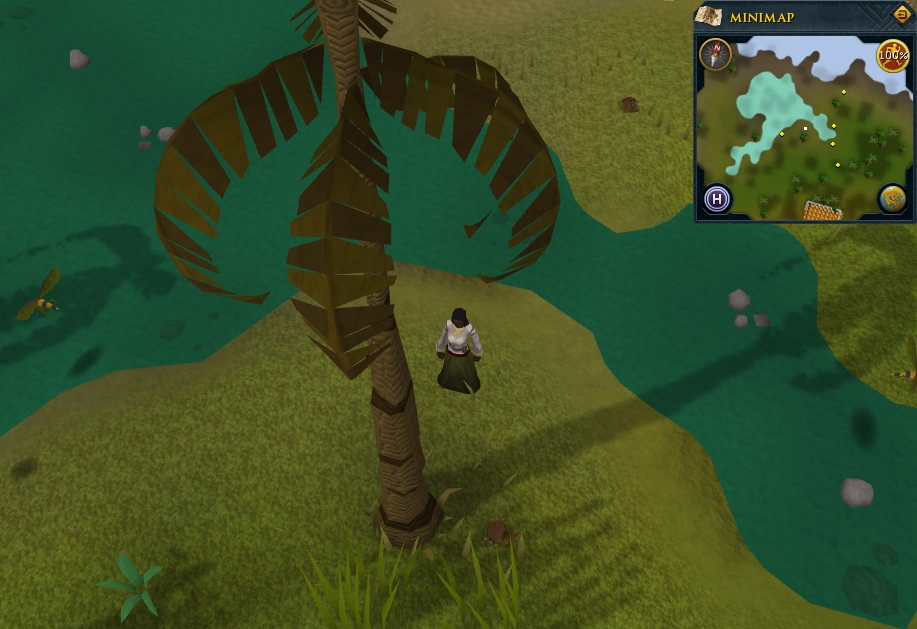 |
| North-east of the most northwestern lake, north of the base, two steps west of a tree stump. | 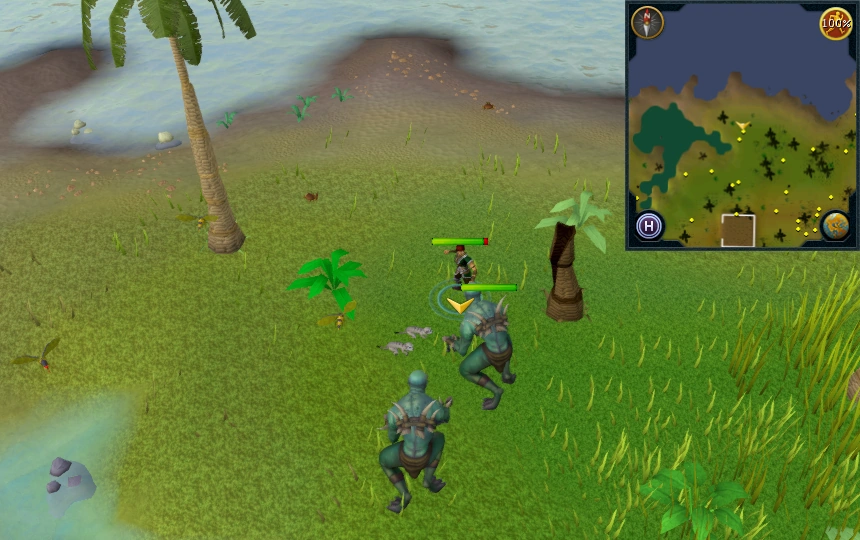 |
| North-east of the most northwestern lake, north of the base. | 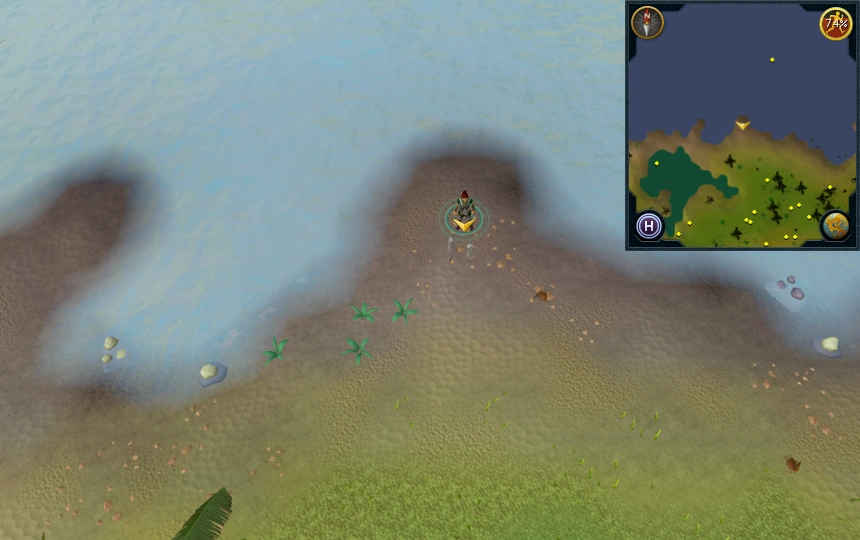 |
| North-west of the most northwestern lake, north of the base, in between a tree and the lake. |  |
| Just north of the group of lakes that are north-east of the base and north-west of Trouble Brewing. |  |
| Just north-east of the group of lakes that are north-east of the base and north-west of Trouble Brewing. |  |
| In the centre of the group of lakes that are north-east of the base and north-west of Trouble Brewing. |  |
| Just south of the group of lakes that are north-east of the base and north-west of Trouble Brewing. | 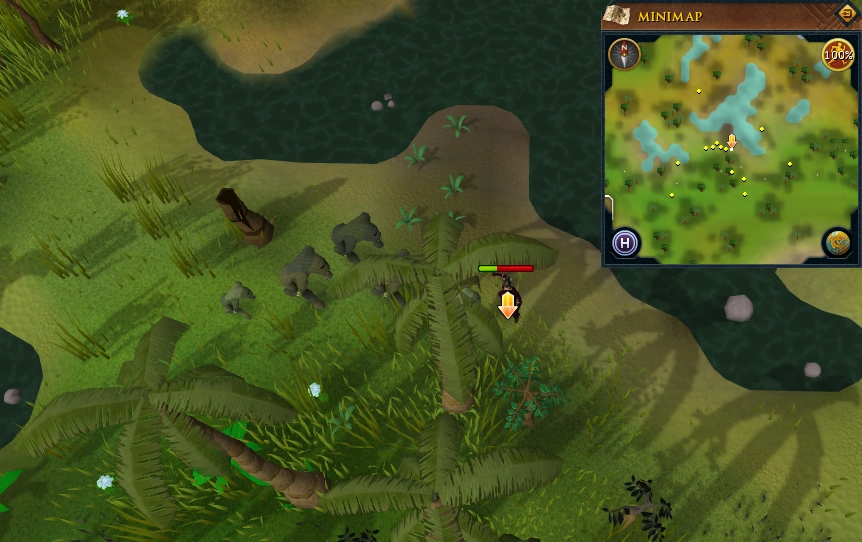 |
| Just south-east of the group of lakes that are east of the base and west of Trouble Brewing. |  |
| East of base's wall, outside of the base. |  |
| West of the entrance to the Mos Le'Harmless Caves that contain cave horrors and albino bats. | 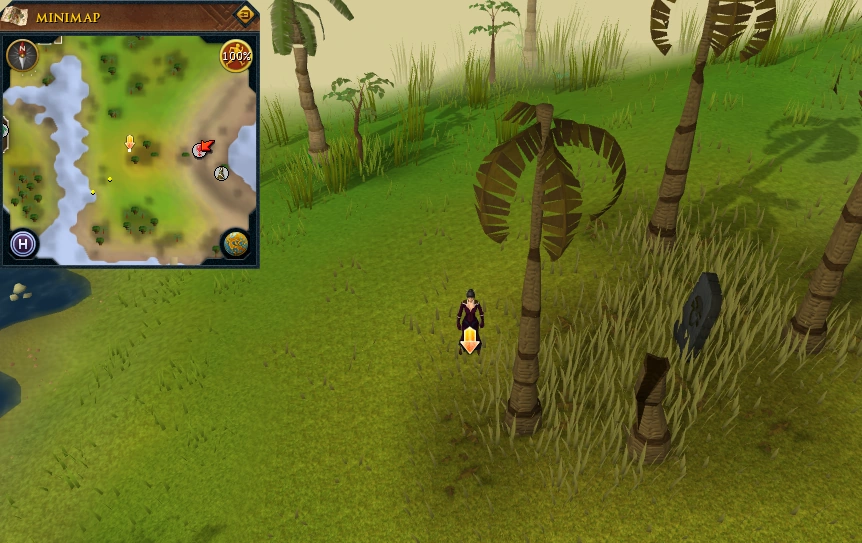 |
| East of Dodgy Mike's Second-hand Clothing (clothes shop), on coastline outside of the base. |  |
| South-east of summoning obelisk and the entrance to the Mos Le'Harmless Caves that contain cave horrorss and albino bats. |  |
| South-west of Trouble Brewing; west of the minigame's blue team base. |  |
| North-west of Trouble Brewing; north-west of the minigame's red team base. |  |
| North-west of Trouble Brewing; west of the minigame's red team base. | 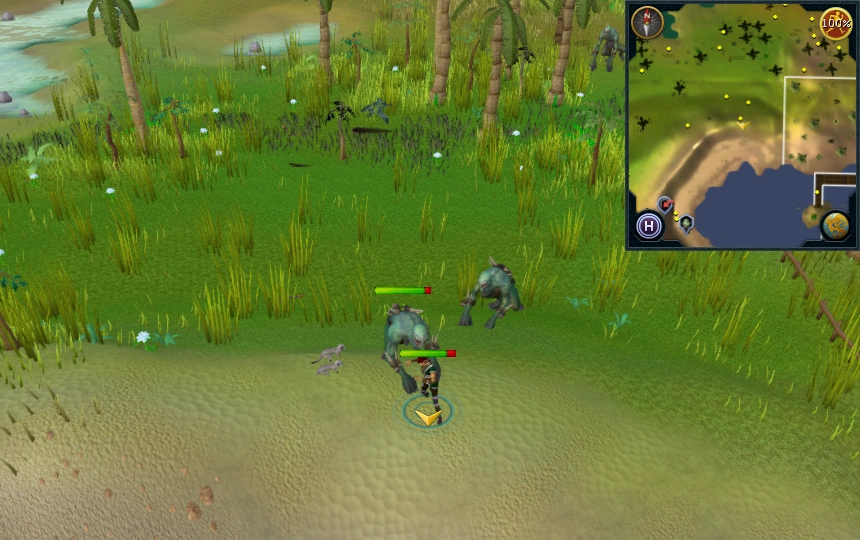 |
| East of the group of lakes that are north-east of the base and north-west of Trouble Brewing. | 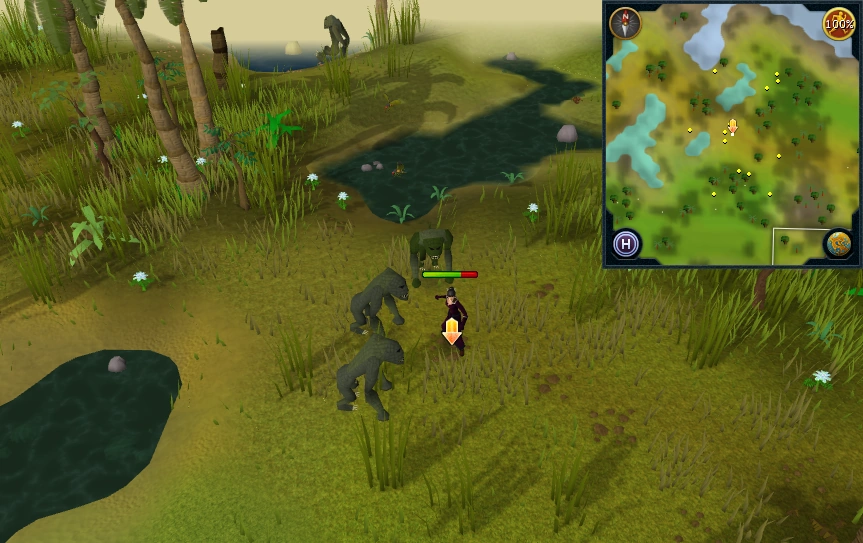 |
| North of Trouble Brewing; north of the minigame's red team waiting room. One pace south of the location pictured. | 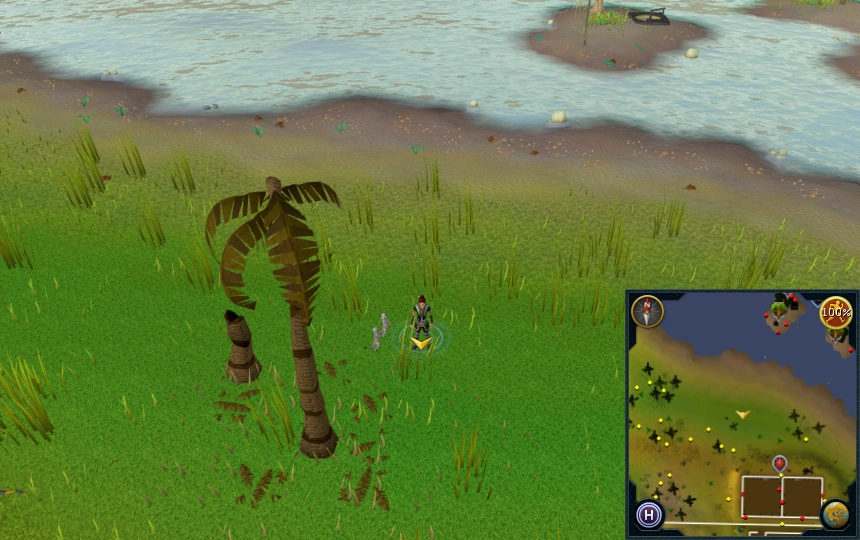 |
| North-east of Trouble Brewing, north-east of the minigame's blue team lobby. | 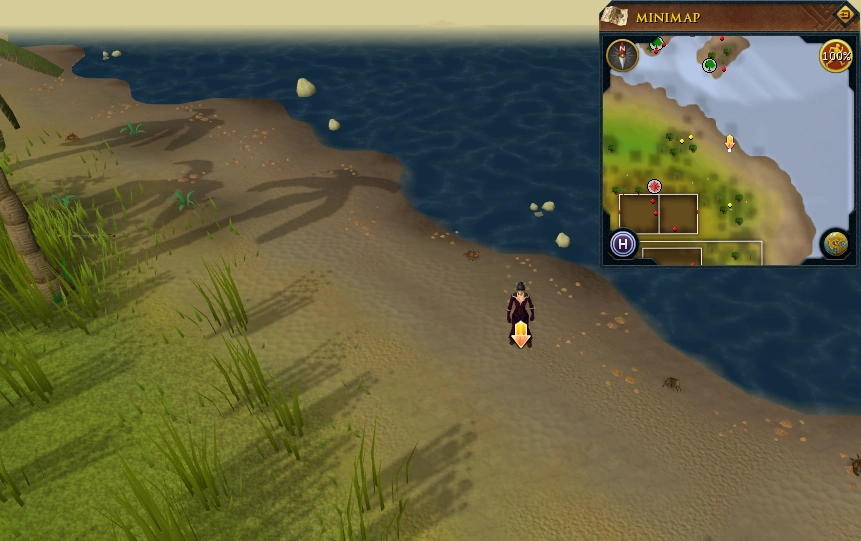 |
| Just north of Trouble Brewing's blue team lobby. |  |
| Just north of Trouble Brewing's red team lobby. |  |
| East of Trouble Brewing; east of the minigame's red team base. |  |
| East of Trouble Brewing north wall, near coast. | 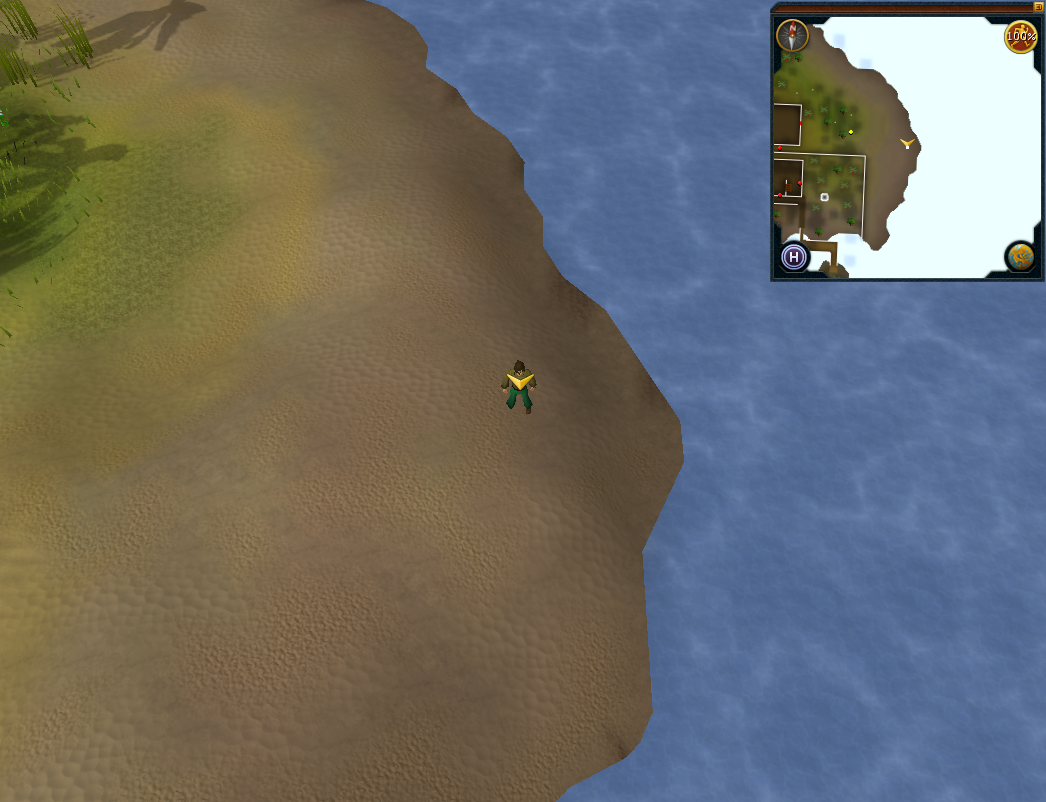 |
Piscatoris Hunter Area
Area Information: Piscatoris Hunter area
Scan range: 14 paces
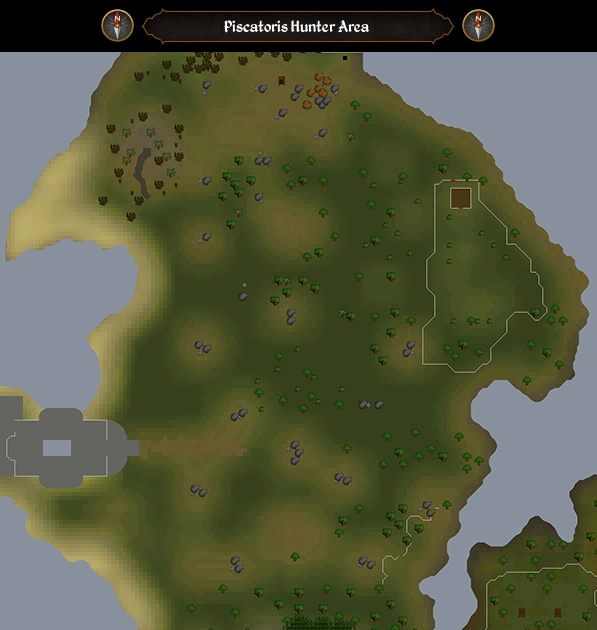
| Possible locations | Image |
|---|---|
| Just north of the fairy ring (code AKQ). | 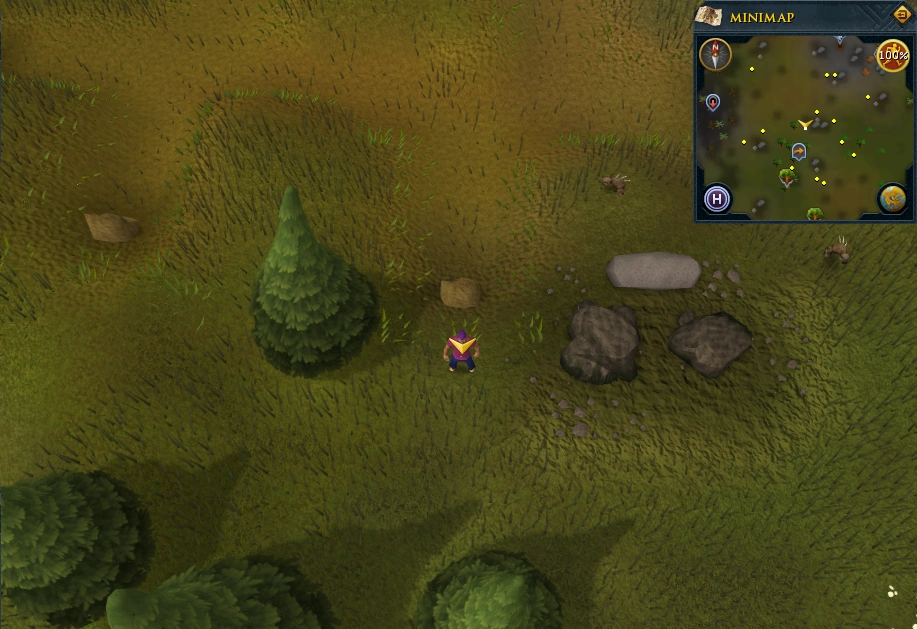 |
| West of the elder tree slightly below the fairy ring. | 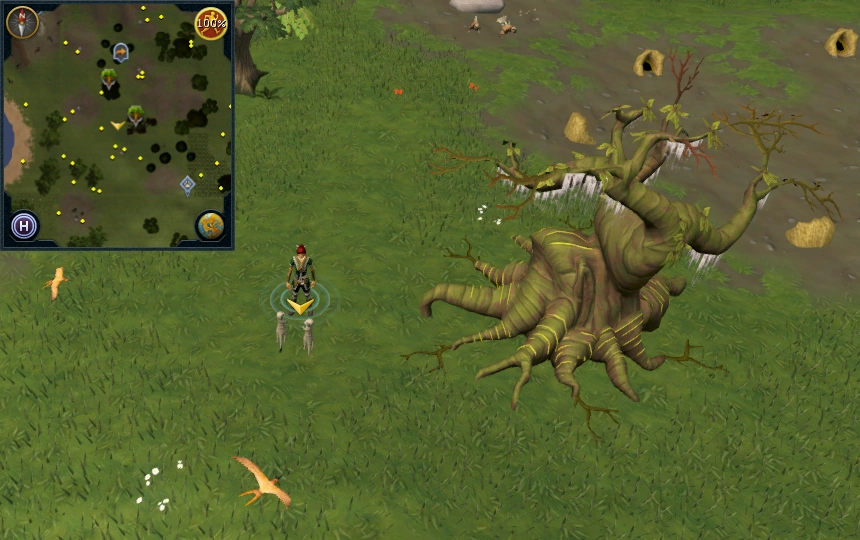 |
| North-east of the fairy ring (code AKQ). South of Piscatoris mining site and summoning obelisk cave entrance. One pace north of the location pictured. | 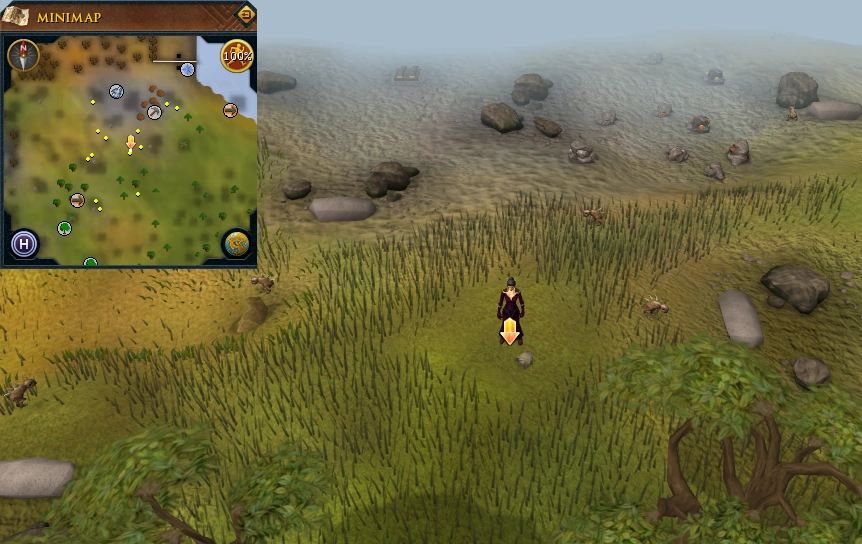 |
| South of the tunnel entrance to Piscatoris Fishing Colony. East of Piscatoris mining site and summoning obelisk cave entrance. |  |
| East of the fairy ring (code AKQ) and west of the falconry area (Hunter training area surrounded by fence). |  |
| North-west of the falconry area and east of the fairy ring (code AKQ). |  |
| North of the falconry area. South-east of the transportation map icon which indicates the rowing boat network between Piscatoris Fishing Colony and the Tree Gnome Stronghold, run by Kathy Corkat and David Mendleberg. |  |
| Inside the falconry area, south of the Falconer's hut. | 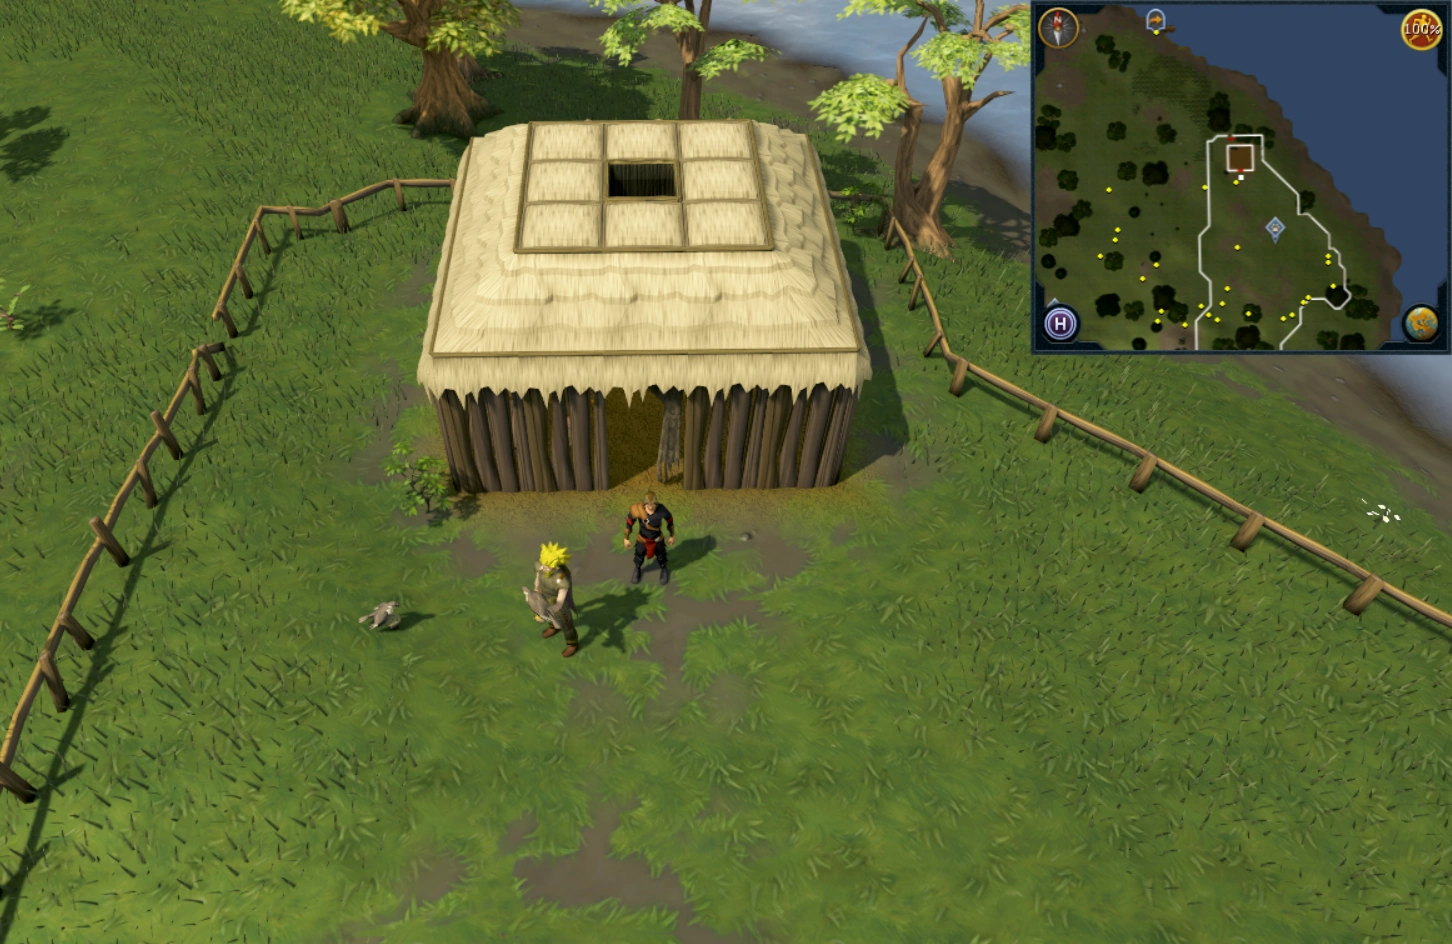 |
| Inside the falconry area, by the fence on the east side of the enclosure. |  |
| South-east of the falconry area. | 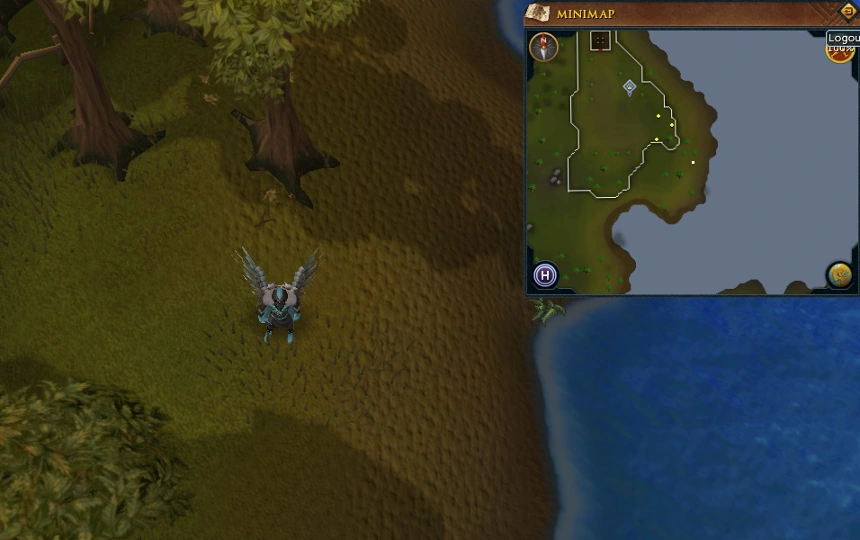 |
| South-east of the falconry area, just outside the fence. |  |
| South-east of the Piscatoris Hunter area. Near the coast north-west of the Tree Gnome Stronghold. |  |
| North of Eagles' Peak lodestone, south from a deadfall trap, and north-west of the southern fence. | 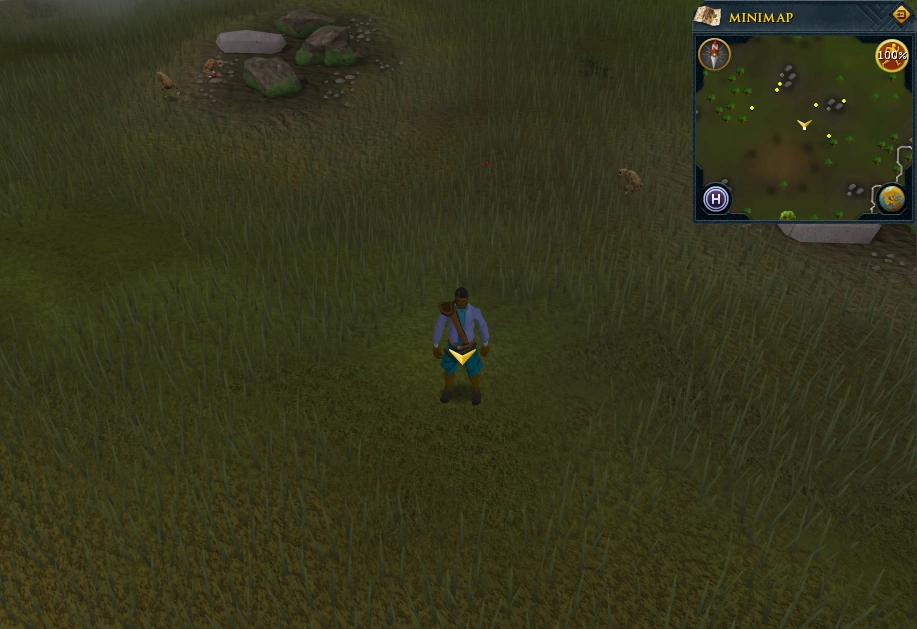 |
| East of the central Hunter training icon which indicates the presence of kebbits, copper longtails, ruby harvests, ferrets, chinchompas and white rabbits. | |
| South-west of the falconry area. South of the boulder next to the south-western corner of the falconry area. | 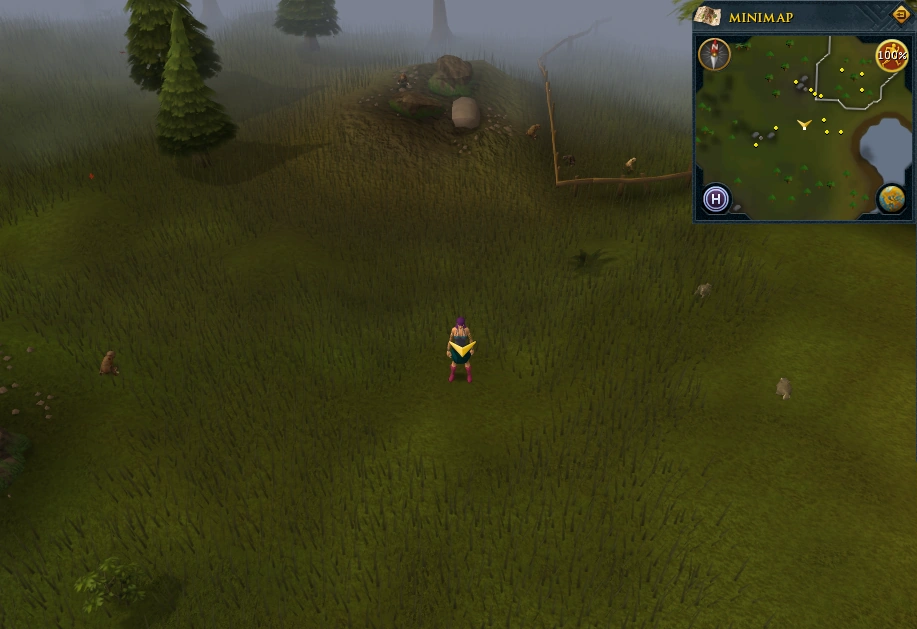 |
| Slightly north-east of the central Hunter training icon. | |
| Just south-east of the central Hunter training icon which indicates the presence of kebbits, copper longtails, ruby harvests, ferrets, chinchompas and white rabbits. One step south of the location pictured. | |
| South of the central Hunter training icon which indicates the presence of kebbits, copper longtails, ruby harvests, ferrets, chinchompas and white rabbits. | |
| West of the central Hunter training icon which indicates the presence of kebbits, copper longtails, ruby harvests, ferrets, chinchompas and white rabbits. East of the western coastline of the area, by trees. | 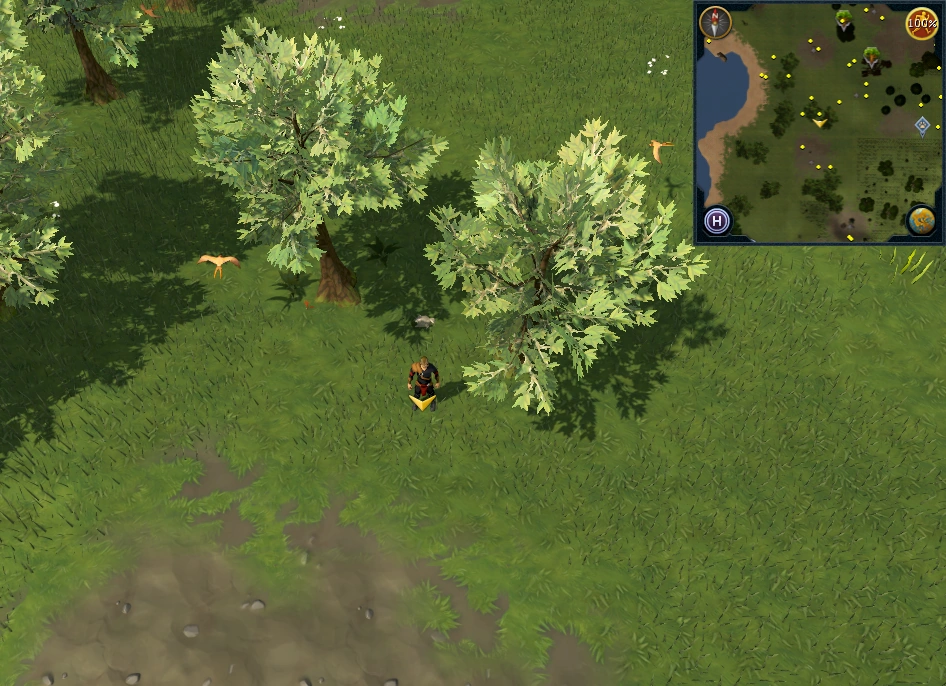 |
| West of the central Hunter training icon which indicates the presence of kebbits, copper longtails, ruby harvests, ferrets, chinchompas and white rabbits. East of the western coastline of the area, by rocks. | |
| On western coastline, west of a deadfall trap. |  |
| South-west of the central Hunter training icon which indicates the presence of kebbits, copper longtails, ruby harvests, ferrets, chinchompas and white rabbits. East of the western coastline of the area. | |
| North-west of Eagles' Peak (mountain), the mountain used in Eagles' Peak quest. |  |
| North-east of Eagles' Peak (mountain), the mountain used in Eagles' Peak quest. South of the fencing in the south-east of Piscatoris Hunter area. | 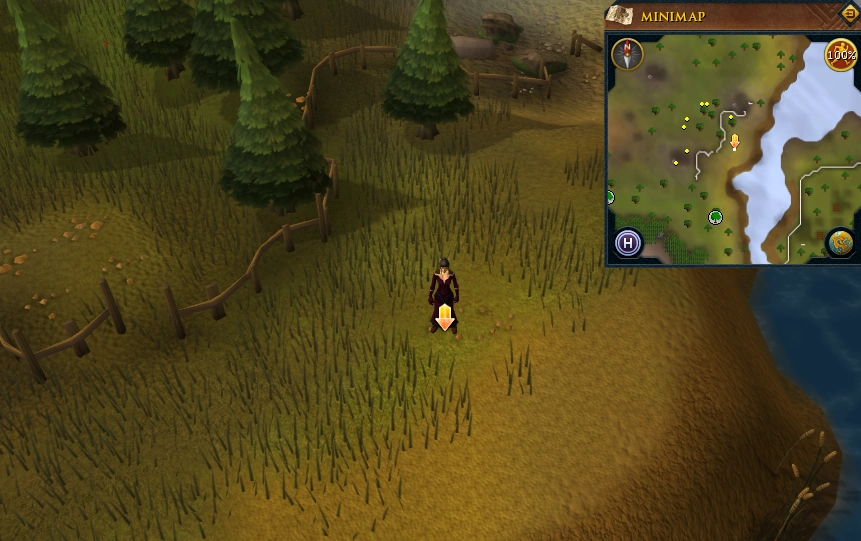 |
| North-east of the fencing in the south-east of Piscatoris Hunter area. North-east of Eagles' Peak (mountain), the mountain used in Eagles' Peak quest. | 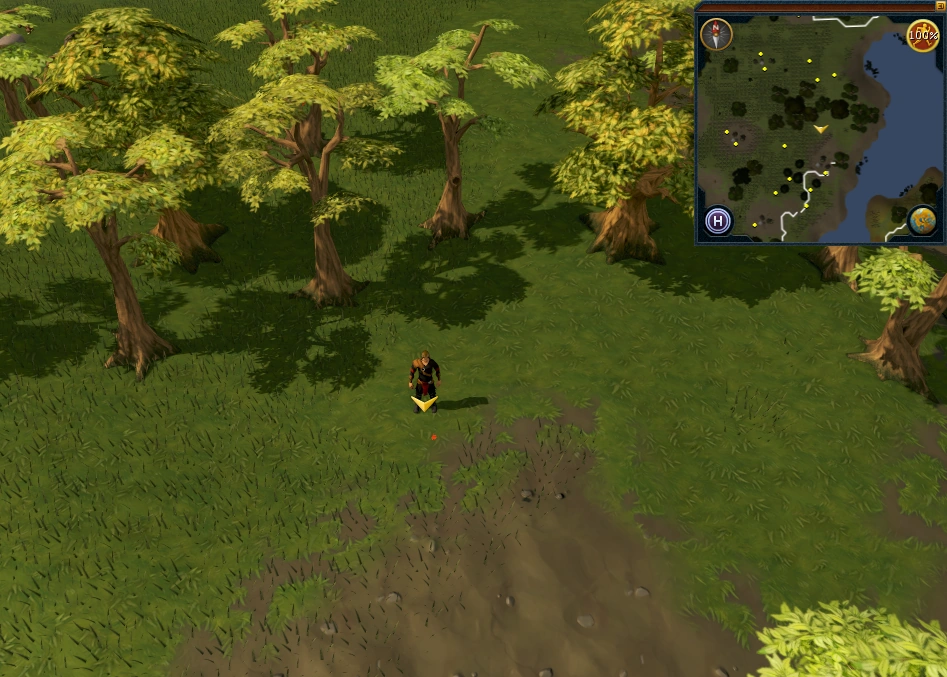 |
| North of the fencing in the south-east of Piscatoris Hunter area. North-east of Eagles' Peak (mountain), the mountain used in Eagles' Peak quest. | 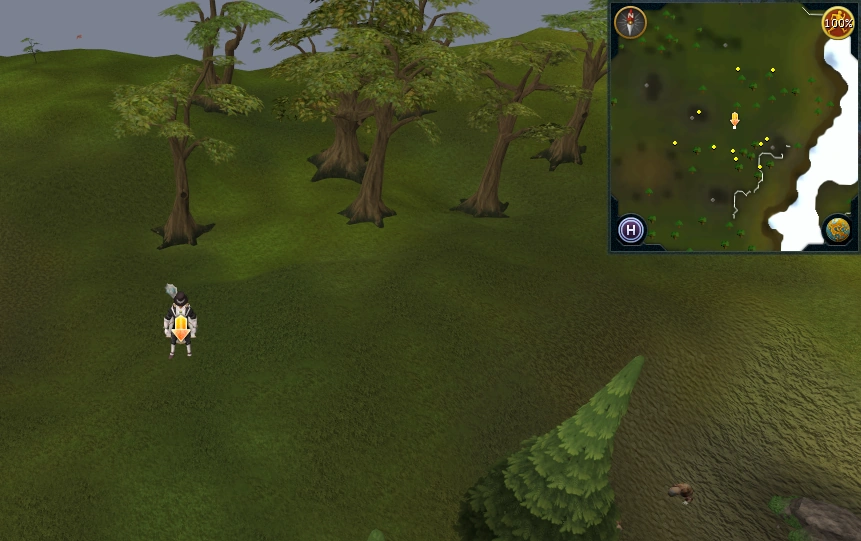 |
Prifddinas
Area Information: Prifddinas
To access Prifddinas the player must have completed Plague's End.
Scan range: 30 paces

| Possible locations | Image |
|---|---|
| Crwys, on the outcrop leading to the Prifddinas Waterfall, just south of the Prifddinas Waterfall Fishing Shop. | 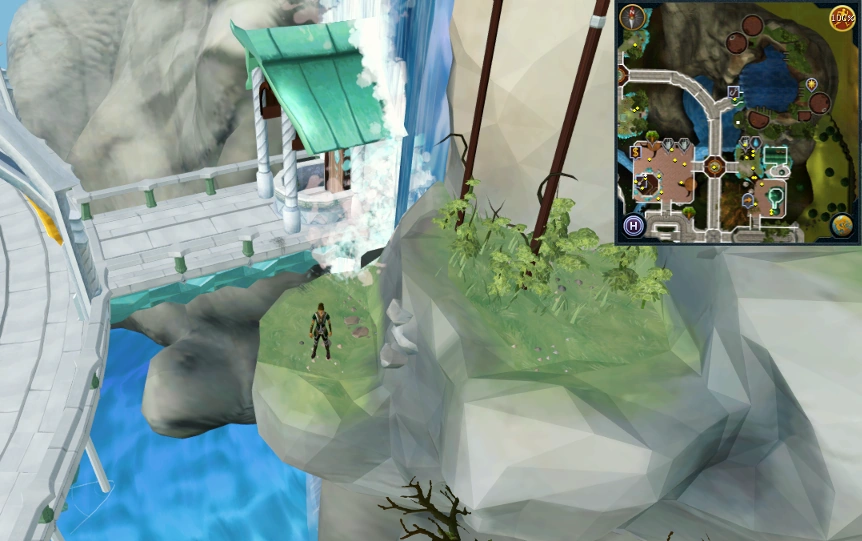 |
| Crwys, south-east of elder tree patch. | 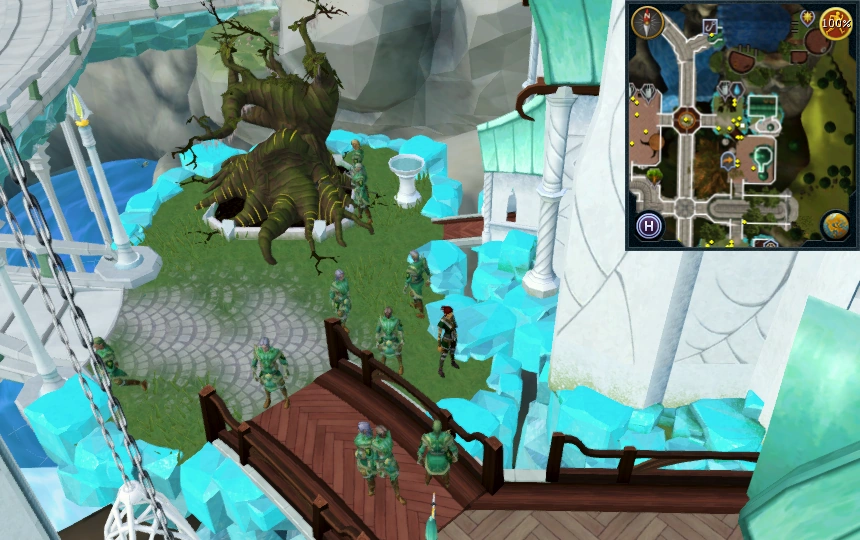 |
| At the eastern entrance. | 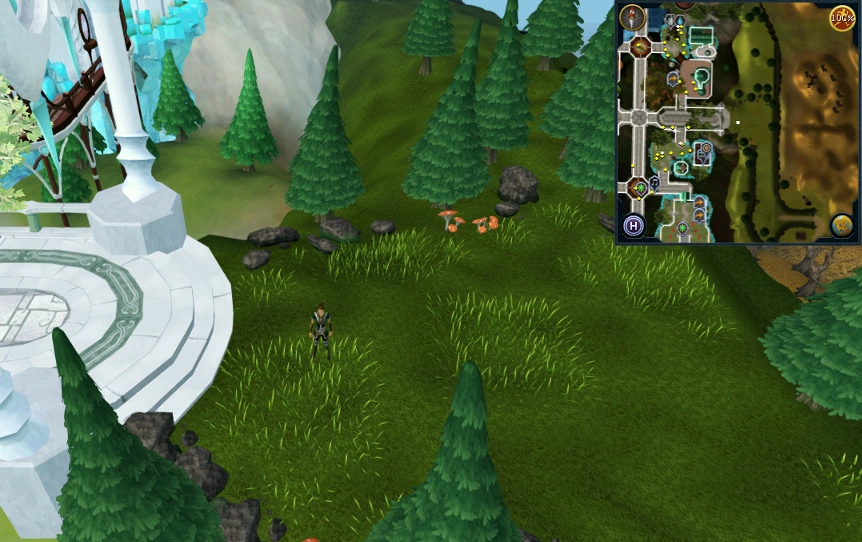 |
| Trahaearn, next to adamantite ore rocks. |  |
| Trahaearn district, south-east of the Seren stones. | 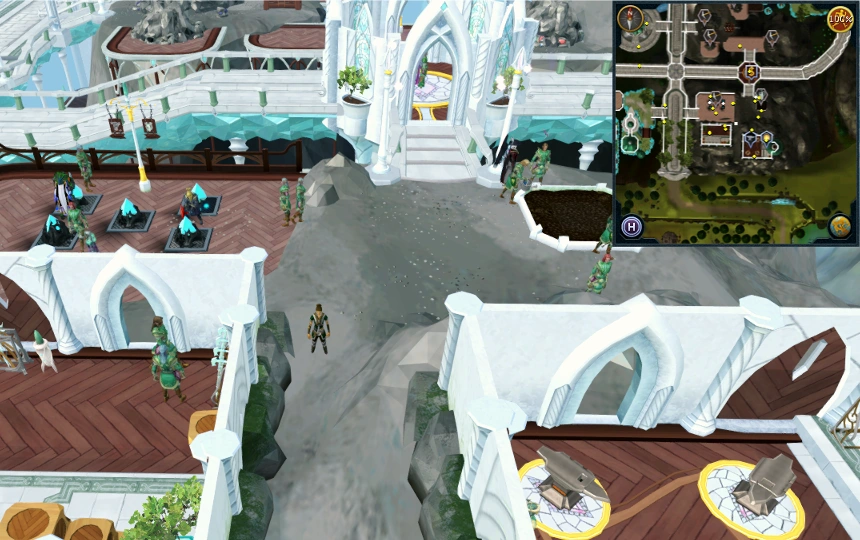 |
| South-west of the southern entrance gate. |  |
| Just south of the southern entrance gate. One pace south of the location pictured. |  |
| South-east of the entrance gate, just south-west of the Prifddinas monument. |  |
| South-east of the entrance gate, just south-east of the Prifddinas monument. | 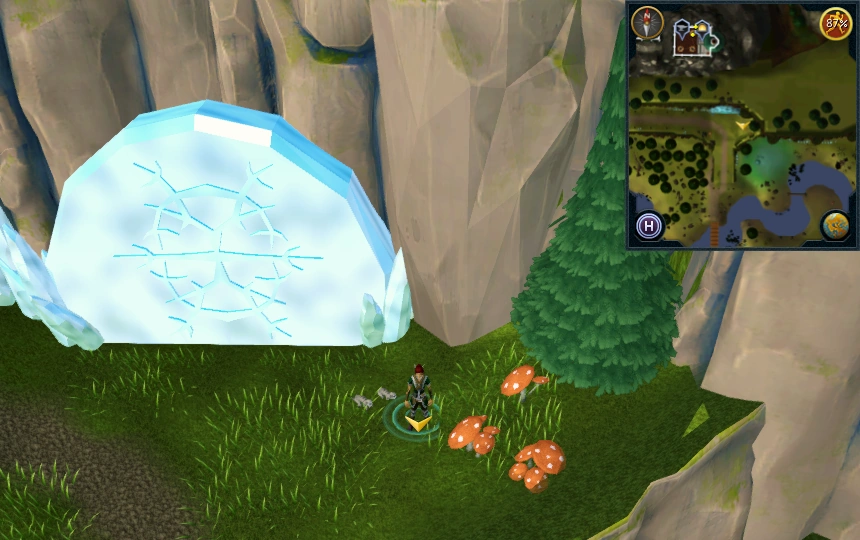 |
| Iorwerth, west of the manor containing the crystal chest. | 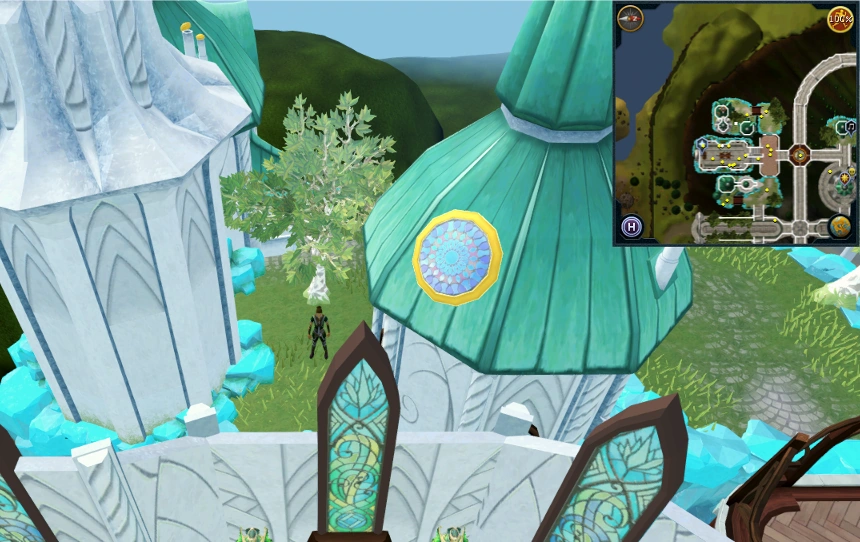 |
| Iorwerth, just south of the Iorwerth musician, west of Morvran. One pace east of the location pictured. | 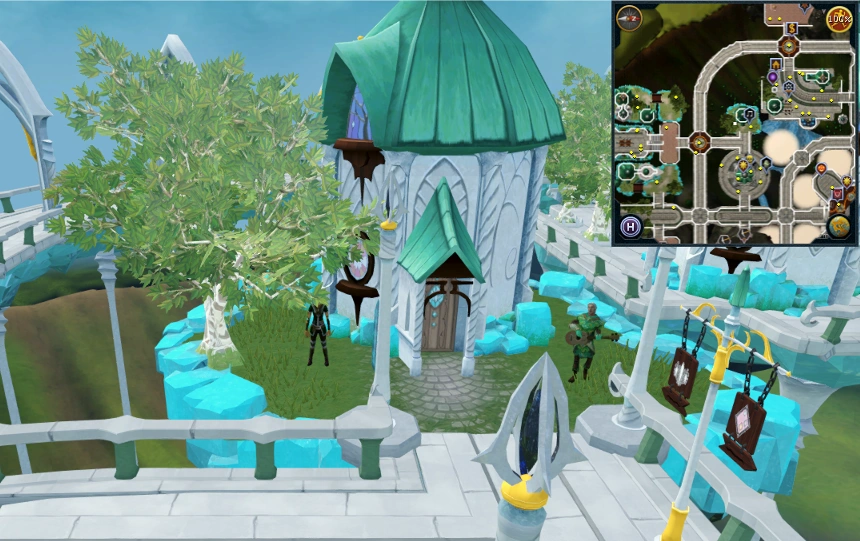 |
| Amlodd, just south of Daffyd's house. | 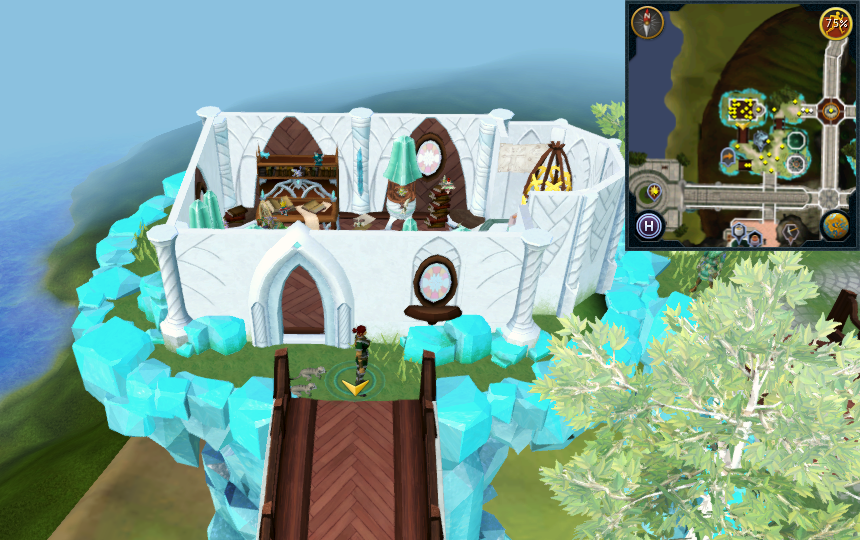 |
| Amlodd, on island east of Daffyd's house. | 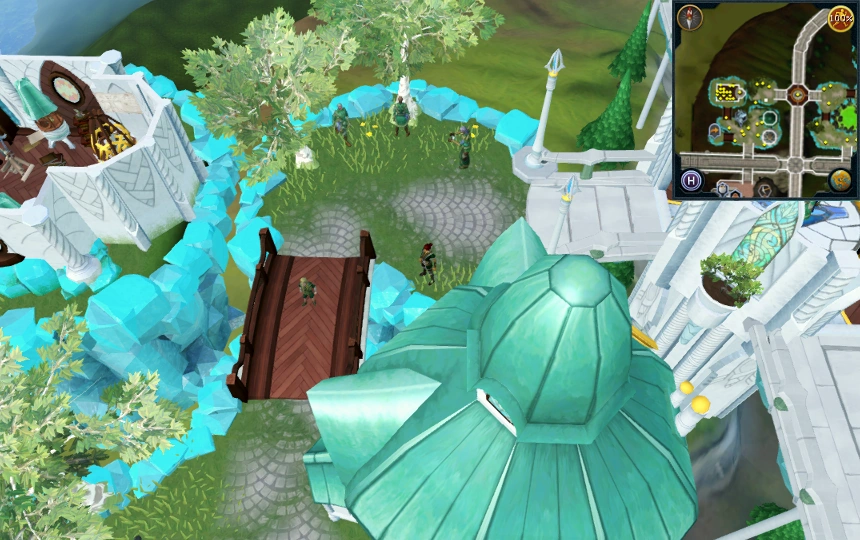 |
| Ithell, next to the crystal-flecked sandstone. |  |
| Hefin, near light creature. | 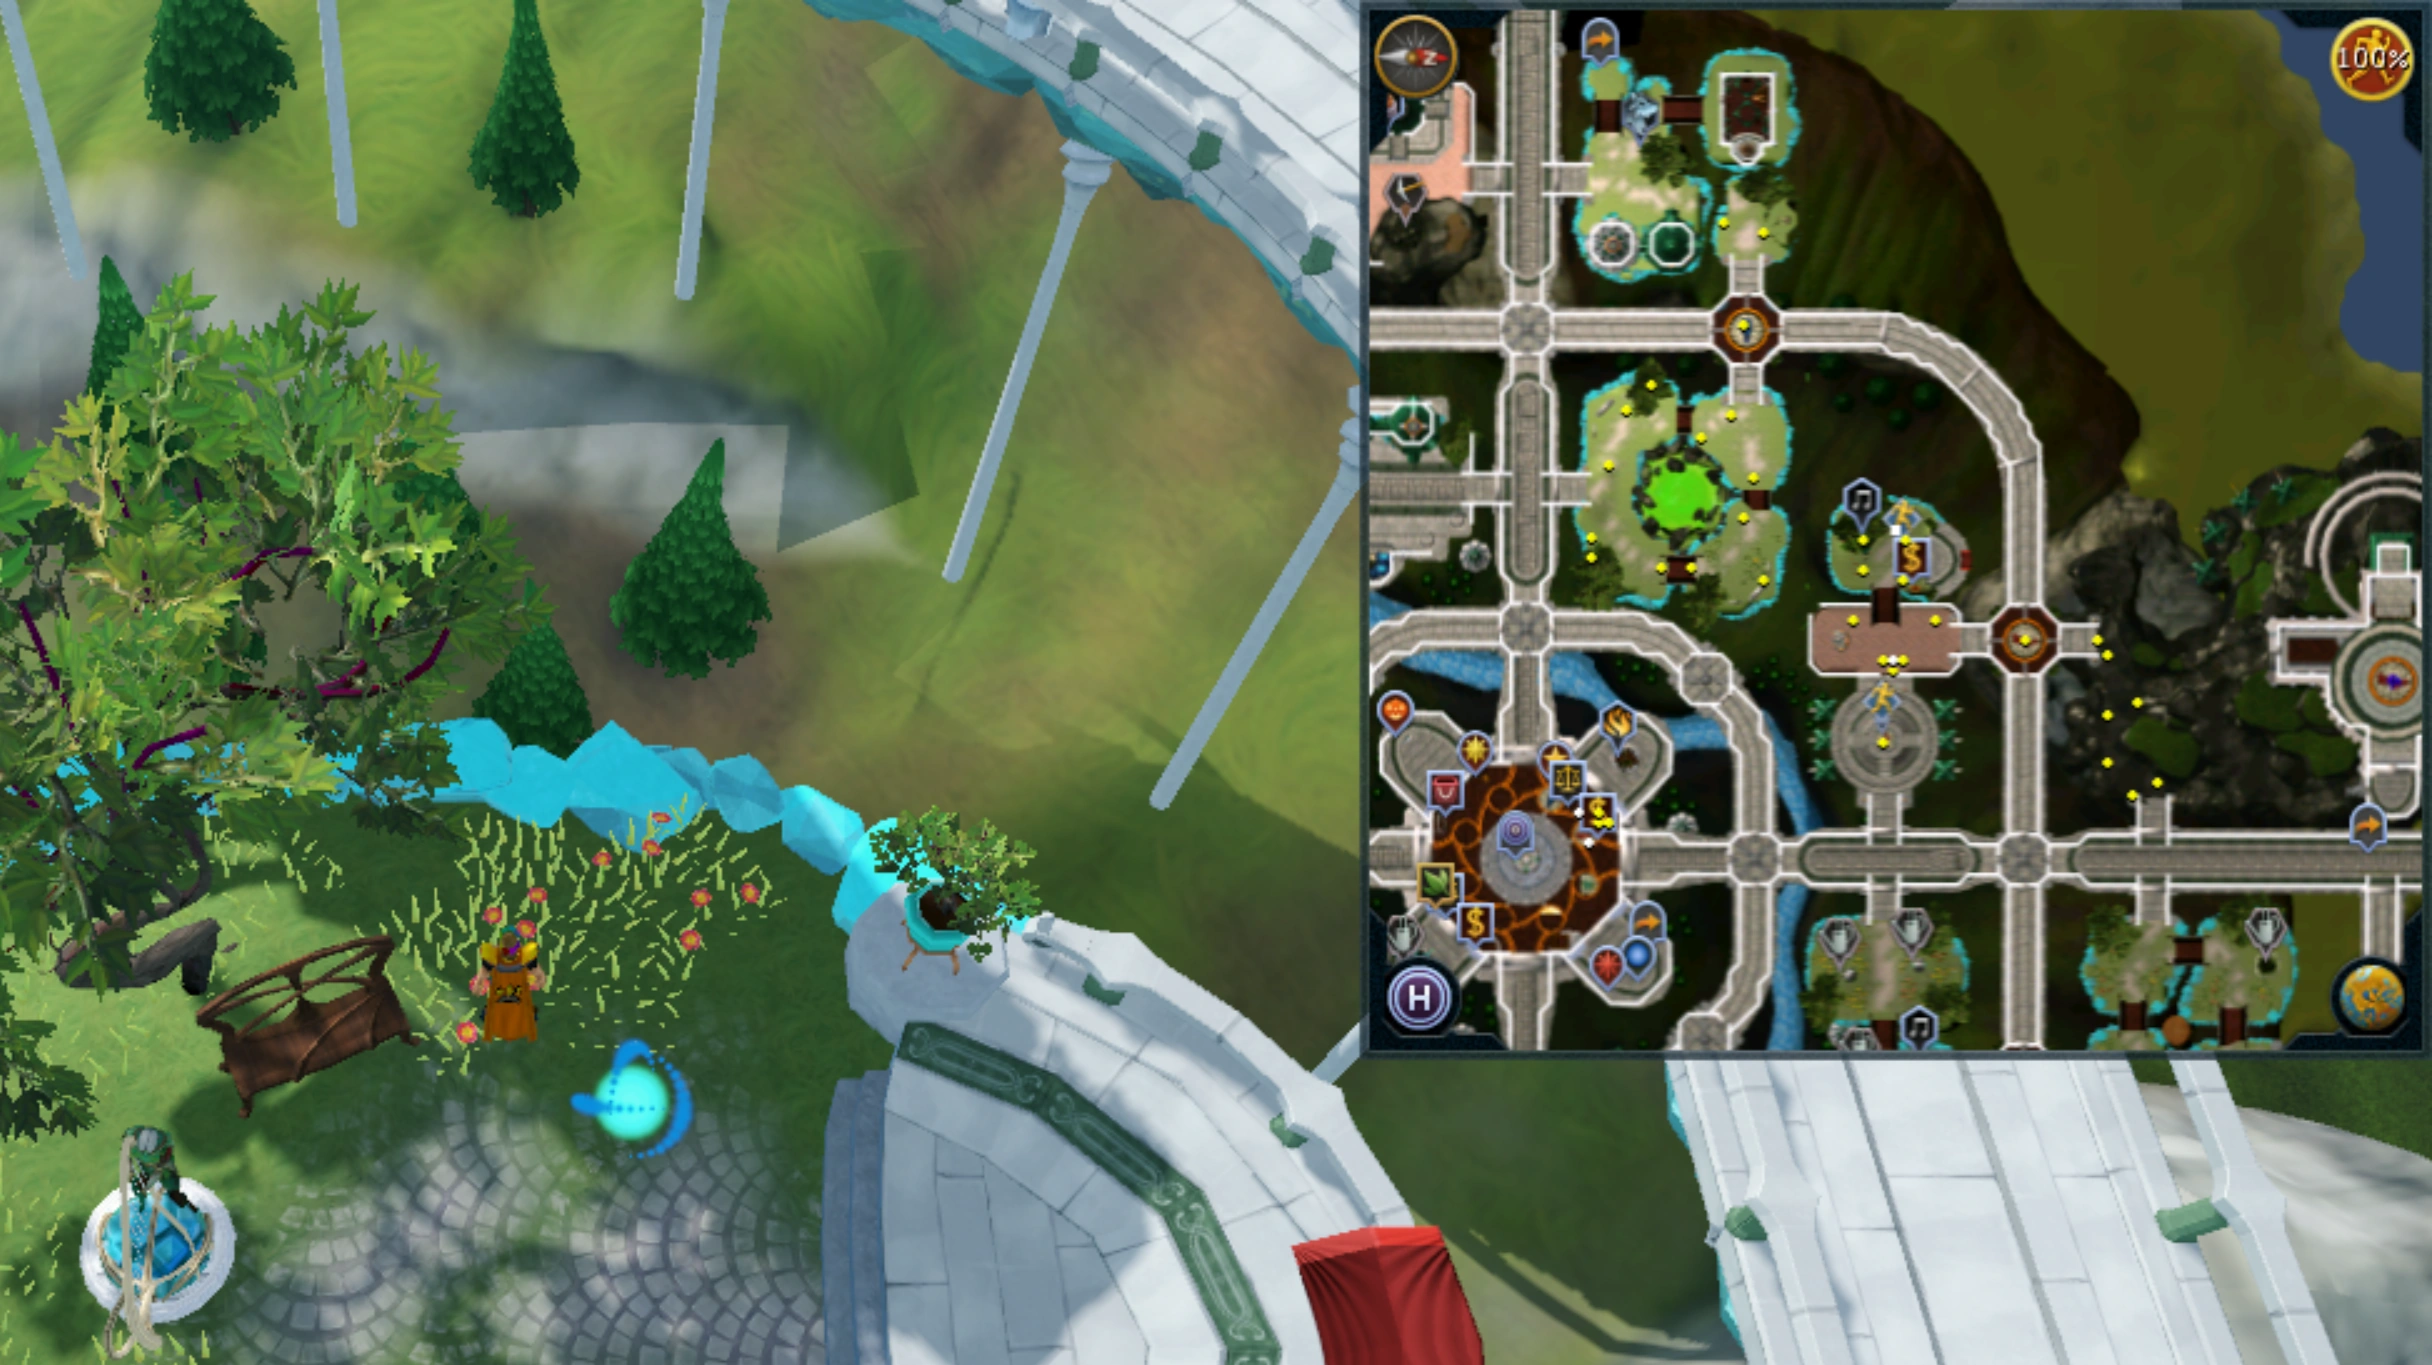 |
| Hefin, south-east of Hefin Cathedral. | 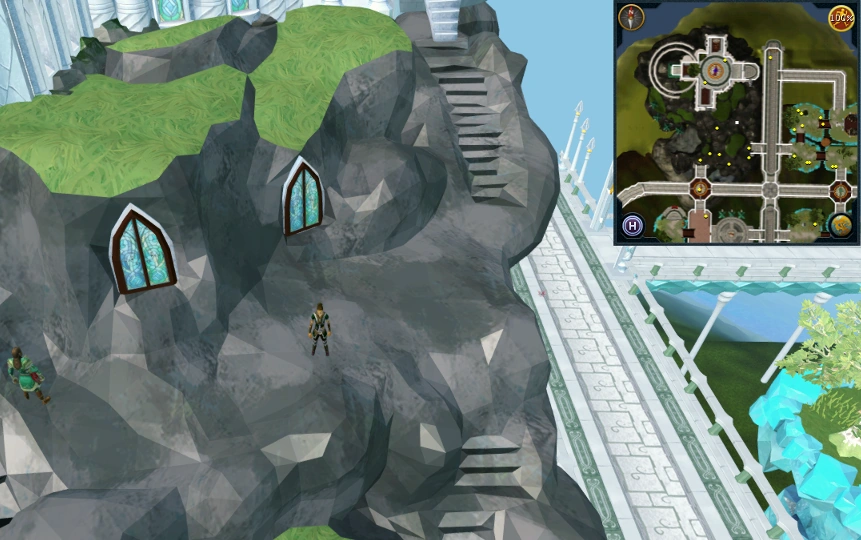 |
| Meilyr, south-east of the fruit tree patch. | 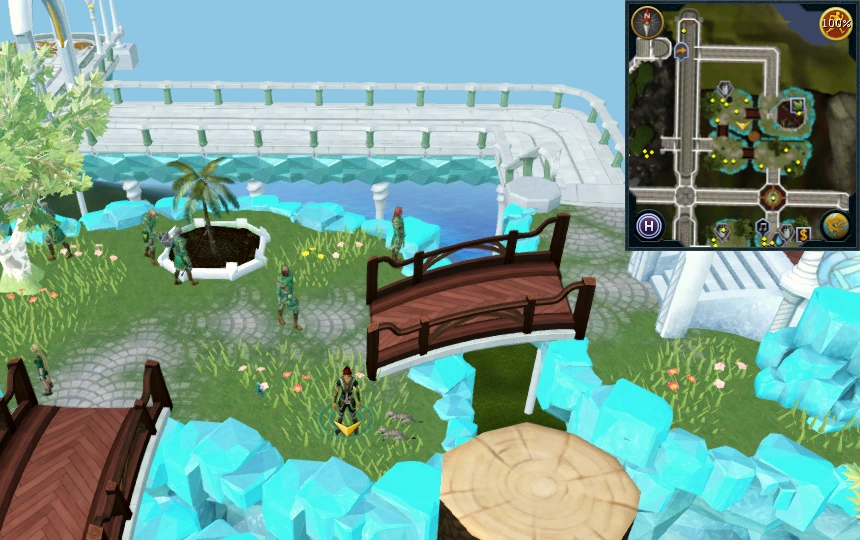 |
| Meilyr, west of Gorajo hoardstalker dungeon. | 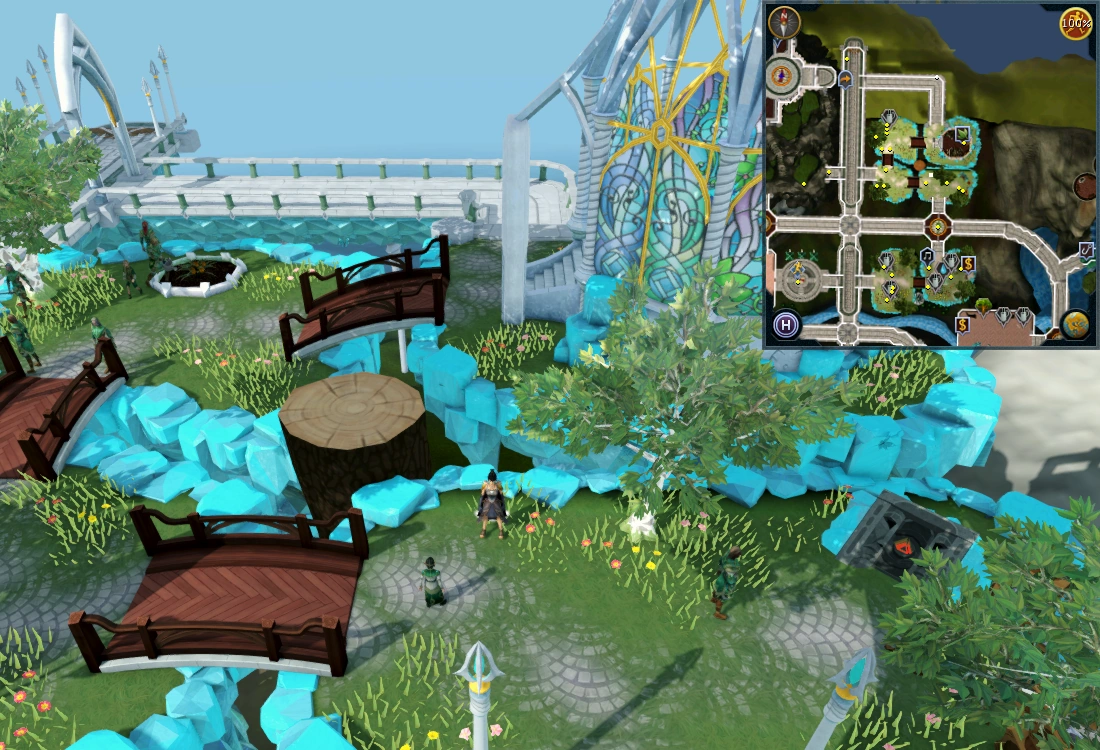 |
|
Other possible locations
| |
Taverley Dungeon
Area Information: Taverley Dungeon
To access all areas of Taverley Dungeon the player will need either a dusty key or level 70 Agility. Players may find this map, showing the locations of the dungeon's monsters, useful when navigating the area.
Scan range: 22 paces
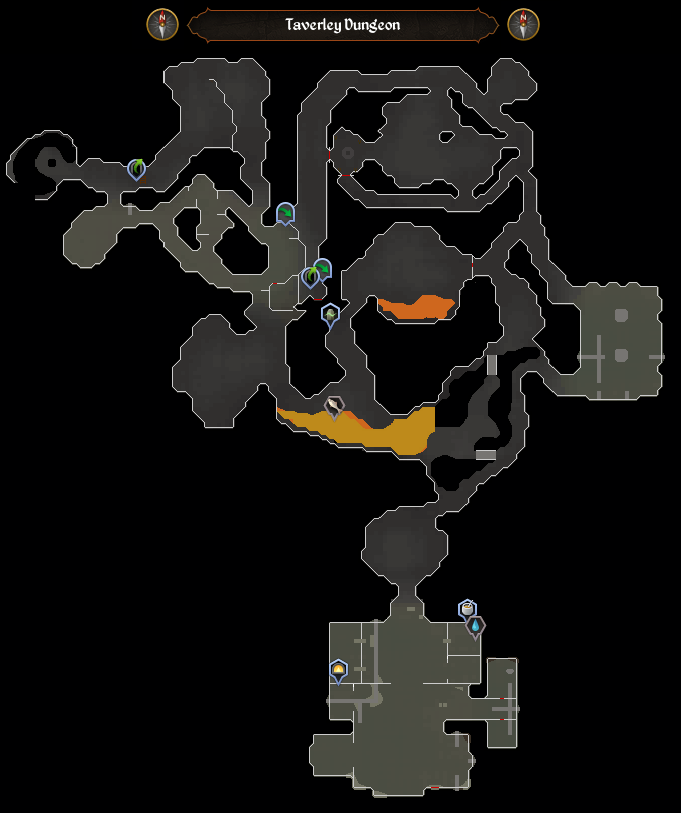
| Possible locations | Image |
|---|---|
| Just north of the entrance to the dungeon, by the obstacle pipe Agility shortcut which requires level 70 Agility to use. | 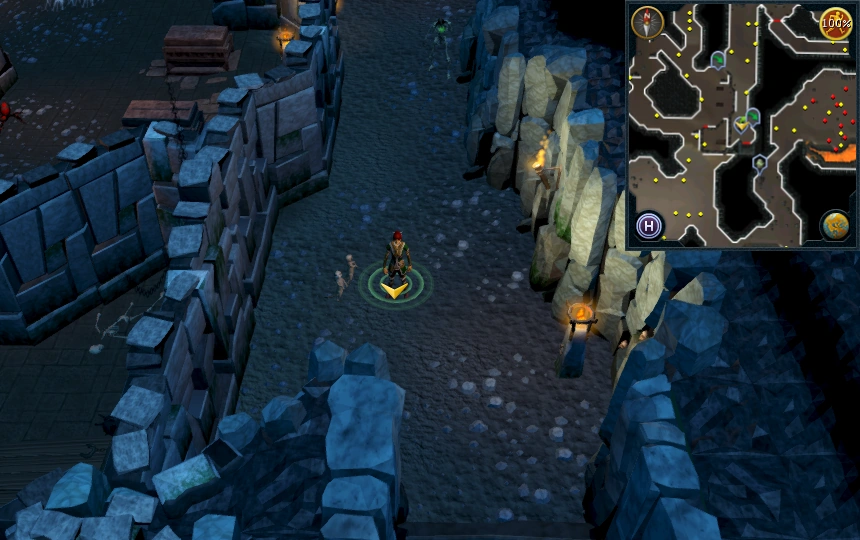 |
| In the passage north of the entrance. | 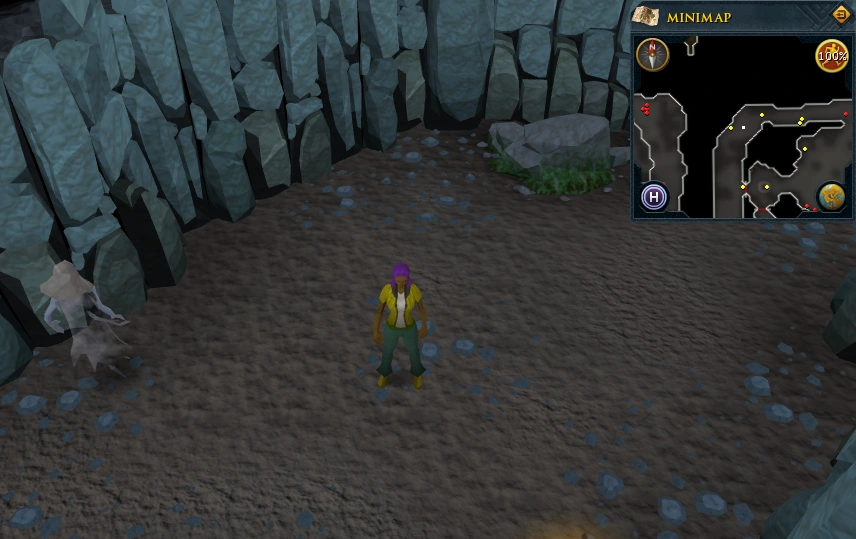 |
| North-east of the dungeon's entrance, in the chamber with the Cauldron of Thunder. | 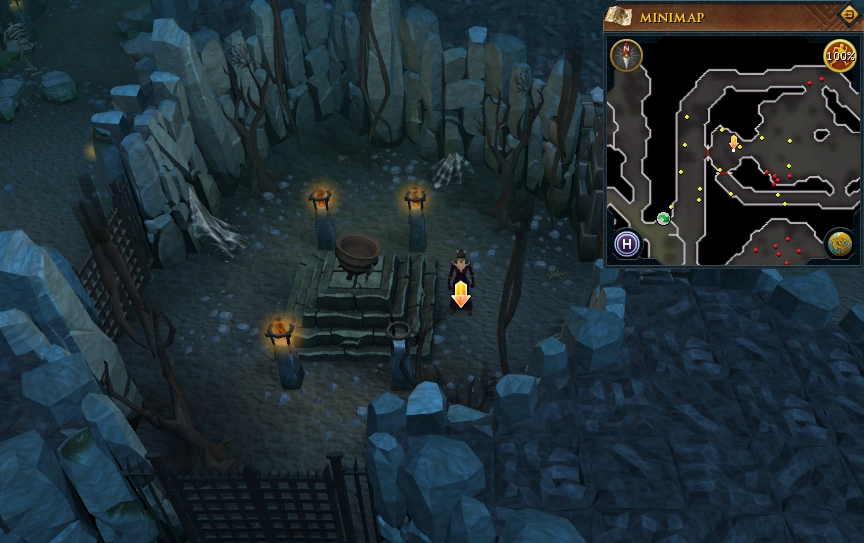 |
| North-east of the chamber with the Cauldron of Thunder. | 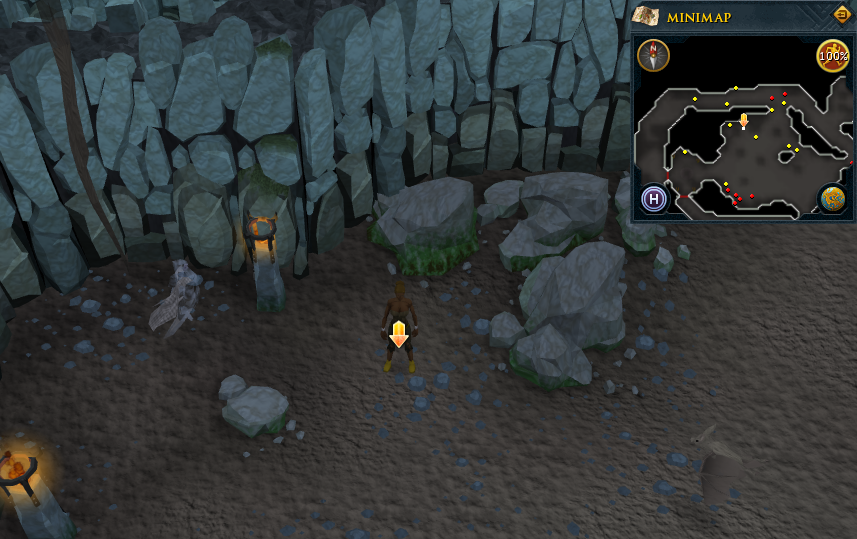 |
| In the north-east corner of the dungeon, in the chamber with chaos druids and their leader Ikadia the Exile. One step north-east of the location pictured. | 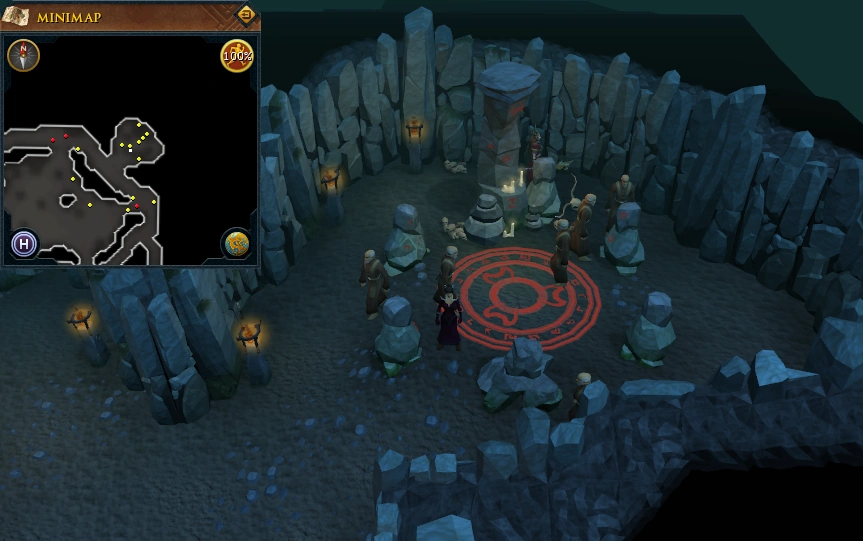 |
| In the eastern part of the dungeon. In the passage containing black knights north-west of the chamber of magic axes. One pace south of the location pictured. | 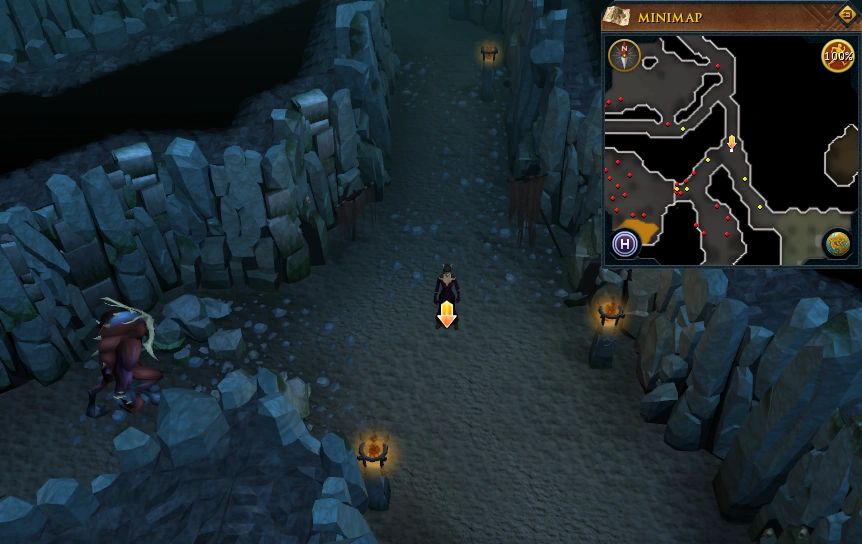 |
| In the eastern part of the dungeon. Just outside the north-west corner of the chamber containing magic axes. |  |
| In the eastern part of the dungeon. On the east side of the chamber containing magic axes. | 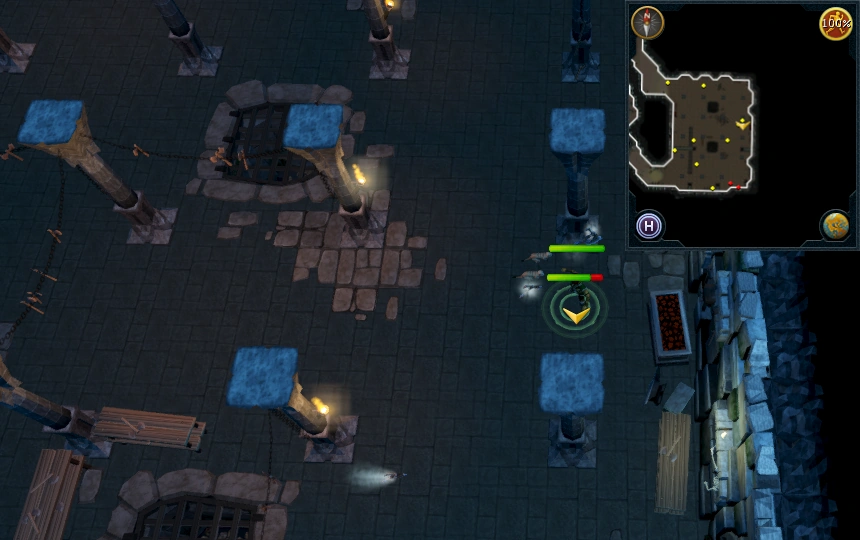 |
| In the eastern part of the dungeon, south-east of the lava eel Fishing spot and the location where the dusty key spawns. West of chaos dwarves. | 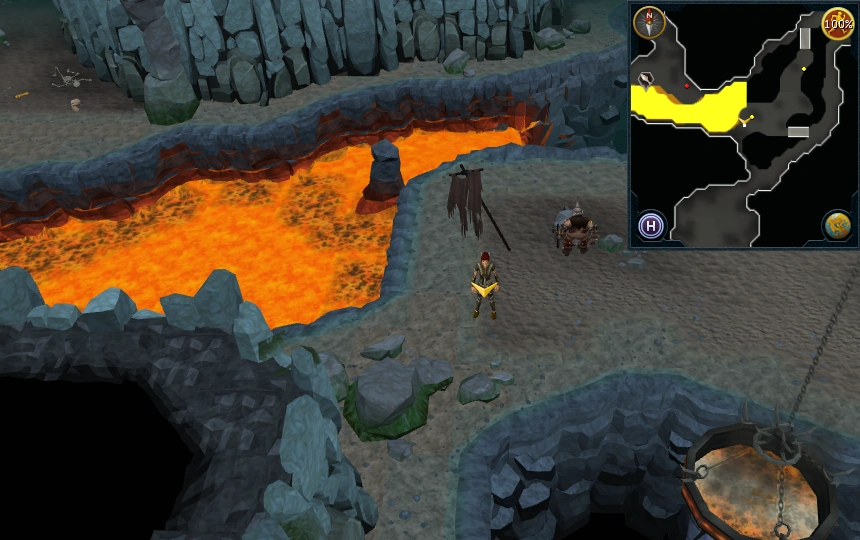 |
| In a small area along the narrow path towards the chaos dwarves and black knights, which has some Poison Scorpions lurking about. | 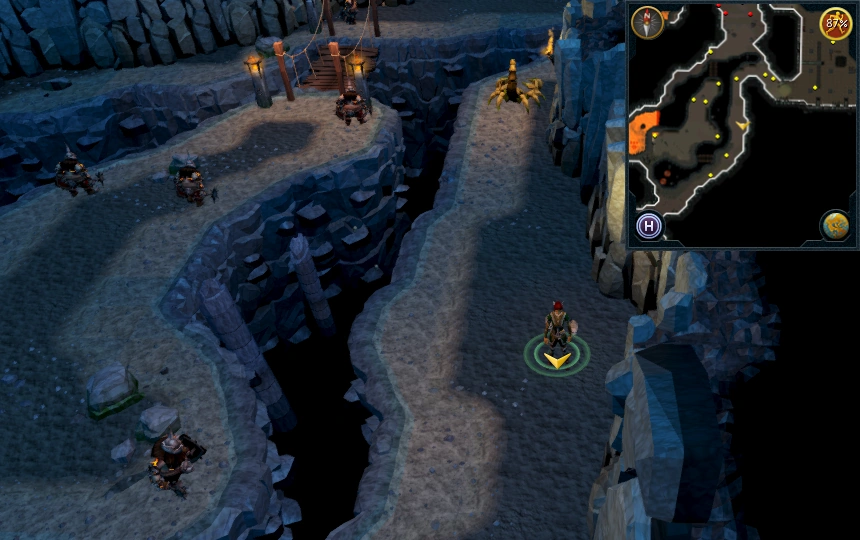 |
| In the southern part of the dungeon. In the centre of the chamber of hill giants. | 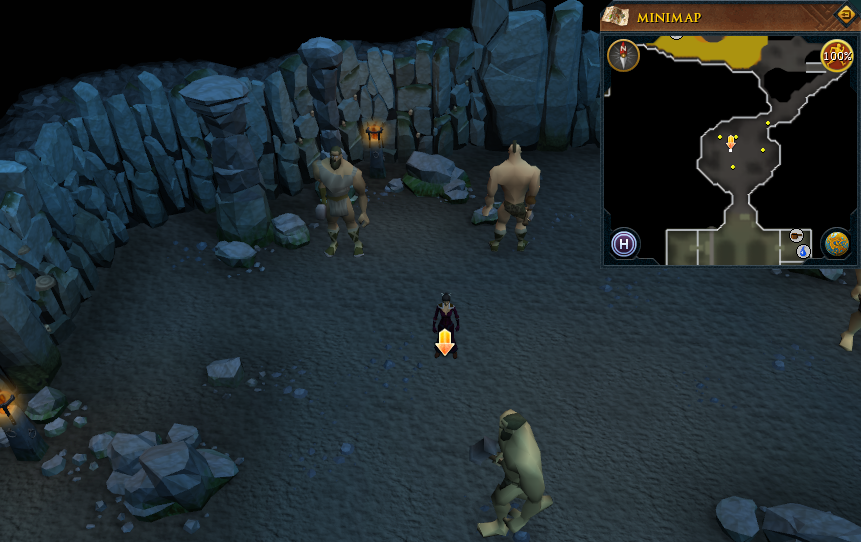 |
| In the southern part of the dungeon. South of the chamber of hill giants and north of the chamber of black knights. | 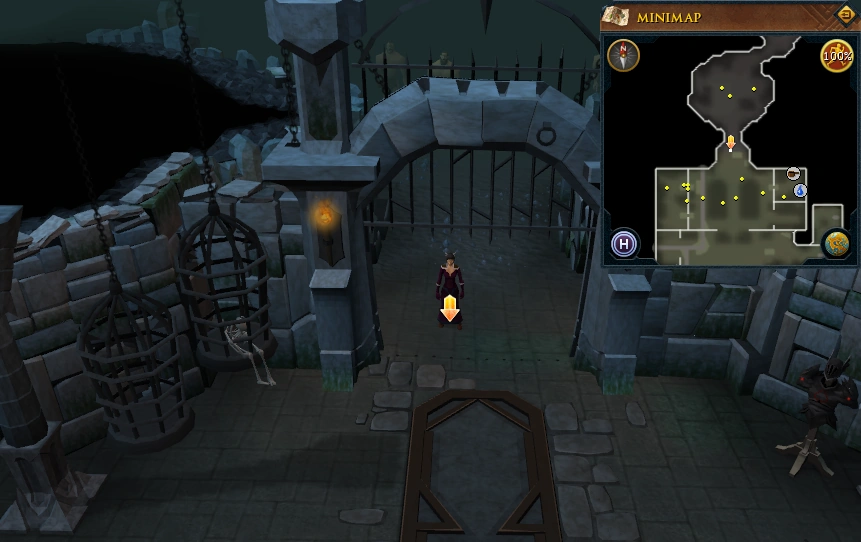 |
| In the southern part of the dungeon. On the north side of the chamber of black knights, south-west of the building containing a water source and Cooking range. | 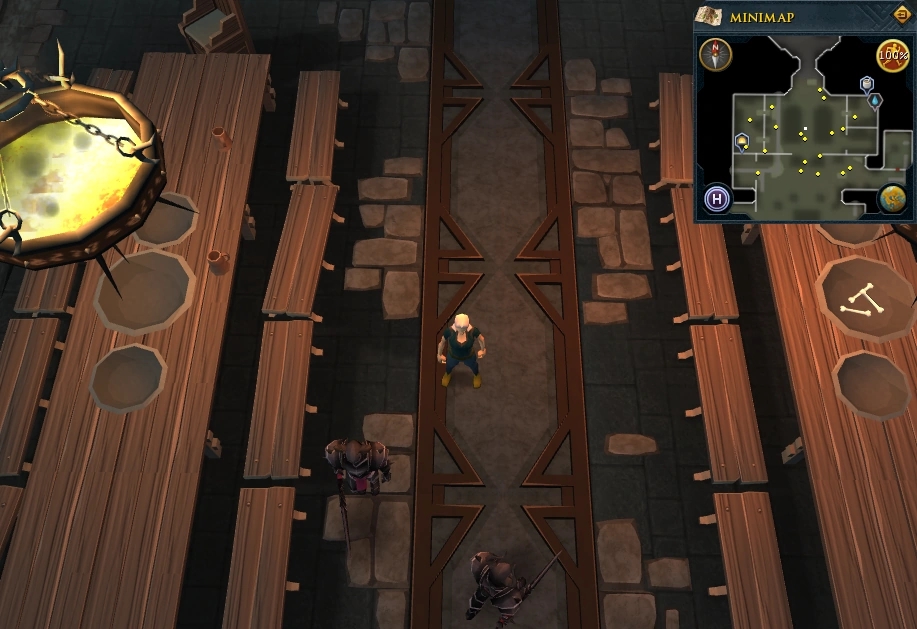 |
| In the southern part of the dungeon. On the east side of the chamber of black knights, by the Jailer. If a player does not have a dusty key then they can obtain one here by killing the Jailer to get a jail key, using the jail key to free Velrak the Explorer from his prison cell and asking him if he knows any good places to explore. |  |
| In the north-west corner of the chamber of blue dragons. Near the entrance to the Taverley resource dungeon. |  |
| In passage south-west of the chamber of blue dragons, near to a small obelisk. |  |
| In the centre of the dungeon, north-east of the Fishing spot for lava eels near the dusty key spawn point. The player must either use a dusty key on the locked door on the east side of the chamber of blue dragons or use one of the Agility shortcuts near the dungeon entrance in order to travel to this location. One pace west of the location pictured. | 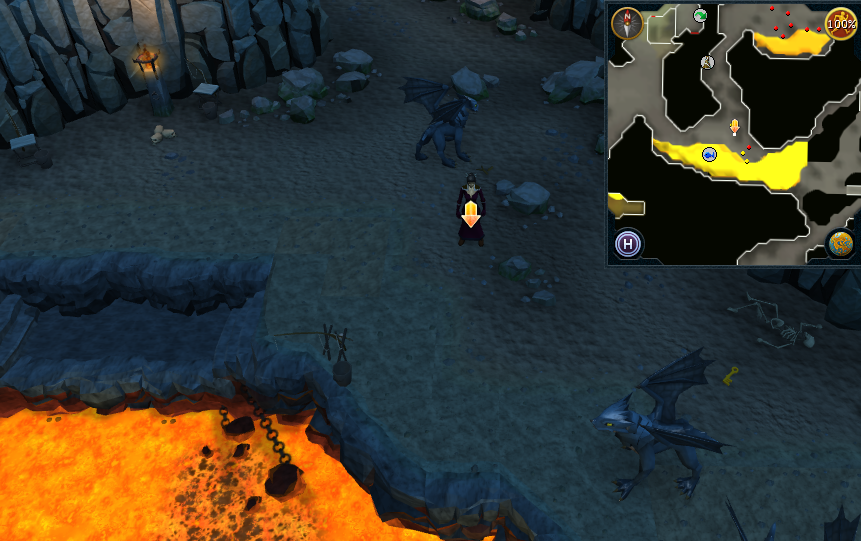 |
| In the western part of the dungeon, on the north side of the chamber of black demons. The player must either use a dusty key on the locked door on the east side of the chamber of blue dragons or use one of the Agility shortcuts near the dungeon entrance in order to travel to this location. | 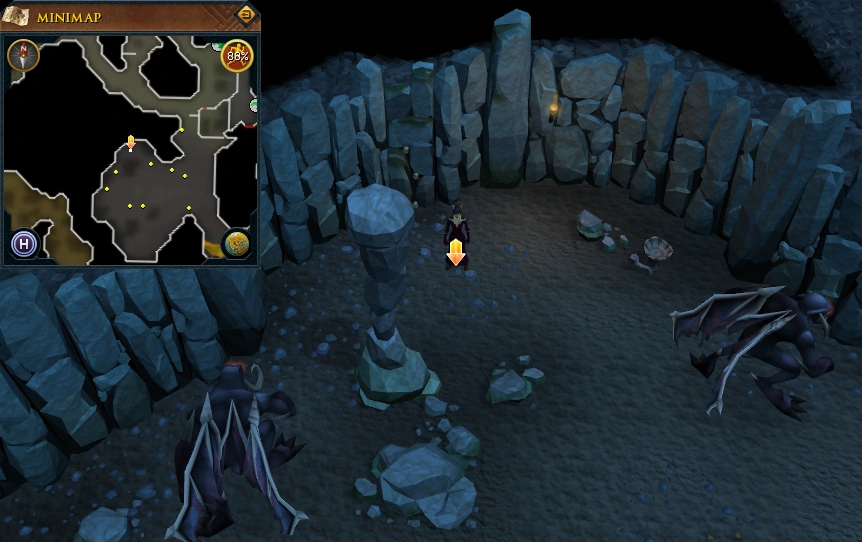 |
| On the path between black demons and poison spiders. | 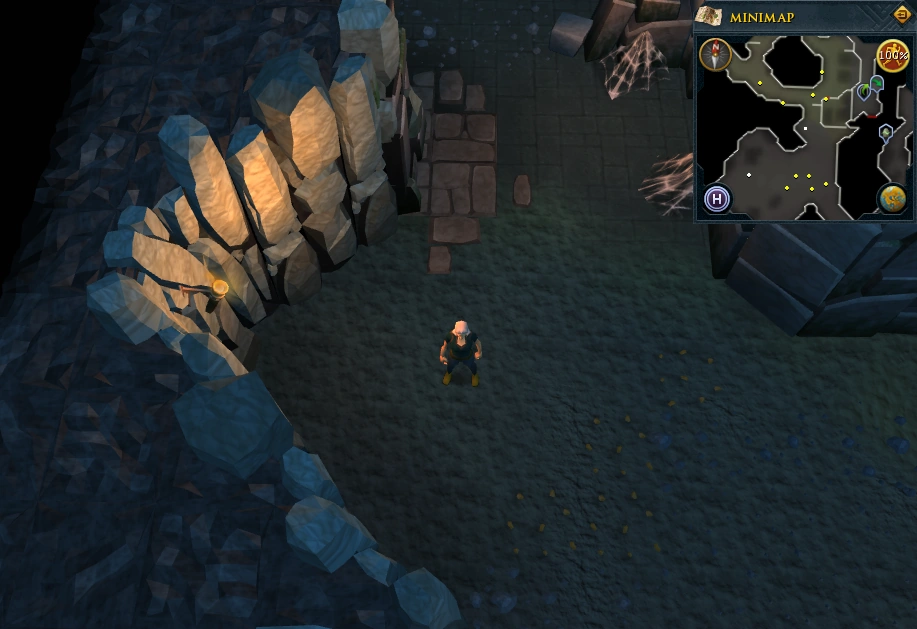 |
| In the centre of the dungeon, north-west of the entrance in the area with poison spiders. The player must either use a dusty key on the locked door on the east side of the chamber of blue dragons or use one of the Agility shortcuts near the dungeon entrance in order to travel to this location. |  |
| In the north-west part of the dungeon, in the chamber with monks of Zamorak. The player must either use a dusty key on the locked door on the east side of the chamber of blue dragons or use one of the Agility shortcuts near the dungeon entrance in order to travel to this location. |  |
| In the north-west part of the dungeon, south-east of the Obelisk of Fire. The player must either use a dusty key on the locked door on the east side of the chamber of blue dragons or use one of the Agility shortcuts near the dungeon entrance in order to travel to this location. | 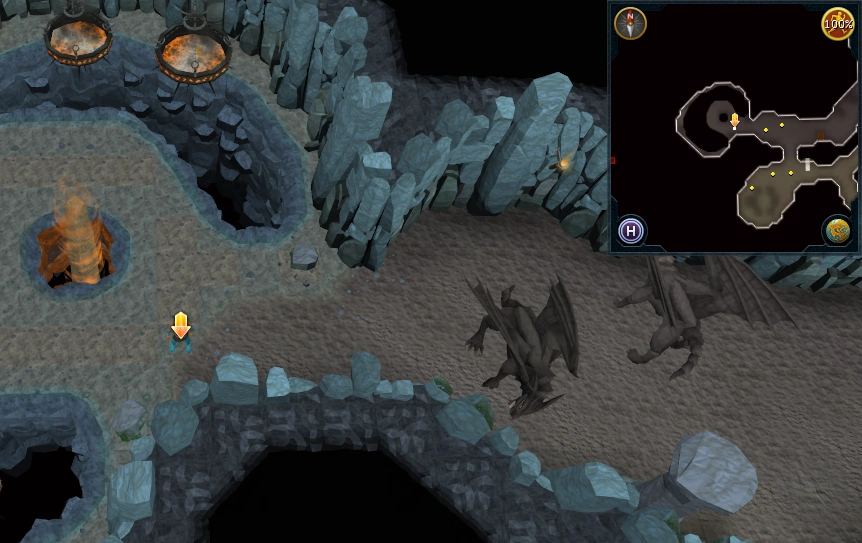 |
| South-west exit of magic axe area, four steps west of the southwestern pillar in the room. | 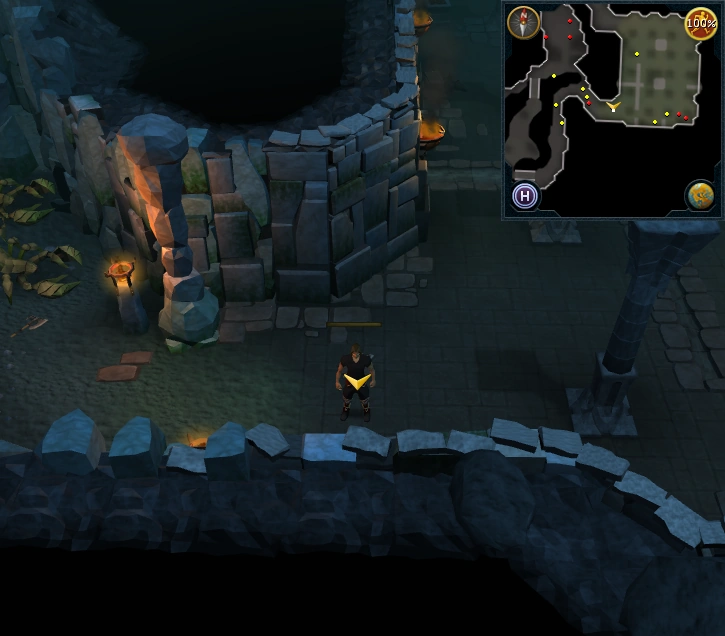 |
|
Other possible locations
| |
Varrock and the Grand Exchange
Area Information: Varrock
Scan range: 16 paces
| Possible locations | Image |
|---|---|
| West side of the Grand Exchange. | 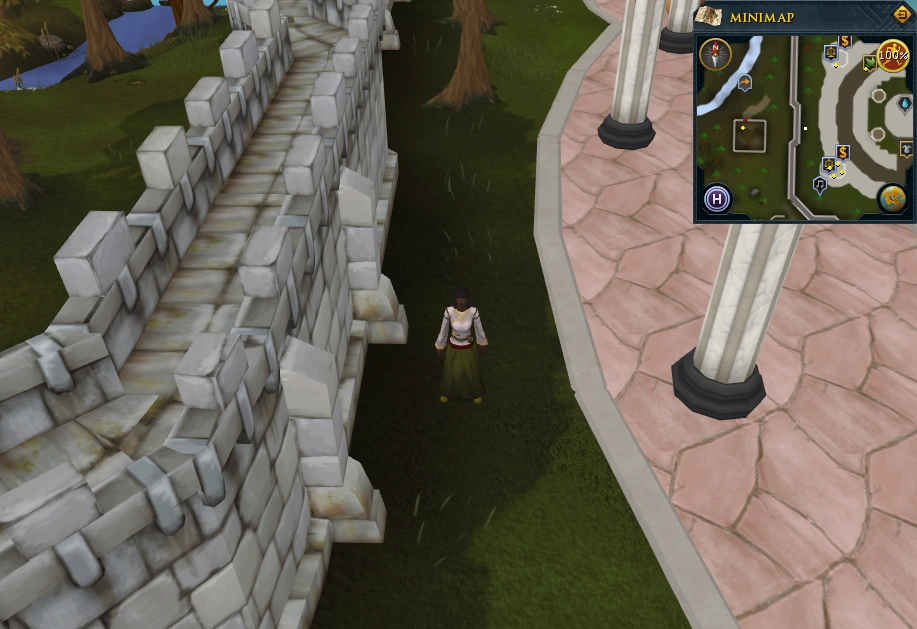 |
| In the south-east corner of the Grand Exchange. |  |
| In the north-east corner of the Grand Exchange, by the spirit tree unlocked after completing the Tree Gnome Village quest. |  |
| East side of the Grand Exchange, by the path leading to Varrock Palace. | 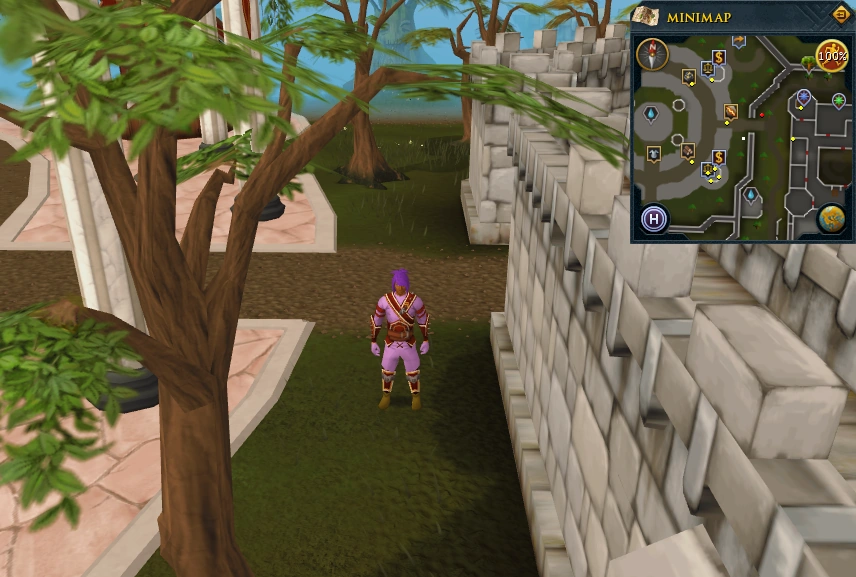 |
| North-east of Varrock Palace, in the palace's grounds north of the garden used in the Garden of Tranquillity quest. East of the rare trees icon indicating the presence of yew trees and south of the cage containing a grizzly bear. One pace south of the location pictured. | 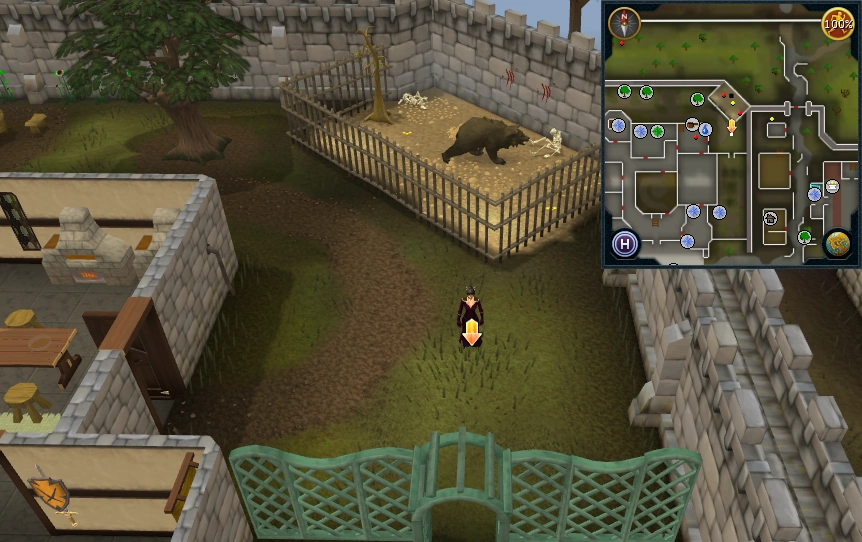 |
| In the courtyard south of Varrock Palace, between two fountains. |  |
| In the grassy area in the centre of Varrock Palace. |  |
| West of Varrock square. South-east of Varrock's west bank, just west of the tent containing Gypsy Aris. | 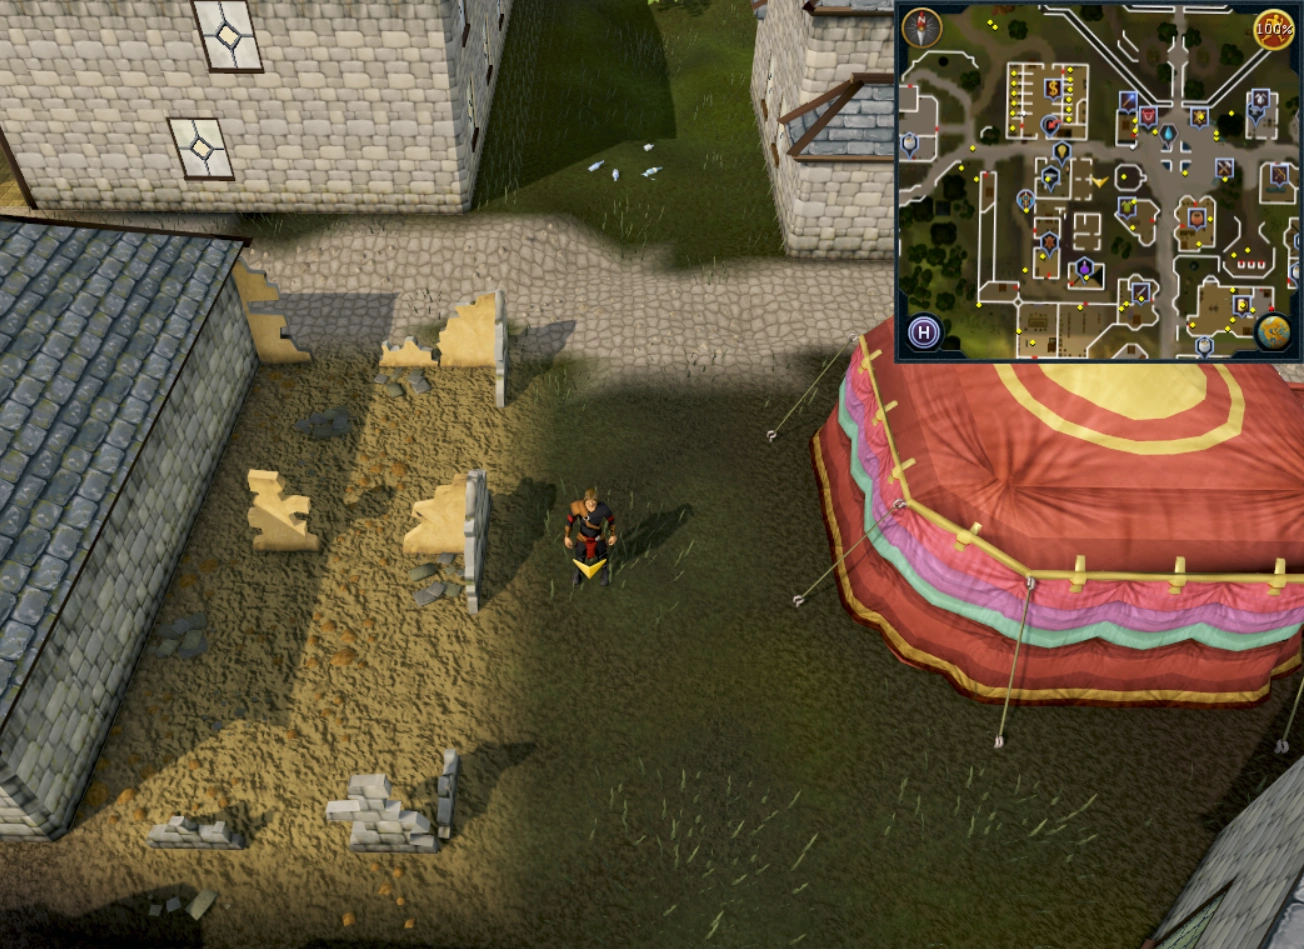 |
| North of the Apothecary. | 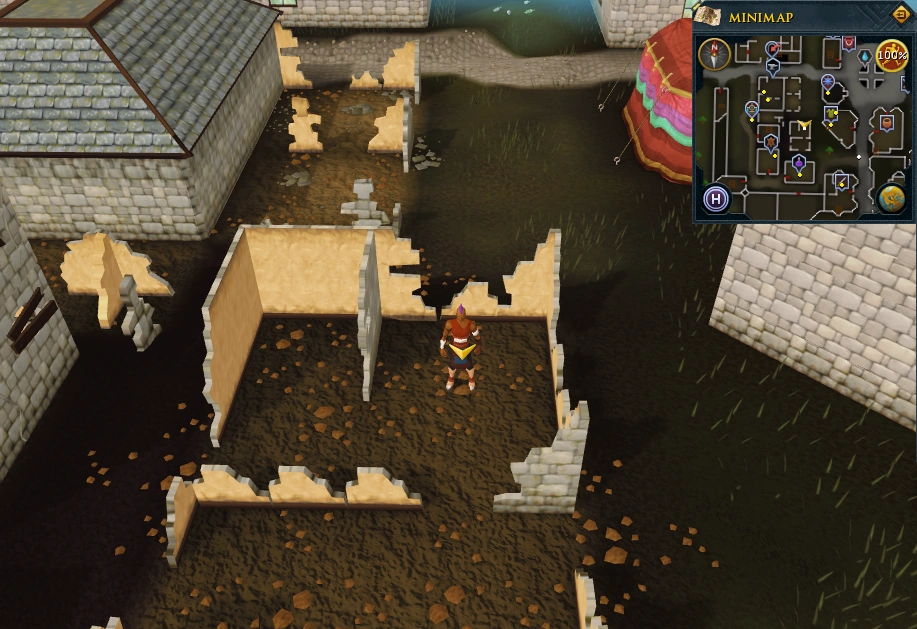 |
| South of Varrock square. West of Varrock General Store and south of Thessalia's Fine Clothes (the clothes shop where players can change their default clothing). | 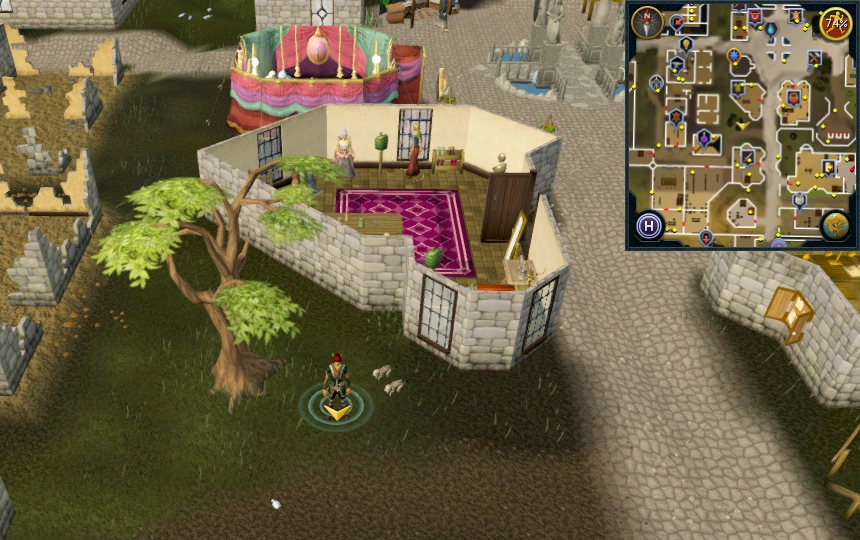 |
| South-west of Varrock's west bank and west of Varrock Tanner, within the south-west city wall. | 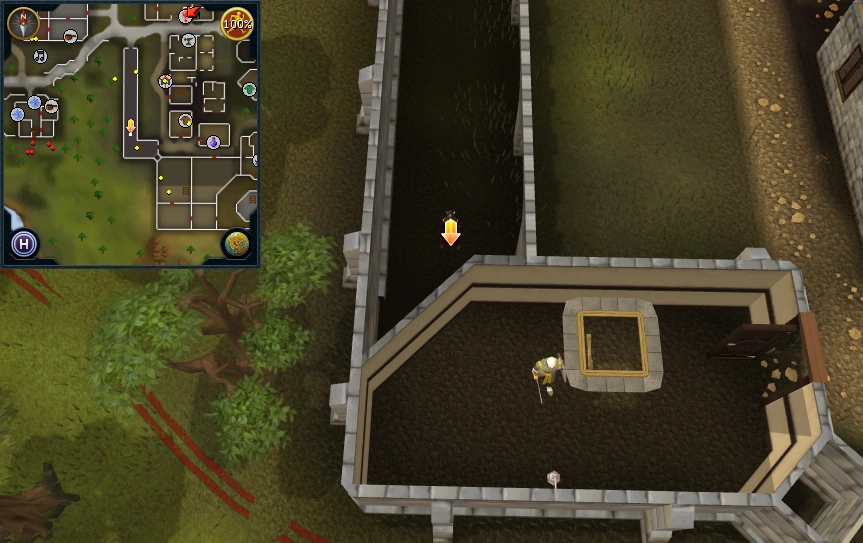 |
| In the south of the city. Just east of the Black Arm Gang's headquarters used in the Shield of Arrav quest and north-west of Varrock lodestone. |  |
| In the south of the city. North of Varrock lodestone and east of the Black Arm Gang's headquarters used in the Shield of Arrav quest. | 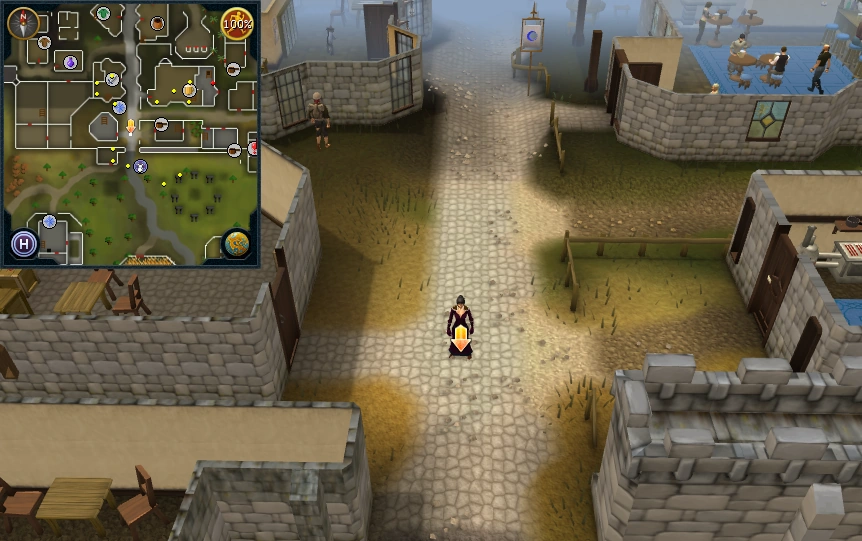 |
| In the south of the city. South of the Blue Moon Inn and just west of the building containing the entrance to the Phoenix Gang's headquarters used in the Shield of Arrav quest. |  |
| In the south of the city. South-east of the Blue Moon Inn and just east of the building containing the entrance to the Phoenix Gang's headquarters used in the Shield of Arrav quest. | 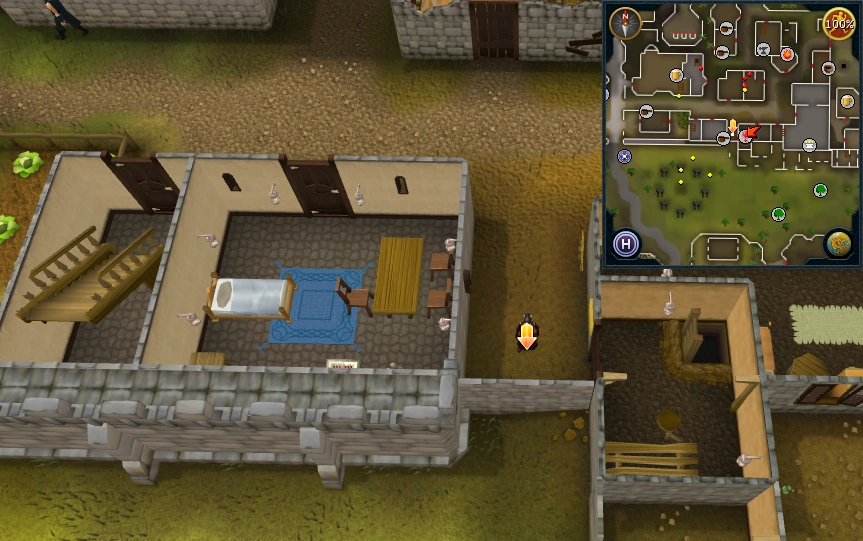 |
| In the south-east of the city, south of Aubury's Rune Shop (the Magic shop containing a teleport to the Rune Essence Mine). |  |
| In the members-only area in the south-east of the city. South of the Dancing Donkey Inn in the southeastern corner. |  |
| In the members-only area in the south-east of the city. North-east of the Dancing Donkey Inn and west of the Fancy Clothes Store. | 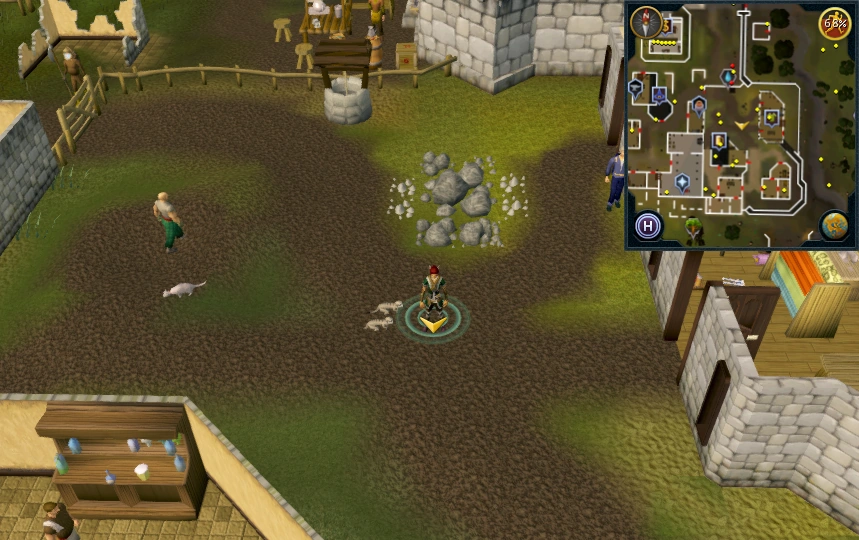 |
| South-east of Varrock square. In the area with pillories, east of Varrock General Store. |  |
| Just north of the Blue Moon Inn and south of Varrock General Store, south of Varrock square. | 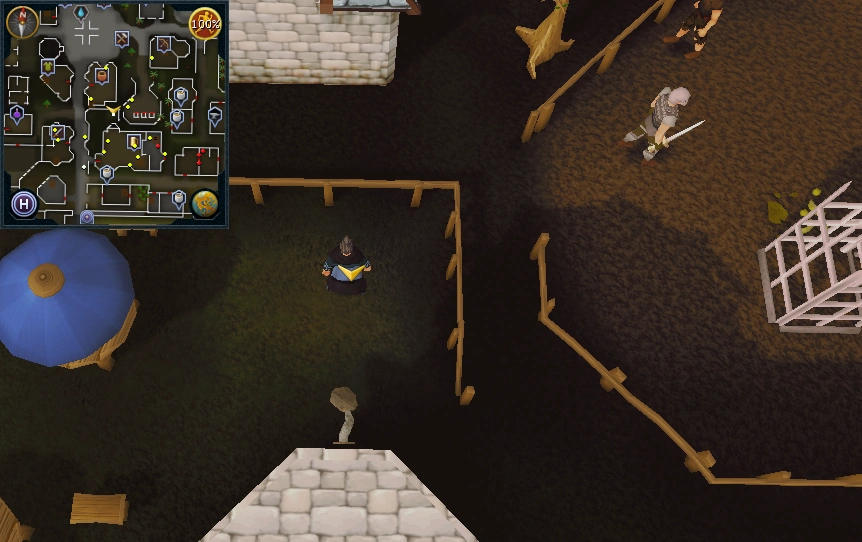 |
| North-east of Varrock square inside Horvik's Armour Shop (the platebody shop). | 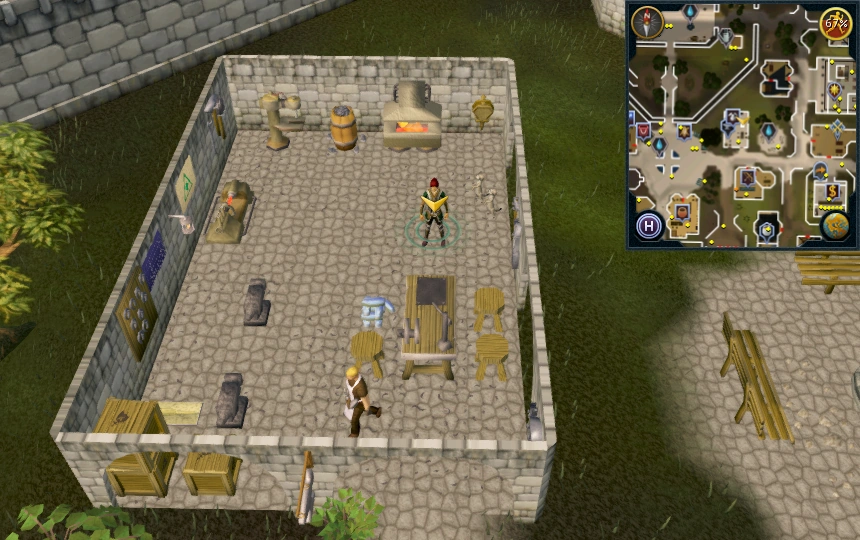 |
| In north-east Varrock. Just north of the estate agent and west of Varrock chapel. | 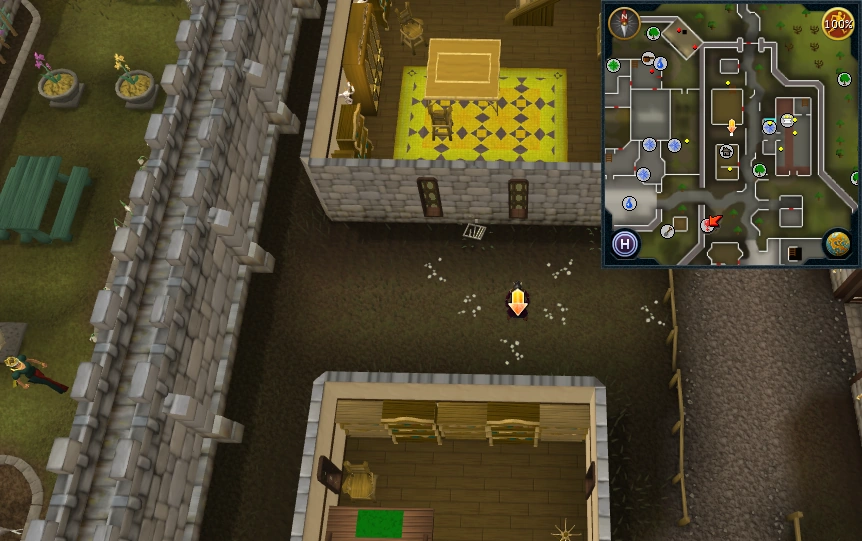 |
| At the entrance of the Varrock Museum. | 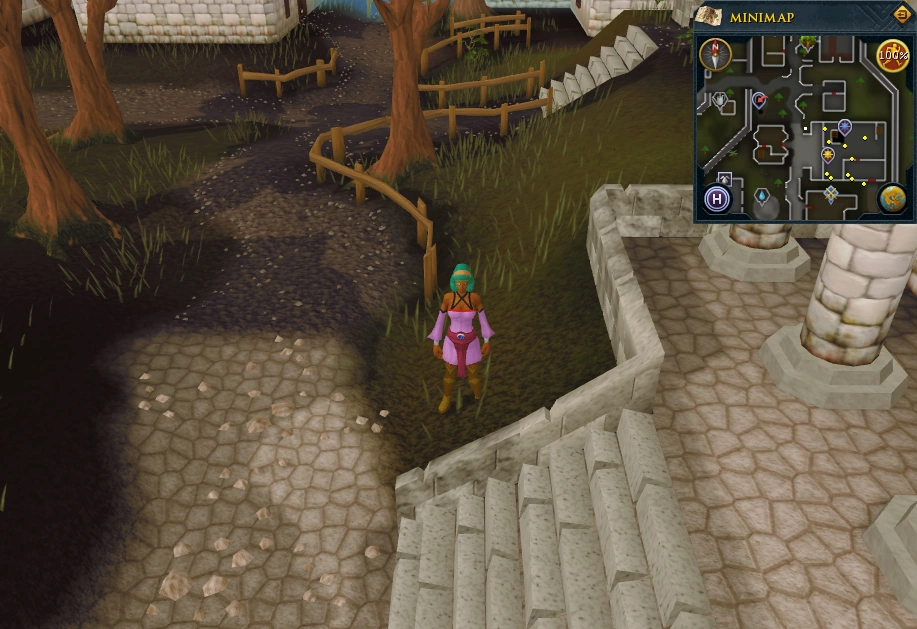 |
| South-west of Varrock's west bank, within the south-west city wall, five steps south of the northern ladder. |  |
Wilderness, deep
"This scroll will work in the deepest levels of the Wilderness."
Area Information: Wilderness
Since the Wilderness and Free Trade Vote, the chance of receiving a scan clue in the Wilderness has been very low.
Scan range: 25 paces

| Possible locations | Image |
|---|---|
| South-east of the Wilderness Agility Course, outside the course's fence, and south-west of the Pirates' Hideout. |  |
| North-west of Rogues' Castle, within the castle's fence. West of the aggressive Chaos Elemental boss monster located just east of Rogues' Castle. |  |
| North-west of the Wilderness North Volcano in the north-east corner of the Wilderness. |  |
|
Other possible locations
| |
Wilderness Volcano
"This scroll will work in the crater of the Wilderness volcano."
Area Information: Wilderness Volcano
Since the Wilderness and Free Trade Vote, the chance of receiving a scan clue in the Wilderness has been very low.
Scan range: 11
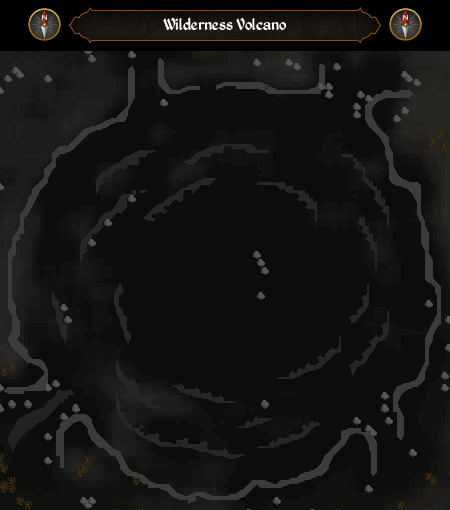
| Possible locations | Image |
|---|---|
| On the south-east side of the volcano, just north of the south-east entrance to the volcano. North-east of the Wilderness Volcano lodestone. | 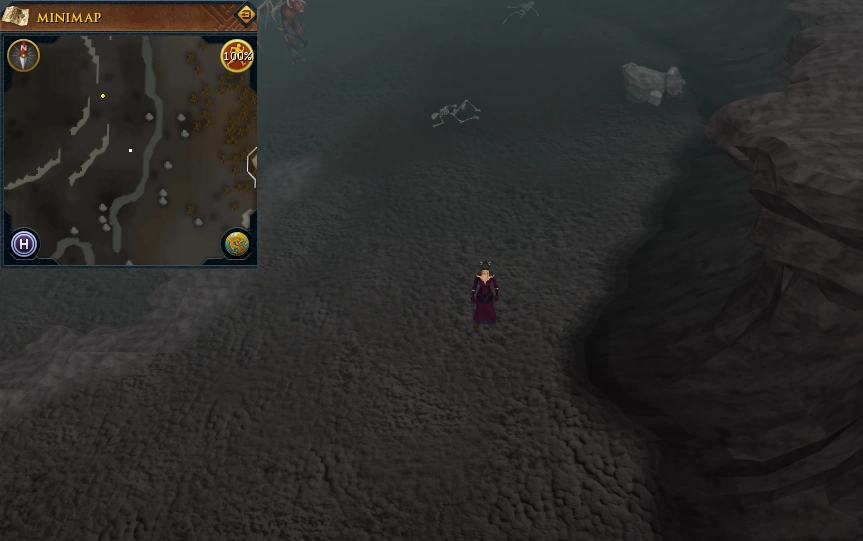 |
| South-east of monolith. | 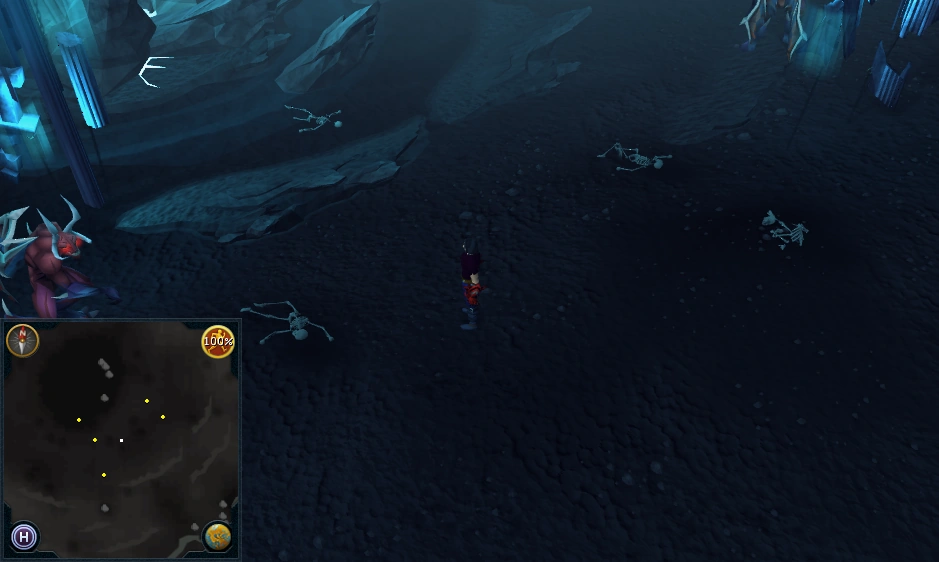 |
| North-west of the south-east entrance of the Volcano. | 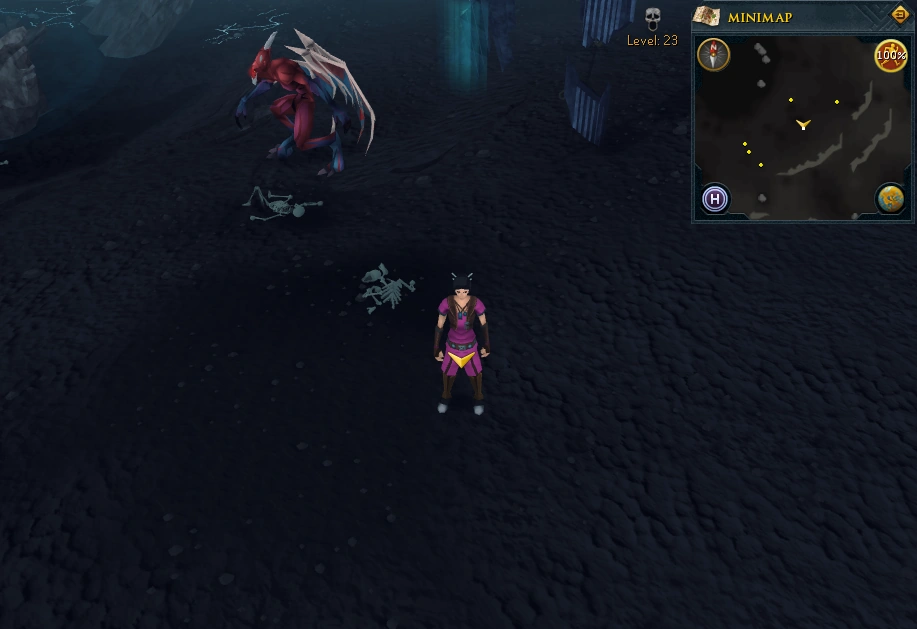 |
| On the south-west side of the volcano, just east of the south-west entrance to the volcano. North-west of the Wilderness Volcano lodestone. |  |
| North of the south-western entrance to the volcano. | 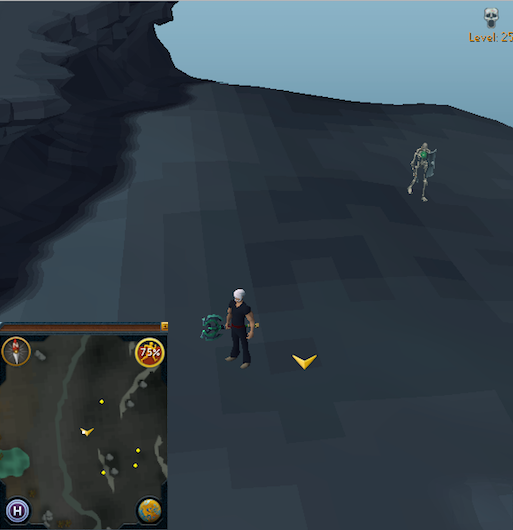 |
| On the north-west side of the volcano, south-west of the volcano's north-west entrance. | 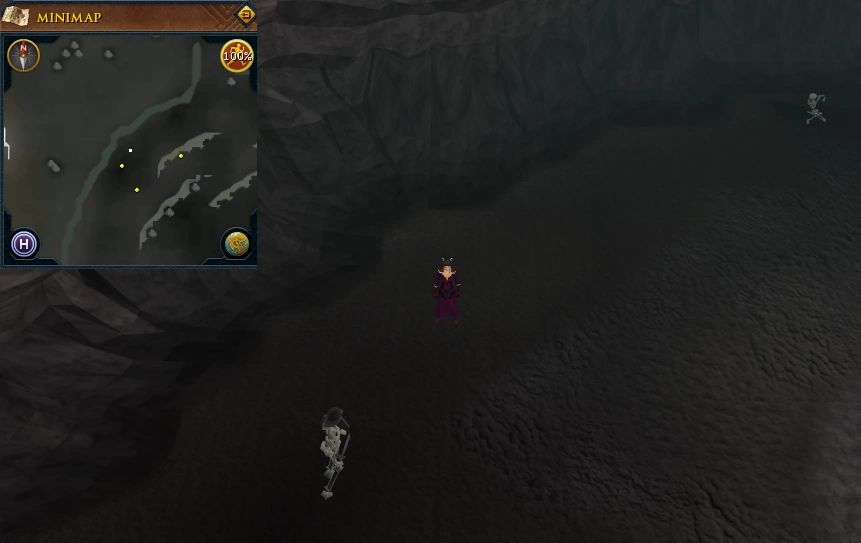 |
| On the northern side of the volcano, just north of the monolith. | 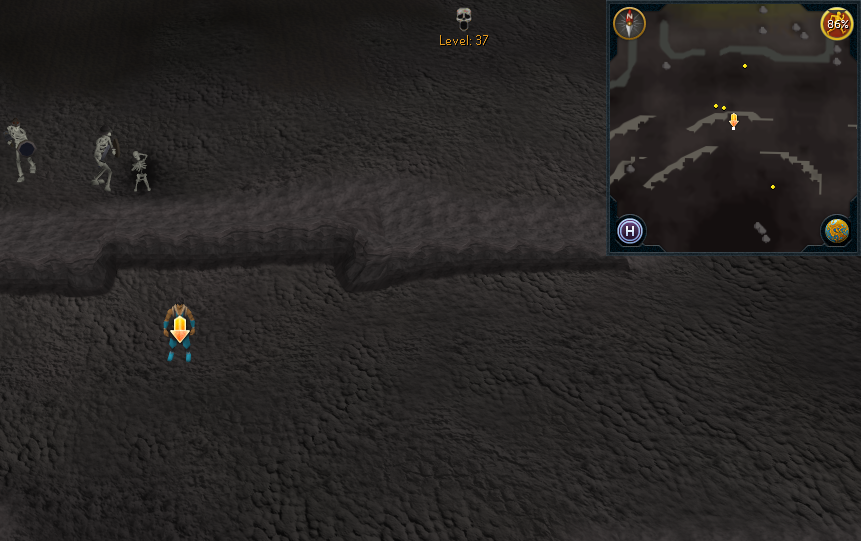 |
| In the centre of the volcano, just north of the monolith. |  |
| On the north-east side of the volcano, just north-east of the monolith. |  |
|
Other possible locations
| |
Zanaris
Area Information: Zanaris
Scan range: 16 paces
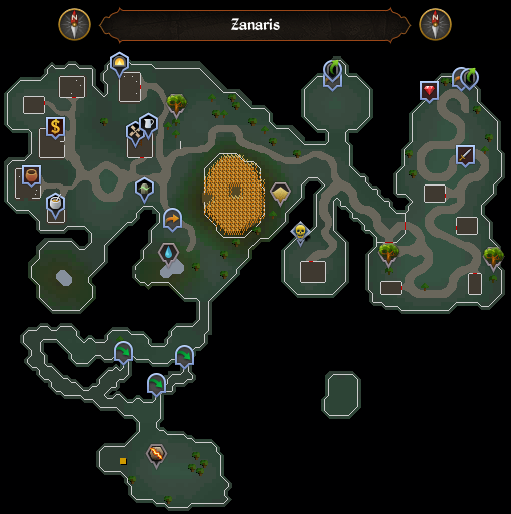
| Possible locations | Image |
|---|---|
| Just south of the wheat field. East of the fairy ring in the centre of Zanaris; this fairy ring is the main fairy ring in RuneScape through which a player can teleport to any other fairy ring. | 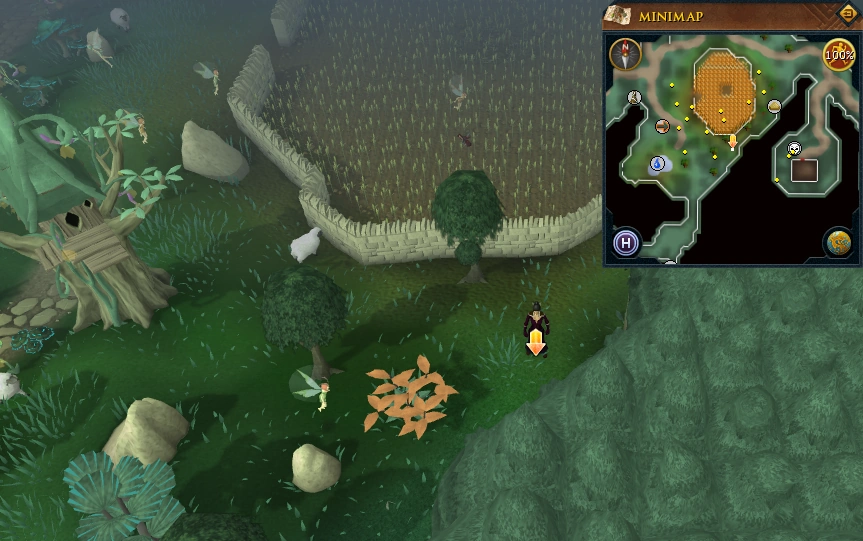 |
| South-west of the fairy ring in the centre of Zanaris; this fairy ring is the main fairy ring in RuneScape through which a player can teleport to any other fairy ring. South-west of the wheat field. One pace north of the location pictured. | 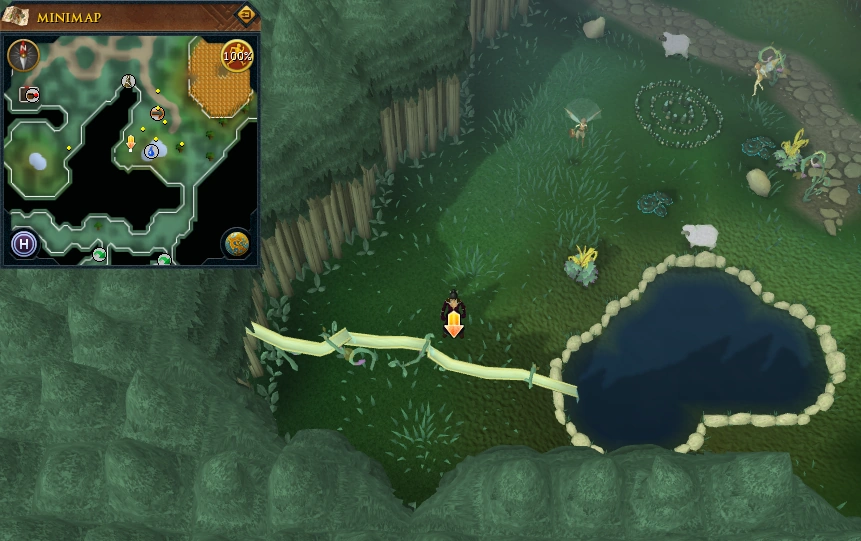 |
| North of the Cosmic Altar. North in the passage with Agility shortcuts leading to the altar. | 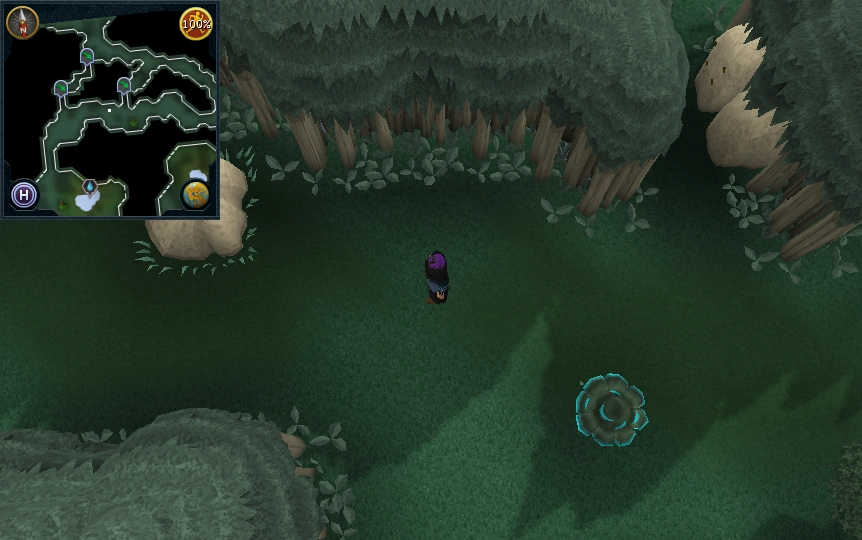 |
| North of the Cosmic Altar. North-west in the passage with Agility shortcuts leading to the altar. |  |
| North of the Cosmic Altar. North-west in the passage with Agility shortcuts leading to the altar. | 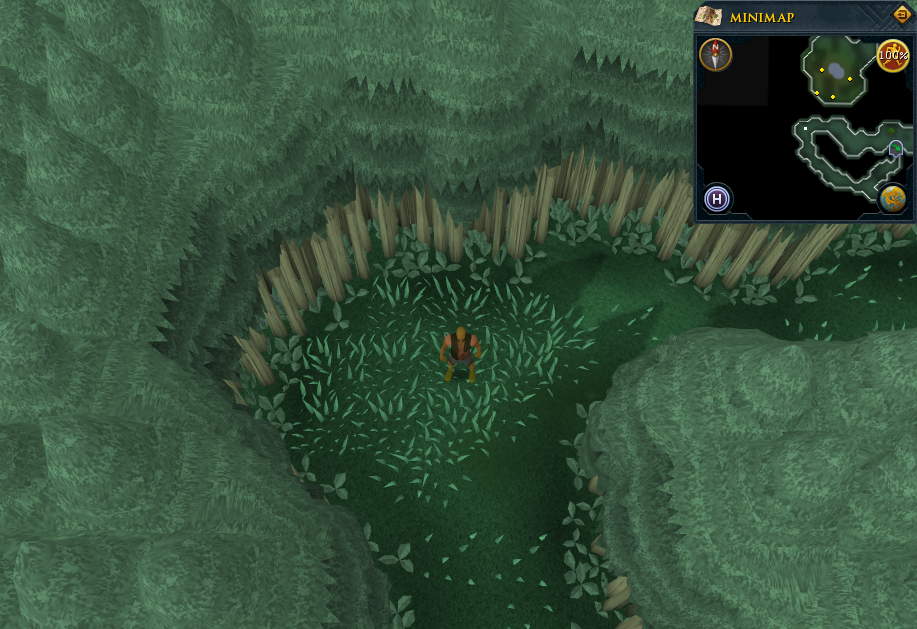 |
| Just north of the trees east of the Cosmic Altar, in the chamber containing the altar. | 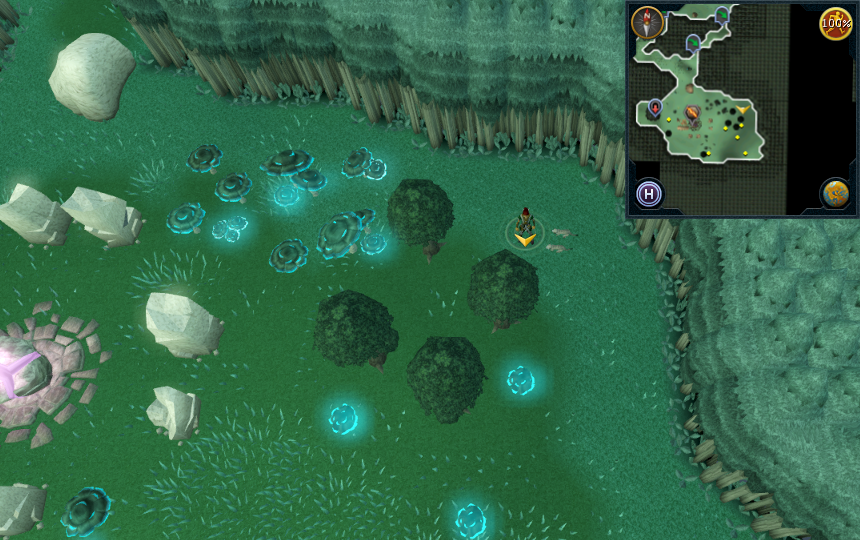 |
| South-east of the Cosmic altar. | 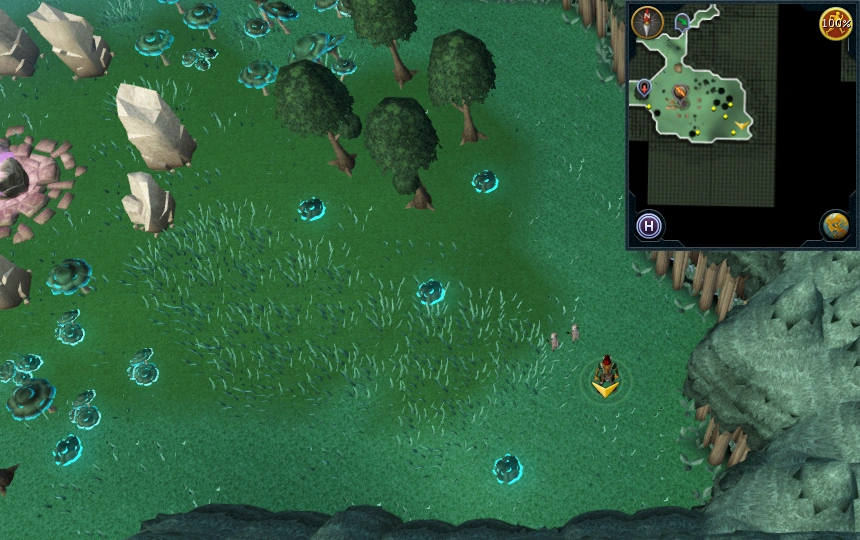 |
| South-west of the Chicken Shrine which can teleport players to the Evil Chicken's Lair containing black dragons. North-east of the wheat field. |  |
| Just south of the Chicken Shrine which can teleport players to the Evil Chicken's Lair containing black dragons. | 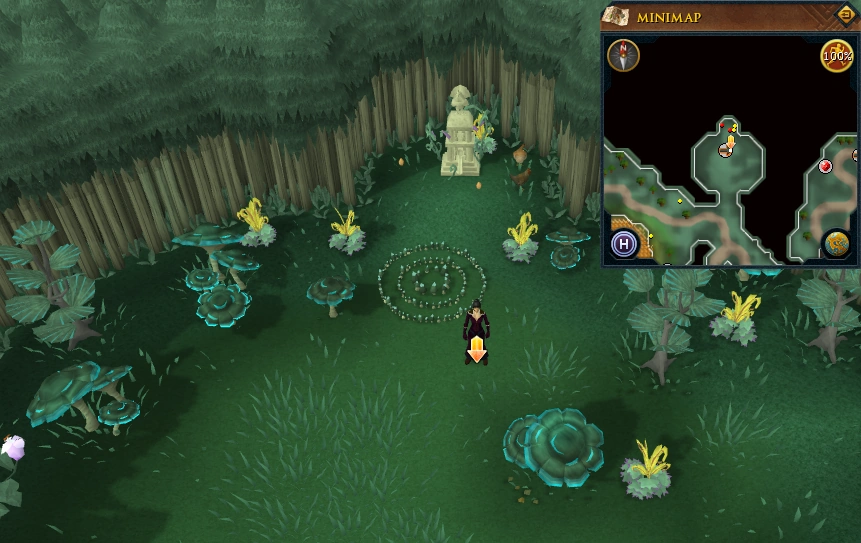 |
| Just west of the Slayer master Chaeldar. |  |
| North-west of the gates to the market area in the east part of Zanaris. | 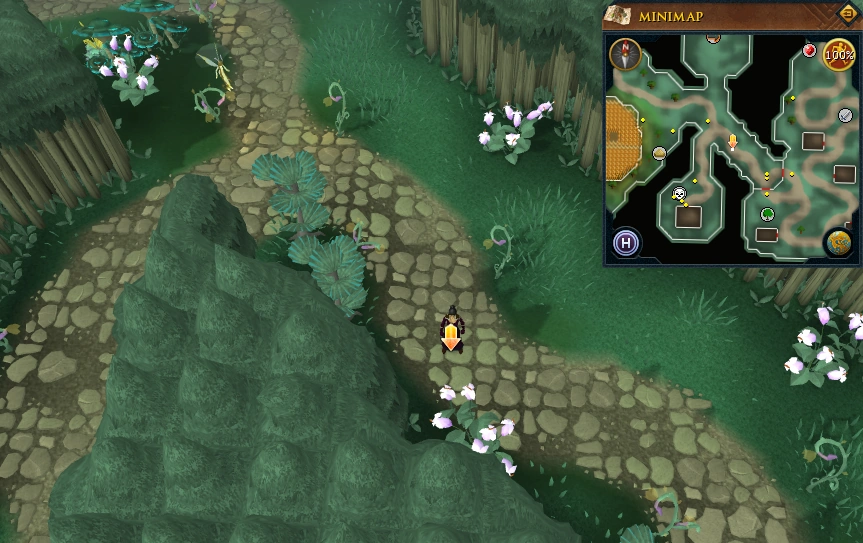 |
| Just west of the gates to the market area in the east part of Zanaris. | 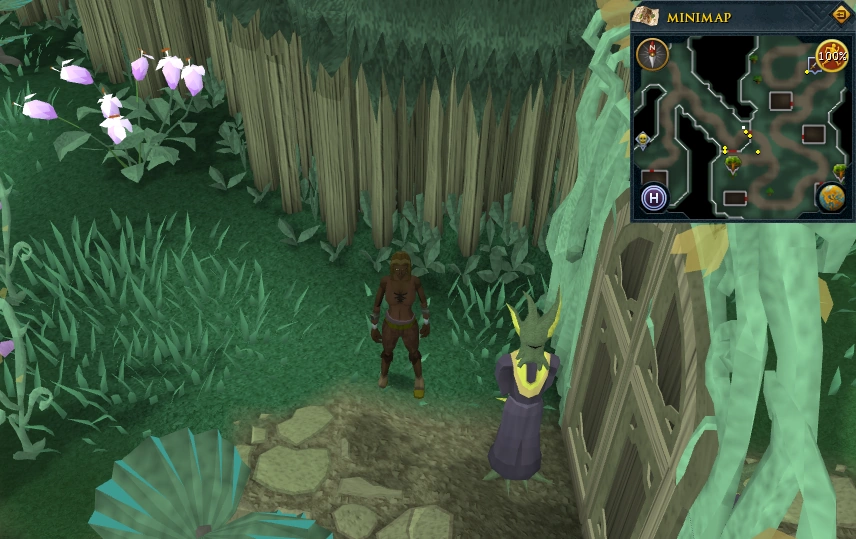 |
| Just west of the wheat field. North-east of the fairy ring in the centre of Zanaris; this fairy ring is the main fairy ring in RuneScape through which a player can teleport to any other fairy ring. | 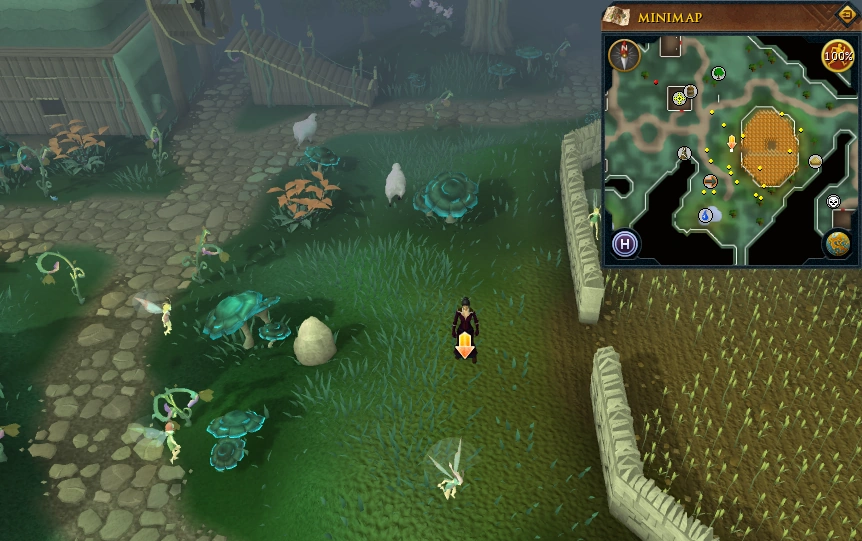 |
| Just west of the Summoning obelisk. North-west of the fairy ring in the centre of Zanaris; this fairy ring is the main fairy ring in RuneScape through which a player can teleport to any other fairy ring. |  |
| North-west of the wheat field. East of the building containing a dairy churn. | 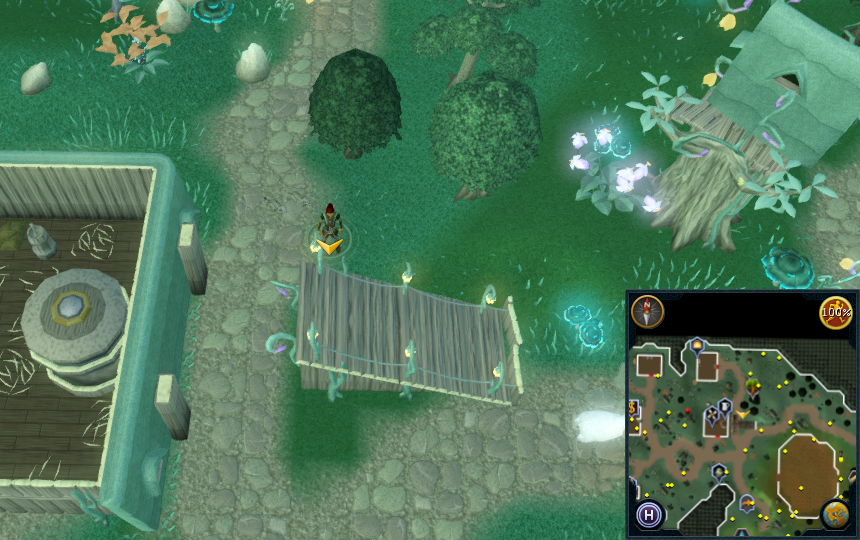 |
| North of the wheat field entrance, east of the building containing a furnace and north-easy of the building containing a dairy churn. One step south of the location pictured. | 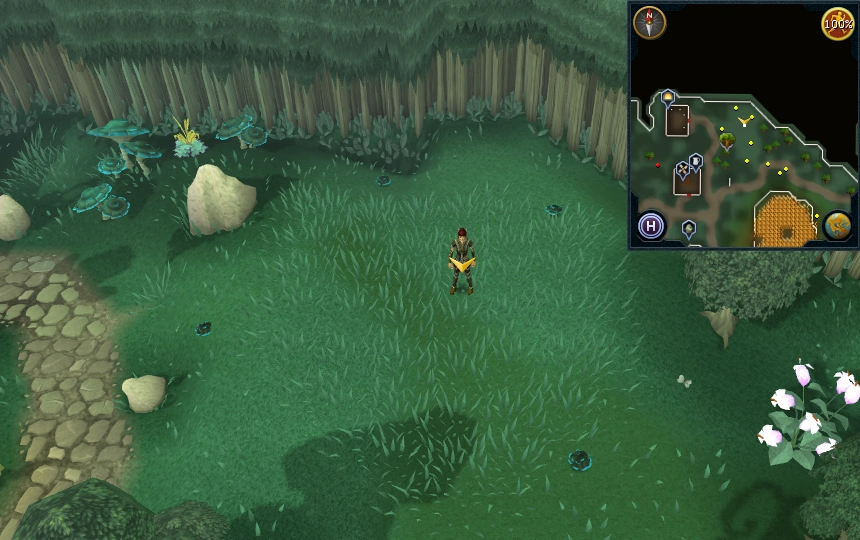 |
| South of the building containing a furnace and north of the building containing a dairy churn. | 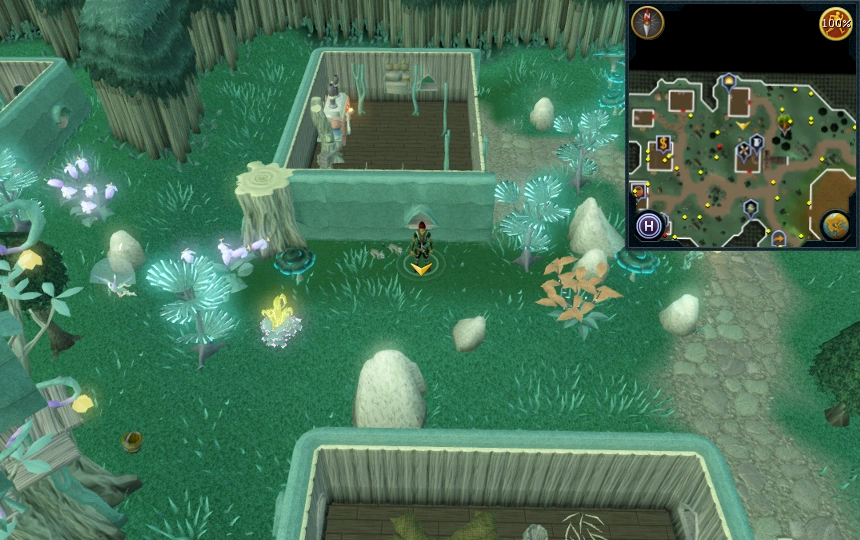 |
| Just west of the building containing a dairy churn and south-east of the building containing a furnace. | 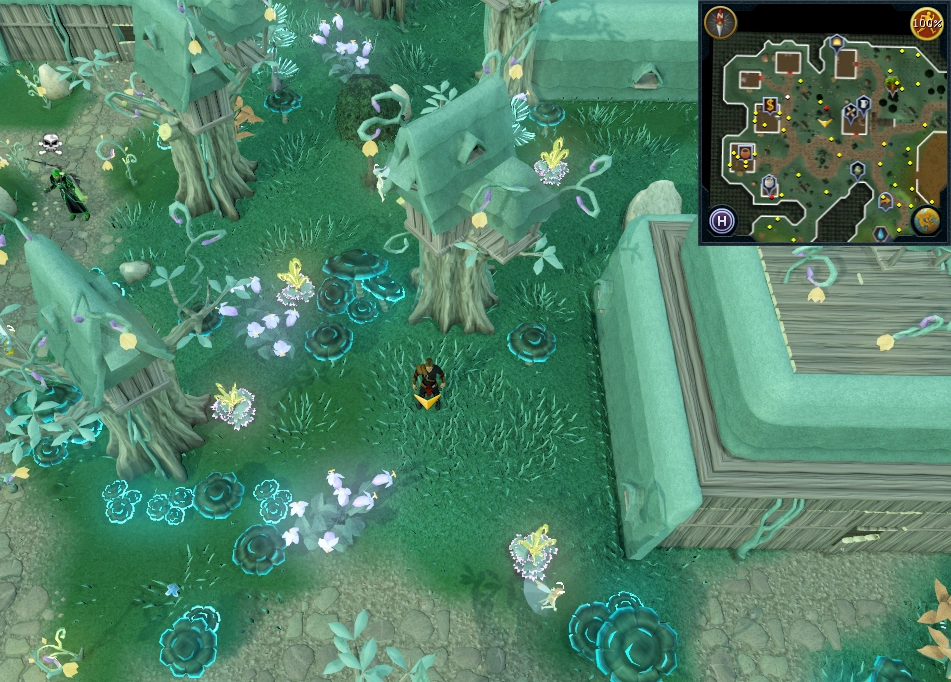 |
| In the west part of Zanaris, north-west of the bank. | 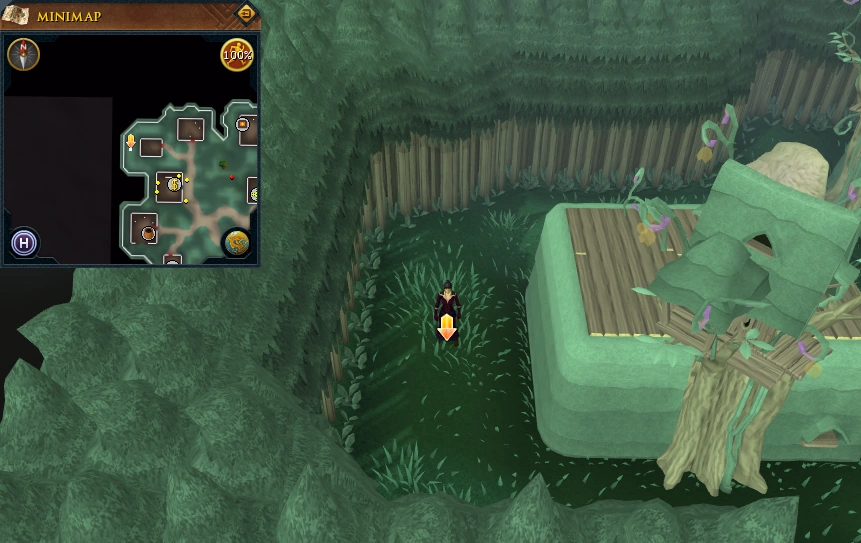 |
| In the west part of Zanaris. East of the general store run by the Fairy Shopkeeper and Fairy Shop Assistant and south of the bank. | 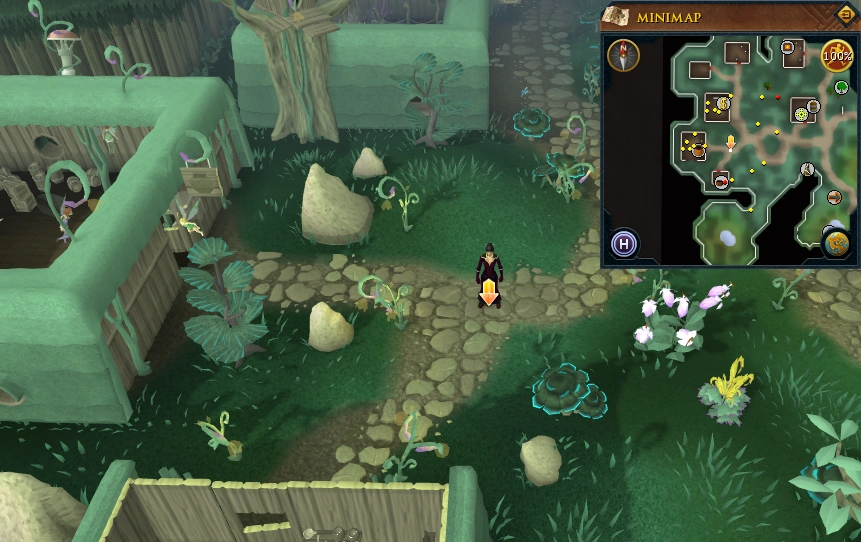 |
| In the area containing otherworldly beings. | 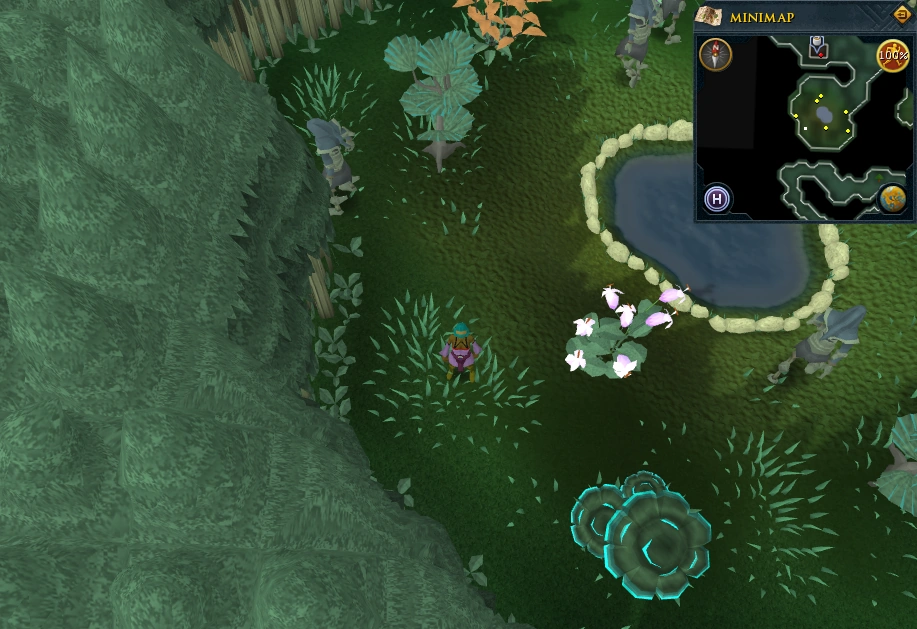 |
| Just east of the Cosmic Altar. | 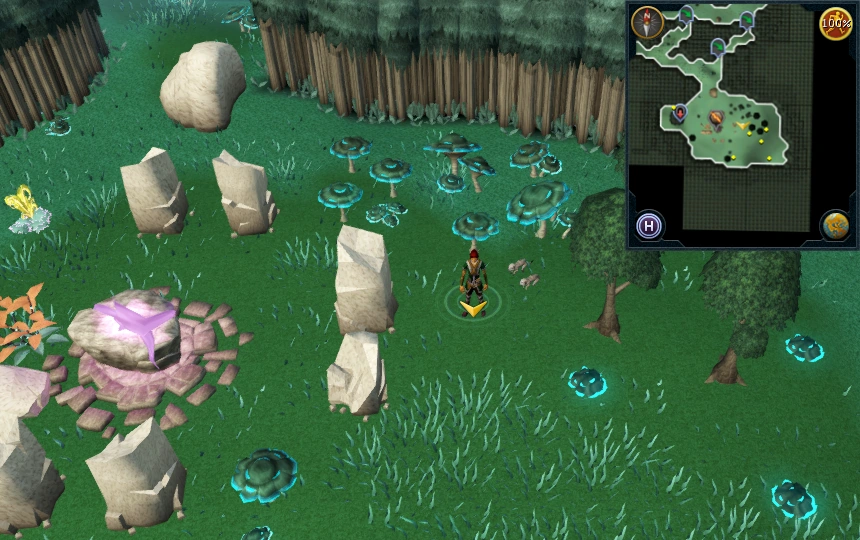 |
Former locations
- Scans for the Chaos Tunnels were removed on 10 July 2017 due to player feedback.
- Scans for White Wolf Mountain were replaced with Menaphos scans in the clue scroll rework on 26 February 2018.
- During the 2018 clue scroll rework all Kharidian Desert scan locations were made to be on the east side of the River Elid and any Kharazi Jungle locations were made to be inside the jungle; those in Herblore Habitat were removed.