This article contains information for players seeking to kill tormented demons. Recommended equipment, levels, and strategy are all covered here.
Tormented demons can be slain in a group or alone; this article applies to both groups and individual players who wish to solo them.
Requirements
- Completion of While Guthix Sleeps
- A sapphire lantern (keep a spare in your bank in case you die, if you do not wish to reclaim from Death)
- A sapphire lantern is not needed if a player has 88 Summoning or access to the Max Guild, as a light creature familiar and Max Guild PvM portal teleports players outside the temple without use of a lantern.
- At least two combat styles (of Melee, Magic, and Ranged) if not bringing an iron or steel titan
- A means to remove the fire shields (Darklight or holy water)
Skill level recommendations
- Level 80+ in your chosen attack styles (
 )
) - Level 70+
- Level 80+
- Level 70+
- Level 68+ (for war tortoises and bunyips or their higher variants, the Pack yak and Unicorn stallion)
Additionally, the following levels may prove useful:
- Level 88+ (for extreme potions)
- Level 95+ (for Turmoil, Anguish, and Torment along with Soul Split)
Preparation
Inventory
| 300 | |||
| 5000 | 5000 | ||
| 1 |
- Sapphire lantern - used for the light creatures.
- This item is not needed if using the Max Guild PvM portal or Light Creature's teleport.
- Darklight or many vials of holy water
- Gear for at least two combat styles (swapping combat style is a must as the demons use 100% protection prayers)
- Extreme potions or overloads
- Healing - While high-healing food (sharks or better) should be brought, do not rely on it for your primary source of healing. A healing familiar, such as a bunyip or unicorn stallion, is highly effective. One option is to bring a beast of burden filled with food, then dismiss it once it is empty and summon a healer. If using a godsword, consider a Saradomin godsword.
- Prayer flasks - it is essential to use protection prayers/deflection curses while fighting the demons. For the first few trips, bring fewer flasks as it is unlikely that you will have enough food to sustain your prayer flasks. As you get experienced over time, bring more flasks.
- Super restore - bring one to restore Summoning points to renew your familiar as the demons do not drop Summoning or super restore potions and there are no obelisks near them.
- Spring cleaner - if the player owns a spring cleaner, it is possible to convert the rune armour and weapon drops into 1 runite ore and 8 coal for each bar it would have taken to smith the drop. The player can bring it along or leave it in the bank depending on the prices of springs.
- Alchemy runes - to alch any drops the spring cleaner may have missed.
- Attuned ectoplasmator - use in conjunction with the demon horn necklace to restore prayer when you kill a demon.
Equipment
Because more than one combat style is required to kill tormented demons, hybrid armour is advised if fighting alone. Hybrid armour has lower defence than tank armour, but that does not matter much, as the demons are rather accurate and protection prayers nullify their damage to 1 per hit.
Tormented demons have relatively high accuracy with their attacks, so accuracy and/or prayer bonuses are helpful when fighting them. Dragon Rider is relatively cheap and provides very good prayer bonuses which allows the player to last longer. However, with a Demon horn necklace and Attuned ectoplasmator, void gives a better choice as it will ensure more accuracy and the player will restore 150 prayer points for every tormented demon killed.
If going with another partner, one combat style is often used while iron or steel titans are used. In this case, melee and magic are used since the titan's ability will deal ranged damage.
The ring of fortune increases the drop rate of ruined dragon platebody pieces, and possibly other dragon items.
Void Knight equipment are to be used together or not at all.
Action bar
Good use of the action bar can aid you when fighting tormented demons.
Having Revolution activated reduces the intensity of fighting demons, and is recommended if new to them. Once experienced, however, using abilities manually can yield significantly faster kills, as proper ability usage can maximise damage dealt before the demon changes its prayer. This becomes even easier if using the equilibrium aura.
A suggested single action bar for tormented demons (ranged/magic):
If not activating abilities from the action bar, one can use the bar to manage their prayers, equipment, and life and prayer points, as demonstrated below (melee/ranged):
Familiars
When killing tormented demons, players may choose to bring a beast of burden filled with food, and summon a bunyip or unicorn stallion once it is empty. Beast of Burdens are useful for inexperienced players. While the Pack yak can also be used for its winter storage scroll to send drops to the bank, it is not needed if you have a spring cleaner and alch runes.
The talon beast and iron titan both use primarily melee attacks, and are advised if fighting with ranged and magic, so that demons never protect from your familiar's attacks. The steel titan is another option if not using ranged and magic together. If using scrolls, you can store them in your familiar so they can be used automatically. Also know that for your familiar to fight, you must engage the demons in a relatively open place where it can move freely.
Dreadnips can also be used, and will cause the demons to switch prayers to the combat style they're using in addition to doing extra damage.
Though a player must inflict 3100 damage to change a demon's prayer, a familiar only needs to inflict 310; the demon treats the familiar's damage as 10x of whatever damage it does. This is not an issue, as all the hits of a titan's special move should land before the demon changes its prayer.
Tips
- When a Tormented demon spawns, it always uses Protect from Melee, has an active shield, and uses magic attacks.
- Begin with Protect/Deflect Magic to block most of the damage.
- The fire shield blocks all but 1/6th of the damage that would have been dealt to the demon.
- The demons swap prayer at approximately 520 life points worth of damage while the shield is on.
- If a player uses a Ranged attack and quickly swaps to Darklight, as long as the attack succeeds, the demon's shield will weaken, allowing the player to avoid attacking directly with Darklight.
- Holy water can be used to remove the shield. It counts as a ranged weapon, so the shield can be disabled without having to force the demon to switch prayers first.
- Using the right protection/deflection prayers reduces the demon's attack to 1 life point.
- Tormented demons often "roar". When this happens, they usually switch combat styles, using the one that they can use effectively. For example, if a Tormented demon is four spaces north of a player without any obstacles to hinder it, when it roars it has a 50% chance to use the other two combat styles it didn't use before it roared. If you attack quickly when the demon changes to melee attacks, the demon will return to magic/range attacks.
- Avoid being attacked by multiple demons. Even though prayer fully blocks their damage (much like Devotion), prayer flicking will not help if multiple demons attack you on the same tick with different combat styles.
Luring

Because being attacked by multiple demons is hazardous, you can lure demons that would threaten you so they become trapped behind obstacles in the room, thus preventing such a dilemma. It is not necessary to lure the demons, as the demons rarely cross over to the other side unless they're chasing after someone. With decent gear and experience, you can kill a demon before another one notices you.
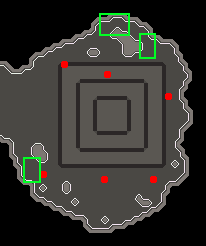
The image at right illustrates the approximate spawning locations of the six tormented demons (red dots) as well as the most common places from which to fight them (green boxes).

The provided luring example should result in something like this.
Here is one example of how to lure the demons:
- Enter the room from the northern side of the entrance. Catch the attention of the north-west demon (make sure the south-west demon doesn't see you) and lure it over to the large pillar.
- Run to the northern safespot (topmost green square). The north-west demon should follow you and get stuck behind a rock. The northernmost demon should see you and follow, becoming stuck between the two northern rocks shown on the map.
- With the north-west and northernmost demons trapped, move around to the eastern side of the rock (the other green square in the north) and lure the north-east demon to you. (Be careful not to move too far away from the second green square, or one of the other demons you trapped might be able to attack you and, more importantly, move out of its trapped position.)
- From here, you are free to kill the northernmost (middle) demon at your leisure, safe from the attacks of the other two. Use the large rock for cover if necessary to eat, drink potions, etc.
With enough healing sources or experience, a player can hunt all six demons instead, although it is still recommended to avoid being attacked by more than two at a time. Although you may end up taking more damage and will need to swap prayers more often, it will be much faster than waiting for a demon to respawn with the luring method. The pillars and haphazard rocks can serve as temporary safespots against other demons while attacking another one. By doing this, you can improve your kills per hour considerably, and even exceed 140 kills per hour with enough practice.
Melee-only methods
Due to the behaviour of Tormented Demons switching prayers when dealt a much lower threshold of damage by familiars as opposed to a player, one can utilise a combat familiar and dreadnip of opposite types to force Tormented Demons into rapidly changing prayers back and forth to enable the use of only one combat style to dispatch them. A Shadow Nihil combined with a mage-form dreadnip can send tormented demons into fits of swapping back and forth between Mage and Magic protection enabling you nearly 100% uptime of melee DPS. With the release of Menaphos, players were given the ability to create their own slayer dungeons, similar to Kuradal's Dungeon, which allows for the placement of a single Tormented Demon without any other spawns, reducing threat levels to extreme lows. 99 Slayer and the capturing of a Tormented Demon soul via. The use of an Ushabti are required to utilise this method. Fortunately, as Tormented Demons are classified as having a Slayer requirement of 1, this soul is generally not too difficult to come by. If you can't manage to capture a Tormented Demon soul, you could always utilise someone else's dungeon that already has one within it.
Strategies for fighting Tormented Demons within a personal dungeon utilising only one spawn are extremely simple. For the first kill, have either Protect from Melee or Deflect Melee on as you enter. As their mage and ranged attacks have a delay to them, if they aren't currently using melee, there's enough time to switch to the proper protection style. Call your follower to ensure it's by you so it will begin attacking the demon. Likewise, drop a dreadnip and simply DPS the demon down as it becomes susceptible to melee. Once defeated, wait with your melee protection prayer on until it spawns. Tormented Demons spawned within a personal dungeon don't follow the typical trends as an overworld variant; they can spawn using any of the three protection styles, any of the three combat styles, and even with the quest version's model. As mentioned before, the other attacks have a delay, melee does not, so if it's not the style the demon is using upon spawning, change appropriately. Since they can spawn not protecting from melee, it's very possible to lower their shield on the very first hit of combat as long as you're utilising Darklight in the mainhand, which is highly recommended to be use as it deals fantastic amounts of damage against them, as well as not being degradable. If you lack access to dreadnips, a Shadow Nihil alone will work, thanks to its fast attack speed, though not as effective if you were to utilise a Dreadnip as well. Utilisation of this method, coupled with good prayer switching ability, can enable a well-supplied player to last vast amounts of time in one session killing Tormented Demons.
Gallery
")
")
")
")