Walkthrough
| Start point | |||
|---|---|---|---|
| Member requirement | |||
| Official difficulty | |||
| Official length | Long | ||
| Requirements | Skill requirements are not boostable unless marked with a [B] for boostable.
| ||
| Items required | Items from the tool belt are not listed unless they do not work or are not automatically added.
Recommended items:
| ||
| Enemies to defeat |
|
Starting out
- Talk to Veliaf Hurtz in the Burgh de Rott pub's basement.
- Enter the tunnel south of the Burgh de Rott Bank
- Pick up the Letter on the floor
- (Optional) There is a decaying tome to the very east of the room, which can be read if wanted.
- Inspect the coffin, which deals a very small amount of damage when opened. In it is a Mysterious medallion.
- Talk to Veliaf Hurtz again, and mention the medallion and the letter.
An unexpected help
- Go to Safalaan, reaching him with the teleport given to you by Veliaf.
- Tell him about the medallion, and he will alter it to have a teleport added to the Meiyerditch Myreque hideout.
- Ask him what the vampyres have been doing, and then mention the letter.
- Go through the dialogue options, and then ask what you should do.
Traversing Meiyerditch
Here, you can choose 2 routes to the meeting spot:
The route to accessing Darkmeyer (blue) and the meeting spot (red) starting from the Meiyerditch Lab.
- Route 1: going through Meiyerditch directly, with cutscene
- Exit the base, go through the wall and climb up the stairs.
- Jump the floorboards to the west and go down.
- Exit and go west a bit, then south at the barricade.
- Enter the building and open the door there in the room with the portrait. Climb up the ladder.
- Go through the cutscene, and jump over the wall to the building to the west, and climb down the ladder.
- Open the door, exit and close the door. Now go north and west around the next building. Enter it and go east, where Vertida will be standing.
- Route 2: Using the medallion, without cutscene
- Teleport to the Meiyerditch Laboratories, go upstairs, open the door, pass through the slashed tapestry and exit the building.
- Run south-west between the houses as shown in the map to the right in red.
- Enter the building, and climb up the wall as shown by the arrow.
- Speak to Vertida.
- Climb up the wall and speak to Mekritus.
- Click the white sickle logo on the ground to spy, and a cutscene will play.
- Go downstairs and talk to Nessie.
Entering Darkmeyer
- After talking to Nessie, you will be told to attack her, after she transformed into Vanescula Drakan.
- She will knock you back. Talk to her, and go through all options.
- Take the envelope to Safalaan, who can be reached teleporting to Meiyerditch with the medallion, who will direct you to Vertida Sefalatis.
- Talk to Vertida, and he will explain the plan of action for entering Darkmeyer.
- Take the 30 Smoke bombs from a crate west of the exit ladder.
- Use the medallion to teleport to the Meiyerditch Laboratories.
- Go up the stairs, through the slashed tapestry, and out the building.
- Run south-west along the diamond building (clockwise) and just run north until you reach the drainage grate. Squeeze through it.
- Talk to Vanescula on the other side of the gate. Note that in Darkmeyer, the Vyrewatch will attack you when you pass them, as opposed to in Meiyerditch.
- Use the smoke bombs only when out of sight of the vampyre juvinates. Do not go near vyrewatch.
- Search chests inside buildings to find clothing, 4 pieces in total.
Tip: You can use another smoke bomb before the previous one dissipates, enter a building before your smoke shroud vanishes. Once in a building, immediately close the door.
- Fix all 4 pieces and wear them. You no longer need to hide in smoke.
- Return to Vanescula, and she will tell you you'll need to be a more respected vampyre to be allowed in the higher tiers of the city.
Gaining Status
- Walk up the ramp at the north-east of the ground floor level of the city, and talk to Sentinel Mortshade.
- Tell him what your vampyre name is, which will be your name from then on.
- ● V - Vanescula Drakan
- ● A - Grigan Kaninus
- ● B - Valentina Kaust
- ● C - Sanguinus Varnis
- ● D - Maria Gadderanks
- ● E - Sentinel Bloodmortis
- ● F - Misdrievus Vakan
- ● G - Captured Meiyerditch citizens
- ● H - Ranis Drakan.
- ▬ - Poster
- ▪ - Common position for Bloodveld younglings
- Complete the vampyre tasks below, to increase your rating. After doing all tasks in this tier of the city, when the rating bar is half full, you can move on to the next part of the city.
These are the tasks available in the middle tier:
- C - Vandalising posters put up by vyrelords and ladies. This task is given by Sanguinus Varnis.
- D - Terrorising Maria Gadderanks.
- D - Talk to Maria while wielding the Gadderhammer.
- D - Talking to Maria Gadderanks.
- D - Using the Angry or Laugh emotes a few times next to Maria Gadderanks (also possible after she has been freed).
- B - Talking to Valentina Kaust; drink the vial of blood she gives you, then select any of the options. Warning: Drinking the blood damages you for half your health.
- A - Recapture bloodveld younglings (after talking to Grigan Kaninus). These vanish for long periods of time, so they can appear in places you've already checked. [1 or 2 have reportedly been found on lower tier.]
- Talk to Sentinel Gorthaur about citizens in Meiyerditch, the Myreque and Burgh de Rott (three conversations).
And for the upper tier:
- F - Entertain Misdrievus Vakan by humiliating a blood tither.
- F(west) - Subsequently talking to the Tithe master about the tither. The options chosen do not affect the amount of status gained.
- V - Speak to Vanescula Drakan to pledge allegiance to the Drakan family.
- G - Kill Captured Meiyerditch citizens for the Vyrewatch guards.
- If you refuse to kill the citizens anyway, the guard will instead ask you to go and get him some blood from the Dark Meyer Blood Trader. Remember the blood types he asks for. The trader will initially refuse as you haven't got any money. He will instead ask you to recover money for him from a werewolf. The werewolf is infact the Canifis settler located in the lowest tier of Darkmeyer. You will need Wolfbane dagger (Use it on her) to persuade her to give you Darkmeyer notes. Trade with the Darkmeyer blood trader and get the blood types the guard requested. Return to the guard to gain status.
- E - Talk to any upper tier sentinel and discuss your opinion of Vanstrom Klause.
- Talk to a Sentinel and discuss your opinion of Lord Drakan.
The Arboretum
- After gaining enough status in the upper tier, talk to Vanescula and she will tell you to enter the Arboretum.
- Ranis will stop you when opening the doors, and give you a blood mark, which deals some damage.
- Check the health of the tree.
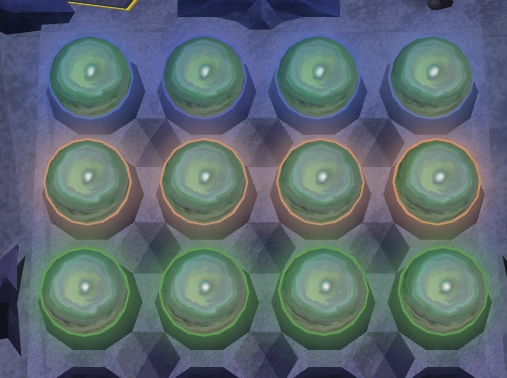
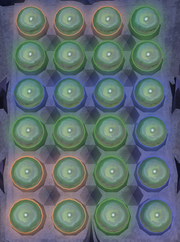
- Pull the lever, and put the orbs in the order from top to bottom of blue-yellow-green. Rotating the orbs is done by clicking the left-bottom orb of a group of four orbs.

- Then pull the lever again, and check the health of the tree again.
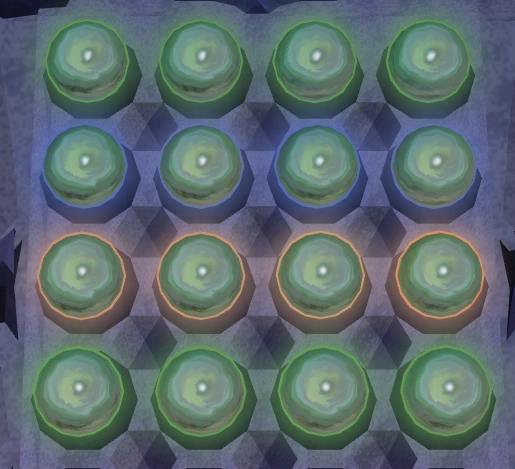
- Pull the lever and then rotate the orbs to green-blue-yellow-green, and pull the lever again.

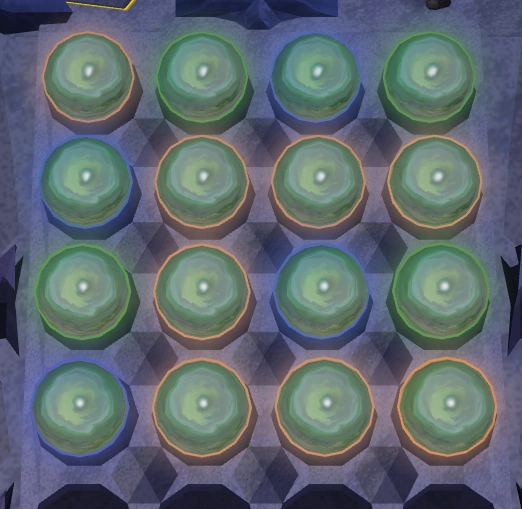
- Check the tree's health again, and pull the lever again. This pattern is a bit more complex.
- Put the orbs in the pattern of the top row and the 3rd row being green-blue-green-blue and the 2nd and 4th row being yellow. Pull the lever again and check the tree's health again, and then again pull the lever.

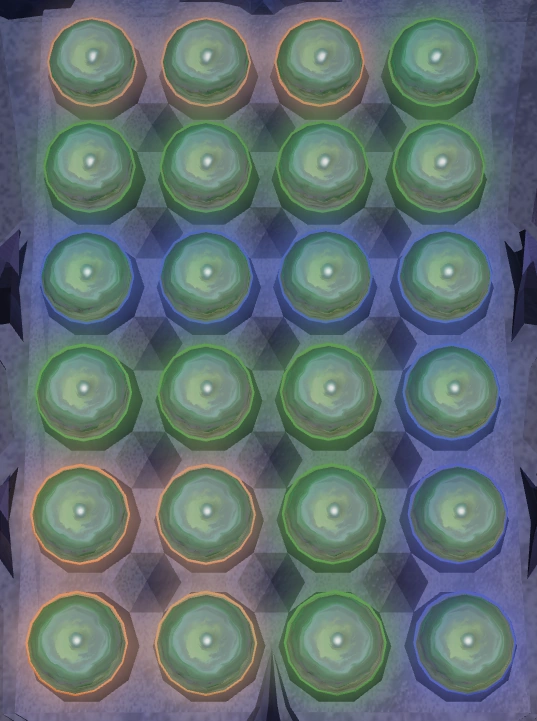
- This time, put all blue orbs at the top, then put the green orbs below them, and put the yellow orbs below that. The yellow orbs may not touch the blue orbs, but any other combination is allowed.
- Now chop the tree to get 3 blisterwood logs. A cutscene will play.
- Talk to Vanescula and you will be teleported to out of Darkmeyer.
- Use the medallion to go to "Meiyerditch", and talk to Vertida Sefalatis.
- Talk to Kael Forshaw, and take his 2 silver sickles.
- Craft the logs into a staff, some stakes and a polearm. MAKE SURE YOU CREATE ONE OF EACH.
- You will also be given a bottle of holy water, which is required for the fights with Vanstrom Klause and Harold.
- Use the medallion to teleport back to Darkmeyer, and bank at the Darkmeyer Treasury.
- Enter the house with Harold in it (just north-east of the captured citizens), and kill him with any weapon. You must throw the bottle of holy water over him to be able to kill him.
- Go back to the bank, and prepare for the final fight with Vanstrom Klause.
The battle with Vanstrom
For this part of the quest, see the full quest guide's description. The quick guide continues at the point where Vanstrom died.
Finishing up in Darkmeyer
- After killing Vanstrom, you will faint, and Vanescula and Sarius will enter the room.
- You will get control of Vanescula, and you have to kill the Bloodveld guardians coming towards you.
- You cannot attack them directly, only through the attack style menu using a series of special attacks.
- Dart deals high damage to all bloodvelds lined up, Shadow stalk deals very high damage to one bloodveld and Scream deals average damage to all nearby bloodvelds.
- It is recommended to use the Scream attack repeatedly as soon as it recharges.
- When you awaken, speak with Vertida and watch a short cutscene
- Talk to Veliaf Hurtz after the cutscenes and dialogues are finished, and tell him you killed Vanstrom Klause.