m (Split up a wall of text into steps) Tag: rte-source |
|||
| (59 intermediate revisions by 28 users not shown) | |||
| Line 5: | Line 5: | ||
===Starting out=== |
===Starting out=== |
||
| − | * |
+ | * Teleport to [[Canifis]] or use [[fairy code]] {{fairycode|BKR}}, and run south to [[Burgh de Rott]]. |
| − | *Enter the |
+ | * Enter the pub, ''climb over'' the broken down wall, and descend into the trapdoor. |
| + | * Talk to [[Veliaf Hurtz]] in the Burgh de Rott pub's basement. {{Chat options |
||
| − | *Pick up the [[Letter (The Branches of Darkmeyer)|Letter]] on the floor |
||
| + | |1 What's wrong? |
||
| − | *(Optional) There is a decaying tome to the very east of the room, which can be read if wanted. |
||
| + | |1 Is there anything I can do to help? |
||
| − | *Inspect the coffin, which deals a very small amount of damage when opened. In it is a [[Mysterious medallion]]. |
||
| + | |Accept |
||
| − | *Talk to [[Veliaf Hurtz]] again, and mention the medallion and the letter. |
||
| + | |1 Okay, I'll go. |
||
| + | }} |
||
| + | * South of the Burgh de Rott bank, ''enter'' the cave entrance. |
||
| + | * Take the [[Letter (The Branches of Darkmeyer)|letter]] on the floor. |
||
| + | * Search the coffin for a [[mysterious medallion]] (deals small amount of damage). {{Chat options|1}} |
||
| + | * Climb the rope to leave the cave. |
||
| + | * Return to [[Veliaf Hurtz]]. {{Chat options |
||
| + | |1 I found a medallion. |
||
| + | |1 Yes, please send me! |
||
| + | }} |
||
===An unexpected help=== |
===An unexpected help=== |
||
| + | * Once teleported, head in the northernmost room. |
||
| − | *Go to [[Safalaan]], reaching him with the teleport given to you by Veliaf. |
||
| − | * |
+ | ** The medallion can also teleport you to the Meiyerditch Labratories. |
| + | * Talk to [[Safalaan]]. {{Chat options |
||
| − | *Ask him what the vampyres have been doing, and then mention the letter. |
||
| + | |2 What do you think of this medallion? |
||
| − | *Go through the dialogue options, and then ask what you should do. |
||
| + | |2 What have the vampyres been doing? |
||
| + | |1 I've got a letter for you. |
||
| + | |1 What do you think? |
||
| + | |1 What do you think we should do? |
||
| + | |1 Of course. |
||
| + | }} |
||
===Traversing Meiyerditch=== |
===Traversing Meiyerditch=== |
||
| + | [[File:The Branches of Darkmeyer Vertida Sefalatis building location.png|right|200px]] |
||
| − | Here, you can choose 2 routes to the meeting spot: |
||
| + | * Teleport to the [[Meiyerditch Laboratories]] with your medallion. {{Chat options|3}} |
||
| − | [[File:Branches of Darkmeyer routes.png|thumb|The route to accessing Darkmeyer (blue) and the meeting spot (red) starting from the Meiyerditch Lab.]] |
||
| + | * Go upstairs, open the door, pass through the slashed tapestry and exit the building. |
||
| − | |||
| + | * Run between the houses to the area (south-west) highlighted in blue on your world map. |
||
| − | *Route 1: going through Meiyerditch directly, with cutscene |
||
| + | * Open the door to the eastern building with [[Vertida Sefalatis]] and talk to him. |
||
| − | **Exit the base, go through the wall and climb up the stairs. |
||
| + | * ''Climb'' the wall and speak to [[Mekritus A'hara]]. |
||
| − | **Jump the floorboards to the west and go down. |
||
| + | * ''Stand'' on the lookout point for a cutscene. |
||
| − | **Exit and go west a bit, then south at the barricade. |
||
| + | * Drop-down the floorboards to the east. |
||
| − | **Enter the building and open the door there in the room with the portrait. Climb up the ladder. |
||
| − | * |
+ | * Talk to Nessie who is in the courtyard south of the building. {{Chat options |
| + | |1 How do you know my name? |
||
| − | **Open the door, exit and close the door. Now go north and west around the next building. Enter it and go east, where Vertida will be standing. |
||
| + | |1 What are you doing here? |
||
| − | *Route 2: Using the [[Mysterious medallion|medallion]], without cutscene |
||
| + | }} |
||
| − | **Teleport to the Meiyerditch Laboratories, go upstairs, open the door, pass through the slashed tapestry and exit the building. |
||
| − | **Run south-west between the houses as shown in the map to the right in red. |
||
| − | **Enter the building, and climb up the wall as shown by the arrow. |
||
| − | *Speak to Vertida. |
||
| − | *Climb up the wall and speak to Mekritus. |
||
| − | *Click the white sickle logo on the ground to spy, and a cutscene will play. |
||
| − | *Go downstairs and talk to Nessie. |
||
===Entering Darkmeyer=== |
===Entering Darkmeyer=== |
||
| + | * Attack [[Vanescula Drakan]] - she will knock you back. |
||
| − | *After talking to Nessie, you will be told to attack her, after she transformed into [[Vanescula Drakan]]. |
||
| − | * |
+ | * Talk to her and exhaust all options, eventually learning about the tree. {{Chat options |
| + | |1 What are you doing here? |
||
| − | *Take the [[Vanescula's offer|envelope]] to [[Saflaan|Safalaan]], who can be reached teleporting to Meiyerditch with the medallion, who will direct you to [[Vertida Sefalatis]]. |
||
| + | |1 How can you help? |
||
| − | *Talk to Vertida, and he will explain the plan of action for entering [[Darkmeyer]]. |
||
| + | |3 I'm not telling you anything, vampyre scum! |
||
| − | *Take the 30 [[Smoke bomb]]s from a crate west of the exit ladder. |
||
| − | + | |2 How do you plan on freeing Meiyerditch? |
|
| + | |3 You won't get any information out of me. |
||
| − | *Go up the stairs, through the slashed tapestry, and out the building. |
||
| + | |1 Why do you want to kill Drakan? |
||
| − | *Run south-west along the diamond building (clockwise) and just run north until you reach the drainage grate. Squeeze through it. |
||
| + | |3 Why should I trust you? |
||
| − | *Talk to Vanescula on the other side of the gate. Note that in Darkmeyer, the [[Vyrewatch]] will attack you when you pass them, as opposed to in [[Meiyerditch]]. |
||
| + | |1 I'll listen, for now. |
||
| − | *Use the smoke bombs only when out of sight of the [[vampyre juvinates]]. Do not go near vyrewatch. |
||
| + | |3 Tell me more about this tree. |
||
| − | *Search chests inside buildings to find clothing, 4 pieces in total. |
||
| + | |1 How do I know you are telling the truth? |
||
| − | ''Tip: You can use another smoke bomb before the previous one dissipates, enter a building before your smoke shroud vanishes. Once in a building, immediately close the door.'' |
||
| + | }} |
||
| − | *Fix all 4 pieces and wear them. You no longer need to hide in smoke. |
||
| + | * Teleport to Meiyerditch with the medallion {{Chat options|2}} and take the [[Vanescula's offer|envelope]] to [[Safalaan]]. |
||
| − | *Return to Vanescula, and she will tell you you'll need to be a more respected vampyre to be allowed in the higher tiers of the city. |
||
| + | * Talk to Vertida. {{Chat options |
||
| + | |1 What do I need to go to Darkmeyer? |
||
| + | }} |
||
| + | * Head southwest to crates. Search them for 30 [[smoke bomb]]s. |
||
| + | * With your medallion, teleport to the [[Meiyerditch Laboratories]]. {{Chat options|3}} |
||
| + | * Go up the stairs, open the door, go through the slashed tapestry, and out of the building. |
||
| + | * Run north and ''squeeze-through'' the grate on the north wall. |
||
| + | * Talk to [[Vanescula Drakan|Vanescula]] on the other side of the grate. {{Chat options |
||
| + | |1 What did you tell Safalaan? |
||
| + | |1 So, where's this tree? |
||
| + | |1 Yes |
||
| + | |2 I'll get on with it, then. |
||
| + | }} |
||
| + | ** In Darkmeyer, the [[vyrewatch]] will attack you when you pass them, as opposed to in [[Meiyerditch]]. |
||
| + | * Use the smoke bombs to avoid being caught by [[vampyre juvinates]]. Do not go near vyrewatch. |
||
| + | * Search chests inside buildings to find clothing, 4 pieces in total. |
||
| + | ** You can use another smoke bomb before the previous one dissipates, enter a building before your smoke shroud vanishes. Once in a building, immediately close the door. |
||
| + | * Fix all 4 pieces and wear them. You no longer need to hide in smoke. |
||
| + | * Return to Vanescula. {{Chat options |
||
| + | |1 So can I go and get those logs now? |
||
| + | |1 No, of course not. |
||
| + | }} |
||
===Gaining Status=== |
===Gaining Status=== |
||
| + | [[File:The Branches of Darkmeyer map.png|link=Map:The Branches of Darkmeyer|right|300px]] |
||
| − | *Walk up the ramp at the north-east of the ground floor level of the city, and talk to [[Sentinel Mortshade]]. |
||
| + | * Walk up the ramp to the north-east to enter the ground floor level of the city. |
||
| − | *Tell him what your vampyre name is, which will be your name from then on. |
||
| + | * Talk to [[Sentinel Mortshade]], telling him your vampyre name. {{chat option|any|any}} |
||
| − | :<span style="color: lightgreen; ">[[File:Darkmeyer_Map.png|left|400px]]●</span> '''V''' - [[Vanescula Drakan]] |
||
| + | * Completing vampyric tasks below increases your rating. After completing enough tasks in the middle tier of the city, your rating bar will be half full, allowing progression into the next tier of the city. |
||
| − | :<span style="color: yellow; ">●</span> '''A''' - [[Grigan Kaninus]] |
||
| + | * Talk to the Vyrewatch guard in the northeastern jail. |
||
| − | :<span style="color: yellow; ">●</span> '''B''' - [[Valentina Kaust]] |
||
| − | :<span style="color: yellow; ">●</span> '''C''' - [[Sanguinus Varnis]] |
||
| − | :<span style="color: yellow; ">●</span> '''D''' - [[Maria Gadderanks]] |
||
| − | :<span style="color: yellow; ">●</span> '''E''' - Sentinel Bloodmortis |
||
| − | :<span style="color: yellow; ">●</span> '''F''' - [[Misdrievus Vakan]] |
||
| − | :<span style="color: yellow; ">●</span> '''G''' - [[Captured Meiyerditch citizen]]s |
||
| − | :<span style="color: red; ">●</span> '''H''' - [[Ranis Drakan]]. |
||
| − | :<span style="color: green; ">'''▬'''</span> - Poster |
||
| − | :<span style="color: blue; ">▪</span> - Common position for [[Bloodveld youngling]]s |
||
| + | ====Middle tier==== |
||
| − | {{Clear}} |
||
| − | + | Complete either of the following tasks until you reach a half-full rating bar and access to the upper tier (proceed to next section). |
|
| + | {| class="wikitable lighttable" |
||
| + | |Terrorising [[Maria Gadderanks]] {{Chat options |
||
| + | |1 Quiet, rat. |
||
| + | |1 What a shame. I'm going to be back later for a tithe. |
||
| + | }}, {{Chat options |
||
| + | |1 Enough, vermin! |
||
| + | |1 He's dead. |
||
| + | }}, {{Chat options |
||
| + | |1 Silence, wretch! |
||
| + | |1 Perhaps we need to 'dispose' of this one. |
||
| + | }} |
||
| + | |- |
||
| + | |Using the [[Angry]] or [[Laugh]] emotes several times next to Maria Gadderanks |
||
| + | |- |
||
| + | |Talking to Maria while wielding the [[Gadderhammer]] |
||
| + | |- |
||
| + | |Talking to [[Valentina Kaust]] {{chat option|1 Ok}} and drink the vial of blood she gives you {{chat option|1 Yes}}, then {{chat option|2 Oh yes, it was the best blood ever.}} |
||
| + | |- |
||
| + | |Vandalising the 4 posters (after getting the task by speaking with [[Sanguinus Varnis]]) and then reporting back to [[Sanguinus Varnis]] again. |
||
| + | |- |
||
| + | |Recapturing 6 [[bloodveld youngling]]s (after talking to [[Grigan Kaninus]] {{chat option|1 Perhaps I could help you get them back?}}). These vanish for long periods of time, so they can appear in places you've already checked. They are displayed as yellow dots on the minimap. |
||
| + | |- |
||
| + | |Talking to [[Sentinel Mortshade]] about the threats to Darkmeyer, while constantly insulting the Myreque, the humans and Drakan. (three conversations) |
||
| + | |- |
||
| + | |Talking to [[Sentinel Draemus]] about citizens in Meiyerditch, the Myreque and Burgh de Rott. (three conversations) |
||
| + | |} |
||
| + | ====Upper tier==== |
||
| − | These are the tasks available in the middle tier: |
||
| + | {| class="wikitable lighttable" |
||
| + | |Entertaining [[Misdrievus Vakan]] {{chat option|1 What do I need to do?}} then ''approach'' the nearby [[blood tither]]. Talk to [[Misdrievus Vakan]], and then enter the building to the west for a cutscene. {{chat option|2 No, I didn't see anything!|1 I think he deserves to die.}} |
||
| + | |- |
||
| + | |Speaking to [[Vanescula Drakan]] to pledge allegiance to the Drakan family. {{chat options |
||
| + | |1 How do I do that? |
||
| + | |1 I pledge fealty to the Drakan family. |
||
| + | |1 I devote my service, land an power to the Drakan before me. |
||
| + | }} |
||
| + | |- |
||
| + | |Killing [[Captured Meiyerditch citizen]]s for the [[Vyrewatch guard]]s. Start task by talking to a Vyrewatch guard in southwestern jail. {{chat option|1 Yes!|1 Ok.}} |
||
| + | |- |
||
| + | |Talking to any upper tier sentinel and discuss your opinion of [[Vanstrom Klause]]. {{chat option|1 I think he's a noble vyre.}} |
||
| + | |- |
||
| + | |Talking to any upper tier sentinel and discuss your opinion of [[Lord Drakan]]. {{chat option|3 You should not question him.}} |
||
| + | |} |
||
| + | ===The Arboretum=== |
||
| − | *'''C - '''Vandalising posters put up by vyrelords and ladies. This task is given by [[Sanguinus Varnis]]. |
||
| + | * After gaining enough status in the upper tier, talk to Vanescula about entering the Arboretum. {{chat option |
||
| − | *'''D - '''Terrorising [[Maria Gadderanks]]. |
||
| + | |1 I'll be off to the Arboretum, then.}} |
||
| − | *'''D - '''Talk to Maria while wielding the [[Gadderhammer]]. |
||
| + | * Enter the Arboretum (Ranis will stop you). {{chat options |
||
| − | *'''D - '''Talking to Maria Gadderanks. |
||
| + | |1 Of course not! |
||
| − | *'''D - '''Using the [[Angry]] or [[Laugh]] emotes a few times next to Maria Gadderanks (also possible after she has been freed). |
||
| + | |1 I hereby pledge fealty to you, Ranis Drakan. |
||
| − | *'''B - '''Talking to [[Valentina Kaust]]; drink the vial of blood she gives you, then select any of the options. '''Warning:''' Drinking the blood damages you for half your health. |
||
| + | }} |
||
| − | *'''A - '''Recapture [[bloodveld youngling]]s (after talking to [[Grigan Kaninus]]). These vanish for long periods of time, so they can appear in places you've already checked. [1 or 2 have reportedly been found on lower tier.] |
||
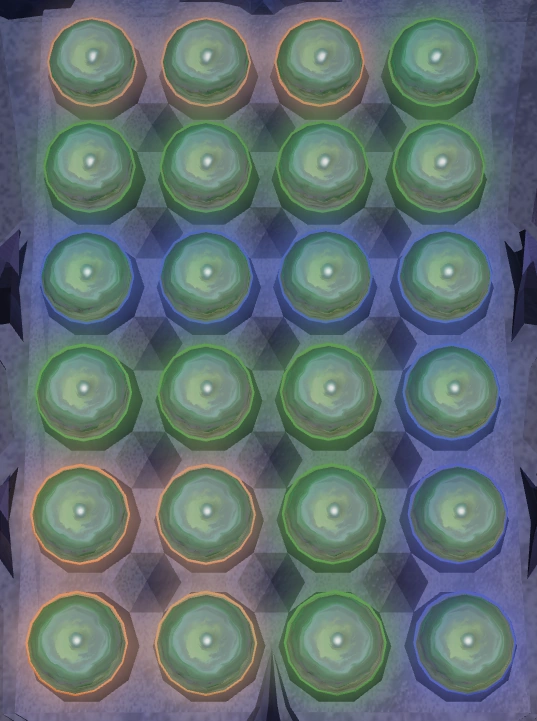
| + | * Solve the 4 puzzles: |
||
| − | *Talk to [[Sentinel Gorthaur]] about citizens in Meiyerditch, the Myreque and Burgh de Rott (three conversations). |
||
| + | ** Check the health of the tree for the orb pattern. |
||
| + | ** Pull the lever to start the first puzzle. |
||
| + | ** Rotating the orbs by clicking the left-bottom orb of a group of four orbs. |
||
| + | ** Match the orbs to the puzzle solution. |
||
| + | ** When the puzzle is complete, pull the lever. |
||
| + | * Check the health of the tree again. Repeat the process for all 4 puzzles. |
||
| + | [[File:Bodtreesolution1.png|left|thumb|Puzzle 1 solution]] |
||
| − | And for the upper tier: |
||
| + | [[File:Bodtreesolution2.png|left|thumb|Puzzle 2 solution]] |
||
| − | *'''F - '''Entertain [[Misdrievus Vakan]] by humiliating a [[blood tither]]. |
||
| − | *'''F(west) - '''Subsequently talking to the [[Tithe master]] about the tither. The options chosen do not affect the amount of status gained. |
||
| − | *'''V - '''Speak to [[Vanescula Drakan]] to pledge allegiance to the Drakan family. |
||
| − | *'''G - '''Kill [[Captured Meiyerditch citizen]]s for the [[Vyrewatch guard]]s. |
||
| − | **If you refuse to kill the citizens anyway, the guard will instead ask you to go and get him some blood from the Dark Meyer Blood Trader. Remember the blood types he asks for. The trader will initially refuse as you haven't got any money. He will instead ask you to recover money for him from a werewolf. The werewolf is infact the [[Canifis settler]] located in the lowest tier of Darkmeyer. You will need [[Wolfbane]] dagger (Use it on her) to persuade her to give you [[Darkmeyer notes]]. Trade with the [[Darkmeyer blood trader]] and get the blood types the guard requested. Return to the guard to gain status. |
||
| − | *'''E - '''Talk to any upper tier sentinel and discuss your opinion of [[Vanstrom Klause]]. |
||
| − | *Talk to a Sentinel and discuss your opinion of [[Lord Drakan]]. |
||
| + | [[File:Bodtreesolution3.png|left|thumb|Puzzle 3 solution]] |
||
| − | ===The Arboretum=== |
||
| + | |||
| − | *After gaining enough status in the upper tier, talk to Vanescula and she will tell you to enter the Arboretum. |
||
| + | [[File:Bodtreesolution4.png|left|thumb|Puzzle 4 solution]] |
||
| − | *Ranis will stop you when opening the doors, and give you a blood mark, which deals some damage. |
||
| + | |||
| − | *Check the health of the tree. |
||
| + | {{Clear|both}} |
||
| − | *Pull the lever, and put the orbs in the order from top to bottom of blue-yellow-green. Rotating the orbs is done by clicking the left-bottom orb of a group of four orbs. |
||
| + | * Chop the tree for 3 blisterwood logs and a cutscene will play. |
||
| − | [[File:Bodtreesolution1.png|center|thumb|Puzzle 1 solution]] |
||
| + | * In the entrance room left, talk to Vanescula to be teleported to out of Darkmeyer. {{chat option|1 But the vampyres will be furious! You've betrayed us!}} |
||
| − | *Then pull the lever again, and check the health of the tree again. |
||
| + | |||
| − | *Pull the lever and then rotate the orbs to green-blue-yellow-green, and pull the lever again. |
||
| + | ===Preparing for the fight=== |
||
| − | [[File:Bodtreesolution2.png|center|thumb|Puzzle 2 solution]] |
||
| + | * Use the medallion to go to Meiyerditch. {{Chat options|3}} |
||
| − | *Check the tree's health again, and pull the lever again. This pattern is a bit more complex. |
||
| + | * Talk to [[Vertida Sefalatis]]. {{Chat options |
||
| − | *Put the orbs in the pattern of the top row and the 3rd row being green-blue-green-blue and the 2nd and 4th row being yellow. Pull the lever again and check the tree's health again, and then again pull the lever. |
||
| + | |1 I managed to get some logs from the blisterwood tree. |
||
| − | [[File:Bodtreesolution3.png|center|thumb|Puzzle 3 solution]] |
||
| + | |1 We may be able to trust her, yes. |
||
| − | *This time, put all blue orbs at the top, then put the green orbs below them, and put the yellow orbs below that. The yellow orbs may not touch the blue orbs, but any other combination is allowed.[[File:Bodtreesolution4.png|center|thumb|Puzzle 4 solution]] |
||
| + | |1 I'd be happy to dispatch one of the Myreque's most fearsome opponents. |
||
| − | *Now chop the tree to get 3 blisterwood logs. A cutscene will play. |
||
| + | }} |
||
| − | *Talk to Vanescula and you will be teleported to out of Darkmeyer. |
||
| + | * Talk to Vertida again for a [[Vertida's bottle of holy water|bottle of holy water]]. |
||
| − | *Use the medallion to go to "Meiyerditch", and talk to [[Vertida Sefalatis]]. |
||
| − | *Talk to [[Kael Forshaw]] |
+ | * Talk to [[Kael Forshaw]] for 2 silver sickles. {{Chat options |
| + | |1 Do you have any sickles I could use? |
||
| − | *Craft the logs into a [[Blisterwood staff|staff]], some [[Blisterwood stake|stakes]] and a [[Blisterwood polearm|polearm]]. MAKE SURE YOU CREATE ONE OF EACH. |
||
| + | |2 That's all, thanks. |
||
| − | *You will also be given a bottle of holy water, which is required for the fights with [[Vanstrom Klause]] and [[Harold (monster)|Harold]]. |
||
| + | }} |
||
| − | *Use the medallion to teleport back to Darkmeyer, and bank at the Darkmeyer Treasury. |
||
| + | * Craft each of the logs into 1 [[Blisterwood staff|staff]], 1 [[Blisterwood polearm|polearm]], and 1 set of [[Blisterwood stake|stakes]]. |
||
| − | *Enter the house with [[Harold]] in it (just north-east of the captured citizens), and kill him with any weapon. You must throw the [[Vertida's bottle of holy water|bottle of holy water]] over him to be able to kill him. |
||
| + | ** Remember to set the quantity to 1 in the Build-X interface or you will lose the logs permanently. |
||
| − | *Go back to the bank, and prepare for the final fight with [[Vanstrom Klause]]. |
||
| + | * The bottle of holy water is required for the fights with [[Vanstrom Klause]] and [[Harold (monster)|Harold]]. |
||
| + | * Use the medallion to teleport back to Darkmeyer {{Chat options|4}}, and bank at the Darkmeyer Treasury. |
||
| + | * Enter the house with [[Harold]] in it (just north-east of the captured citizens), and kill him with any weapon. You must throw the [[Vertida's bottle of holy water|bottle of holy water]] over him to be able to kill him. |
||
| + | * Go back to the bank, and prepare for the final fight with [[Vanstrom Klause]]. |
||
===The battle with Vanstrom=== |
===The battle with Vanstrom=== |
||
| + | {{Needed|Equip full [[Darkmeyer disguise]], [[Vertida's bottle of holy water]], 1 blisterwood weapon of choice |
||
| − | For this part of the quest, see [[The Branches of Darkmeyer#The Battle with Vanstrom|the full quest guide's description]]. The quick guide continues at the point where Vanstrom died. |
||
| + | |recommended=Combat armour, [[prayer potion]]s, stat-boosting potions}} |
||
| + | * How to kill Vanstrom: |
||
| + | ** Only blisterwood weaponry can deal damage. |
||
| + | ** If you're attacking at a distance use magic protection prayers, otherwise protect from melee. |
||
| + | ** If he shouts '''"Stare into the darkness!"''' run to the edge of the arena and rotate your camera away from him. '''Maximum 4000 damage'''. |
||
| + | ** If he shouts '''"Let the blood consume you!"''' run away from the blood splodge on the floor. '''Maximum 6000 damage'''. |
||
| + | ** If he shouts '''"Come, fiends, and aid your master!"''' kill the two easy minions that he spawns. |
||
| + | ** If he throws '''blood bombs''' towards you, keep running around the room to avoid them. '''Maximum 4000 damage per bomb'''. |
||
| + | ** Once he is very low health he turns into a cloud. Keep using holy water near him until he loses all health. Unequip your [[ring of life]] if you're wearing one! |
||
===Finishing up in Darkmeyer=== |
===Finishing up in Darkmeyer=== |
||
| − | * |
+ | * Take control of Vanescula and kill the [[Bloodveld guardian]]s. |
| + | ** It is recommended to use the Shriek attack repeatedly as soon as it recharges. |
||
| − | *You will get control of Vanescula, and you have to kill the [[Bloodveld guardian]]s coming towards you. |
||
| + | * When you awaken, speak with [[Vertida Sefalatis|Vertida]] {{Chat options|1 Vanstrom believed that Safalaan may be the Icyene blood.|1}}, and watch a short cutscene. |
||
| − | *You cannot attack them directly, only through the attack style menu using a series of special attacks. |
||
| + | * Teleport to Burgh de Rott and talk to [[Veliaf Hurtz]]. {{Chat option|1 Vanstrom is dead!}} |
||
| − | *Dart deals high damage to all bloodvelds lined up, Shadow stalk deals very high damage to one bloodveld and Scream deals average damage to all nearby bloodvelds. |
||
| + | * Quest complete! |
||
| − | *It is recommended to use the Scream attack repeatedly as soon as it recharges. |
||
| + | |||
| − | *When you awaken, speak with Vertida and watch a short cutscene |
||
| + | ==Rewards== |
||
| − | *Talk to [[Veliaf Hurtz]] after the cutscenes and dialogues are finished, and tell him you killed [[Vanstrom Klause]]. |
||
| − | {{ |
+ | {{Quest rewards page|The Branches of Darkmeyer}} |
| + | |||
| + | {{The Branches of Darkmeyer}} |
||
| + | {{DEFAULTSORT:Branches of Darkmeyer/Quick guide, The}} |
||
[[Category:The Branches of Darkmeyer| ]] |
[[Category:The Branches of Darkmeyer| ]] |
||
Latest revision as of 17:07, 18 July 2018
Walkthrough
| Start point | |||
|---|---|---|---|
| Member requirement | |||
| Official difficulty | |||
| Official length | Long | ||
| Requirements | Skill requirements are not boostable unless marked with a [B] for boostable.
| ||
| Items required | Items from the tool belt are not listed unless they do not work or are not automatically added.
Recommended items:
| ||
| Enemies to defeat |
|
Starting out
- Teleport to Canifis or use fairy code BKR, and run south to Burgh de Rott.
- Enter the pub, climb over the broken down wall, and descend into the trapdoor.
- Talk to Veliaf Hurtz in the Burgh de Rott pub's basement. (
 •••)
•••) - South of the Burgh de Rott bank, enter the cave entrance.
- Take the letter on the floor.
- Search the coffin for a mysterious medallion (deals small amount of damage). ( 1)
- Climb the rope to leave the cave.
- Return to Veliaf Hurtz. ( •)
An unexpected help
- Once teleported, head in the northernmost room.
- The medallion can also teleport you to the Meiyerditch Labratories.
- Talk to Safalaan. ( •••••)
Traversing Meiyerditch

- Teleport to the Meiyerditch Laboratories with your medallion. ( 3)
- Go upstairs, open the door, pass through the slashed tapestry and exit the building.
- Run between the houses to the area (south-west) highlighted in blue on your world map.
- Open the door to the eastern building with Vertida Sefalatis and talk to him.
- Climb the wall and speak to Mekritus A'hara.
- Stand on the lookout point for a cutscene.
- Drop-down the floorboards to the east.
- Talk to Nessie who is in the courtyard south of the building. ( •)
Entering Darkmeyer
- Attack Vanescula Drakan - she will knock you back.
- Talk to her and exhaust all options, eventually learning about the tree. ( •••••••••)
- Teleport to Meiyerditch with the medallion ( 2) and take the envelope to Safalaan.
- Talk to Vertida. ( )
- Head southwest to crates. Search them for 30 smoke bombs.
- With your medallion, teleport to the Meiyerditch Laboratories. ( 3)
- Go up the stairs, open the door, go through the slashed tapestry, and out of the building.
- Run north and squeeze-through the grate on the north wall.
- Talk to Vanescula on the other side of the grate. ( •••)
- In Darkmeyer, the vyrewatch will attack you when you pass them, as opposed to in Meiyerditch.
- Use the smoke bombs to avoid being caught by vampyre juvinates. Do not go near vyrewatch.
- Search chests inside buildings to find clothing, 4 pieces in total.
- You can use another smoke bomb before the previous one dissipates, enter a building before your smoke shroud vanishes. Once in a building, immediately close the door.
- Fix all 4 pieces and wear them. You no longer need to hide in smoke.
- Return to Vanescula. ( •)
Gaining Status
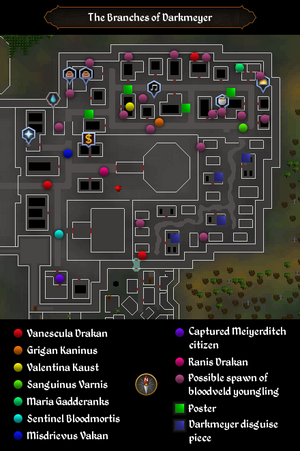
- Walk up the ramp to the north-east to enter the ground floor level of the city.
- Talk to Sentinel Mortshade, telling him your vampyre name. ( •)
- Completing vampyric tasks below increases your rating. After completing enough tasks in the middle tier of the city, your rating bar will be half full, allowing progression into the next tier of the city.
- Talk to the Vyrewatch guard in the northeastern jail.
Middle tier
Complete either of the following tasks until you reach a half-full rating bar and access to the upper tier (proceed to next section).
| Terrorising Maria Gadderanks ( |
| Using the Angry or Laugh emotes several times next to Maria Gadderanks |
| Talking to Maria while wielding the Gadderhammer |
| Talking to Valentina Kaust ( |
| Vandalising the 4 posters (after getting the task by speaking with Sanguinus Varnis) and then reporting back to Sanguinus Varnis again. |
| Recapturing 6 bloodveld younglings (after talking to Grigan Kaninus ( |
| Talking to Sentinel Mortshade about the threats to Darkmeyer, while constantly insulting the Myreque, the humans and Drakan. (three conversations) |
| Talking to Sentinel Draemus about citizens in Meiyerditch, the Myreque and Burgh de Rott. (three conversations) |
Upper tier
| Entertaining Misdrievus Vakan ( |
| Speaking to Vanescula Drakan to pledge allegiance to the Drakan family. ( |
| Killing Captured Meiyerditch citizens for the Vyrewatch guards. Start task by talking to a Vyrewatch guard in southwestern jail. ( |
| Talking to any upper tier sentinel and discuss your opinion of Vanstrom Klause. ( |
| Talking to any upper tier sentinel and discuss your opinion of Lord Drakan. ( |
The Arboretum
- After gaining enough status in the upper tier, talk to Vanescula about entering the Arboretum. ( )
- Enter the Arboretum (Ranis will stop you). ( •)
- Solve the 4 puzzles:
- Check the health of the tree for the orb pattern.
- Pull the lever to start the first puzzle.
- Rotating the orbs by clicking the left-bottom orb of a group of four orbs.
- Match the orbs to the puzzle solution.
- When the puzzle is complete, pull the lever.
- Check the health of the tree again. Repeat the process for all 4 puzzles.
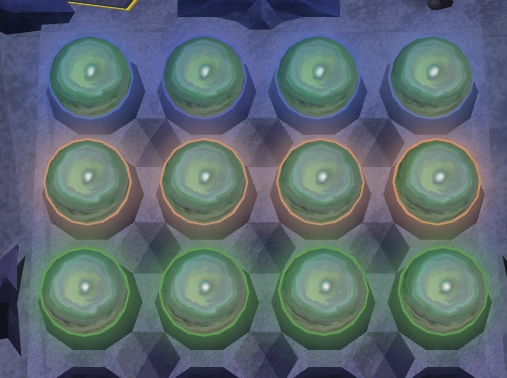

Puzzle 1 solution
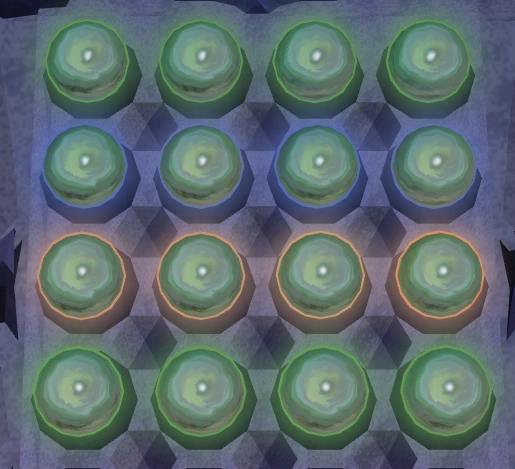

Puzzle 2 solution
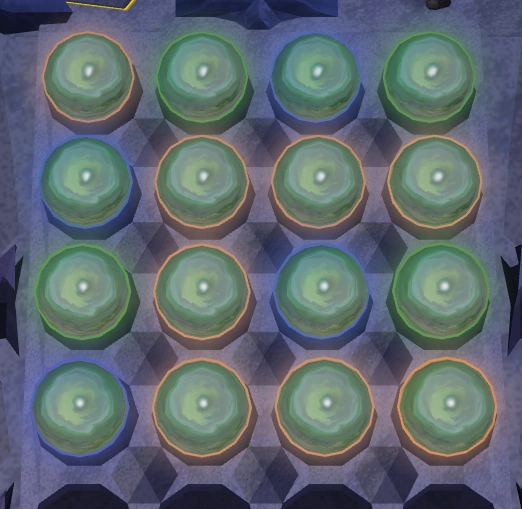

Puzzle 3 solution
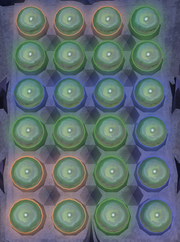
Puzzle 4 solution
- Chop the tree for 3 blisterwood logs and a cutscene will play.
- In the entrance room left, talk to Vanescula to be teleported to out of Darkmeyer. ( )
Preparing for the fight
- Use the medallion to go to Meiyerditch. ( 3)
- Talk to Vertida Sefalatis. ( ••)
- Talk to Vertida again for a bottle of holy water.
- Talk to Kael Forshaw for 2 silver sickles. ( •)
- Craft each of the logs into 1 staff, 1 polearm, and 1 set of stakes.
- Remember to set the quantity to 1 in the Build-X interface or you will lose the logs permanently.
- The bottle of holy water is required for the fights with Vanstrom Klause and Harold.
- Use the medallion to teleport back to Darkmeyer ( 4), and bank at the Darkmeyer Treasury.
- Enter the house with Harold in it (just north-east of the captured citizens), and kill him with any weapon. You must throw the bottle of holy water over him to be able to kill him.
- Go back to the bank, and prepare for the final fight with Vanstrom Klause.
The battle with Vanstrom
Items needed: Equip full Darkmeyer disguise, Vertida's bottle of holy water, 1 blisterwood weapon of choice
Items recommended: Combat armour, prayer potions, stat-boosting potions
Items recommended: Combat armour, prayer potions, stat-boosting potions
- How to kill Vanstrom:
- Only blisterwood weaponry can deal damage.
- If you're attacking at a distance use magic protection prayers, otherwise protect from melee.
- If he shouts "Stare into the darkness!" run to the edge of the arena and rotate your camera away from him. Maximum 4000 damage.
- If he shouts "Let the blood consume you!" run away from the blood splodge on the floor. Maximum 6000 damage.
- If he shouts "Come, fiends, and aid your master!" kill the two easy minions that he spawns.
- If he throws blood bombs towards you, keep running around the room to avoid them. Maximum 4000 damage per bomb.
- Once he is very low health he turns into a cloud. Keep using holy water near him until he loses all health. Unequip your ring of life if you're wearing one!
Finishing up in Darkmeyer
- Take control of Vanescula and kill the Bloodveld guardians.
- It is recommended to use the Shriek attack repeatedly as soon as it recharges.
- When you awaken, speak with Vertida ( •1), and watch a short cutscene.
- Teleport to Burgh de Rott and talk to Veliaf Hurtz. ( )
- Quest complete!
Rewards
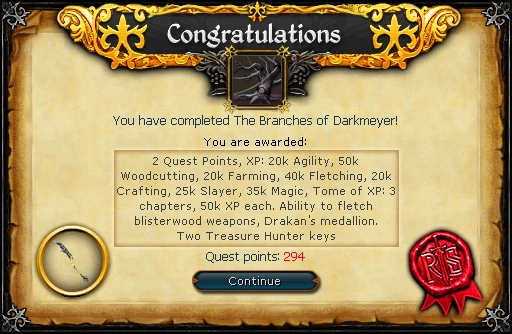
- 2 quest points
- 20,000 experience
- 50,000 experience
- 20,000 experience
- 40,000 experience
- 20,000 experience
- 25,000 experience
- 35,000 experience
- A tome of xp 3rd ed with three 50,000 experience chapters in any skill 60 or higher.
- Access to Darkmeyer.
- Ability to fletch and use Blisterwood weapons.
- Darkmeyer disguise (can be put into a Costume box in a Player-owned house).
- A new title depending on your status bar progress.
- Vyreling [Name] (0–24%)
- Vyre Grunt [Name] (25–49%)
- Vyrewatch [Name] (50–99%)
- Vyrelord / Vyrelady [Name] (100%)
- Drakan's medallion, allowing teleportation to various places in Morytania (Barrows, Burgh de Rott, Meiyerditch, Darkmeyer and Meiyerditch Dungeon).
- Ability to receive Vyrewatch as a Slayer task from Chaeldar, Sumona, Duradel or Lapalok, Kuradal, and Morvran.
- Access to a Bloodwood tree outside the arboretum.
- 2 Treasure Hunter keys and 2 Hearts of Ice
- Music unlocked
- Darkmeyer (upon entering Darkmeyer)
- Arboretum (upon entering the Arboretum)
- Upir Likhyi (upon entering the large chamber in Vanstrom's house)
- Vanescula Fight (when Vanescula Drakan defeats the bloodveld guardians)