Walkthrough
| Start point | |||
|---|---|---|---|
| Member requirement | |||
| Official difficulty | |||
| Official length | Very, Very Long | ||
| Requirements | Skill requirements are not boostable unless marked with a [B] for boostable.
| ||
| Items required | Items from the tool belt are not listed unless they do not work or are not automatically added.
Recommended:
| ||
| Enemies to defeat |
|
Getting started
- Talk to Sir Tiffy Cashien in Falador Park about the Ritual of the Mahjarrat.
- Tell him "I'll get right on it" and accept the teleport.
Mos Le'Harmless
- Find Sir Tendeth in the larger of the two pubs on Mos Le'Harmless.
- Talk to Tendeth after the cutscene.
- Talk to the pirates outside.
The Mighty Jungle
Items recommended: Food and armour as well as protection against dragonfire
- Note: It is highly recommended to have auto-retaliate off for this portion of the quest. Minimum graphics may also make it easier to see the safe areas.
- Using the western side of the trees as cover and following the burnt areas, head to the east side of the island.
- Tip: You can hide behind tropical trees and the small burnt trees. The magic "surge" ability may help.
- Tip: The music will change when you are not behind cover.
- Tip: You can use surge at the final tree to teleport and trigger the cutscene.
- Tip: If hit by a fireball, heal with the nearby bank's healing effect
- Warning: Remaining in the open for too long will cause a fireball to do damage and reset the player to the town gates.
- After the cutscene, report back to Sir Tiffy.
The Archives
Items needed: Catspeak amulet (e)
- Talk to Sir Tiffy and explain the situation to him.
- Tell Lady Table and Sir Tiffy that Robert the Strong reincarnated as Bob. Also tell them that you think you are the stonetoucher.
- Use the Catspeak Amulet to find Bob.
- Once found, ask him for his collar.
Kethsi
Items needed: Bob's collar, a Spade, a Pickaxe, eight empty inventory spaces, and weight reduction gear for agility course next part to reduce chance of falling.
Items recommended: Food
Items recommended: Food
- Go through any fairy ring to Zanaris.
- Study Bob's collar - the back too!
- At the main fairy ring, dial DIR and then dial AKS.
- Head north and search the rubble in the centre of the island to get Tetrahedron 4.
- Go southeast and up a ramp.
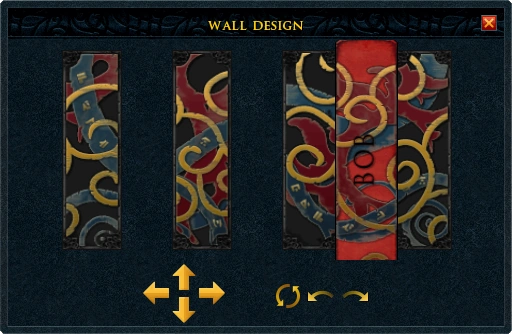

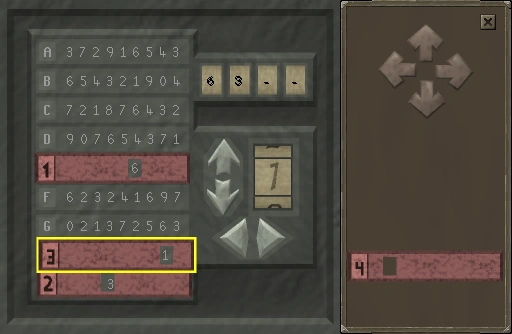
An almost completed puzzle. In this state, the collar must be moved upwards. (Click to enlarge.)
- Use Bob's collar on the wall design and, using the buttons on the bottom, solve the puzzle.
- Once solved, investigate the design.
- Note: Robert's necklace has no use in the quest and may be banked.
- Go southwest and jump across the ledge.
- Use the Statue arm on the statue.
- Cross the fallen spire that appears and go down the ladder.
- Go east and up the wall jump.
- Climb the wall to the west then use the swing pole to the north.
- Walk across the beam and jump east over the gap.
- Jump down a floor to the south and go down the southern ladder twice.
- Squeeze through the pipe to the east and use a pickaxe to mine the rocks.
- Climb the nearby wall and run across the walls to the west. (If you fail either wall run or the handholds, go back to the pipe)
- Climb across the handholds then go down the ladder.
- Go east (along the north coast) and search the rubble to find Tetrahedron 3 and a Strange device.
- Go back up the ladder twice and jump across the floor to the south.
- Slide down the roof to the south and walk across the plank to the south.
- Search the rubble to find Tetrahedron 2.
The Lost Library
- Once all four tetrahedrons are collected, go down the stairs north of the area where Tetrahedron 2 was located.
- Use each tetrahedron on an indentation (on the walls close to the entrance)
- Check the quest journal for the code that must be found.
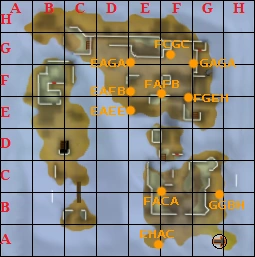
- Find the coordinates received and dig there with a spade. The Strange device tells you your current location.
- Below is a map of Kethsi with coordinates.
- Go back to the dungeon and through the door to the south.
- Search the southern bookcase for a message.
- (Optional) If you wish to learn the Lunar Spell Tune Bane Ore, you will find the scroll in the south east bookshelf.
Planning
- Read the message, then take it to Sir Tiffy.
- Go to the White Knights' Castle and talk to any one of them Idria, Thaerisk Cemphier, or Akrisae. Tell them what the message revealed.
- Tell Akrisae the following:
- So, instead, you'd risk all our lives?
- I can't think of another way.
- Yes, we'll have to be careful.
- I will risk my own life to negotiate.
- Go to the Senntisten Temple and talk to Azzanadra. Ask him about the quest.
Setting Up the Site
Items needed: Ring of visibility, Rope, and all items from the previous step.
Items recommended: Super energy potions, food, protection from dragonfire, and a weapon.
Items recommended: Super energy potions, food, protection from dragonfire, and a weapon.
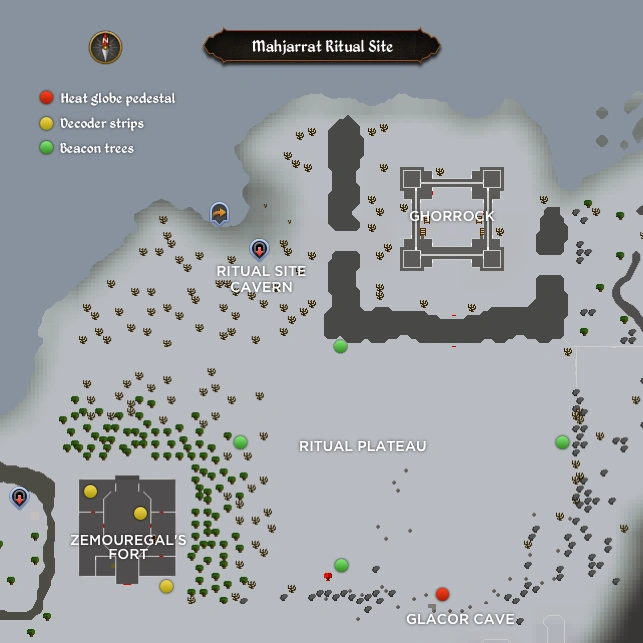
A map of the Ghorrock locations
- Go to Ghorrock and climb over the pillar in the southern part of the courtyard then go through the tunnel.
- Warning: Avoid the undead Broavs or the player will get thrown into Zemouregal's dungeon. To escape, search the bed and lift up the tiles to the east of the cell. Enter the tunnel to escape.
- Several items will need to be placed around the ritual site:
- Northern Beacon: Run west from the ice entrance at the north of the plateau. Place it on the closest tree.
- Southern Beacon: Run directly south, and place the second beacon in the tree southwest of the ritual stone. If this is done correctly, you should have a message saying the south beacon is opposite the northern beacon.
- Arrav's Heart: Place Arrav's heart in the rocks south of the ritual stone. (The site is several paces south of the marker and just a pace or two east.) If you cannot place the heart in a pile of rocks, you are at the wrong place.
- Western Beacon: Run up the west side of the plateau until you find a tree just north of a central line. Place the beacon here. Please note that using the tree just south of the central line will NOT work.
- Eastern Beacon: Run straight east and place the beacon on the tree directly opposite the western tree. You should have a message saying the east beacon is directly opposite the west beacon.
- Go to the north-west corner of the plateau and look for an 'overhanging tree' (it's a tree that cannot be chopped down). Use a rope on it to create a rope climb from the beach to the plateau. This will be used for your allies to climb to the ritual. (From now on, you can also use the rope yourself to get between the canoe landing site and the plateau without having to go past the dragons around Ghorrock.)
Zemouregal's Fort
- Head to Zemouregal's fort which is southwest of the ritual site.
- Kill the Armoured zombie outside of the main entrance and pick up the Code key and Decoder strips.
- Obtain the code from the key and strips.
- An example is below.
An example of the puzzle. The code reads EIHC, thus the final strip must be placed on the C, revealing that the number is 7.
- Go through the front door and climb the western staircase.
- Go through the hallway and examine Zemouregal and Sharathteerk.
- Go down and search the crate by the northeastern weapon rack for the storeroom's Code key.
- Read it and use it to open the storeroom door to the west in the same manner as the front entrance.
- In the northern part of the storeroom, search the crates.
- Read the Heart magic notes.
- Go up the eastern stairs and use the newly acquired Code key to enter the reliquary.
- Smash the Black stone in the southern half of the room.
Searching for the Stone of Jas
- Exit the fortress and head to the southeastern part of the ritual site.
- Talk to Movario.
- With the ring of visibility equipped, run west from Movario along southern wall of the site to find a shadow pedestal.
- Go back to Ghorrock and climb the stairs next to the statue of Khazard.
- Go east and climb down the stairs.
- Climb up the handholds next to the door then go past the smashed pedestal and jump down the wall at the next corner. Enter the trapdoor.
- Enter the room to the west and head south.
- Take the Heat globe and return to the shadow pedestal.
- Put the globe on the pedestal.
- Note: If you try to put heat globe on the shadow pedestal and it says "That could be a good idea, but you've got other things to do first.", it means either that the beacons are not aligned properly, you have not placed Arrav's heart in the rocks to the south of the Ritual marker, you haven't placed the rope to the north-west of the tunnel or you have not talked to Movario after having done so. If you are completely sure you have done all of these things, talk to Movario to the east of the shadow pedestal, and he will place the heat globe in the pedestal. A few players have removed a beacon from a tree and put in back in the tree - this also has worked. Some report that reading the notes/Dathana's message also fixes this.
The Ritual
Warning: Before doing this part, make sure to prepare for the final fight.
- Enter the newly opened entrance.
- Follow the open passageway and touch the Stone of Jas.
The Battle
Warning: Using an overload will cause you not to be able to hit, as it interferes with the Stone of Jas buff.
Khazard
- After the cutscenes, defeat Khazard.
- Note: It helps to pray against magic and when Bouncer is summoned, lure him to Wahisietel so that he dies.
Ice Titans
- Defeat the Enhanced ice titans. (Do not attack Lucien)
- Note: Lucien will be casting spells at the player whilst fighting the ice titans. If a smoking black skull is flying towards you, move at least two squares away from your current position. Also, praying melee completely negates damage from the titans' normal attacks. If ice starts encasing the player, they should run.
Ice Demons
- Defeat the Ice Demons
- Note: Praying against magic helps limit the damage the demons can cause. They will also summon icicles which will fall around the player. When this happens, run out of the icicles to avoid being trapped due to Lucien still casting the skull spell at the player.
Arrav
- Attack Arrav until he follows you.
- Note: You may have to attack the zombies before Arrav will follow you.
- Lure him over to where his heart is placed.
- Warning: If you have a combat follower out, it is best to dismiss it when Arrav starts following you. Otherwise, it is possible that the combat familiar and Arrav will fight. If this occurs when Arrav gets his heart back, the familiar's attack may distract Arrav from attacking Zemouregal. Instead, Arrav will stand near the rockpile where his heart was hidden and will not move. This is a glitch, and the only way to overcome it is to leave the battle, return, and fight the fourth battle again from its start.
The Broken Beacon
- Head to where the southern beacon was.
- Turn on a prayer against ranged or magic attacks and pick up the beacon pieces.
- Click on a piece to assemble all of them and then place the beacon back into the tree.
Finishing up
- Watch the cutscenes.
- Continue through the destroyed version of Draynor Village.
- Watch the last cutscene.
- Talk to Sir Tiffy.
- Quest complete!