(Undid revision 11224964 by 101.103.43.207 (Talk) - Toolbelt should work.) |
m (cleanup) |
||
| (51 intermediate revisions by 36 users not shown) | |||
| Line 1: | Line 1: | ||
| + | {{External|os}} |
||
{{Has quick guide}} |
{{Has quick guide}} |
||
{{Infobox Quest |
{{Infobox Quest |
||
|name = Horror from the Deep |
|name = Horror from the Deep |
||
| − | |image = [[File: |
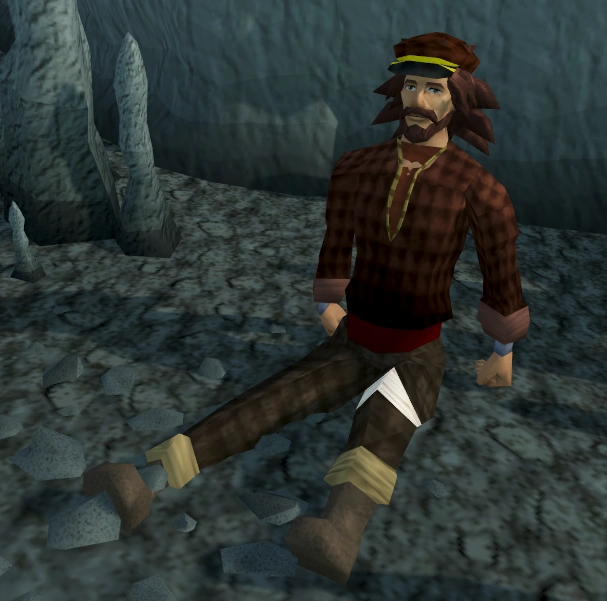
+ | |image = [[File:Horror from the Deep.png|200px]] |
|release = [[17 November]] [[2004]] |
|release = [[17 November]] [[2004]] |
||
|update = Horror From The Deep |
|update = Horror From The Deep |
||
| Line 8: | Line 9: | ||
|series = [[Fremennik quest series|Fremennik]] |
|series = [[Fremennik quest series|Fremennik]] |
||
|difficulty = Experienced |
|difficulty = Experienced |
||
| ⚫ | |||
|voice = No |
|voice = No |
||
| − | |number = |
+ | |number = 63 |
|developer = James B |
|developer = James B |
||
}} |
}} |
||
| Line 17: | Line 17: | ||
{{ToC}} |
{{ToC}} |
||
{{Clear|left}} |
{{Clear|left}} |
||
| − | |||
==Official description== |
==Official description== |
||
| − | {{ |
+ | {{Quote|The lighthouse protecting Kandarin's north western coastline has mysteriously stopped operating, and contact with the lighthouse keeper Jossik has been lost. |
The Council would greatly appreciate it if somebody could discover for them what has happened to this most vital landscape feature.}} |
The Council would greatly appreciate it if somebody could discover for them what has happened to this most vital landscape feature.}} |
||
| − | == |
+ | ==Walkthrough== |
{{Quest details |
{{Quest details |
||
|icon = Horror from the Deep icon.png |
|icon = Horror from the Deep icon.png |
||
| − | |start= Speak with [[Larrissa]], who is outside the [[Lighthouse]], north of [[Barbarian Outpost]]. |
+ | |start = Speak with [[Larrissa]], who is outside the [[Lighthouse]], north of [[Barbarian Outpost]]. |
|difficulty = Experienced |
|difficulty = Experienced |
||
| ⚫ | |||
| − | |length=Medium (Unless you haven't already done the [[Bar Crawl]] miniquest to enter the Barbarian agility course) |
||
| − | |members=Yes |
+ | |members = Yes |
| − | |requirements= |
+ | |requirements = |
{{Questreq|Horror from the Deep}} |
{{Questreq|Horror from the Deep}} |
||
| − | {{Skillreq|Agility|35}} |
+ | {{Skillreq|Agility|35}} |
'''Recommended:''' |
'''Recommended:''' |
||
{{Skillreq|Prayer|43}} |
{{Skillreq|Prayer|43}} |
||
| − | *Ability to defeat a level 100 and level 84 monster, the second one being tricky. |
+ | * Ability to defeat a level 100 and level 84 monster, the second one being tricky. |
| − | |items= |
+ | |items = |
'''For fixing the bridge:''' |
'''For fixing the bridge:''' |
||
| − | *60 [[steel nails]] |
+ | * 60 [[steel nails]] |
| − | *2 normal [[plank]]s (can be obtained during quest, just north of the [[Barbarian Outpost]]) |
+ | * 2 normal [[plank]]s (can be obtained during the quest, just north of the [[Barbarian Outpost]] agility course). |
'''For fixing the lighthouse mechanism:''' |
'''For fixing the lighthouse mechanism:''' |
||
| − | *[[Molten glass]] |
+ | * [[Molten glass]] |
| − | *1 [[swamp tar]] |
+ | * 1 [[swamp tar]] |
| − | *[[Tinderbox]] ( |
+ | * [[Tinderbox]] (tool belt does not work) |
'''For activating the wall:''' |
'''For activating the wall:''' |
||
| − | *1 [[Fire rune]] |
+ | * 1 [[Fire rune]] |
| − | *1 [[Water rune]] |
+ | * 1 [[Water rune]] |
| − | *1 [[Earth rune]] |
+ | * 1 [[Earth rune]] |
| − | *1 [[Air rune]] |
+ | * 1 [[Air rune]] |
| − | *A [[sword]] of any type that you are willing to lose |
+ | * A [[sword]] of any type that you are willing to lose |
| − | *An [[arrow]] of any type (except ogre and training) you are willing to lose |
+ | * An [[arrow]] of any type (except ogre and training) you are willing to lose |
| + | |recommended = |
||
| − | '''Recommended:''' |
||
| − | *A melee weapon (Ideally a slash weapon), a ranged weapon (ideally thrown weapons), and runes for all four elemental spells to switch amongst in combat |
+ | * A melee weapon (Ideally a slash weapon), a ranged weapon (ideally thrown weapons), and runes for all four elemental spells to switch amongst in combat |
| − | *[[Games Necklace]] and quick teleport tabs are very helpful to reach the Lighthouse during the quest. |
+ | * [[Games Necklace]] and quick teleport tabs are very helpful to reach the Lighthouse during the quest. |
| − | *[[POH|Houses]] by [[Rellekka]] are also helpful transportation methods. |
+ | * [[POH|Houses]] by [[Rellekka]] are also helpful transportation methods. |
| + | * [[Lighthouse Teleport]] for quick teleportation to Larrissa |
||
| − | |kills= |
+ | |kills = |
| ⚫ | |||
| − | *Level |
+ | * Level 100 [[Dagannoth|Baby Dagannoth]] |
| ⚫ | |||
}} |
}} |
||
| − | [[File:Lighthouse area.png|thumb|550px|center|The lighthouse.]] |
||
===Unattended=== |
===Unattended=== |
||
| − | [[File: |
+ | [[File:Larrissa chathead.png|left|Larrissa]] |
| + | [[File:Fixing lighthouse bridge.png|thumb|Fixing the bridge to the Lighthouse.]] |
||
| − | Travel to the [[Lighthouse]] by using an [[enchanted lyre]], a [[games necklace]] teleport to [[Barbarian Outpost]], a [[Teleport to House]], if your house is in |
+ | Travel to the [[Lighthouse]] by using an [[enchanted lyre]], a [[games necklace]] teleport to [[Barbarian Outpost]], a [[Teleport to House]], if your house is in Rellekka, or any other method that you wish. Start the quest by speaking to [[Larrissa]], who can be found standing just outside the lighthouse entrance. |
[[Larrissa]] tells you that she thinks that her boyfriend, who resides in the lighthouse, has gone missing as she hasn't seen him for a few days. To further her fears, the light is switched off and the front door bolted shut, which she says is unlike him. |
[[Larrissa]] tells you that she thinks that her boyfriend, who resides in the lighthouse, has gone missing as she hasn't seen him for a few days. To further her fears, the light is switched off and the front door bolted shut, which she says is unlike him. |
||
===Diary of the.. Presumably Dead=== |
===Diary of the.. Presumably Dead=== |
||
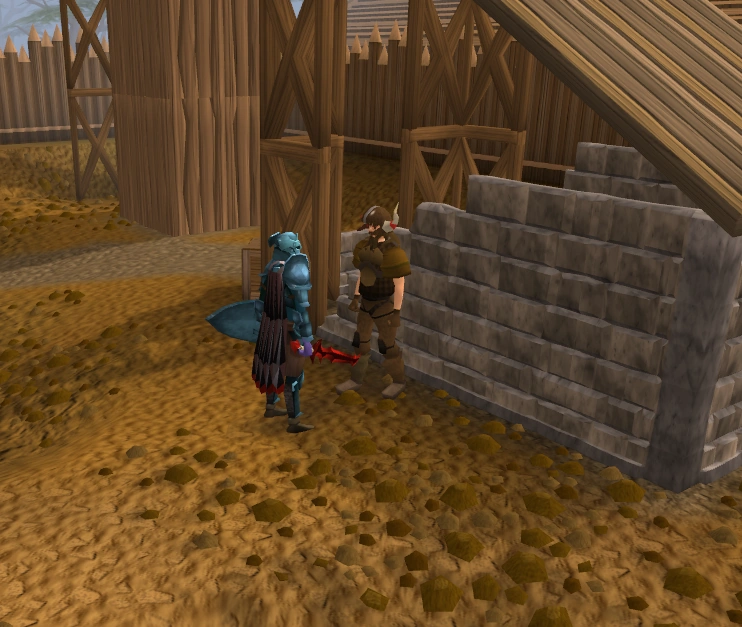
| − | [[File:HFTD - Gunnjorn.png|thumb|170px|A player speaking to Gunnjorn |
+ | [[File:HFTD - Gunnjorn.png|thumb|170px|A player speaking to Gunnjorn]] |
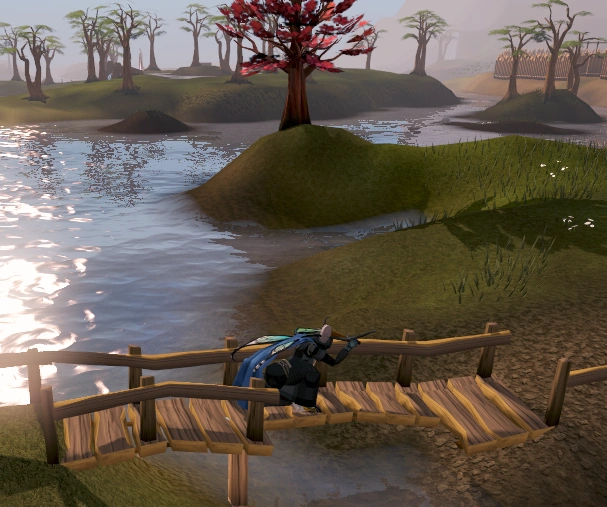
When you offer to help search for her boyfriend, Larrissa suggests you speak to [[Gunnjorn]] at the [[Barbarian Outpost]] for a spare key to the lighthouse and also fix the broken bridge to the east. |
When you offer to help search for her boyfriend, Larrissa suggests you speak to [[Gunnjorn]] at the [[Barbarian Outpost]] for a spare key to the lighthouse and also fix the broken bridge to the east. |
||
| − | + | To be able to enter the agility area and talk to Gunnjorn, you must have completed the [[miniquest]] [[Bar Crawl]]. |
|
| − | *Travel to the outpost by either using a [[games necklace]] teleport or by going south, across the basalt platforms. Talk to [[Gunnjorn]] |
+ | * Travel to the outpost by either using a [[games necklace]] teleport or by going south, across the basalt platforms. Talk to [[Gunnjorn]], in the agility course (next to the [[Talent Scout]]) and get the [[lighthouse key]]; you can get two planks here; they respawn just north of the outpost. |
| − | *With |
+ | * With 60 [[steel nails]] in your inventory, use the [[plank]]s on both sides of the broken bridge located east of Larrissa. You can cross the broken bridge by doing a small jump, so just hop to the other side and fix that part of the bridge. |
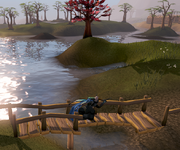
[[File:Lighthouse repaired.png|thumb|The fixed lighthouse.]] |
[[File:Lighthouse repaired.png|thumb|The fixed lighthouse.]] |
||
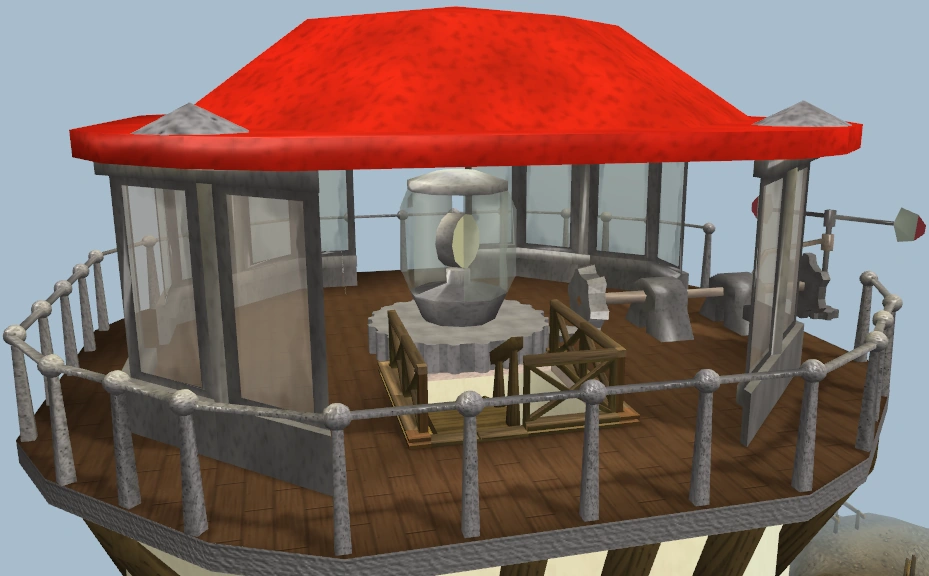
Go back and talk to Larrissa again, who now tells you to enter the lighthouse and search for [[Jossik]]. Inside the lighthouse, climb to the first floor and search the bookcase. Retrieve and flip through the [[manual|lighthouse manual]], [[ancient diary]] and [[Jossik's Diary|Jossik's diary]], which tells you about the history of the lighthouse and its inhabitants. |
Go back and talk to Larrissa again, who now tells you to enter the lighthouse and search for [[Jossik]]. Inside the lighthouse, climb to the first floor and search the bookcase. Retrieve and flip through the [[manual|lighthouse manual]], [[ancient diary]] and [[Jossik's Diary|Jossik's diary]], which tells you about the history of the lighthouse and its inhabitants. |
||
| − | *On the top level, use [[molten glass]], [[swamp tar]] ( |
+ | * On the top level, use [[molten glass]], [[swamp tar]] (not [[swamp paste]]) and a [[tinderbox]] on the lighting mechanism. The lighthouse will now be fixed. |
===Elementary=== |
===Elementary=== |
||
| Line 85: | Line 85: | ||
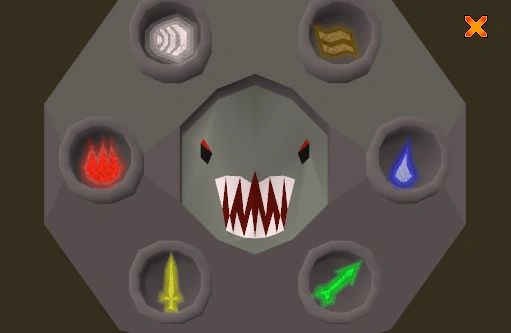
Go down to the basement of the lighthouse, where you will find a small cavern with a strange wall, having six empty slots fitted into its frame. |
Go down to the basement of the lighthouse, where you will find a small cavern with a strange wall, having six empty slots fitted into its frame. |
||
| − | *Use all of the basic elemental runes on the wall, (fire, water, earth, and air) |
+ | * Use all of the basic elemental runes on the wall, (fire, water, earth, and air) |
| − | *Use your [[sword]] and your [[arrow]] (any type, but remember that you will not get them back). |
+ | * Use your [[sword]] and your [[arrow]] (any type, but remember that you will not get them back). |
| ⚫ | |||
| − | ---- |
||
| ⚫ | |||
| − | ---- |
||
===Preparation=== |
===Preparation=== |
||
| Line 96: | Line 94: | ||
====Inventory==== |
====Inventory==== |
||
| − | *It is recommended to bring at least two types of attack styles, that is, either magic, melee or range. |
+ | * It is recommended to bring at least two types of attack styles, that is, either magic, melee or range. |
| − | *Bring good armour (at least [[rune equipment]], [[dragon hide armour]], or [[mystic |
+ | * Bring good armour (at least [[rune equipment]], [[dragon hide armour]], or [[mystic equipment]]), enough combat runes to cast several of each [[elemental spell]] (wind, water, earth, and fire). If possible, equip a [[ring of life]] and bring a one-click teleport just in case things get messy. |
| − | *Stock with [[prayer potion]]s and a [[super set]]. |
+ | * Stock with [[prayer potion]]s and a [[super set]]. |
====Combat==== |
====Combat==== |
||
| + | [[File:Dagannoth mother battle.png|thumb|The fight with the Dagannoth mother.]] |
||
If you cannot see the colour changes very well, look to the chat box. There would be a message "The Dagannoth mother turns (colour)..." Also, you can change the graphics to "safe mode" to brighten the scene, allowing you to see her colour clearly. Using the wrong type of attack incurs splash damage. |
If you cannot see the colour changes very well, look to the chat box. There would be a message "The Dagannoth mother turns (colour)..." Also, you can change the graphics to "safe mode" to brighten the scene, allowing you to see her colour clearly. Using the wrong type of attack incurs splash damage. |
||
| − | *By default, her first form is always white. The cycle of the colour changes of the Dagannoth mother seems to be totally random. |
+ | * By default, her first form is always white. The cycle of the colour changes of the Dagannoth mother seems to be totally random. |
| − | *She can detect prayer and will automatically switch to an attack type different to your protection prayer. By default, she ranges at a distance and melees up close. She can hit up to 160 with melee and accurate, double-120s with ranged, so [[Protect from Missiles]]/[[Deflect Missiles]] is recommended. |
+ | * She can detect prayer and will automatically switch to an attack type different to your protection prayer. By default, she ranges at a distance and melees up close. She can hit up to 160 with melee and accurate, double-120s with ranged, so [[Protect from Missiles]]/[[Deflect Missiles]] is recommended. |
| − | *If you stop attacking her at any point or take too long to finish her off, there is a possibility that she will disappear and you will have to start the fight again. |
+ | * If you stop attacking her at any point or take too long to finish her off, there is a possibility that she will disappear and you will have to start the fight again. |
| − | *If a player has reasonable [[defence]], they could consider using attack-boosting prayers instead, because the Dagannoth mother has a rather poor accuracy. |
+ | * If a player has reasonable [[defence]], they could consider using attack-boosting prayers instead, because the Dagannoth mother has a rather poor accuracy. |
| − | + | Get ready to face the mother! |
|
===The Horror=== |
===The Horror=== |
||
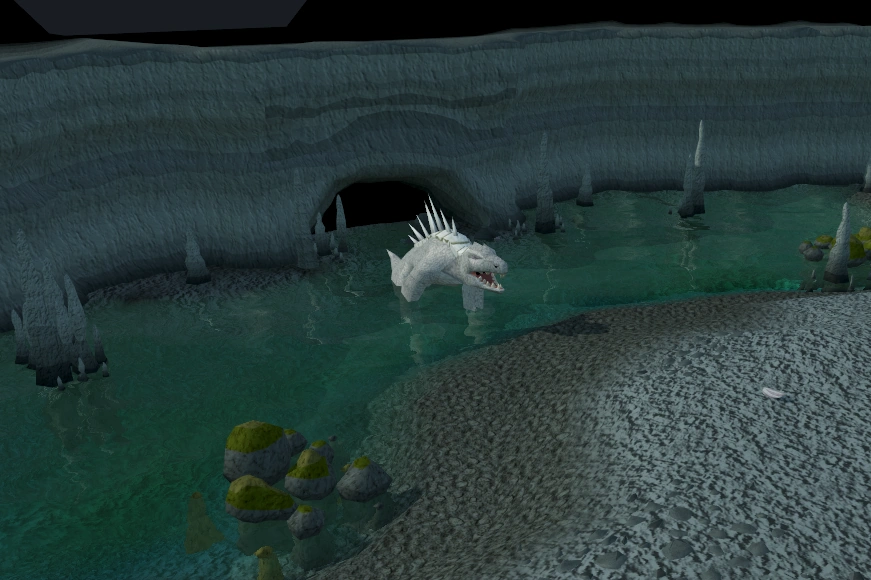
| − | [[File: |
+ | [[File:Jossik (Injured).png|thumb|Jossik, injured in the dungeon below the lighthouse.|100px]] |
Once you are ready, walk through the unlocked wall and down the ladder. You find Jossik alive, but hurt and resting against the dungeon wall. He tells you that his search for his lost uncle, Silas, had brought him past the secret door, but he was attacked by a monster who was able to trap him there. |
Once you are ready, walk through the unlocked wall and down the ladder. You find Jossik alive, but hurt and resting against the dungeon wall. He tells you that his search for his lost uncle, Silas, had brought him past the secret door, but he was attacked by a monster who was able to trap him there. |
||
| Line 159: | Line 158: | ||
As a reward from the Dagannoth mother, you obtain a [[rusty casket]]. Go to the first floor of the lighthouse and show it to Jossik. If you had a full inventory when defeating the Dagannoth mother, you will not receive a rusty casket. Instead, you must talk to Jossik, who will have picked it up for you. |
As a reward from the Dagannoth mother, you obtain a [[rusty casket]]. Go to the first floor of the lighthouse and show it to Jossik. If you had a full inventory when defeating the Dagannoth mother, you will not receive a rusty casket. Instead, you must talk to Jossik, who will have picked it up for you. |
||
| − | You may now choose a book affiliated with |
+ | You may now choose a book affiliated with three gods: [[Saradomin's Book of Wisdom]], [[Guthix's Book of Balance]] or [[Zamorak's Book of Chaos]]. Be sure to choose the same book twice in a row when he asks if you are sure about your selection. |
==Reward== |
==Reward== |
||
| + | {{Quest rewards |
||
| ⚫ | |||
| ⚫ | |||
| − | *2 [[quest point]]s |
||
| + | |qp = 2 |
||
| − | *4,662 {{Skill clickpic|Magic}} Experience |
||
| + | |rewards = |
||
| − | *4,662 {{Skill clickpic|Strength}} Experience |
||
| + | * {{sxp|Magic|4662}} |
||
| − | *4,662 {{Skill clickpic|Ranged}} Experience |
||
| + | * {{sxp|Strength|4662}} |
||
| ⚫ | |||
| + | * {{sxp|Ranged|4662}} |
||
| ⚫ | |||
| ⚫ | |||
| ⚫ | |||
| ⚫ | |||
| − | *{{Universal quest reward}} |
||
| ⚫ | |||
| − | |||
| + | * The ability to request [[Dagannoth]]s as a slayer task if the [[Mask of the Dagannoth]] is owned |
||
| − | ==Music unlocked== |
||
| + | |music = |
||
| − | *[[Out of the Deep]] |
+ | * [[Out of the Deep]] |
| − | *[[Lighthouse (music track)|Lighthouse]] |
+ | * [[Lighthouse (music track)|Lighthouse]] |
| + | }} |
||
==Required for completing== |
==Required for completing== |
||
Completion of Horror from the Deep is required for the following: |
Completion of Horror from the Deep is required for the following: |
||
| − | *[[Blood Runs Deep]] |
+ | * [[Blood Runs Deep]] |
| − | *[[Recipe for Disaster/Defeating the Culinaromancer]] |
+ | * [[Recipe for Disaster/Defeating the Culinaromancer]] |
| − | *[[Rag and Bone Man/Wish list]] ( |
+ | * [[Rag and Bone Man/Wish list]] (unless you have started [[The Fremennik Trials]]) |
| − | *[[Desert Tasks]]: |
+ | * [[Desert Tasks]]: |
| − | **'''[[Desert Tasks |
+ | ** '''[[Elite Desert Tasks|Elite]]:''' "Sun Shade" (the Dagannoth mother needs to be killed in a special match in the [[Dominion Tower]]) |
==Transcript== |
==Transcript== |
||
| − | {{ |
+ | {{Hasdialogue|quest}} |
==Cultural references== |
==Cultural references== |
||
| Line 192: | Line 193: | ||
==Trivia== |
==Trivia== |
||
| − | *The quest was originally named ''Lighthouse Quest''. |
+ | * The quest was originally named ''Lighthouse Quest''. |
* When you complete the quest, the scroll says: 'Congratulations! You have survived the Horror From The Deep!' This is one of the only quests that say something different to having completed a quest, along with [[My Arm's Big Adventure]], [[Between a Rock]], [[The Giant Dwarf]] and [[One Small Favour]]. |
* When you complete the quest, the scroll says: 'Congratulations! You have survived the Horror From The Deep!' This is one of the only quests that say something different to having completed a quest, along with [[My Arm's Big Adventure]], [[Between a Rock]], [[The Giant Dwarf]] and [[One Small Favour]]. |
||
| − | *It is impossible to obtain a book of Armadyl, Bandos, or Zaros as a reward for the quest. You can only choose to buy those books after you obtain |
+ | * It is impossible to obtain a book of Armadyl, Bandos, or Zaros as a reward for the quest. You can only choose to buy those books after you obtain one of the three books of Guthix, Saradomin or Zamorak. |
| − | * With the release of Legacy Mode, the combat level of most monsters and NPCs were scaled down. While the Dagannoth Mother was downgraded from 120 to 84, the Baby Dagannoth remains at 100. |
+ | * With the release of [[Legacy Mode]], the combat level of most monsters and NPCs were scaled down. While the Dagannoth Mother was downgraded from 120 to 84, the Baby Dagannoth remains at 100. |
| ⚫ | |||
{{Fremennik Series}} |
{{Fremennik Series}} |
||
[[nl:Horror from the Deep]] |
[[nl:Horror from the Deep]] |
||
[[fi:Horror from the Deep]] |
[[fi:Horror from the Deep]] |
||
| + | [[pt:Terror das Profundezas]] |
||
| ⚫ | |||
| − | [[Category:Wikia Game Guides quests]] |
||
Latest revision as of 12:56, 8 June 2019
| |||||||||||||||||||||||||
| Release date | 17 November 2004 (Update) | ||||||||||||||||||||||||
|---|---|---|---|---|---|---|---|---|---|---|---|---|---|---|---|---|---|---|---|---|---|---|---|---|---|
| Members | Yes | ||||||||||||||||||||||||
| Voice Over | No | ||||||||||||||||||||||||
| Official difficulty | Experienced | ||||||||||||||||||||||||
| Quest series | Fremennik | ||||||||||||||||||||||||
| Age | Fifth Age | ||||||||||||||||||||||||
| |||||||||||||||||||||||||
Horror from the Deep is an experienced quest revolving around the mysterious disappearance of Jossik, keeper of the Lighthouse near the Fremennik Province. As the title suggests, the investigations lead to the discovery of very dangerous creatures living beneath the lighthouse.
Official description
The lighthouse protecting Kandarin's north western coastline has mysteriously stopped operating, and contact with the lighthouse keeper Jossik has been lost. The Council would greatly appreciate it if somebody could discover for them what has happened to this most vital landscape feature.
Walkthrough
| Start point | |||
|---|---|---|---|
| Member requirement | |||
| Official difficulty | |||
| Official length | Medium | ||
| Requirements | Skill requirements are not boostable unless marked with a [B] for boostable.
Recommended:
| ||
| Items required | Items from the tool belt are not listed unless they do not work or are not automatically added.
For fixing the bridge:
For fixing the lighthouse mechanism:
For activating the wall:
| ||
| Recommended |
| ||
| Enemies to defeat |
|
Unattended

Fixing the bridge to the Lighthouse.
Travel to the Lighthouse by using an enchanted lyre, a games necklace teleport to Barbarian Outpost, a Teleport to House, if your house is in Rellekka, or any other method that you wish. Start the quest by speaking to Larrissa, who can be found standing just outside the lighthouse entrance.
Larrissa tells you that she thinks that her boyfriend, who resides in the lighthouse, has gone missing as she hasn't seen him for a few days. To further her fears, the light is switched off and the front door bolted shut, which she says is unlike him.
Diary of the.. Presumably Dead

A player speaking to Gunnjorn
When you offer to help search for her boyfriend, Larrissa suggests you speak to Gunnjorn at the Barbarian Outpost for a spare key to the lighthouse and also fix the broken bridge to the east.
To be able to enter the agility area and talk to Gunnjorn, you must have completed the miniquest Bar Crawl.
- Travel to the outpost by either using a games necklace teleport or by going south, across the basalt platforms. Talk to Gunnjorn, in the agility course (next to the Talent Scout) and get the lighthouse key; you can get two planks here; they respawn just north of the outpost.
- With 60 steel nails in your inventory, use the planks on both sides of the broken bridge located east of Larrissa. You can cross the broken bridge by doing a small jump, so just hop to the other side and fix that part of the bridge.

The fixed lighthouse.
Go back and talk to Larrissa again, who now tells you to enter the lighthouse and search for Jossik. Inside the lighthouse, climb to the first floor and search the bookcase. Retrieve and flip through the lighthouse manual, ancient diary and Jossik's diary, which tells you about the history of the lighthouse and its inhabitants.
- On the top level, use molten glass, swamp tar (not swamp paste) and a tinderbox on the lighting mechanism. The lighthouse will now be fixed.
Elementary
The fully unlocked door.
Go down to the basement of the lighthouse, where you will find a small cavern with a strange wall, having six empty slots fitted into its frame.
- Use all of the basic elemental runes on the wall, (fire, water, earth, and air)
- Use your sword and your arrow (any type, but remember that you will not get them back).
This is your last chance to prepare for the fight.
Preparation
If you haven't prepared for this fight with armour and runes for casting magic, teleport to any place with a bank to ready yourself. If you only brought a games necklace, then use it to teleport to the Gamers Grotto or Burthorpe Troll Invasion and bank there. While you are there, you may wish to pick up any quick teletab to any city or your POH, just in case you are close to death, to save yourself.
Inventory
- It is recommended to bring at least two types of attack styles, that is, either magic, melee or range.
- Bring good armour (at least rune equipment, dragon hide armour, or mystic equipment), enough combat runes to cast several of each elemental spell (wind, water, earth, and fire). If possible, equip a ring of life and bring a one-click teleport just in case things get messy.
- Stock with prayer potions and a super set.
Combat

The fight with the Dagannoth mother.
If you cannot see the colour changes very well, look to the chat box. There would be a message "The Dagannoth mother turns (colour)..." Also, you can change the graphics to "safe mode" to brighten the scene, allowing you to see her colour clearly. Using the wrong type of attack incurs splash damage.
- By default, her first form is always white. The cycle of the colour changes of the Dagannoth mother seems to be totally random.
- She can detect prayer and will automatically switch to an attack type different to your protection prayer. By default, she ranges at a distance and melees up close. She can hit up to 160 with melee and accurate, double-120s with ranged, so Protect from Missiles/Deflect Missiles is recommended.
- If you stop attacking her at any point or take too long to finish her off, there is a possibility that she will disappear and you will have to start the fight again.
- If a player has reasonable defence, they could consider using attack-boosting prayers instead, because the Dagannoth mother has a rather poor accuracy.
Get ready to face the mother!
The Horror
.png)
Jossik, injured in the dungeon below the lighthouse.
Once you are ready, walk through the unlocked wall and down the ladder. You find Jossik alive, but hurt and resting against the dungeon wall. He tells you that his search for his lost uncle, Silas, had brought him past the secret door, but he was attacked by a monster who was able to trap him there.
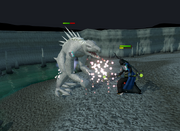
As he is talking, he announces that the monster is coming back. A cutscene plays where a dagannoth appears from the water. The monster can be fairly easily disposed; put on protect from melee and range or melee it, as you need to save your runes for its mother.
After you defeat it, try to help Jossik up to the surface, but he tells you that that wasn't the monster that had attacked him. A cutscene will show the Dagannoth mother emerging into the cavern, and engaging you immediately into battle.
| Colour | Attack Weakness |
|---|---|
|
White |
Air spells (Wind Strike, Bolt, Blast, Wave, and Surge) Smoke spells (Smoke Rush, Burst, Blitz and Barrage) |
| Blue |
Water spells (Water Strike, Bolt, Blast, Wave, and Surge) Ice spells (Ice Rush, Burst, Blitz and Barrage) |
| Brown |
Earth spells (Earth Strike, Bolt, Blast, Wave, and Surge) Shadow spells (Shadow Rush, Burst, Blitz and Barrage) |
| Red |
Fire spells (Fire Strike, Bolt, Blast, Wave, and Surge) Blood spells (Blood Rush, Burst, Blitz and Barrage) |
| Orange | Melee attacks (Slash > Stab/Crush) |
| Green | Ranged attacks (Thrown > Arrow/Bolt) |
The God Books
After you defeat the Dagannoth mother, Congratulations. You have survived the Horror from the Deep!...once.
As a reward from the Dagannoth mother, you obtain a rusty casket. Go to the first floor of the lighthouse and show it to Jossik. If you had a full inventory when defeating the Dagannoth mother, you will not receive a rusty casket. Instead, you must talk to Jossik, who will have picked it up for you.
You may now choose a book affiliated with three gods: Saradomin's Book of Wisdom, Guthix's Book of Balance or Zamorak's Book of Chaos. Be sure to choose the same book twice in a row when he asks if you are sure about your selection.
Reward
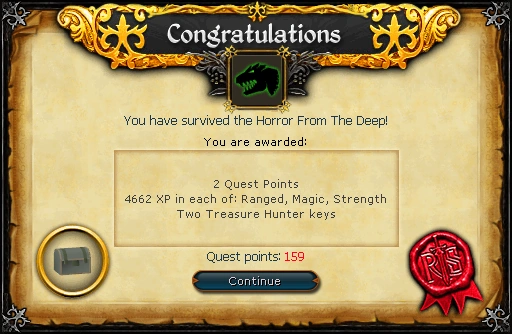
- 2 quest points
- 4,662
 experience
 - 4,662 experience
- 4,662 experience
- A god book of your choice
- Dagannoth Mother is unlocked in Dominion Tower.
- Access to the lighthouse general store and the dagannoth caves underneath (There are level 77 and 78 dagannoths. The level 77's use an inaccurate ranged attack, while the level 78's use a much more effective melee attack)
- The ability to request Dagannoths as a slayer task if the Mask of the Dagannoth is owned
- 2 Treasure Hunter keys and 2 Hearts of Ice
- Music unlocked
Required for completing
Completion of Horror from the Deep is required for the following:
- Blood Runs Deep
- Recipe for Disaster/Defeating the Culinaromancer
- Rag and Bone Man/Wish list (unless you have started The Fremennik Trials)
- Desert Tasks:
- Elite: "Sun Shade" (the Dagannoth mother needs to be killed in a special match in the Dominion Tower)
Transcript
Cultural references
- The name of the quest may be a reference to H.P. Lovecraft and the X-Com game, Terror from the Deep.
- Silas' diary contains numerous references to American poet Walt Whitman's verses, particularly his poem Crossing Brooklyn Ferry.
Trivia
- The quest was originally named Lighthouse Quest.
- When you complete the quest, the scroll says: 'Congratulations! You have survived the Horror From The Deep!' This is one of the only quests that say something different to having completed a quest, along with My Arm's Big Adventure, Between a Rock, The Giant Dwarf and One Small Favour.
- It is impossible to obtain a book of Armadyl, Bandos, or Zaros as a reward for the quest. You can only choose to buy those books after you obtain one of the three books of Guthix, Saradomin or Zamorak.
- With the release of Legacy Mode, the combat level of most monsters and NPCs were scaled down. While the Dagannoth Mother was downgraded from 120 to 84, the Baby Dagannoth remains at 100.
Horror from the Deep | |
|---|---|
| Part 2 of the Fremennik quest series | |
| NPCs | |
| Enemies |
|
| Items |
|
| Rewards |
|
| Locations |
|
| Music |
|
| Miscellaneous |
|
| Main series | |
| Related (mini)quests |
|