Occasionally, players will need to solve puzzle boxes for a level 3 or 4 clue in Treasure Trails or during the Monkey Madness or Quiet Before the Swarm quests. Puzzle boxes contain a scrambled image that players must work to unscramble by clicking on tiles to move them to an empty space. Once the puzzle box is completed, players will need to talk to the NPC who gave the puzzle to receive the next clue or the reward.
All puzzles, including the Monkey Madness puzzle, will rescramble if prematurely terminated even after completing the puzzle if you have yet to talk to the NPC. If you would like to receive a different starting puzzle, destroy the box (not the clue) and ask the NPC for another or simply log off.
Only for the Monkey Madness quest, players have the option to 'bypass' the puzzle by paying Glough, in his words, a "small fee" of 200,000 coins (200K). Although this is not recommended, players may still do so if they find puzzle boxes particularly long and grueling. If the player elects to pay Glough the 200K, he will solve the puzzle to the point where the player only needs to slide one piece.
A puzzle-skipping ticket may be used to skip a puzzle box from Treasure Trails.
Currently, there are nine puzzle box images to unscramble. 7 belong exclusively to the treasure trails activity, 1 belongs exclusively to the Monkey Madness quest, and 1 3x3 puzzle belongs to the Quiet Before the Swarm quest.
Method for solving puzzles[]
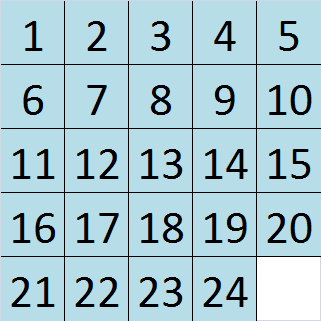
| The image to the right is a solved puzzle. We can use numbers to reference each tile. A solved puzzle will have all of the tiles ordered from left to right in each row with the empty space in the bottom right corner. You should begin by placing tiles 1, 2, 3, 4, and 5 in their correct position. |
|
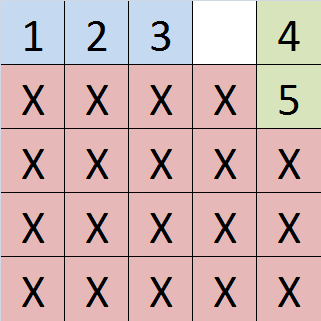
| One possible way to achieve this is to position the tiles like the image to the right. Try not to move tiles 1, 2, or 3. Tile 5 should be directly underneath tile 4. Occasionally, tile 4 will be stuck underneath tile 5. If this happens, you will have to move the tiles using this method to complete row 1. Or, just make tile 5 sink a few lines lower in the puzzle, put tile 4 in the top right corner, and then move tile 5 back underneath tile 4. However, if your board looks like the one to the right, you can continue with these steps. |
|
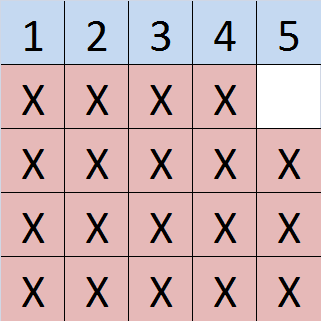
| Now, the board should look something like this after sliding tiles 4 and 5 in the correct position. The same method can be used to solve rows 2 and 3. |
|
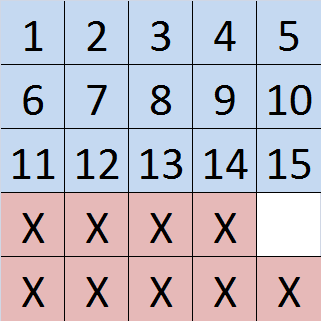
| Now, the board should look something like this after solving rows 1, 2, and 3. |
|
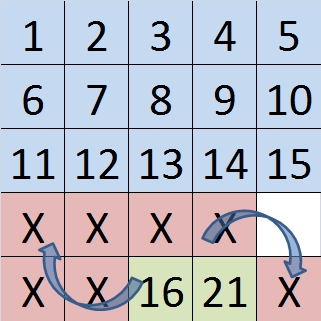
| From now on, the puzzle should be solved in terms of vertical columns instead of rows. It is easiest to just place tiles 16 and 21 on the right hand side of the bottom row and slide the remaining tiles clockwise.If you try to arrange the tiles too close to the left border, you may find it difficult to place the pieces next to each other in the correct order. |
|
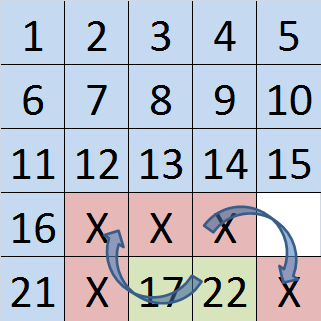
| Tiles 17 and 22 can be solved in a similar fashion.
Now that two columns are completed, the remaining 5 tiles should be rearranged to solve the entire puzzle. Every puzzle box generated by the game can be solved. If you cannot manage to complete the puzzle, it is likely that you have confused the positions of two very similar looking tiles. Refer to the completed images below and look closely at the details of each tile. Make sure yours matches the picture exactly! After getting 17 and 22 to their positions, try and get 23 to the left of 18. Then put 18 and 23 in their places. You should be able to get it now. |
|
| Congratulations! Solving slide puzzles isn't too difficult when a method is used. With enough practice, almost anyone can become an expert. |
|
Additional Techniques[]
What to do if 4 is underneath 5:[]
The process is quite simple using an easy process that involves moving 4 blocks to moving 6 blocks. As only one block can move in the same direction at any given time, a way to reduce confusion when following this guide is to only remember the direction and not the tile. Here's how to do it:
| 1 | 2 | 3 | 5 | |
| X | X | X | A | 4 |
| X | X | X | B | C |
| X | X | X | X | X |
| X | X | X | X | X |
With tile 5 at the top right corner, try to position tile 4 on the far right side of the middle row.
- Move A one square up.
- Move B one square up
- Move C one square left.
- Move 4 one square down.
Which gives us this "C" shaped pattern:
| 1 | 2 | 3 | A | 5 |
| X | X | X | B | |
| X | X | X | C | 4 |
| X | X | X | X | X |
| X | X | X | X | X |
Place tile 5 next to tile 3.
- Move B one square right.
- Move A one square down.
- Move 5 one square left.
Which gives us:
| 1 | 2 | 3 | 5 | |
| X | X | X | A | B |
| X | X | X | C | 4 |
| X | X | X | X | X |
| X | X | X | X | X |
Finish by placing tile 4 underneath tile 5. Then just rotate them into place.
- Move B one square up.
- Move 4 one square up.
- Move C one square right.
- Move A one square down.
- Move 4 one square left.
- Move B one square down.
- Move 5 one square right.
- Move 4 one square up.
Congratulations! Here's what you should have:
| 1 | 2 | 3 | 4 | 5 |
| X | X | X | B | |
| X | X | X | A | C |
| X | X | X | X | X |
| X | X | X | X | X |
Remember: This technique works for other rows (such as pairs 9 and 10, 14 and 15) and the squares on the last two rows (16 and 21, 17 and 22, 18 and 23). Also keep in mind that the main goal when using this technique is moving one of the two object squares (in this case square 4 or 5) into the location it isn't supposed to be (i.e. moving square four to the location where square five is supposed to be or vice-versa) whilst keeping the other square away from the one you are focused on. Then, you should proceed to bring the isolated one near the formation and simply rotate everything into place.