Preparation
Suggested skills
(Note: These values are for optimal survivability rates. It is entirely possible to complete the Fight Kiln without any of these skills.)
- 92/95 or 70
 (for Soul Split and Turmoil/Torment/Anguish, or for Piety/Rigour/Augury)
 - 80+
 ,
,  , , , , and
 - 96+ (for overloads)
- 96 or 67 (for Pack Yak or War tortoise)
- 85+ for obsidian armour (can be boosted or assisted)
Other
- 450+ boss kills in the Dominion Tower (for dreadnips)
- Completion of Temple at Senntisten for Ancient Curses
- The Brink of Extinction for obsidian armour
Recommended equipment
Monsters in the Fight Kiln take halved damage when not attacked with their general weakness. As such, it is recommended to use all three combat styles inside of the minigame.
Choose the most appropriate armour for your designated style(s), and prepare for the long fight ahead.
Inventory
For high level players:
- Equipment for multiple styles
- 1 melee weapon (used in tandem with a pickaxe on the tool belt, of rune quality or higher to break the armour of the many TokHaar-Ket-Dills), dreadnips, or a steel titan. Dreadnips and steel titans are very effective against the TokHaar-Ket-Dill.
- 2 Supreme overload potion or 2 Overload flasks (if you do not have overloads, replace them with 2 Super warmaster's potions)
- 2 Prayer renewal flasks
- Alternatively, 2 Super prayer renewal potion
- Alternatively, instead of 2 overload and 2 prayer renewals, 2 Holy overload potions
- 2 Saradomin brew flasks/2 Super saradomin brew flasks/Summer pies/Rocktails*
- 4 Super restore flasks
- 1 Adrenaline potion
- 1 Weapon poison++
- Enhanced excalibur (free passive healing that does not require any adrenaline - it shares its cooldown with Rejuvenate and Guthix's blessing)
- Ring of vigour
- Water Surge runes
For lower levels/if using lower-end gear:
- Equipment for all combat styles (on average this takes 8 inventory spaces)
- 1 melee weapon (used in tandem with a pickaxe on the tool belt, of rune quality or higher to break the armour of the many TokHaar-Ket-Dills)
- 2 Super warmaster's potions
- 2 prayer renewal flasks
- 4 saradomin brew flasks
- 6 super restore flasks
- 4 Summer pies or Rocktails (more or less, depending on what gear you're carrying)
- Water wave runes
Beast of burden inventory
If using a pack yak:
- 20+ Summer pies or Rocktails (For higher levels little food is actually needed)
- 4 Super restore flasks
- 1 Unicorn stallion pouch (if beast of burden runs out)
- 100 Healing aura scrolls
If using a war tortoise:
- 12 Summer pies or Rocktails
- 4 super restores
- 2 extra pouches
- If bringing a healing familiar, replace 2 Summer pies with the healing familiar and a decent number of scrolls.
- Saradomin brew flasks do heal more than Summer pies and Rocktails; however, they should only be used if you have very low defence as the Fight Kiln does not require an excessively large amount of food due to the Regenerate, Rejuvenate, and Resonance abilities.
Combat familiars can also be used in the Kiln:
- If you decide to use mostly Magic throughout the Fight Kiln (with the exception of the TokHaar-Ket-Dills that appear), an Ice Nihil will boost magic accuracy by 5%, and it will help kill enemies faster.
- A Steel titan may be brought to kill enemies faster, including the TokHaar-Ket-Dills. This will require a fair amount of Steel of Legends scrolls.
Action bar setup
The action bar is one of the most important elements of combat strategy in the Fight Kiln. For maximum damage and control, consider switching between individual style-dedicated action bars.
When fighting a monster, open the section of the ability book respective to which combat style is being used and try to use abilities directly after an auto-attack. This will maximize damage output and speed up the Kiln. The last three abilities will require the use of a shield so remember to bring one. The Regenerate ability should be used at the end of every wave so try to keep your adrenaline high at the end of a wave. The Rejuvenate ability restores 40% of life points and all stats to their base levels. This ability may eliminate the need for food. If using Rejuvenate, do not take off the shield for the full 10 seconds it takes to heal you or else the ability will not give its full effect. Dreadnips are automatically sent to attack your current target so simply pressing your keybind for the Dreadnip will deploy it.
Saving progress
As it may take a while to complete the Fight Kiln, you are able to save your progress at the end of each wave, working similarly to the saving procedure within the Fight Caves. If you find yourself in the need to log out of the game for any reason, click on the logout button once so that the client knows that you wish to take a break. You will then automatically be logged out after all enemies in the current wave have been defeated. When you log back in, you will begin again on whatever the next wave would have been. If you manage to log yourself out before defeating all of the enemies on the current wave (i.e. by avoiding any combat for 10 seconds then logging out) you will have to start over on whatever wave you logged out on.
Though there is a slight pause between waves, be advised that it can be risky to use this saving feature. You may not have time to activate the appropriate protection prayer on logging back in, i.e. you'd hit the logout button on wave 9 and log back in on wave 10 at a later time, not having the time to react to the TokHaar-Jad's attack. This can however be countered by placing your protection prayers on your action bar or by using quick prayers.
Waves
Interactive map
| 2 TokHaar-Hur 2 TokHaar-Xil 1 TokHaar-Tok-Xil | |||||||||||||||||||||||||||||||||||||
Table
Important Wave Strategies
Knowing the spawn locations of the TokHaar-Jads and other enemies provides a large advantage in the Fight Kiln. Watch out for Wave 35 when Jad spawns north-east. In other Jad waves they spawn in south-east or south-west corners.

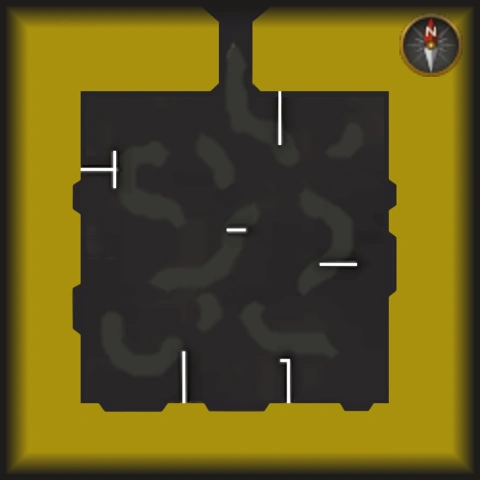
A map of the Fight Kiln area before beginning the Kiln.
Waves 10, 20 and 30: One TokHaar-Jad will spawn in the southwest corner of the map. Standing on the northeast side of the safe spot in the middle of the cave will lure and trap Jad. Kill Jad first and then kill the remaining monsters.
Wave 28: 6 TokHaar-Ket-Dill and one TokHaar-Ket-Zek will spawn on this wave. The Ket-Zek will spawn on the north-west side of the arena, 1 Dill will spawn north-east and north-west, 2 Dills will spawn on south-east and south-west. Work on cracking through the Dill's armour with a pickaxe or a melee weapon.
Wave 34: One TokHaar-Jad will spawn in the southeast corner of the map. Standing on the northeast side of the safe spot in the middle will lure and trap Jads much easier.
Wave 35: One TokHaar-Jad will spawn in the northeast corner of the map. It is advised to use the invulnerability crystal right before the wave begins. Defeat it and dispose of the remaining monsters.
Wave 36: Two TokHaar-Jads will spawn in the southwest and southeast sides of the map. Stand on the northeast side of the safe spot and wait for both Jads to come to a halt. It is then recommended to step one square northeast of this safe spot to handle the Jad that spawned from the southeast. Clicking on a Jad instead of the brief aforementioned movement will bring a player immediately into Jad's melee distance and put theirself into immediate danger.
Wave 37: Har-Aken's head will appear every 72 seconds beginning when the cutscene ends; it stays up for approximately 30 seconds. The tentacles begin to spawn 10 seconds after the cutscene finishes. The head will never appear on the North side of the arena. It will not immediately pop up upon the start of this wave, so use this time to build adrenaline off of Har-Aken's tentacles. Standing in the very middle of the arena will allow full vision of the surroundings and Har-Aken's head's spawn locations.
The head is level 800 with 150,000 life points and is immune to stun. Even using level 80 or better weapons, it will take several cycles to kill Har-Aken.
Crystals
Throughout the Fight Kiln, powerful crystals will spawn at the end of certain waves. Only one crystal may be in effect at any time. The wave list above details the waves in which one of the six crystals will spawn. By nature, half of these crystals have offensive properties and the other half have defensive properties.
Offensive crystals:
- Strength
- Ranged
- Magic
These crystals will raise the appropriate statistic by 50%, while decreasing the other two statistics to 50% for 3.5 minutes. Statistic restoring potions will not counteract this decrease.
Defensive crystals:
- Constitution
- Invulnerability
- Restoration
The Constitution crystal will tremendously boost your life points for 3.5 minutes and replenish them fully after it runs out. The invulnerability crystal makes a character nearly immune to all non-typeless damage (reduced to 1 point of damage) for 30 seconds. The restoration crystal will give a one-off full replenish to both life and prayer points.