| Line 232: | Line 232: | ||
'''Note:''' This puzzle will most likely prevent progress if a party member leaves the party, except when the floor is set to a lower difficulty. |
'''Note:''' This puzzle will most likely prevent progress if a party member leaves the party, except when the floor is set to a lower difficulty. |
||
| − | '''Note: '''In the past the statue would deal major damage to players when the players do wrong emote. This made the puzzle nearly impossible to clear in large teams and especially near release time of the Dungeoneering skill. It is reduced to |
+ | '''Note: '''In the past the statue would deal major damage to players when the players do wrong emote. This made the puzzle nearly impossible to clear in large teams and especially near release time of the Dungeoneering skill. It is reduced to 100 damage now for teams, however the statue still deals well over 1000 damage each time a solo Dungeoneering player does an incorrect emote. |
|} |
|} |
||
Revision as of 06:01, 23 July 2014
All puzzles can be found on non-members worlds, though the members-only ones will be unsolvable, thus preventing free players from obtaining access to some rooms.
Puzzle rooms may contain key doors, but on free worlds members' puzzles will not.
Transferable resources
A list of puzzles with one or more transferable resources:
- Fishing ferret - Vile fish
- Hunter ferret - traps
- Three statue weapon/Ten statue weapon - Stone block
- Magical construct - Lump of stone
- Grapple Tightrope/Winch room - Broken climbing hook head, Meatcorn
- Keystone bridge - Carved keystone
- Coloured Recess - Blue vial/Green vial/Yellow vial/Violet vial
Non-member puzzles
Icy pressure pad (Frozen floors only)
| Image |
|---|
| Description |
| The floor is covered in a sheet of ice, along with 4 squares. To complete the puzzle, players will have to land on each of the 4 squares. |
| Skill requirements |
| None |
| Solution |
| The solution varies each time. Though there is no official solution (there are different puzzles) the best tactic to use is to eye yourself on an obstacle or pad, and then angle each way. You can move diagonally. Clicking on the eight squares around your player instead of on the destination will help reduce errors. You will stop if you are near an obstacle (3x3 range of the obstacle itself) or hit a tile.
Tip: If you have branches of any kind, it might be useful to light a fire to offset yourself from the corner. |
Seeker sentinel
| Image |
|---|
 |
| Description |
| In this room, a Seeker sentinel rotates around in a circle with 4 Seeker spawn patrolling and taking large breaks at certain points. The objective of this puzzle is reach another door and/or pick a key to progress through the dungeon. If a Seeker spawn spots you, they will respond with a message appearing over their head, and the Seeker sentinel will look your way. If you are spotted, you will receive damage and be teleported behind one of the stone walls. |
| Skill requirements |
| None |
| Solution |
| The method to get around this room is to "subdue" the Seeker spawn when they are facing away from you, with the Seeker sentinel facing away from you too. When subdued, you can run past the Seeker spawn, into the next alcove. Continue this method until you reach the door which you need to enter. Note: The teleportation has proven useful for progressing through the puzzle, as you are sometimes teleported next to the door. The damage dealt by the Seeker sentinel is also less than many puzzles. |
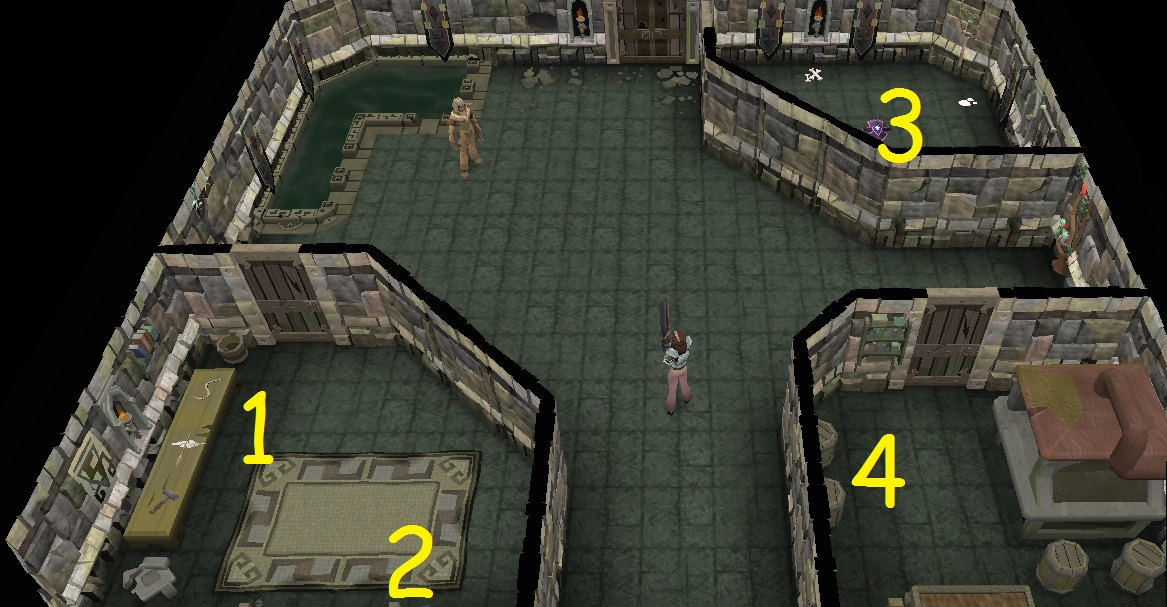
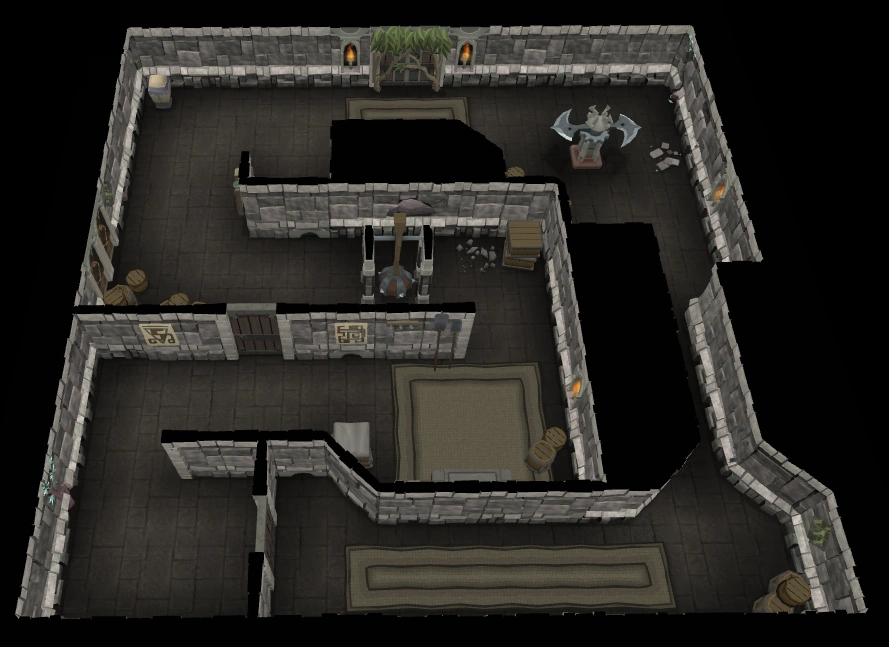
Sleeping guards (Furnished floors only)
| Image |
|---|
 |
| Description |
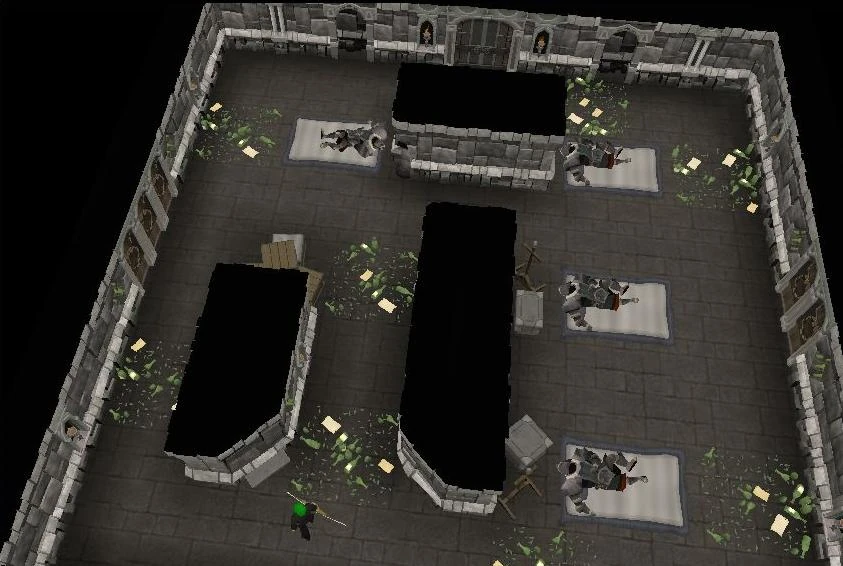
| In this room, there are 4 sleeping brute guards and each of them has a key that can possibly unlock a door. |
| Skill requirements |
| Thieving helps, but not necessarily required |
| Solution |
| You must get the right key to unlock the door(s), this can be done in 2 ways.
The first (and recommended) method is to pickpocket the guards for the keys to unlock the doors in the room, taking care not to run over the tiles and making noise. Turn off Run before you enter this room. This method avoids having to kill the brutes. The second method is activated if the brutes are awaken (either by running over the tiles or by failing to pickpocket the brutes). The brutes must be killed for them to drop the key. If a player tries to open door without any keys, or in rare occasion player will step on bottle even when they are walking, the brute would still wake up. Team players tend to kill the brutes straight as less work is done. There can be multiple doors requiring keys, but each key can only unlock one of the doors. A key disappears when it is used to unlock a door. The Brutes can be dangerous if woken up, depending on the player's combat level, on some occasions there will be Brutes sleeping that have Gorgonite/Promethium Mauls on. Players soloing who encounter this room will never face Brutes using high level mauls, typically tier 6 or lower will be encountered here. |
Sliding tiles
| Image |
|---|
 |
| Description |
| This room contains a 3x3 grid with 8 tiles and 1 space. Each tile has a part of a picture on it. To complete the puzzle, the player must move the tiles to form the picture. The puzzle is the image that represents each floor theme, that appears on the floor of the auto-grouping rooms. This puzzle is similar to the one that appears in the Quiet Before the Swarm quest. |
| Skill requirements |
| None |
| Solution |
| The player can plan the solution, they must push the tiles to the correct place, like in the image above. The compass must be north. In a group, it is best for only one player to attempt the puzzle at a time. Any player attempting to move an incorrect tile or moving the same tile after the first member will suffer damage. Damage may still be taken from incorrectly moving the tiles even if the puzzle is completed. |
Sliding statues
| Image |
|---|
 |
| Description |
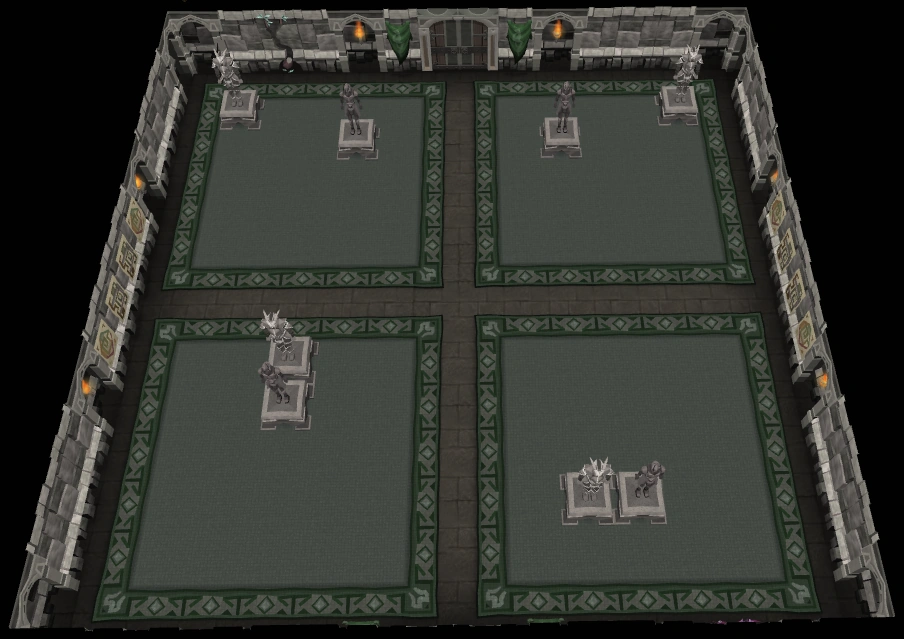
| This room has eight statues split into four groups. The four southern statues will be movable, while the northern four statues are stationary. |
| Skill requirements |
| None |
| Solution |
| The southern groups of statues can be moved. The statues must be matched with the northern groups to unlock the door.
Note: Make sure to copy the opposite side of the room with stationary statues and not the opposite side with movable statues. In addition, if two players are moving the same statue at the same time, it can glitch and the doors won't open. To fix, move that statue one tile (north,south, east or west) until the doors click open. A recent update has allowed players to pull the statues making it easier for players. Attempting to push a statue to a location where a monster or player is will result in the statue not moving. Thus, it is advisable to pull the statue to avoid this. |
Three statue weapon
| Image |
|---|
 |
| Description |
| This room has 3 statues that represent the combat triangle in it. Two of the statues are armed with a weapon and one of the statues is unarmed. A crumbling wall will appear on one of the edges. |
| Skill requirements |
| Mining and Crafting |
| Solution |
| The player must carve a stone weapon to give to the unarmed statue.
Note: A hilarious accident might destroy the block and cause damage. Just go through the steps again if this happens. Note: If you attempt to mine two stone blocks it will cause some damage and you will not receive the stone block. The drop trick will work here. Note: In case you are unable solve this puzzle due to insufficient skill levels, it IS possible to use stone weapons you can mine and craft in the Ten statue weapon puzzle provided you have both of these puzzles in the same dungeon. Note: Once you leave room, may have to repeat steps 1-3. |
Ten statue weapon
| Image |
|---|
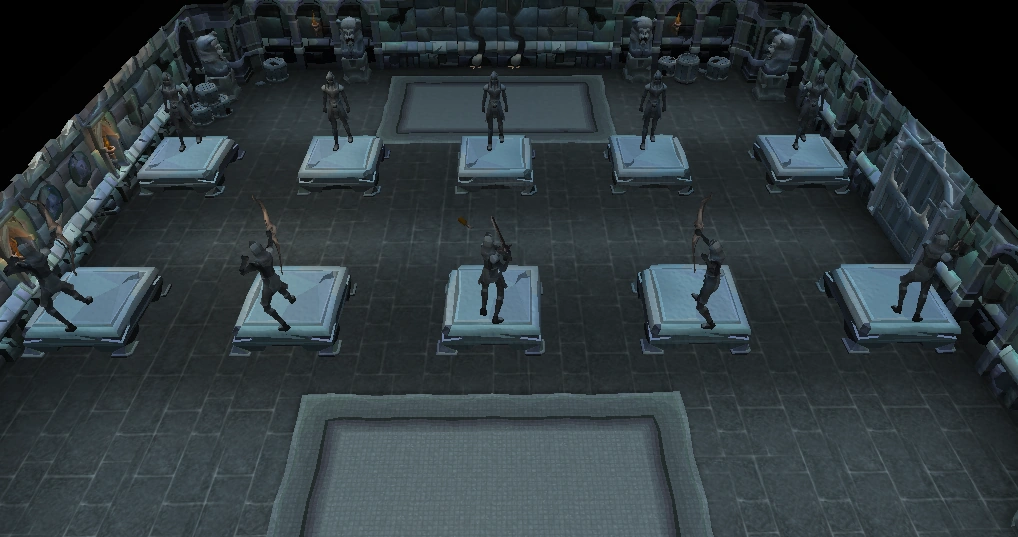 |
| Description |
| This room has two rows of up to five statues in the middle of the room. One of the rows is not armed. A chisel is in the centre of the room and a crumbling wall can be found on the side of one of the walls. |
| Skill requirements |
| Mining and Crafting |
| Solution |
The player must carve a stone weapon for each of the statues in the unarmed row. The player must carve a weapon for each unarmed statue such that the unarmed statue would win against the armed statue according to the combat triangle.
Note: If you give a statue the wrong weapon, continue giving the other statues the correct weapons. After the battle statues with correct weapons will retain their weapon and incorrectly armed statues will return to being unarmed. You can then simply give the statue(s) the right weapon. Note: The Dungeoneering update has modified the amount of statues depending on the team size. If there is just one player, there will be 2 to 3 pairs of statues to finish, unlike having to do all 5 pairs of statues before that update. |
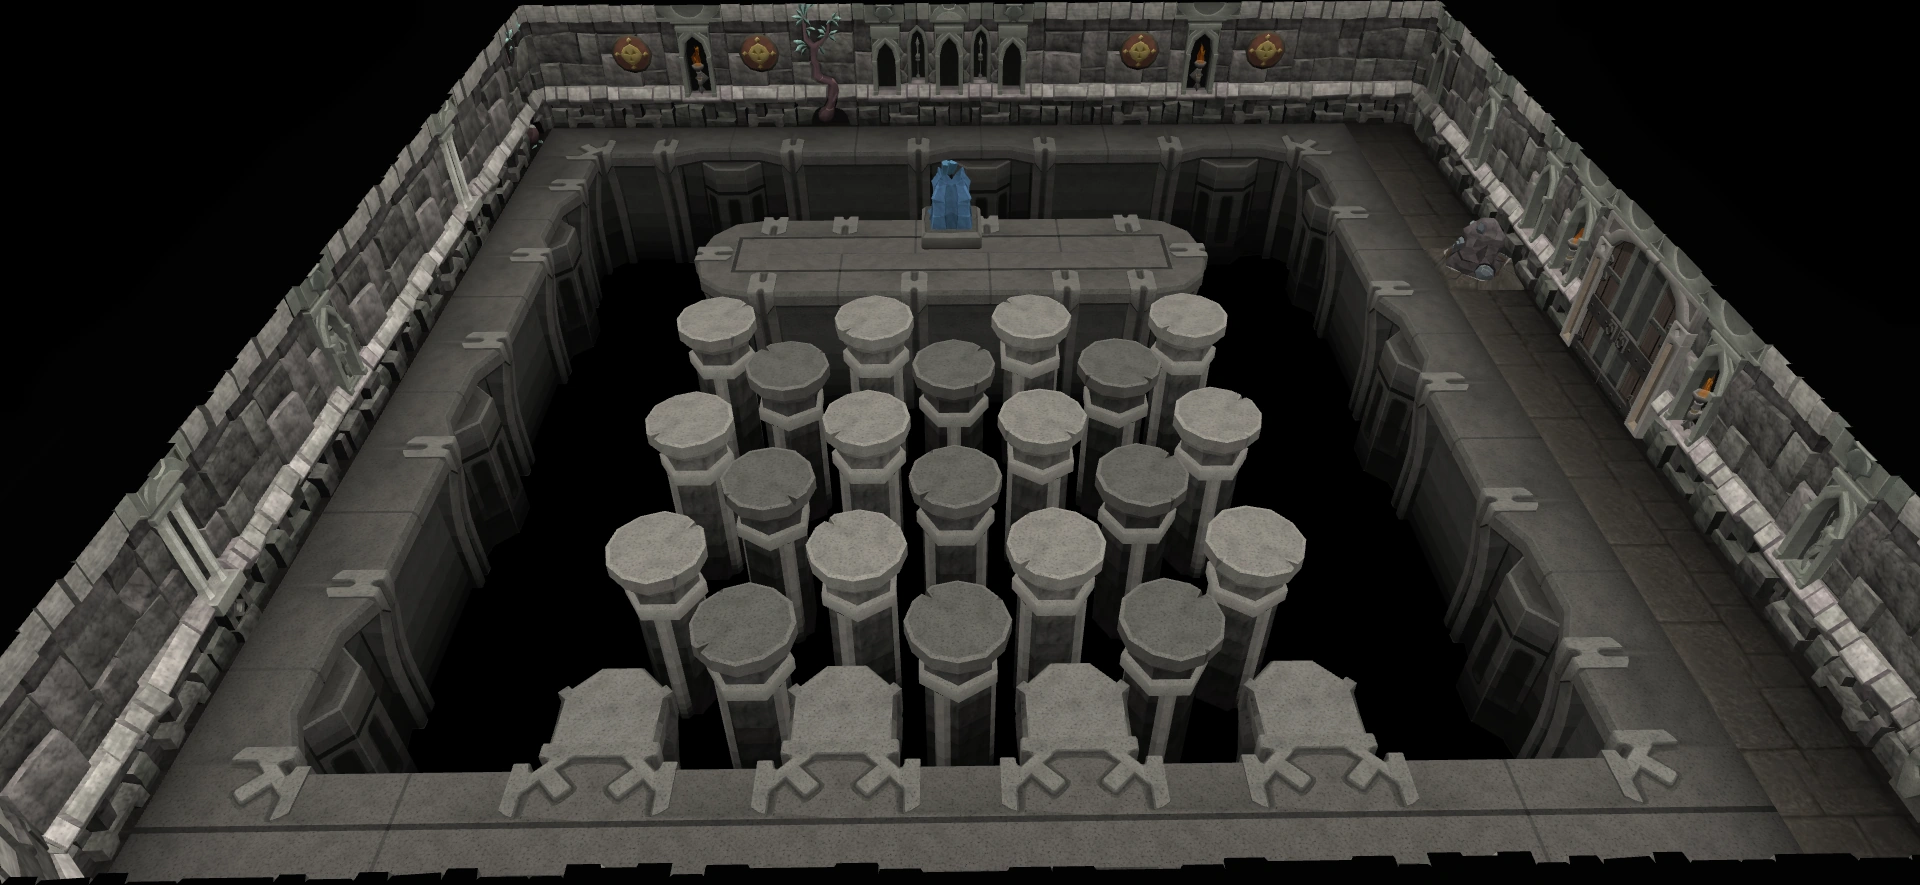
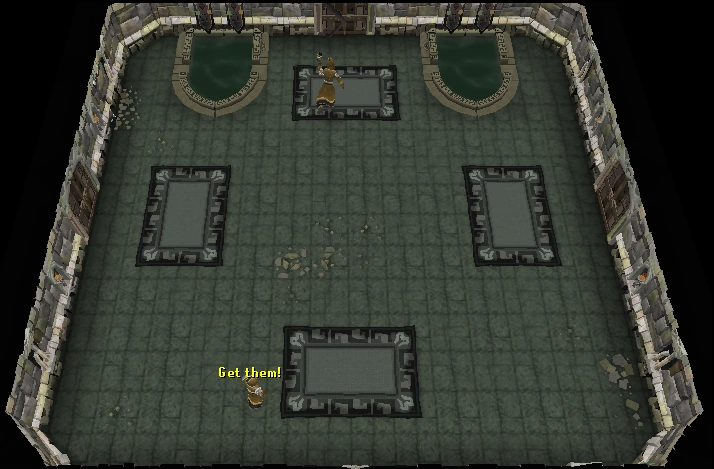
Follow the leader
| Image |
|---|
 |
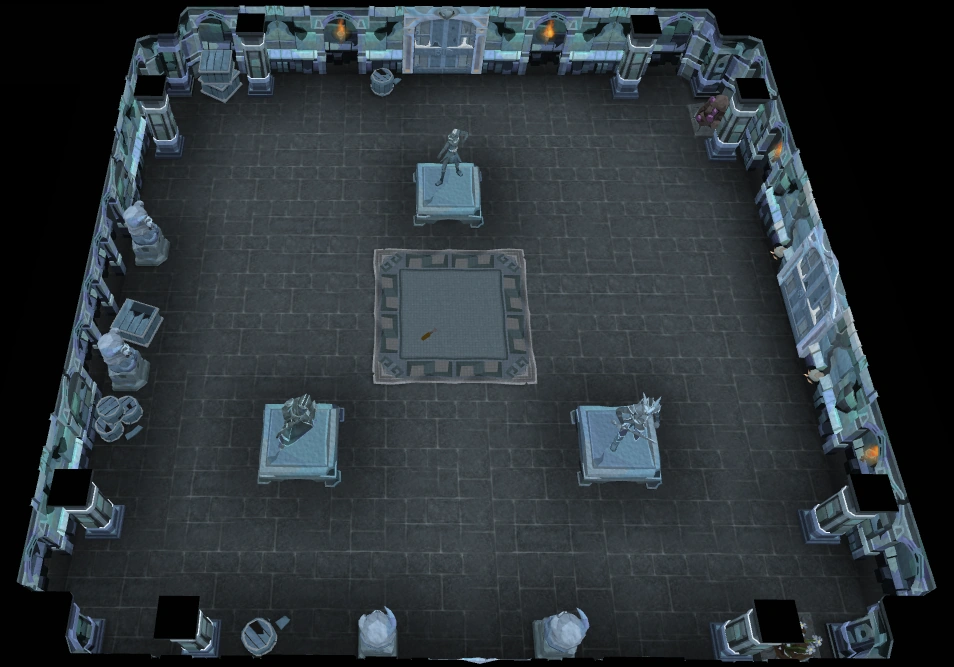
| Description |
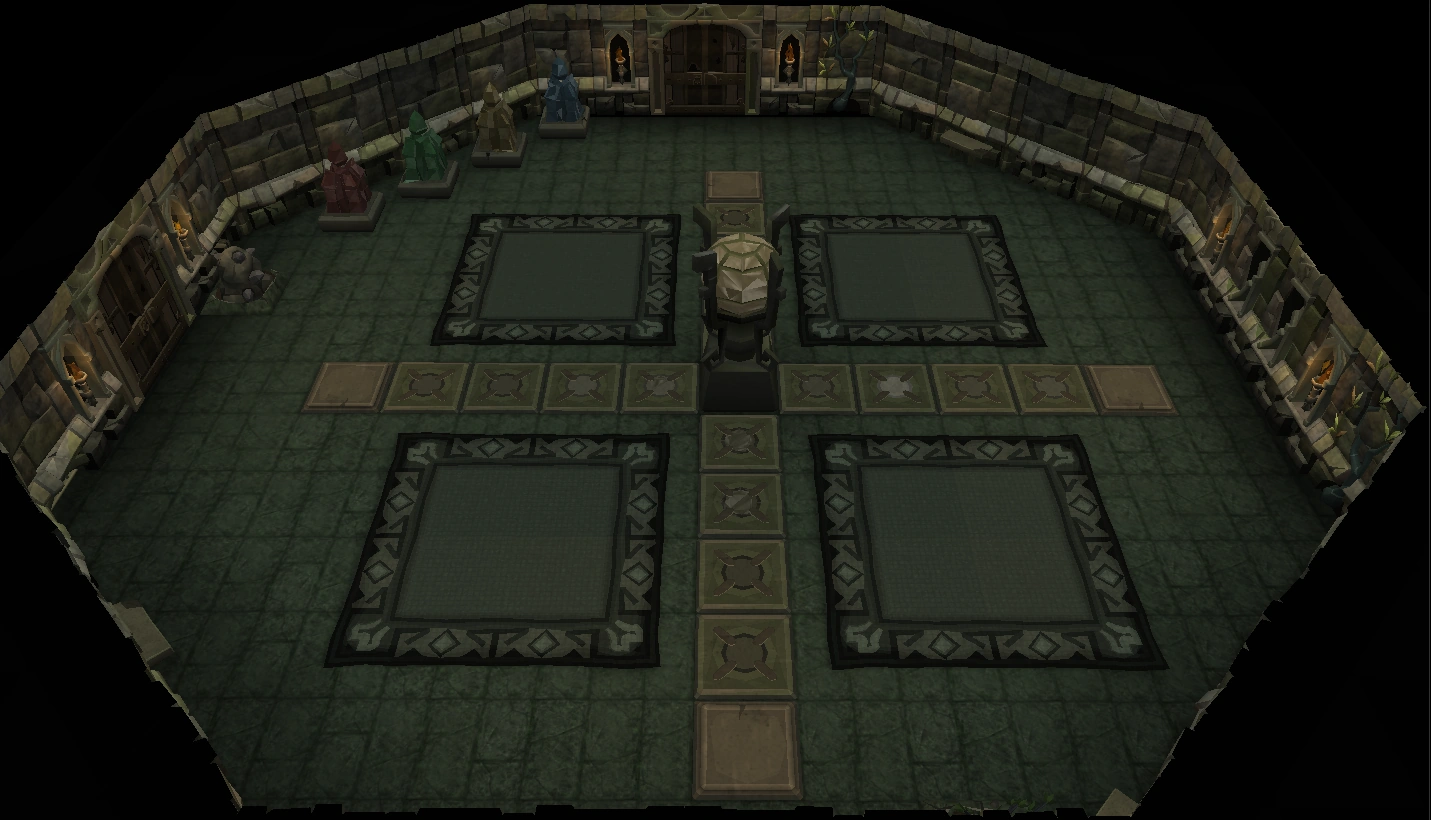
| This room contains as many whole statues as players the dungeon was intended for. The remaining statues are just broken statues. This room also contains 5 pads. The pads near the fixed statues are active and the pads near the broken statues are inactive. |
| Skill requirements |
| None |
| Solution |
| All 5 pads are visible on the floor, but only a number of them equal to the number on members in your party (1-5) are active. Each inactive pad is associated with a broken statue. Each player must stand on an active pad and react to the closest statue by mimicking the emote that the statue does.
There are 5 emotes (offered from a menu not from the standard emote tab):
All members of your party must get 3 in a row correct. Each try has a time limit to choose the correct emote. A failure to choose the right emote in the allotted time by any member of your party results in every member of your party taking some damage and having to restart the count. It is possible to avoid damage by quickly running out of the tile if a mistake is made as this will make the statues inactive. You will have to wait though, since moving in and out will still make the statue attack you. Note: This puzzle will most likely prevent progress if a party member leaves the party, except when the floor is set to a lower difficulty. Note: In the past the statue would deal major damage to players when the players do wrong emote. This made the puzzle nearly impossible to clear in large teams and especially near release time of the Dungeoneering skill. It is reduced to 100 damage now for teams, however the statue still deals well over 1000 damage each time a solo Dungeoneering player does an incorrect emote. |
Levers
| Image |
|---|
 |
| Description |
|
The puzzle consists of 5 levers, each with a "Pull Switch" left-click option. Players need to pull all of them in the shortest time before a trap is triggered and levers reset, releasing gas harming the players in the room. There have been some complaints about this puzzle having a bug since you get zapped about half a second before the final lever is pulled. On the sides of the levers there is a marking that looks like the Chinese numeral (五), possibly there as a reminder to those who can read it, that there are five levers, as the lever closest to the entrance may be overlooked. The larger the Dungeoneering party, the less time there is to pull all the levers before being zapped. Thus, when players have difficulty in larger parties, this simple task can (and does) become one of the hardest challenge rooms available. |
| Skill requirements |
| None, but high agility and low weight can help. |
| Solution |
| To unlock the door to the next room, all of the levers must be pulled. As soon as one of the levers is pulled, all the other levers must be pulled within a certain time. If the levers are not pulled within a certain amount of time, poisonous gas will damage the player(s) and timer and levers will be reset. The more players there are, the less time the players have to pull all the levers.
Important! If you are unable to pull all five levers in the time allotted, you should stand in the centre of the room to avoid taking damage.
|
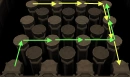
Flip tiles
| Image | ||||||||||||||||||||||||||||||||||||||||||||||||||||||||||||||||||||||||||||||||||||
|---|---|---|---|---|---|---|---|---|---|---|---|---|---|---|---|---|---|---|---|---|---|---|---|---|---|---|---|---|---|---|---|---|---|---|---|---|---|---|---|---|---|---|---|---|---|---|---|---|---|---|---|---|---|---|---|---|---|---|---|---|---|---|---|---|---|---|---|---|---|---|---|---|---|---|---|---|---|---|---|---|---|---|---|---|
 | ||||||||||||||||||||||||||||||||||||||||||||||||||||||||||||||||||||||||||||||||||||
| Description | ||||||||||||||||||||||||||||||||||||||||||||||||||||||||||||||||||||||||||||||||||||
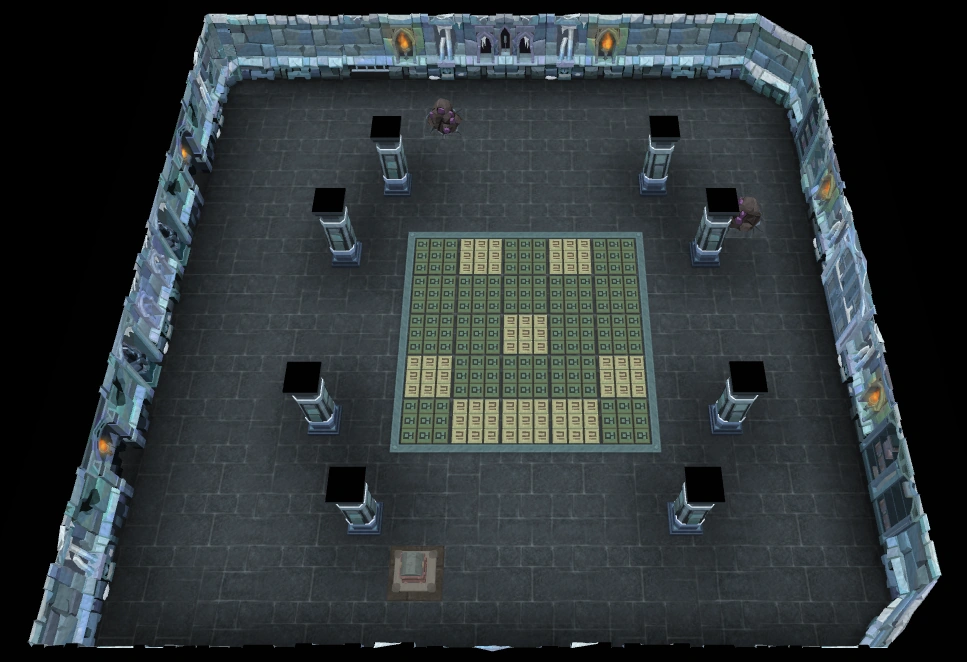
| In the centre of the room is an overall grid of 5x5 tiles consisting of two different colours. The tiles have a runecrafting level requirement. When right-clicked, tiles give 2 options:
| ||||||||||||||||||||||||||||||||||||||||||||||||||||||||||||||||||||||||||||||||||||
| Skill requirements | ||||||||||||||||||||||||||||||||||||||||||||||||||||||||||||||||||||||||||||||||||||
| Runecrafting | ||||||||||||||||||||||||||||||||||||||||||||||||||||||||||||||||||||||||||||||||||||
| Solution | ||||||||||||||||||||||||||||||||||||||||||||||||||||||||||||||||||||||||||||||||||||
The simplest way to solve the puzzle involves 'chasing' wrong-colour tiles down the puzzle until there is only one row of wrong-colour tiles left. To do this, start on the second row from the top (the direction you are facing does not matter), "imbuing" the tiles on the second row that are below the wrong-colour tiles on the top row. This should leave no wrong-colour tiles on the top row. Repeat this process on the third row, "imbuing" the tiles that are below the wrong-colour tiles on the second row. Do this two more times for the fourth and fifth rows. If you have done this correctly, there will only be wrong-colour tiles in the fifth (bottom) row, or, in rare cases, you will have solved the puzzle. At this point you may choose to simply "force" the remaining wrong-colour tiles on the bottom row to solve the puzzle, or, if you wish to completely avoid "forcing", you may use the following chart, followed by one more "chase", as described above, to solve the puzzle.
Note: Often, in large teams, players would try imbuing the tiles until only 1-3 tiles are the wrong colour (not dependent of rows), then forcing them and taking some damage. If you use this method, be sure to check that the forcing player has enough constitution to endure this. By pressing the orange on the example setup in the diagram to the left you get three black squares as shown in the diagram to the right. The orange dot on the right diagram is the mentioned win location. The three green dots will bring down the first row dark squares created by the orange dot. The blue dot then brings down the single remaining dark square within the second row. The four purple dots will clear the third row and the yellow dot will solve the board. These buttons are pushed in this order for this example only, to demonstrate what to do. In practice, all 11 tiles (including the first orange) could have been done in any order, but the order given here explicitly shows how it "Pulls Down" to the win. See the Wikipedia article on the game called Lights Out for some additional information on this puzzle. See this link for an applet that can solve for various puzzles. Note: If the puzzle is completed and the room is unlocked, you can toy around the tiles. This DOES NOT re-lock the door. |
Monolith
| Image |
|---|
 |
| Description |
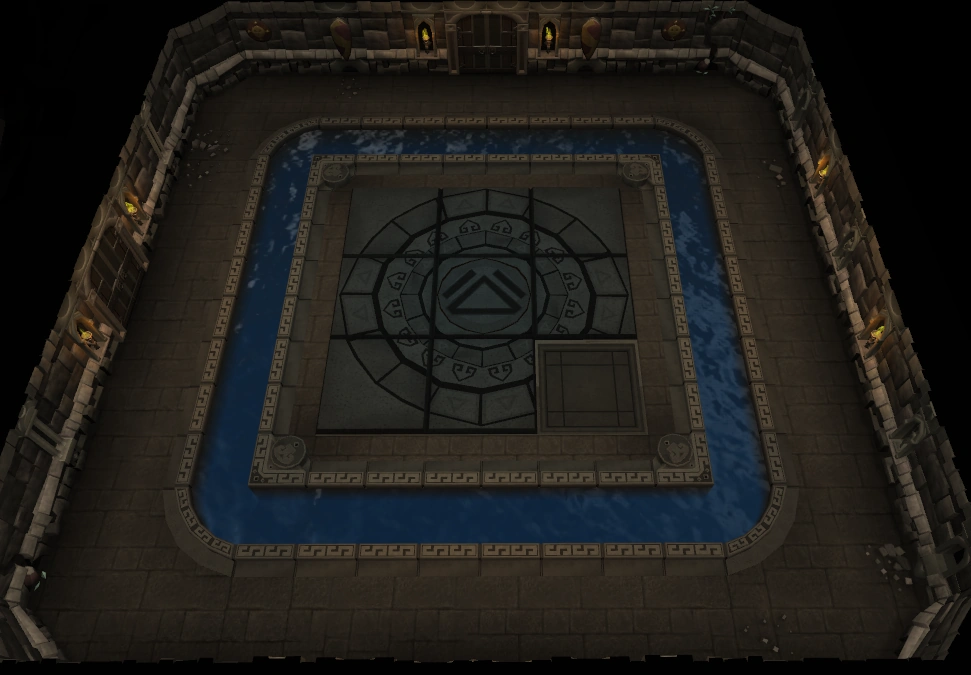
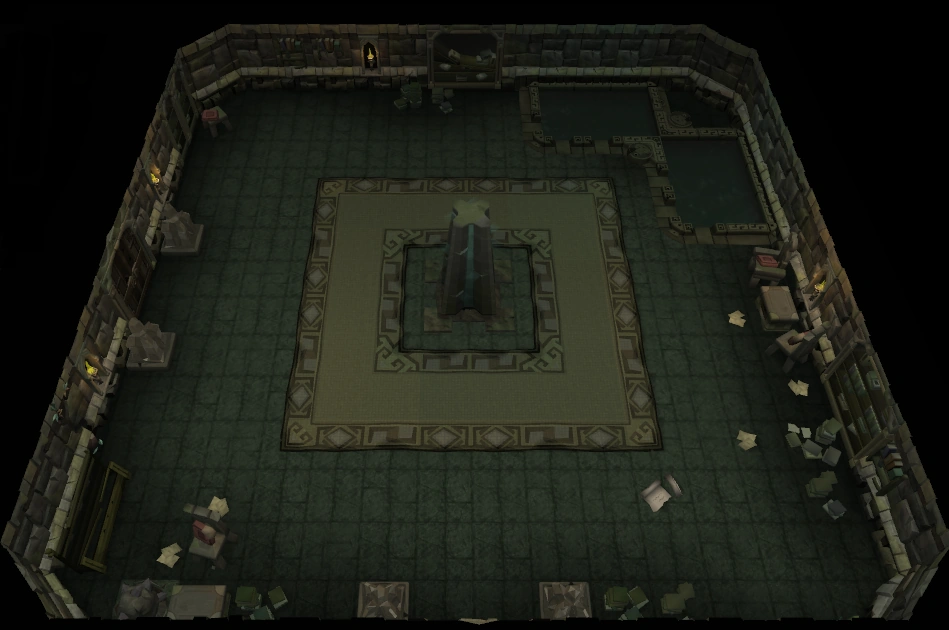
| This room contains a monolith with unstable energy. It needs to be protected from the Mysterious shades. |
| Skill requirements |
| None |
| Solution |
| Just protect the monolith from the shades. They can go down quickly. If the power of the monolith goes down again, all shades will die and you will have to start over again. Contrary to popular belief, the combat level of the shades depends on how much players the host had put in, not by their Magic level. |
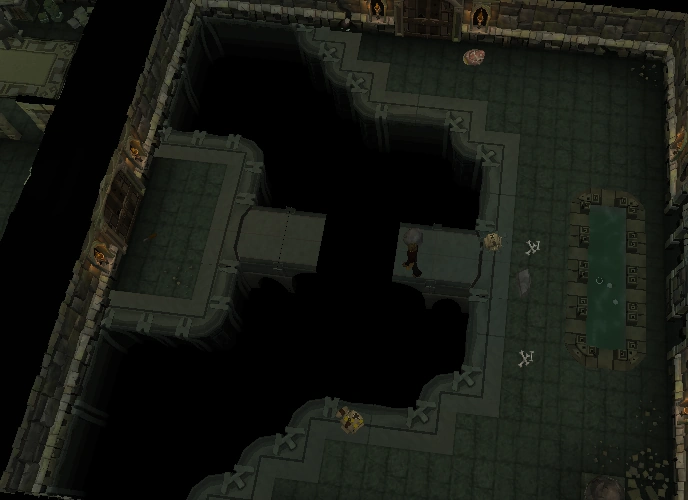
Ghosts
| Image |
|---|
| Description |
| This room contains several ghosts who seem to be normal enemies, but one of them contains a spirit. |
| Skill requirements |
| None, though high combat skills will finish this puzzle faster. |
| Solution |
|
To complete this puzzle, you must defeat all the ghosts. Watch carefully for the spirit to emerge from one ghost and enter another because only the ghost containing the spirit is vulnerable to attack. Once you kill a ghost, the spirit will switch to a different ghost (always the closest ghost) until you've killed them all. The ghosts attack with both melee and magic, and cannot be poisoned. They are similar to the ghosts of the occult floors, but the levels will vary depending on party size (sometimes in a group of 5, the ghosts could be of low level) |
Suspicious grooves
| Image |
|---|
| Description |
| Three lines of suspicious grooves are found on the ground, separating the entrance from the rest of the room. |
| Skill requirements |
| None, but Thieving is helpful. |
| Solution |
| There is one safe path through the grooves; any incorrect choice will cause the player to be damaged for very high amounts of life points, possibly as high as around 40%. If you chose a wrong set of suspicious grooves, spikes will appear from the ground and inflict damage on you, making you grasp your foot and going back a space. You can reduce some of the damage by switching your ring of kinship to the Gatherer setting. The higher the tier bought, the less damage will be inflicted. Choosing the correct set does not activate the spikes.
If spikes are activated from a groove the spikes will stay, become stagnant. The player can not walk over them and must continue to search for that line's safe groove. When the correct groove is found, it becomes a regular tile that the player can walk on to, through, and around permanently-but the other spikes on the same tile can still be triggered. Warning: If soloing a dungeon and you get this room, you will, with the levers room, end up with low level creatures in a few rooms ahead. |
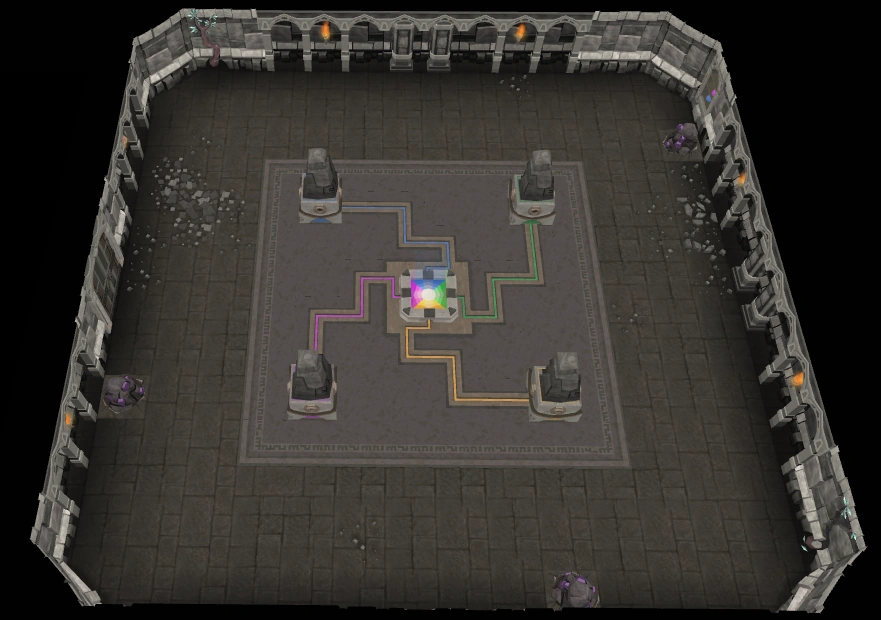
Crystal puzzle
| Image |
|---|
 |
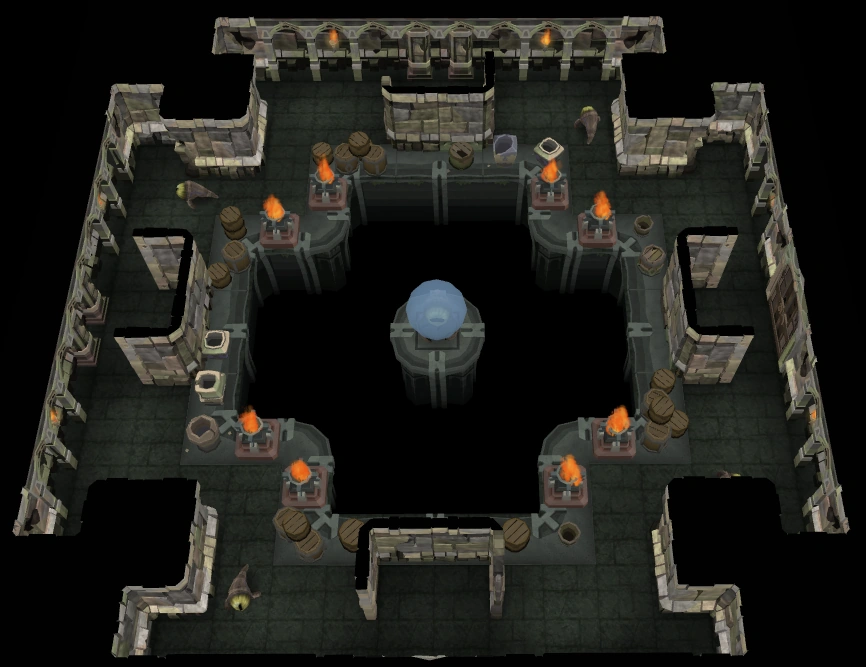
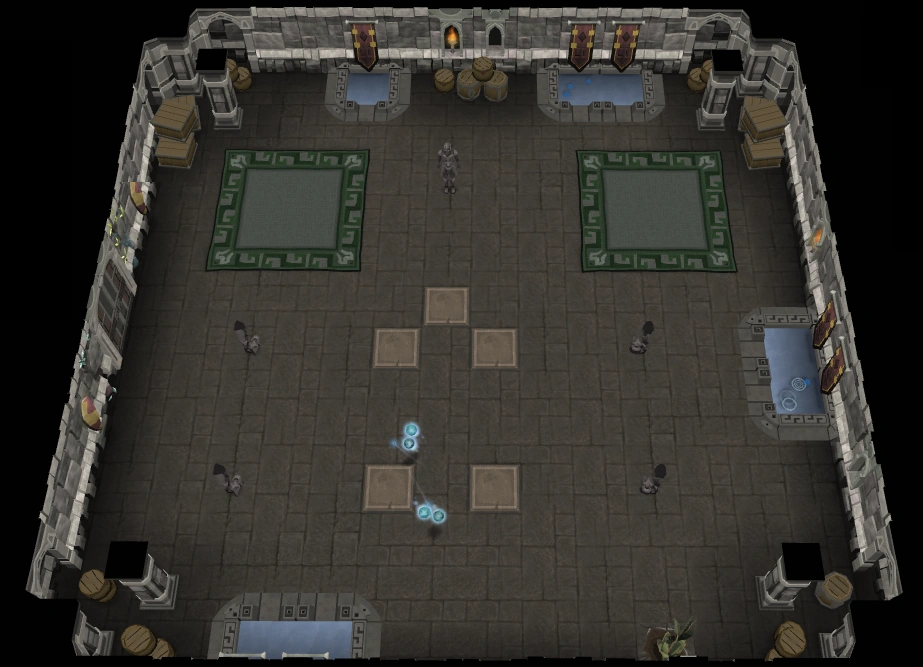
| Description |
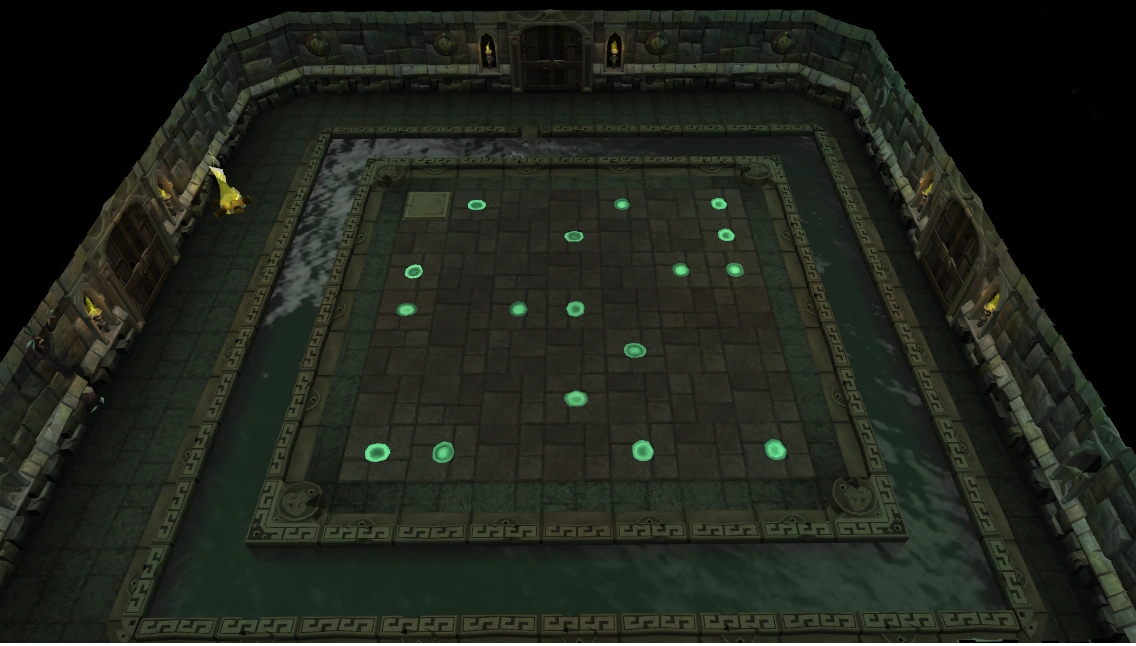
| This room contains four lodestones: one red, one yellow, one green, and one blue. One or more may already be active. The inactive ones will require varying magic levels to power up. This room also contains a large crystal, 4 lights continually moving towards the crystal and 4 pressure pads. |
| Skill requirements |
| Magic (Unless all 4 lodestones are already charged) |
| Solution |
| To solve this puzzle, you must stop all 4 lights on the large crystal. If you step onto one of the 4 pressure pads, the corresponding light will stop moving until you step off, this includes if it is in the crystal. Once you step off the pad it will start moving again.
Solo players - You need to synchronize the lights so that they hit the crystal all at the same time. Stepping on and off the pressure pad starts and stops them. Once all 4 hit the crystal at the same time, the lock will open. A good strategy is to stand on a pressure pad while watching another colour—when the other colour is just before the Large Crystal, just off the second to last spot—step off the pressure pad. The idea is to synchronize that other colour with the one you are controlling. When two colours are synchronized move to the third, then the fourth, opening the doors. A better strategy is to first choose a colour. Now, stand by an unactivated stone, and when the colour chosen is in the middle, activate it. If done correctly, both colours will be synchronized. Be sure to let other teammates know which colours to trap in the middle and which you have synchronized. The last colour can easily be finished by stepping on it while it is in the centre crystal and waiting for the other colours to meet. Another strategy is to wait near a pressure pad and step on it as soon as it is one space away from the crystal. This will cause the light to stop as soon as it reaches the crystal. Also, you can try having 3 of them at the same time, and one not coming in. This will also solve the puzzle without wasting a small amount of time. In teams of 3+ players you can have all three players stand on a different pad and trapping 3 lights in the centre. when the 4th light moves into the center the doors will unlock. Note: In rare occasions the puzzle will already be solved and doors open when you enter the room. |
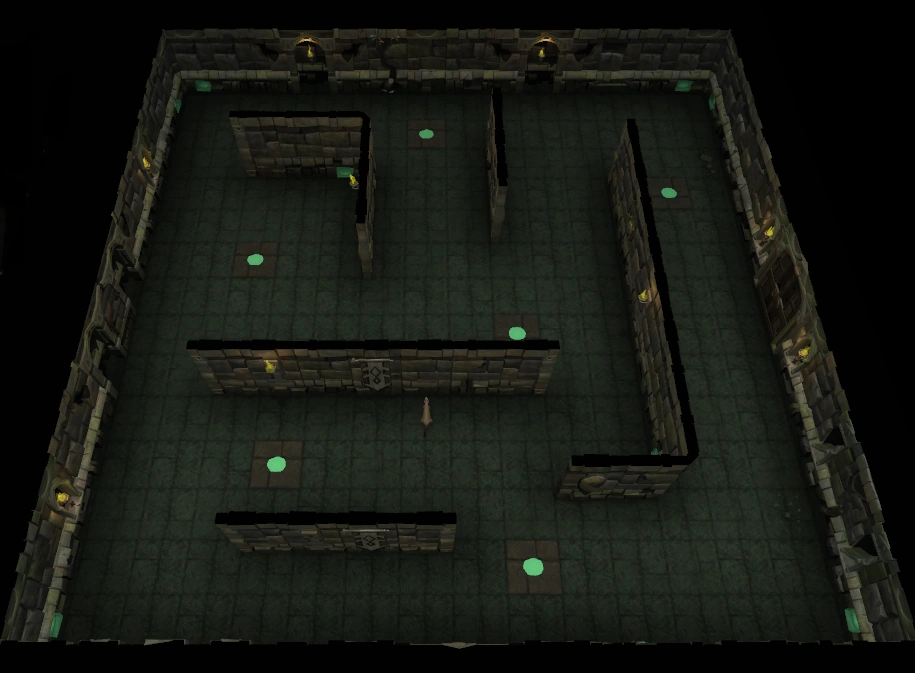
Toxin maze
| Image |
|---|
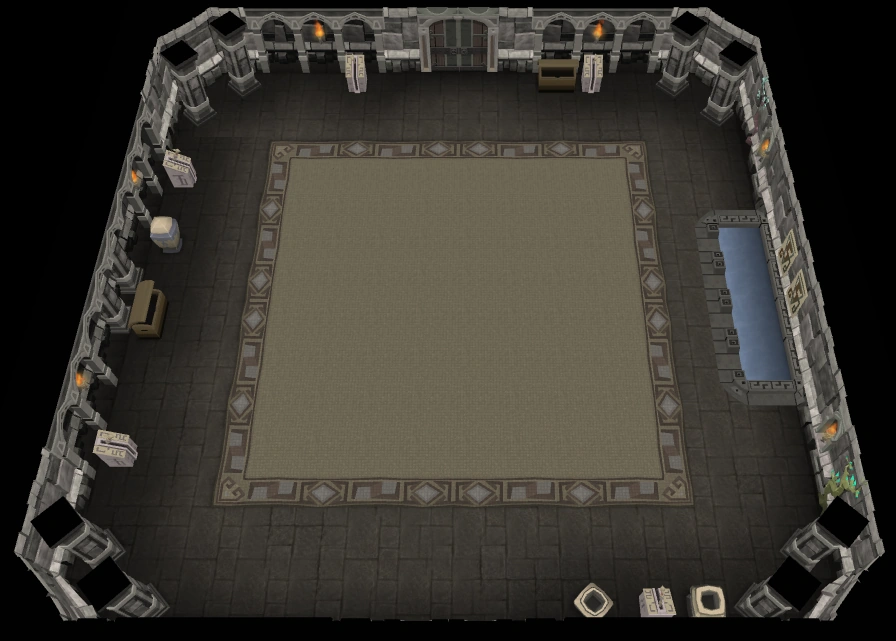
| Description |
| A maze with long, tight corridors blocked by magical doors in which the player must reach the centre before poison gas kills them. |
| Skill requirements |
| None |
| Solution |
| Next to the entrance of the room is a switch, once it's pulled, a countdown starts but you must do it if you want to pass through the barriers. If you run out of time, a toxin spreads through the room, dealing continuous damage. If there are more doors, you don't need to reach the centre in order to pass, but there are sometimes keys (occasionally vital to main path) in the centre. There's also a chest, and opening it stops the toxin, and due to an update on 15 March 2011, removes the obstacles. If the player is able to unlock the chest without using up the grace time, they will be rewarded but those using up time don't. Free players will sometimes encounter members only treasure in the chest, in that case nothing will be gained instead and a message popping up. All maze centres are reachable, but very often a long path is needed to reach the centre.
Tips:
|
Pondskaters
| Image |
|---|
 |
| Description |
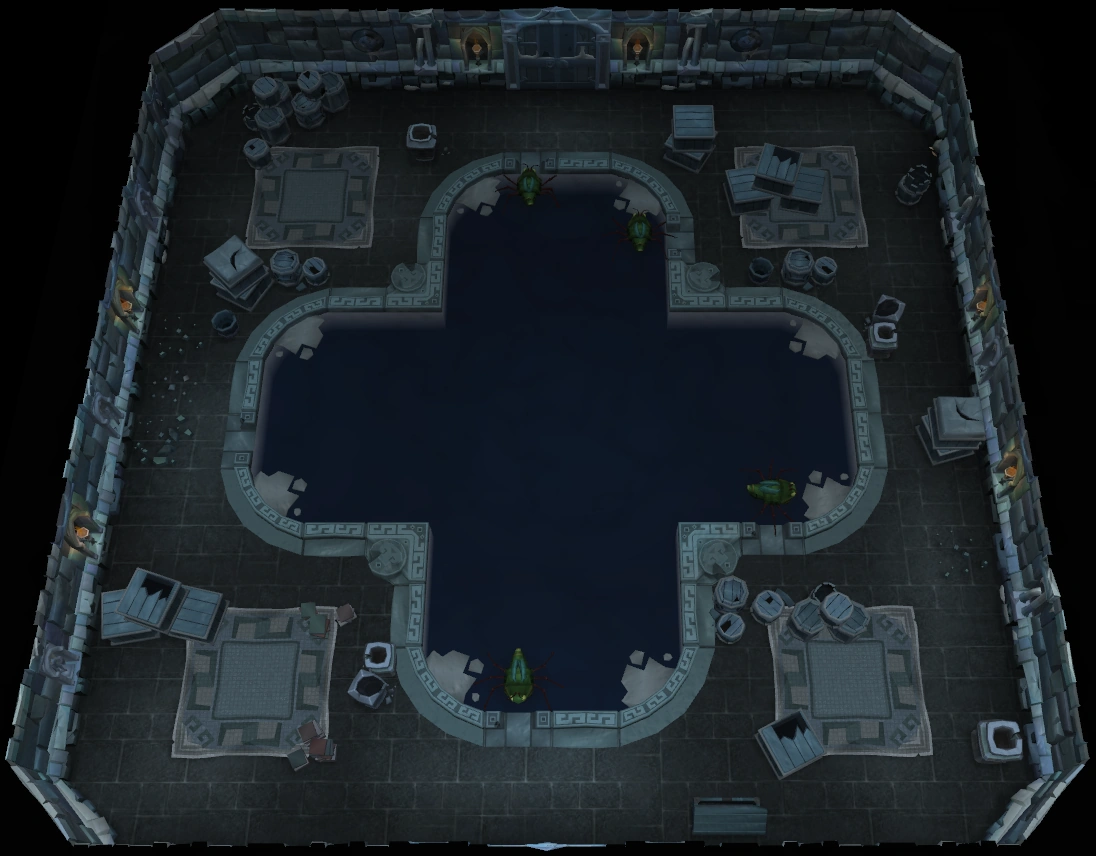
| The room contains four swimming Pondskaters. One Pondskater has the key required to open the door. Upon catching the Pondskater with the right key, the door automatically unlocks. |
| Skill requirements |
| Fishing |
| Solution |
|
Use a Fly fishing rod to catch the key out of the mouth of the Pondskater. This can only be attempted when a Pondskater is at the edge of the water. If the wrong bug is caught, it will bite the player and will continue to swim around. The correct pondskater yawns when they assemble in the middle of the pond, visibly holding a key on its tongue. There is a chance fishing the correct pondskater would not unlock the room, for this keep trying at the correct one until the player retrieves the key. The correct pondskater is always the one which spawns in the south west of the group. If you are quick to look when you open the door you may be able to see the correct one before they spread out, and can significantly decrease time taken to solve the puzzle. 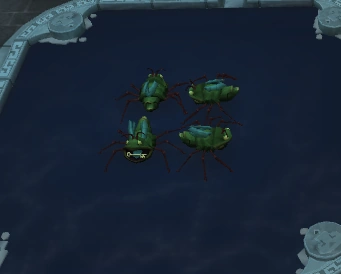  Pondskater with key yawning |
Fishing ferret
| Image |
|---|
 |
| Description |
| A ferret is on an island surrounded by water with a fishing spot in it. Players must catch and cook vile fish on the provided fire. Players then must throw the cooked fish onto tiles in the island, leading the ferret to the pressure plate and avoiding holes. |
| Skill requirements |
| Fishing, Cooking, and Ranged |
| Solution |
|
Coloured ferrets
| Image |
|---|
 |
| Description |
| In this room, there are 5 coloured ferrets wandering around and 5 coloured plates on the ground, and each ferret has a plate of its colour. The goal is to lure each ferret to the plate with the same colour as it. |
| Skill requirements |
| None |
| Solution |
| To do this puzzle, you do not need any special item, but you do need a lot of patience. Ferrets will attempt to move away from any player that is in the two squares encompassing the one it occupies. Hence standing 1 square south of a ferret will make it walk two squares North away from you resulting in it being 3 squares away from where you are standing. Ferrets stuck in a corner of a room or against a wall will need to be scared so that they randomly move 2 to 3 spaces, hopefully to a spot in which they are no longer trapped against a wall. Due to this it is best left to one or two experienced players to finish this room so that others don't interfere with their work. Alternatively, if a ferret gets stuck on a wall or corner, one could move onto the space where the ferret is standing to make it move away, but this does not always work.
Scaring the ferret causes it to move around randomly, and it is usually necessary to scare a ferret if it gets stuck along a wall. Once a ferret steps into its plate, it becomes immobile and you do not need to worry about it any more. Once all the ferrets are in their plates, the doors in the room open. Tip: Turn off run and rather walk at it. Its easier to control where and how many paces it will move that way. |
Magical construct
| Image |
|---|
 |
| Description |
| Near the entrance of the room is a construct in need of repair and a Crate of magic rocks. Take the Lump of stone, cut them into the appropriate missing piece of the damaged construct with a chisel (Crafting level required), imbue them with the appropriate Runecrafting level and then charge up the construct (requires a Magic level). The rune construct will then slowly unlock all the walls (Rune covered door) in the room. As with all puzzles, players will take moderate to severe damage if they fail. Previously, this puzzle would reduce a player's Magic level if they failed to imbue or charge the construct, which would oftentimes result in the dungeon being impossible to complete. Jagex changed this on 15 March 2011. |
| Skill requirements |
| Crafting, Runecrafting, and Magic |
| Solution |
|
Lodestone power


Collapsing room
| Image |
|---|
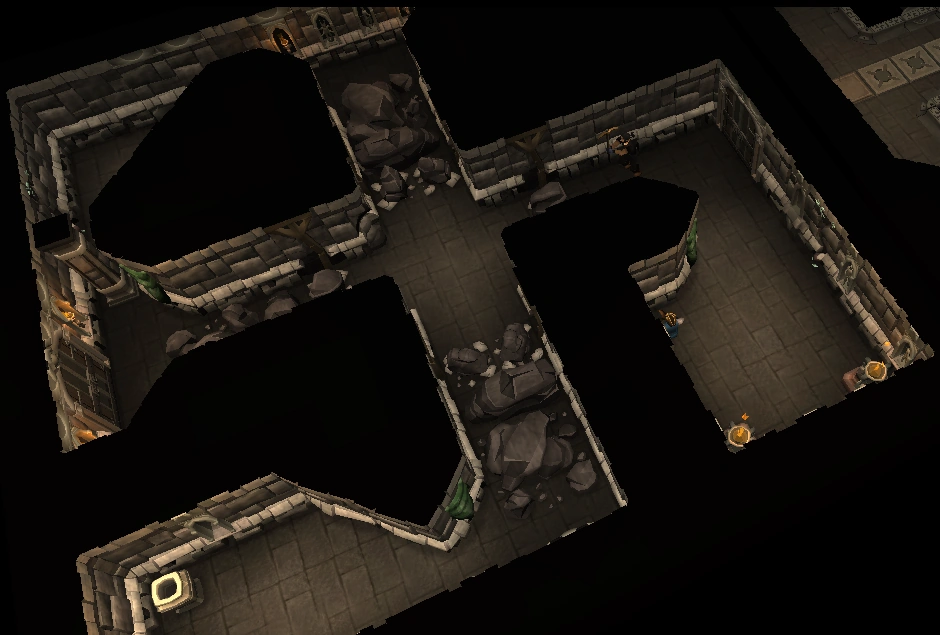 |
| Description |
| In this room, several piles of rocks will be blocking your exit. The rocks need to be mined to complete the room. The largest two rocks can be mined and removed completely, however, the smallest two (and one for the middle rock on one side) will respawn and drop down again causing large damage to the player if they are underneath, unless the frames have been fixed. |
| Skill requirements |
| Mining; Construction helps, but not necessarily required |
| Solution |
|
The solution is to mine the rocks then repair the collapsing frame that is supposed to be holding the rocks up. The frame cannot be repaired on F2P worlds due to a construction requirement, but players can still quickly run past the rocks after it is mined. It is suggested to mine all the rocks as you will get a large amount of mining experience. There will also be resources, so mine the rocks away to get access to them. Tip: If you do not have one of the requirements for a small rock, try mining the other small rock instead. It will almost always have a different requirement. Tip: Usually small rocks will respawn very shortly after having been mined for the first time. Mine them, then step back and wait a few seconds until the rock has respawned. Now mine again and fix the frame. |
Winch bridge
| Image |
|---|
| Description |
| There is a wide gap between the entrance to the room and the door on the other side. You must use the materials found within the room the create a bridge to walk across. Note that there are usually monsters on the other side. |
| Skill requirements |
| Smithing, Crafting, Ranged, and Strength |
| Solution |
| Grab an item from both boxes in the room and use the meatcorn (leaf-like item) on the spinning wheel to get a rope. Then use the broken hook on the anvil (requires a hammer). Now use the two items on each other to make a grapple hook. Grapple the other ledge and use the winch to pull the bridge across.
The Crafting and Smithing requirements are based off of which anvil/spinning wheel you use, NOT where the meatcorn/broken hook was obtained from. |
Ramokee familiars
| Image |
|---|
 |
| Description |
| There is a large obelisk in the centre of the room that is home to four ramokee familiars: Ramokee skinweaver, Ramokee deathslinger, Ramokee stormbringer, Ramokee bloodrager. There may also be other monsters inside as well. |
| Skill Requirements |
| None, but combat helps. |
| Solution |
| Defeat all monsters to continue. For teams, it is important that the team works together and kills each one as a group.
Kill the Ramokee skinweaver first since it heals the other Ramokees. Then kill the deathslinger (range), stormbringer (mage), and bloodrager (melee) in that order. Finally, kill the other monsters inside the room, if any. This is the common order for players with melee binds. The skinweaver and stormbringer are weak to arrows, the deathslinger is weak to stab, and the bloodrager is weak to water spells. Tip: Use snare on the bloodrager when attacking the other enemies. Using Deflect/protect from Summoning does reduce the damage taken. Warning: Larger teams can contain also very high levelled creatures inside. Such incidents happen, as having all of the Ramokees on such a team are level 130+, and some other creatures such as skeletons or so can also be similar to that. Note: If this room occurs early, there is a good chance of the familiars being a low level, and hence easy to kill |
Mercenary leader
| Image |
|---|
 |
| Description |
| The room has a mercenary leader with some backup minions that teleport in and out. |
| Skill Requirements |
| None |
| Solution |
| To complete the room, kill the mercenary leader. Wait for a moment where it is only the mercenary leader in the room, to minimise damage. Focus on killing the leader only. It may be a good idea to have the party leader mark it.
Group Strategy:
That was the common strategy before the Mercenary leader got an update due to player complaints about the leader. Such examples was when players were soloing a floor and then encountered a tier 11 mercenary leader, which resulted in tier 11 warriors/mages/rangers, resulting in a quick death for the player. Now, the leader and his minions may vary depending on the size, complexity and players. Note: the Hexhunter bow greatly aids in killing the leader. |
Member puzzles
Hunter ferret
| Image |
|---|
 |
| Description |
| A ferret will run away when players get too close, escaping down a hole and out of another. The players must trap the ferret by cutting some dry branches that are on the wall to get dry logs. Ordinary trees may also be present in the room, but won't work. The dry logs can be fletched to make a simple trap. Lay the trap and chase the ferret in to it. Free players, regardless of solo or team, can complete the puzzle without making a trap, but most likely they will encounter a message saying: "You need a Hunter level of at least X to catch the ferret." |
| Skill requirements |
| Hunter is always required, either to catch it bare-handed or to lay down traps. The level required for catching it bare-handed, however, will sometimes be higher than the level required for catching it in a trap. Woodcutting and Fletching are required (woodcutting to chop dry branches, fletching to turn logs into traps) if you decide to make traps, but not necessarily required.
A F2P player that has never trained the hunter skill will not be able to catch the ferret even by hand, unless the room requires Level 1 Hunter. F2P players cannot chop the dry branches. |
| Method #1 (for groups/solo) |
|
| Method #2 (for groups/solo) |
| In some variations of the hunter ferret room, it is possible to catch the ferret solo without traps. This is known as "one-shotting".
|
| Method #3 (for groups) |
| In large teams of 5 people you can have 3-4 people in each corner and one person with the highest hunter level try to catch the ferret. This way, the ferret will get trapped between 2 people and will run back and forth, allowing for easy capture.
This method tends to be the fastest when 3-5 people are in the room. |
Fremennik camp
| Image |
|---|
| Description |
| There will be a Fremennik scout setting up a new camp for adventurers. Free players can receive this puzzle, but won't be able to proceed due to their inability to string bows. However, free players can receive experience from smithing the battleaxes and cooking the fish. A free furnace and permanent fire (tier 1) are also provided in the room. |
| Skill requirements |
| Cooking, Smithing, and Fletching |
| Solution |
| Talk to him then click on the three crates to retrieve bars, which you will smith into battleaxes, to obtain materials for cutting and stringing bows, and raw fish to cook for the new explorers. He will then unlock the door(s). A Knife and hammer can be obtained from him if a player can go through a long conversation. |
Enigmatic hoardstalker (riddles)
| Image | |||||||||||||||||||||||||||||||||||||||||||||||||||||||||||||||||||||||||||||||||||||||||||||||
|---|---|---|---|---|---|---|---|---|---|---|---|---|---|---|---|---|---|---|---|---|---|---|---|---|---|---|---|---|---|---|---|---|---|---|---|---|---|---|---|---|---|---|---|---|---|---|---|---|---|---|---|---|---|---|---|---|---|---|---|---|---|---|---|---|---|---|---|---|---|---|---|---|---|---|---|---|---|---|---|---|---|---|---|---|---|---|---|---|---|---|---|---|---|---|---|
 | |||||||||||||||||||||||||||||||||||||||||||||||||||||||||||||||||||||||||||||||||||||||||||||||
| Description | |||||||||||||||||||||||||||||||||||||||||||||||||||||||||||||||||||||||||||||||||||||||||||||||
| The enigmatic hoardstalker will ask the players riddles, and the player has to show the correct item to him to proceed through the exit door. If the player shows the wrong item to the enigmatic hoardstalker, they will receive heavy damage. (The items with (o) have no utility outside of the enigmatic hoardstalker room). Free players can receive this puzzle, but won't be able to proceed; the enigmatic hoardstalker will not speak to the player on a free-to-play world. This hoardstalker can be a good way to "suicide"; it is best to kill yourself if no altars are in the dungeon or you are low on health. However, "suiciding" is impossible once the room is complete. | |||||||||||||||||||||||||||||||||||||||||||||||||||||||||||||||||||||||||||||||||||||||||||||||
| Skill requirements | |||||||||||||||||||||||||||||||||||||||||||||||||||||||||||||||||||||||||||||||||||||||||||||||
| Summoning (may need to recharge current Summoning points) and possibly Thieving if the item required cannot be found elsewhere in the dungeon. | |||||||||||||||||||||||||||||||||||||||||||||||||||||||||||||||||||||||||||||||||||||||||||||||
| Solution(s) | |||||||||||||||||||||||||||||||||||||||||||||||||||||||||||||||||||||||||||||||||||||||||||||||
| Note: You are able to use items other than the ones provided in the room. For example, if the riddle calls for a vial of water, but no one in the party can open the doors, you can use a vial that you've bought from the Smuggler. The only ones to worry about will be a Needle, Unholy symbol, a Vial of water and possibly the Banana if one has encountered the Construction room but ate the banana or the chest gave another loot.
No Summoning level is required to complete this puzzle. If no one can understand the Hoardstalker, you can still try giving him every item possible until the riddle is solved. Be cautious, however, because each incorrect item may deal up to about 400 damage.
|
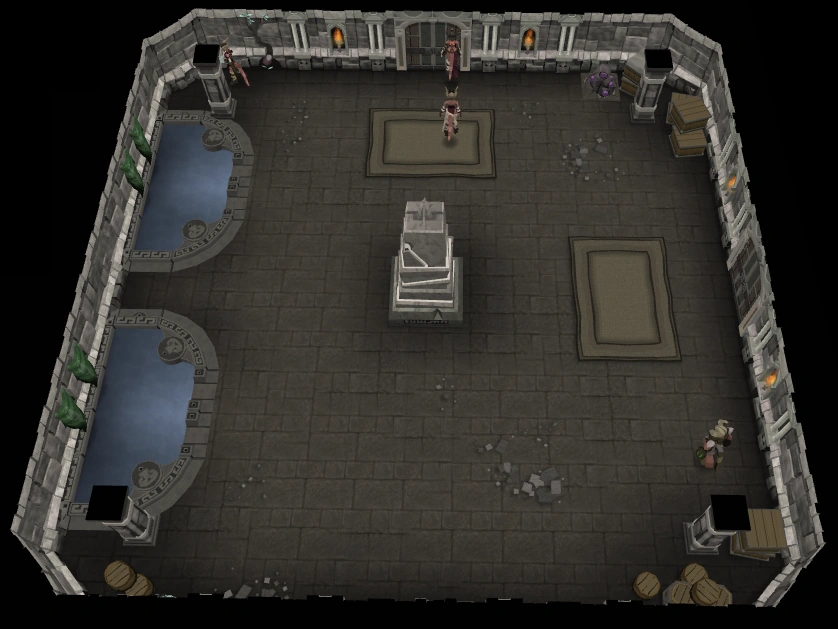
Barrel puzzle
| Image |
|---|
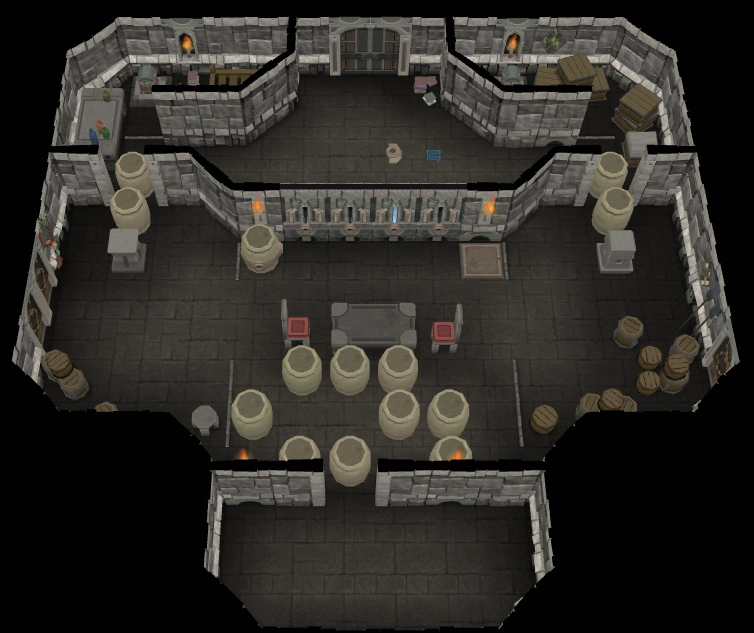 |
| Description |
| You will not be able to enter the room until you push the first series of barrels out of the way to make a path. You cannot pull barrels, only push. The monsters are in the very small section of the room. They don't tend to leave that area unless they are lured.
After this first stage is completed, you will have to choose between two paths to get behind the wall at the back of the room. Each path blocks off one bonus chest while allowing you to access the other, so it does not make a difference which path you choose as you will miss out on one of the chests in either case. Note that only one chest contains real loot. The other contains a banana (you even get a message saying so), so luck matters when choosing a chest. Free players can receive this puzzle and obtain loot from the chests and push the barrels around, but they are unable to fix the barrel. |
| Skill requirements |
| Strength and Construction |
| Solution |
| Push the barrels to reach the Broken barrel bits. Pushing has a strength requirement, with all barrels except for the broken one having the same requirement.
Pick up the broken barrel bits and fix the broken barrel in the centre of the room (has a construction requirement). The fixed barrel must then be pushed (no Strength requirement) so it is adjacent to an 'Expelling Pipe', which will increase the capacity of the barrel. Leaving the barrel by a 'Devouring Pipe' will reduce the capacity. You must get the barrel to full capacity before the room unlocks; once this happens, the barrel will stay full. In a large team, one can have players on both ends for maximum efficency, but soloing is still highly efficient. |
Agility maze
| Image |
|---|
 |
| Description |
| This room will contain a miniature agility maze which requires the user to traverse through a wall of wires, dodge a swinging pendulum, and avoid a pair of spinning blades. |
| Skill requirements |
| Agility (above level 5) |
| Solution |
| It is possible to take damage from the maze by failing the agility obstacles. F2P players were previously able to complete this puzzle, but this has been fixed. The puzzle is now available to free players since the 7th of December, but is impossible for them to complete.
After the puzzle is complete, door(s) can be opened from behind to allow fellow team mates pass through or for later convenience. Note: There are continuously spinning blades in the corner of the room. Walk around them, do not think that your character will automatically go around them. They can hit a high amount of damage if you run into them (600+), and can hit you several times. |
Keystone bridge
| Image |
|---|
 |
| Description |
| The room has islands at each door and in the centre, surrounded by a vast pit. Bridges between the central island and further doors are broken and must be repaired by mining a rock and crafting it. |
| Skill requirements |
| Mining, Crafting, and Construction |
| Solution |
| This variant of the broken bridge room involves mining a rock from the Mining rock, crafting it into a carved keystone, and placing it on the damaged bridge gap. If you fail to mine the rock, fail to craft the carved keystone, or the keystone drops into the pit, you will have to try again. |
Broken plank bridge
| Image |
|---|
| Description |
| The room has islands at each door and in the centre, surrounded by a vast pit. The bridge between the central island and further doors are broken and need to be repaired by using planks provided on the other side. |
| Skill requirements |
| Agility, Construction (optional) |
| Solution |
| This variant of the broken bridge room involves jumping over the gap. Optionally, you can take 5 planks from the crate and construct a wooden bridge to fill the gap, allowing teammates to cross who do not meet the Agility requirement.
Note: This puzzle can no longer be completed by a free player, regardless if they have trained Agility or Construction. |
Return the flow
| Image |
|---|
| Description |
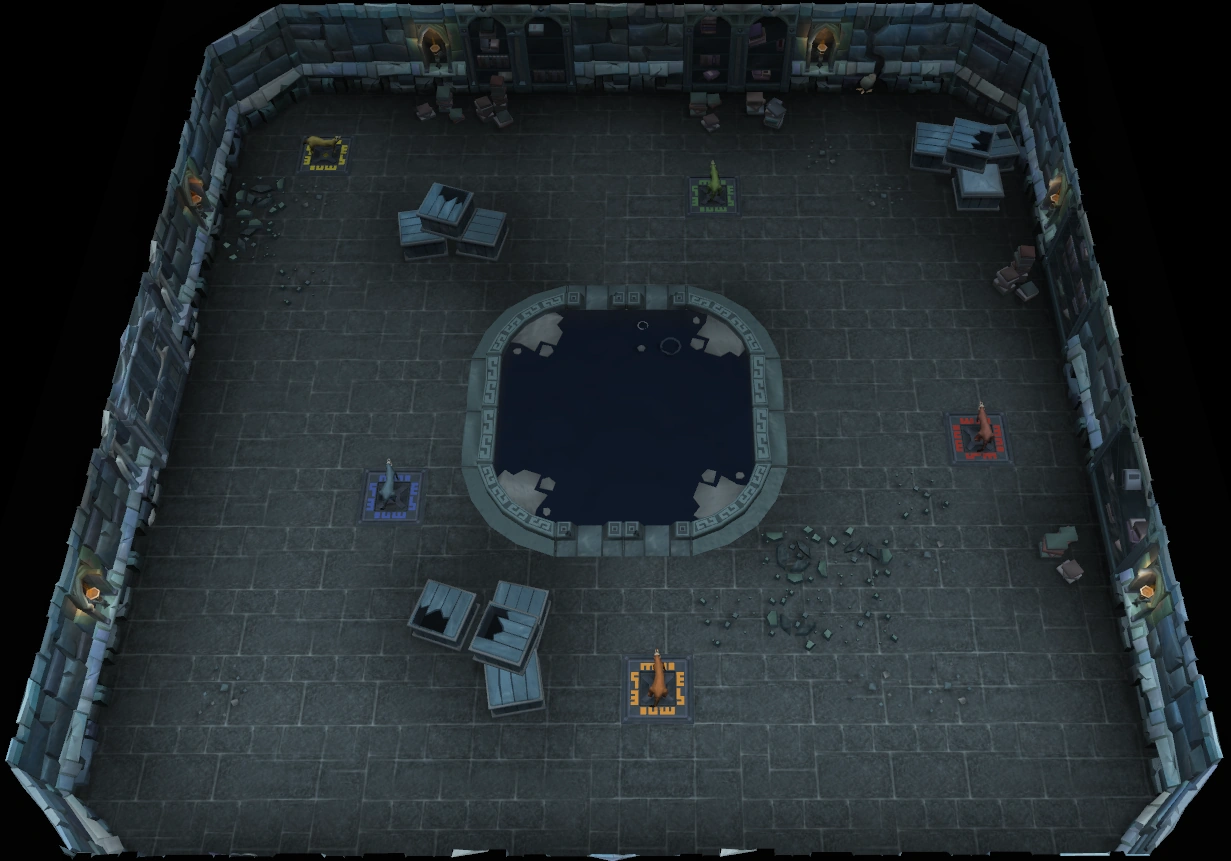
| This room contains four pillars, a central fountain, and some debris blocking the liquid's path. |
| Skill requirements |
| Mining and Construction. Note: Uncommonly, only mining or only construction will be required |
| Solution |
| Fix the broken pillars (requires Construction) and mine away the debris (requires Mining). Once all the debris is gone and all pillars are fixed, the fountain will fill and unlock the door.
You can tell which corner of the room has debris/broken pillars by seeing which of the paths are not flowing red. |
Grapple tightrope
| Image |
|---|
| Description |
| There is a wide gap between the entrance to the room and the door on the other side. You must use the materials found within the room the create a tightrope to walk across. Note that there are usually monsters on the other side. |
| Skill requirements |
| Smithing, Crafting, Ranged, and Agility |
| Solution |
| Grab an item from both boxes in the room and use the leaf-like item on the spinning wheel to get a string. Then use the grapple head on the anvil (requires a hammer). Use the two items on each other to get a grapple hook. Grapple the other ledge, and walk across on the tightrope.
If you fail to smith the hook, it will disappear from your inventory and you will have to get a new broken climbing hook. If the hook falls in the gap, you will have to make both the string and grapple hook again. Note: This puzzle is not to be confused with the winch bridge, the version of the puzzle that does not require Agility and can be completed by non-members. After one person crosses the rope there is no longer an agility requirement. |
Statue bridge
| Image |
|---|
| Description |
| There are two stone statues near the edge of the gap. You will notice that a pressure pad is close to one of them. There is also a Mining rock within the room. The giant statue initially requires a construction level to fix, although fixing gives mining experience |
| Requirements |
| Mining, Construction, and Strength. |
| Solution |
| Mine the mining rock found in the room. You will receive a lump of stone. Use this on the statue without a clear face to repair it. Now, push the statue on the pressure pad. The bridge will slide across closing the gap. If a monster is standing directly on the pressure pad, you will have to move it out of the way. |
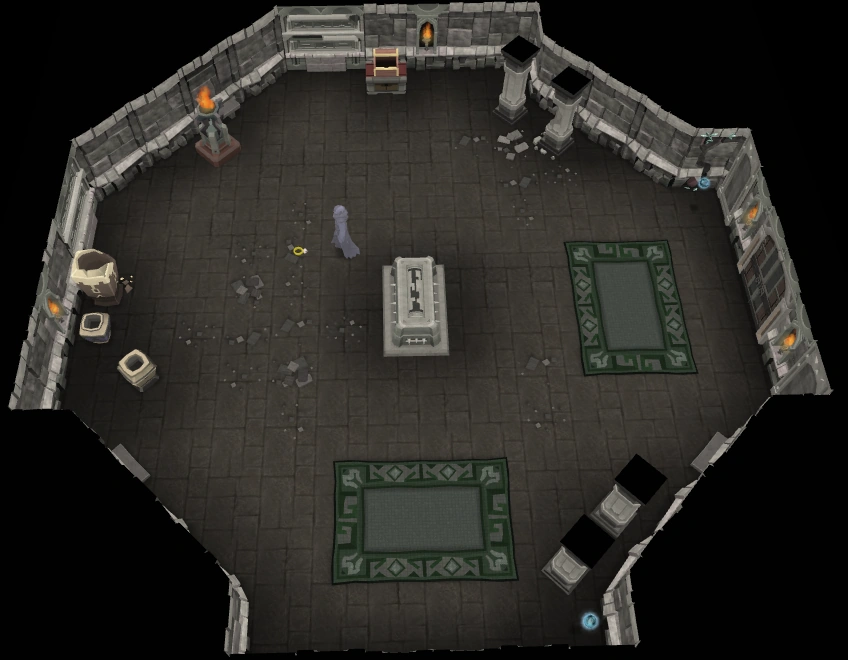
Poltergeist
| Image |
|---|
 |
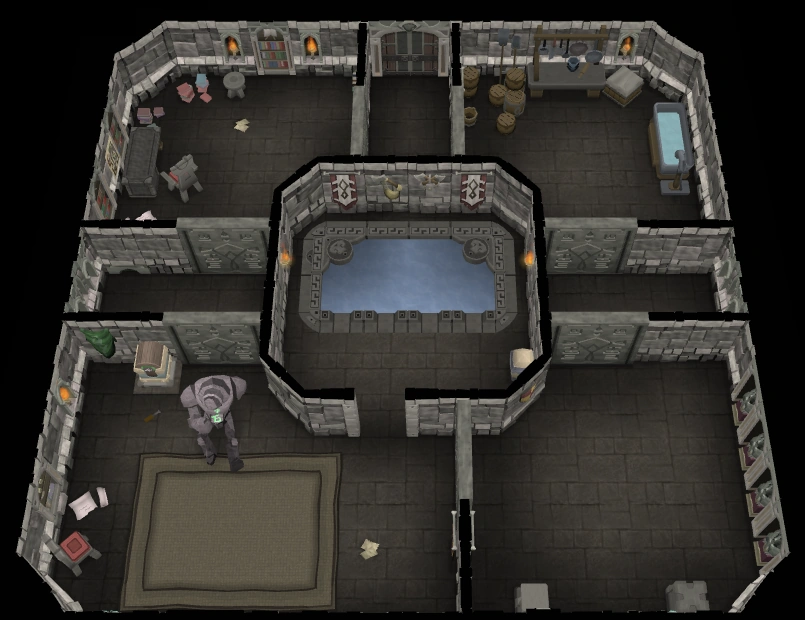
| Description |
| The room contains a sarcophagus with four censers around it and a ghost walking around it. There is a farming patch with several different herbs that must be used to open the sarcophagus and unlock the door. |
| Skill requirements |
| Herblore, Prayer, Firemaking, and Thieving |
| Solution |
| Read the inscription on the sarcophagus. The inscription will give you a clue that will tell you which of the herbs in the available patch to pick (Corianger, Explosemary, Parslay, Cardamaim, Papreaper or Slaughtercress, If you pick the wrong herb, you will take damage.
After picking the correct herb four times (requires a Herblore level, NOT farming), consecrate them (requires a Prayer level), put them in the censers and then light them (requires a Firemaking level). Then open the sarcophagus (requires a Thieving level). If you fail to open the sarcophagus, you will take damage. Tip: The farming patch in this room can be used to grow herbs and food, if you need it. |
Unhappy ghost
| Image |
|---|
 |
| Description |
| Looks similar to the poltergeist room, but instead, the Ghost's tomb has been ransacked and needs some repairing. |
| Skill requirements |
| Construction, Thieving, and Prayer |
| Solution |
| There are a variety of tasks that need to be done to cheer up the ghost. An antique ring is on the ground and needs to be returned to the jewellery box. A broken pot (along the sides of the room) and a damaged pillar require repairing, requiring the same Construction level to repair each. Unlock the coffin (requires thieving) and bless the remains of the coffin (requires prayer).
Beware that it's possible to take damage from failing any of the skill-related tasks, and your prayer points may be reduced if you fail to bless the remains. |
Coloured recess
| Image |
|---|
 |
| Description |
| These rooms contains 4 coloured recesses; a green, purple, blue and yellow one. One of the walls contains vials. There are 4 blocks scattered across the room. |
| Skill Requirements |
| Strength and Herblore |
| Solution |
| Push or pull all 4 blocks onto a coloured recess. Then take all 4 coloured vials from the wall. Use the coloured vials on the block placed on the corresponding recess, and the doors will unlock. (The shelf has an option Take-Bottle, but you get a vial, not a bottle).
If you put the wrong vial into a block, you will have to recolour it using the correct vial. You will get a warning message asking you if you are sure you want to recolour it. When you recolour it, a random effect will happen to you as listed below:
All of the above are NOT protected by the gatherer upgrade for the Ring of kinship except for the first message only when it occurs from taking the vials off the shelve. |
Flower roots
| Image |
|---|
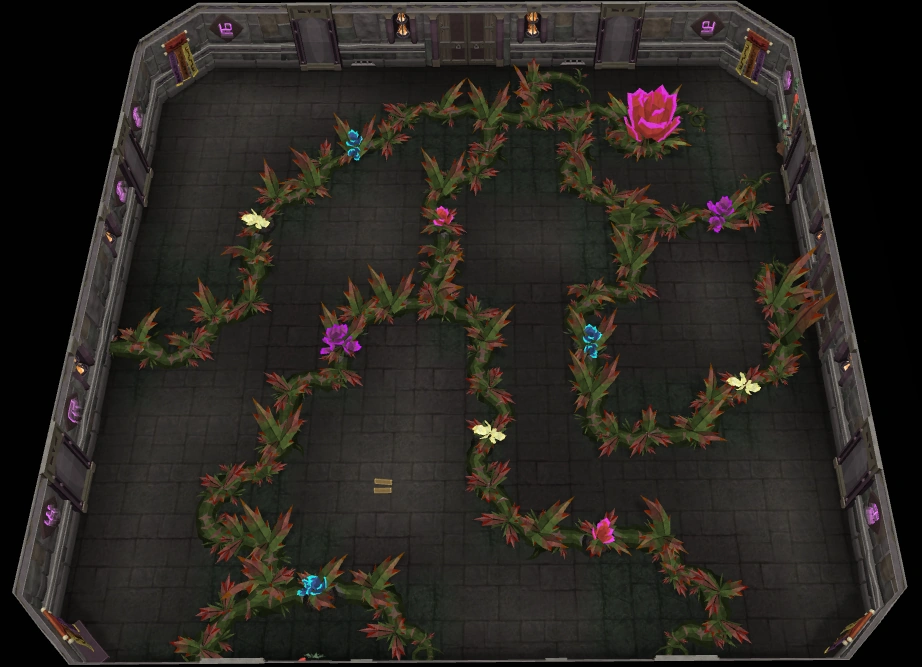 |
| Description |
| The room contains a big flower which requires Farming Skill to uproot. The vine roots growing from the big flower have smaller flowers which need to be chopped away using the Woodcutting skill. This will clear a path to the big flower. |
| Skill requirements |
|
Woodcutting and Farming |
| Solution |
| Look at the colour of the biggest flower located at the centre in the room and the flowers on the root that block the way and all the flowers in the room will change colour. (You can hover over the flowers to verify the colour.)
Only cut the small flowers which match the colour of the biggest flower, otherwise you will take damage from trying to cut other flowers which don't match the correct colour. After reaching the biggest flower, uproot it to unlock the door. All the unchopped flowers will be removed and the vines will be lowered, allowing easier passage through the room. Often there is no flower that match with the biggest flower. Wait for the flowers to change colours and then chop them. The colours rotate through: red, yellow, blue, and purple (in that order). The biggest flower rotates through the colours slightly faster than the roots. |
Coloured bookcases (Occult floors only)
| Image |
|---|
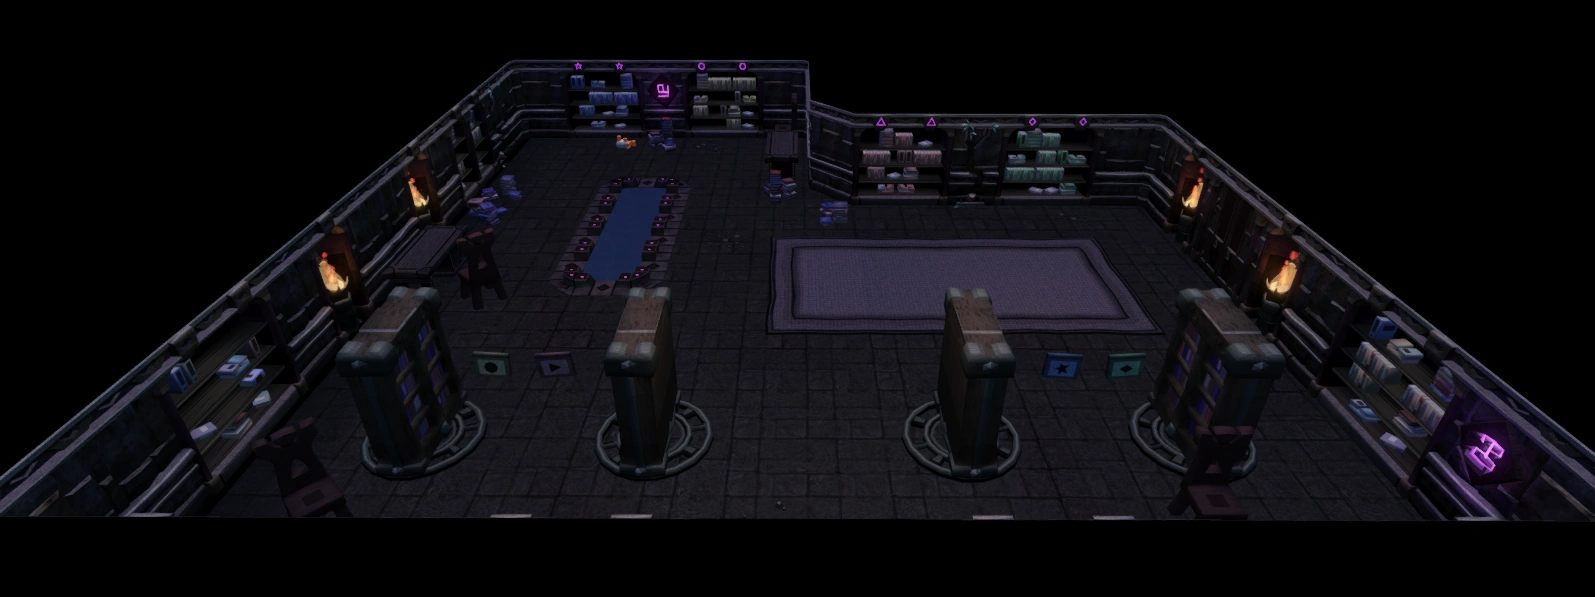 |
| Description |
| This room contains four rotating bookcases with four flying books. |
| Skill requirements |
| None |
| Solution |
| In this room are four different coloured bookcases and four matching books flying around. The goal is to direct each book to its appropriate bookcase. When a set of bookcases are facing each other, the books from them will go fly from one to the other. The rotating bookcases are essentially used to catch and throw books to the next bookcase. As soon as a book goes inside of a rotating bookcase, it can be turned once to stop the book from returning.
To find the colour the bookcase should hold, examine the bookcase on the wall by right-clicking. This will tell you the colour needed. Once the book is in the desired case, it can be rotated to face the next case and 'throw' the book. Once a book is in its correct coloured bookcase, the book will stay inside the case and stop flying. The doors will unlock once all the books are in their proper cases. |
Portal maze (Warped floors only)
| Image |
|---|
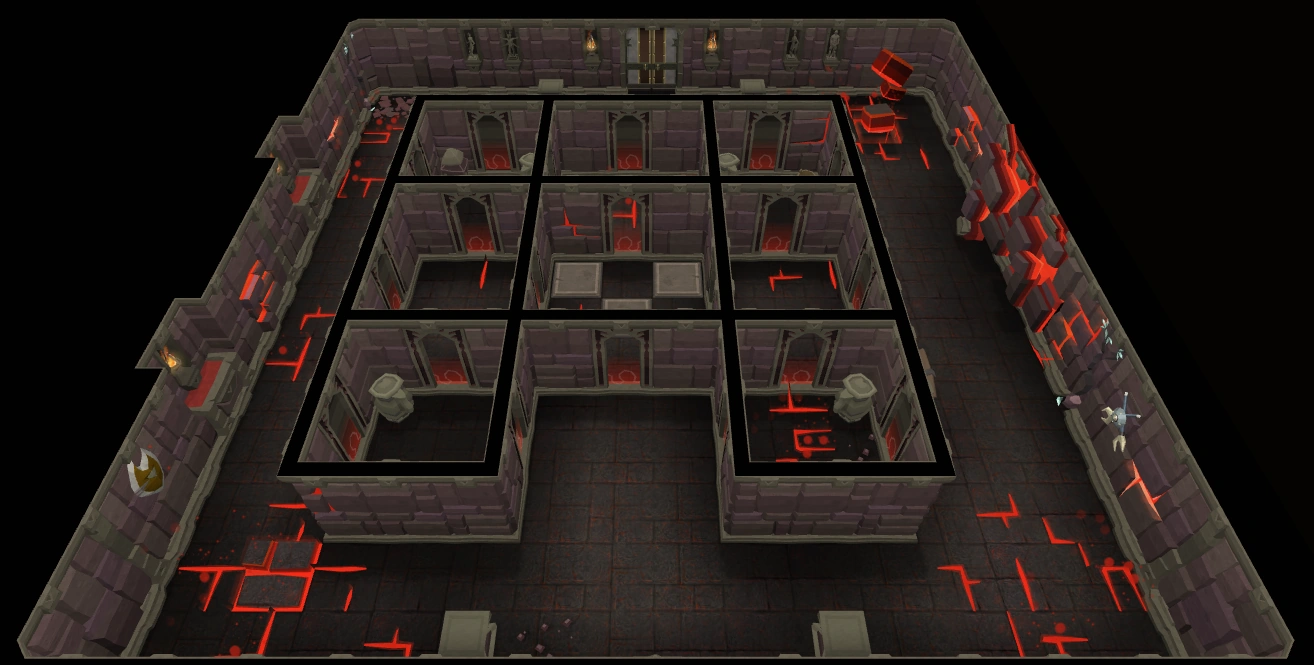 |
| Description |
| The maze has 8 rooms, each with portals on the sides that lead to a random room. |
| Skill Requirements |
| Constitution |
| Solution |
| The goal is to reach the centre of the maze. Keep moving as you will continuously take damage while inside the maze until you reach the centre. Once you reach the centre, wait a few seconds and the doors will unlock. In larger teams, there will be pressure pads equal to the number of people the dungeon was designed for. You will need to have everyone standing on a pressure plate in the centre room. There was a glitch where you could stand on one of the tiles, logout, and upon returning the door would unlock without the need of your team. This glitch has been patched as of 2011-09-21. A strategy which always works is that once you enter through one of the initial three doors, go through the door opposite of you. If you are sent back outside in the process, simply go through the outside door you haven't gone through yet.
People with low constitution levels may not be able to complete this room, as the damage inside the maze may be more than the amount of lifepoints they have. |